Space Invaders and the world of 1’s and 0’s

After leaving South Africa in the late 70’s I worked in London for one of the “big 8” accounting firms, now called the “big 4”.  I remember a multi-day training event where in the evenings we drank a lot of beer, socialized and I discovered the addictive Space Invaders arcade video game which was housed in a large console.  As the commander of the only remaining space ship I had to dodge from side to side to evade incoming missiles and simultaneously destroy the horde of menacing invaders which moved across the screen left to right and lower and lower, and faster and faster all the while to a heart thumping hypnotizing background sound.

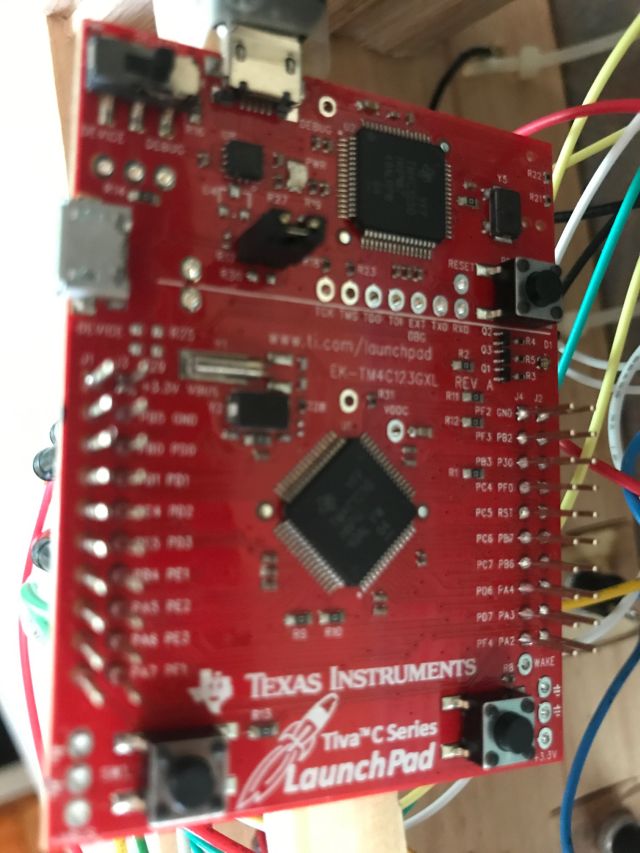
I have now completed a 16 week embedded systems IoT (Internet of Things) course with University of Texas, Austin, which was excellent, and one of the last projects was to write the software for Space Invaders and build the hardware. 

inputs and outputs

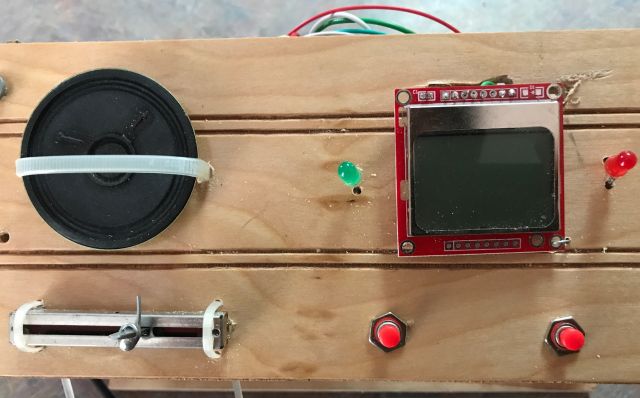
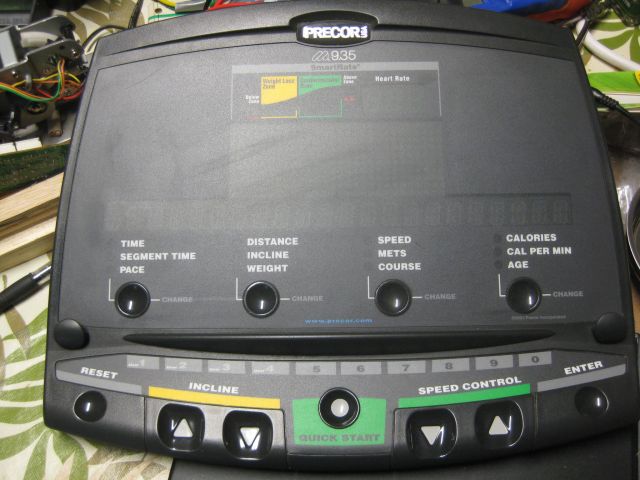
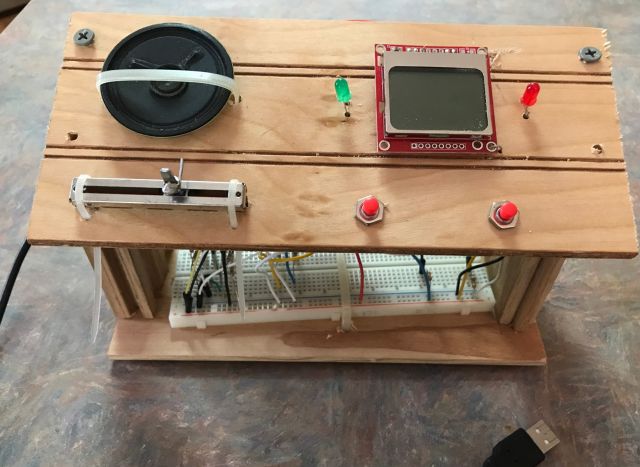
Above are the inputs and outputs.  The inputs are the slidepot (bottom left) which moves the defender ship horizontally across the screen and the 2 red buttons which are the fire buttons – one fires vertical take off missiles, the other 2 diagonally veering missiles. 

The outputs are the speaker which transmits battle sounds, the LCD screen which shows the field of combat with invaders moving across the sky lower and lower and exchange of missiles and explosions; and 2 signal lights – the green shows success, the red shows failure.

this Cortex TM4C microcontroller is the brains behind the scenes.  we used this powerful device throughout the course

My game software is relatively simple – I do not have levels to attain and the enemy does not move faster as the game progresses.  If my space ship is destroyed then I lose, if the enemy invaders or “sprites” are destroyed first, then I win.  Here is a YouTube video of my software in action – https://www.youtube.com/watch?v=Zok8T3PWSEE

We used to inhabit an analog world where even our record players and film cameras were analog with the film directly capturing the nuances of the image, and the groove in the record directly transmitting to the pickup stylus the recorded sounds of voice and music.  Now the digital world of 1’s and 0’s intermediates – sound is converted to binary digital sound and images to digital images.  And when we hear the sound through a speaker or headphone it has been converted back to analog sound. 

In the Space Invader game, ADC (analog to digital converter) software is used to convert the movement of the slide pot (which is analog) into a digital signal and DAC (digital to analog converter) is used to convert the sounds of the invaders, the missiles and explosions from digital code to analog output for the speaker.  (It is clever how the invaders are coded to advance digitally across the screen and I would explain the principles except that I will lose most all the readers who have persevered to this point.)

We immerse ourselves increasingly in the digital world for information, socializing, entertainment and transactions.  First the CD players, then the internet, now smart phones and soon more of us will fall under the spell of AR (augmented reality) and VR (virtual reality).

Through VR we will be able to visit world heritage sites and see animals and birds and fish more vividly than we could possibly do in the wild.  But will it be a satisfying experience?  Can there be satisfaction when instead of a strenuous hike, pestered by mosquitoes, to see an isolated waterfall, we ask our digital assistant for the Victoria Falls (the Smoke that Thunders) or the Niagara Falls and we zoom in to all their splendor. 

The world of 1’s and 0’s will enhance our safety (house security & car sensors) and health (personal monitoring sensors, data compilation & analysis) and efficiency.  But for me it has limits and working in the field and growing food is far more satisfying than working out in a gym accompanied by sound and video generated from 1’s and 0’s.  For me live guitar music or theater or a local sport event is more satisfying (most of the time) than the best guitarist, actors or sports heroes, recorded in video? 

Ps1 – the edX Austin MOOC uses the ARM Cortex processor and is challenging unless you are a competent programmer.  There are easier courses and I just started a Coursera course on Arduino hosted by MIPT (Moscow Institute of Physics and Technology) which is for beginners and is fun.

Ps2 – the ADC (analog digital converter) uses successive approximation to discover the unknown analog input and convert it to binary number.  The technique is similar to the process used in a game where a friend imagines a number between (say) 0 and 255 and you have to determine the number and your friend will only tell you if the answer is higher or lower than your guessed number.  So You guess 128 (half of 256); Friend says lower. You guess 64 (half of 128); Friend says lower.  You guess 32; Friend says lower.  You guess 16, Friend says higher.  You guess 24; Friend says higher. You guess 28; Friend says higher. You guess 30; Friend says lower.  You say 29 and friend says that is the answer.  The software follows a similar technique and codes “higher” with a 1 and “lower” with a 0, and at the end of it all has determined the analog number and translated it into 1’s and 0’s. 

am I a Maker?

There is a Maker movement afoot and a few weeks ago I visited my first Maker Faire, which was in Atlanta.  A few weeks prior I signed up for a MOOC (online course) on 3D printing and I was deciding which 3D printer I should buy – the large one in the photo above costs around $30k, I was thinking of $300.  Makers enjoy tinkering and making things most often using new technologies.  I think this is different from DIY where the focus is on repairing or installing things, which would usually be done by a contractor.

I enjoy understanding how things work – both natural and fabricated.  So therefore my organic growing activities where I interact with a complex changing natural force.  When I was 16, just  for the heck of it, I separated the rear engine of my Mom’s Renault Dauphine car from the rest of the body.  And hastily re-assembled it when confronted by my irate Dad.  During my London years (1978-1986) I did a lot of work on an old, neglected house including installing 17 hot water radiators – see my  write up referenced on “self reliance & projects list.”  So I suppose I have a Maker’s instincts.

The Faire was absorbing – there were a number of 3D printer vendors who were happy to engage in discussion.  I chatted to the folks at Freeside Atlanta who describe themselves as ” a community of makers, tinkerers, engineers, programmers, artists, teachers, and lunatics”.  Lincoln Electric had a welding simulator which charitably graded my wobbly bead at 47%.

arenas for battles between autonomous grappling machines or ball hurlers which gather up a white ball and propel it into the air
there were several arenas for battles between autonomous grappling machines or in this case a ball hurler(1746)  which gathers up a white ball and propels it into the air

Fun was watching the drone racing competition as these screaming fast moving airborne objects chased around the course and then dived through rectangular frames at different heights.

a serious contest of technology and human reflexes

It was fun, I learned some and a week later after more research  I purchased a HICTOP self assembly 3D printer for $316.  I will write separately of the assembly, calibration and first print experience.  If you are curious you can read my review today on Amazon.

And now I have the opportunity to become a Maker.


TV via antenna

6 years ago I wanted to receive TV via antenna.  We have DSL and I can access Netflix and YouTube etc. but not local stations.  I positioned the antenna facing south (Atlanta’s direction) about 20 feet off the ground and connected a cable from the antenna to the cable attached to the previous owner’s dish receiver, and in the winter received a few stations.  Since I have digital TV and the signal is digital I do not require a converter box.  In the summer reception fell off because the trees grew leaves.  I lost interest in the project.  Now I have re-engaged.

some technicals

I input my street address at website “antennaweb.org” and it tells me which stations can be accessed and their direction relative to my house.  Most are from Atlanta about 40 miles distance.  The website “tvfool.com” provides more detailed analysis of nearby channels including the signal strength (Noise Margin decibels– NM(dB)).

I have grappled with but never understood dB (decibels) which is a measurement of the intensity of sound.  It is about logarithms, a weak area for me, except that I remember that instead of multiplying two numbers you can take their logs and add them together and the antilog gives the result of multiplication.  If the intensity of sound falls by half  so the output is (0.5), the input, this is described as a 3 dB fall –  the log calculation is 10log 0.5 i.e. take the log of 0.5 and multiply by 10 and the answer is -3.0dB.  As the TV signal wends its way through the house to the TV it loses strength – if you wish to power 2 TV’s you use a splitter to split the input into 2 outputs and a consequence is the signal is reduced by half which is 3dB (usually 3.5dB is used in calculations).  If 100 ft of RG-6 cable is used and the frequency carried is 700MHz, there is a further loss of 5.6dB, so total loss is 9.1dB (-3.5dB-5.6dB).  If you add an amplifier at the antenna end which has a rating of +8dB, then the net loss is 1.1dB.  So a nice feature using dB is you simply add up the gains and losses and ensure your signal strength is not too diminished on its way to the TV.  You could also use a dB signal meter which is now offered for <$100 (used to be >$500) but not worth the investment for one time use.

I mention that signal loss in the cable is affected by the frequency carried.  The impact is significant – for example the attenuation (reduction) to a 50MHz signal on 100ft RG-6 is 1.4dB and for a 900MHz signal is 6.0 dB.  A 200ft cable has twice the loss, a 50ft cable half the loss.  Which raises the question – what is the frequency of the stations I receive?

There are two bands VHF and UHF.  VHF for the 2 stations I receive, has frequency range between 174 and 216 MHz, and the UHF frequency range is between 470 and 890 MHz.  Almost all the channels I receive are UHF.  So when I design my system I have to ensure it will adequately handle frequencies up to 900 MHz.

back to installation

As mentioned, in summer the view of the antenna was blocked by branches and leaves, shown below:

summer view from old antenna location, 12 ft above ground level
horizontal summer view from old antenna location, 12 ft above ground level

Rather than attach the antenna to the chimney (lightning hazard?) or locate in the attic (signal interference from steel roof?), I moved it to a south facing dormer window.

horizontal summer view 22 ft above ground level
horizontal summer view 24 ft above ground level

The old antenna was too wide so I snipped off a couple of inches from each side and suspended it from the ceiling.

the width reduced antenna suspended from the ceiling
the width reduced antenna suspended from the ceiling in the dormer window bay

Next step was to connect the antenna to the TV in the living room.  I decided to use the existing RG-6 TV cables in the house since every room had been wired for TV and there was a nearby outlet.  I connected a battery to the outlet and headed for the basement and located the cable which carried 9 DC volts.  I did the same in the living room and then knew which 2 cables to connect.

the connected cables are middle left
the connected cables are middle right

Not knowing better at the time, I used 2 splitters – 1 for connecting upstairs cables and 1 for the basement cables.

a splitter with antenna signal entering on right & 1 output to upstairs room and 1 output to basement

I instructed the TV to scan for digital channels and it found 8.  I thought I could do better and decided to eliminate the 2 splitters since I was only using 1 TV in the house, and directly connect the cables together.

antenna cable connected directly with the basement cable
direct connection of the cables

The TV now located 18 channels.  I was on a roll.  I remembered I had once purchased a signal amplifier so I connected it at the antenna end and the TV was now able to locate 34 digital channels.

signal amplifier, you can see it enhances the signal by 8dB

Could I do even better?  This far I had incurred no cost – the screw on cable connectors, stub RG-59 cable and the signal amplifier were leftovers from previous projects.  The screw on cable connector not only looks amateurish but has a practical disadvantage – you twist it clockwise onto the cable and then you twist its rotating cap clockwise onto the male thread of the TV or antenna or connector.  And the 2nd twisting motion is opposite to the first and unless you are careful you can loosen the grip on the cable and weaken the connection.  So I ordered for for about $20 a package containing a stripping tool to remove the sheathing on the cable, a compression crimping tool which compresses fittings on the cable, and  blue locking compression connectors.   For good measure I also ordered an additional 50 black connectors for about $10.  I also decided to replace the RG-59  stub cables with RG-6 which is a thicker cable with better insulation for higher frequency signals and the 20 ft length of black RG-59 in the living room was conspicuous against the white walls.  So I ordered 100 ft of white RG-6 for $16.  I had now invested just under $50 and was hoping for better reception.

I replaced the 3 stub cables (antenna to amplifier, amplifier to upstairs room cable, living room outlet to TV) with RG-6 cable and the twist on cable connectors with the attractive blue compression connectors.  Instead of 34 channels my TV now scanned 14 channels.  This was a setback.  I remembered the basement connectors were twist on cable and found one was loose and replaced them with blue compression connectors and I now go 18 channels.  It seemed one of 3 things could be wrong – the cable was bad, the connectors were bad or my technique was bad.  I reexamined all the connections and found one I had forgotten to compress.

my new blue connectors

You can see the connector on the left was not compressed, so I compressed with the compression crimp tool and the TV located 24 channels, 11 less than with the old cable and connectors.  I examined the cable and it clearly stated it was RG-6 and I concluded it could not be the problem.  Then I examined the blue connectors and found each had a rubber ring inside the threaded female twist cap.  The ring probably protects against moisture but it could also block end on end electrical contact.  Perhaps this was the problem?  So I replaced 9 blue connectors with the new black compression connectors.  And…

And I now have 43 channels and am happy.

a gratifying electronic repair

You may well ask – ” I thought this site was about organic growing and permaculture, why so much electronics?”  I want some control over my life and surroundings.  Perhaps I could work and pay others to maintain the yard; repair my house, car and everything else that fails; administer to my health; and grow my food.  But, I like self reliance and making effective inputs to what goes on around me provides satisfaction.  Which brings me to the treadmill which failed.

My usual caveat – working with electricity can be dangerous or even deadly, so stay clear if you are not experienced.

Around 2003 I bought a good quality Precor 9.35 treadmill, which M. and B. often used, and then it went on the blink – literally its various lights would blink but nothing happened.  Some quick checks brought the conclusion that the circuit board was defective.  Previously, when the wall oven and refrigerator failed, I located via the internet, outfits specialized in those circuit boards and sent them the board and received a working board a few days later (cost <$200).  And the appliances worked and continue to work.

But wouldn’t it have been great to repair the board myself?

My first venture down this route was fixing the simple board on my scroll saw.  It was frustrating, took a long time but I learned techniques along the way and succeeded.  The treadmill board is more sophisticated.

the control panel of the Precor 5.35i
the control panel of the Precor 9.35

Here is the underside of the circuit board – not much going on.

this view shows some of the traces or connections between the components
this view shows some of the traces or connections between the components but not all of them.  some are buried in layers of the board

And here is the component side of the board.  My starting point is to test the capacitors, cylindrical objects, of which there are 8.

can you spot the capacitors?

Here is a close up view of 3 capacitors.

all the capacitors have the same value 47uF @ 25v. when replacing polarity must be observed - the light grey band signifies the negative leg
all the capacitors have the same value 47uF @ 25v. when replacing polarity must be observed – the light grey band identifies the negative leg

With my ESR meter I established that one capacitor was defective – 7 had an ESR of<0.31 and the defective cap had an ESR of 1.  Here is the bad guy.

the photograph was to remind me which side was negative
the photograph was to remind me which side was negative.  no indication from its external appearance that it is damaged

Diagnosis was quick.  The actual replacement was difficult.  Previously, to desolder a component I heated a soldered leg and with my other hand wiggled it free.  But this was a multilayered board and it did not wiggle free.  I figured lead free solder was used and raised the iron’s temperature.  I was concerned too much heat would destroy the board.  Touch and go.  Eventually I was able to extricate the component but the holes, through which their legs had been inserted, promptly blocked up again with solder.  With various diameter wires I was eventually able to clear the holes.  Then I soldered a new component  (same Farad rating, higher voltage, cost before shipping 15 cents), and it was done.

the new capacitor with polarity observed

But was it fixed?  That evening M. tested it and it worked – “significant event” she said!


my Irrigation Adviser

Recent bad weather discouraged outdoor activity.  So I used my time indoors to tackle a BJC.3 (Beauty and Joy of Computing – Berkeley, CA) project.  We were recently instructed on web scraping which means using Snap! (a block programming language derived from Scratch) to go to the internet and scrape selected data from websites.

From Spring to Fall a daily decision is whether to water my crops and, if so, how much.  To make this analysis I need to know current soil moisture, expected precipitation (rainfall) in the next 12 hours and local average temperature.  If there is sufficient moisture in the ground or rain is imminent then it is not necessary to irrigate.  The need for irrigation is increased if temperatures are high since this will accelerate evaporation and unnecessary if temperatures are low.  At some point I will install sensors which will report ground conditions.  In the meantime I had some fun and devised my “Irrigation Adviser”.  Click on the following link and you can see the message given me on 2/16/2016 @ 2.10pm.


leaf bag experiment and a cable sizing conundrum

My leaf bag collecting operations produce confusion for some neighbors and emulation with others.  A close neighbor, whose current preoccupation is the recent resignation of Mark Richt, the UGA football coach, was unclear whether I was collecting the leaf bags in order to keep the paper bags or for the leaves, and if the latter, why?  On a more pleasing but also disconcerting note some, or at least one  neighbor, has also begun removing leaf bags from the curbside – new competition for next year?.  However, this year I have amassed at least 100 bags and much good compost will result.

lots of leaves, and more on the way

When I have collected all the bags I need, I will break the bags and mix the leaves with other organic materials and compost.  In the meantime the dry leaves are enclosed in the bags, protected from rain and wind and achieving little.  It occurred to me – why not make a slit at the top of each bag and pump stored rainwater via a hose into each bag.   The leaves would be saturated and the bag would prevent evaporation and retain heat produced by the leaves and so the decomposition process could begin even before I mix up all the materials with the bobcat.  I will see in a few weeks if this makes any difference.

the cable sizing conundrum

I need an extension cord for 12 volt dc 3amp power and referred to online calculators which produced very different recommendations.  So I tried doing the calculation myself and was pleased that one of the websites has similar calculation  results though 2 others recommend much thicker cable.  This is not my area of expertise so you should go with the recommendations of a reputable site, but for interest only, my calculations are under the self reliance tab/ups.

update on growing, blueberries, leaf bag collection, shoe repair & ups

Today is Nov 20 and, after lots of rain earlier in the week the past few days have been in the 60’s and 70’s and no freezing temps yet.  So my fall greens (collard, kale, turnip greens and radishes) have been doing really well with minimal pest evidence.

raised growing beds filled with green or garlic

Each year I get a little better.  I pull the weeds early and cover the growing areas with growth.  Garlic is different since it does not provide shading leaves and does poorly with weeds so I weed carefully before planting garlic and then keep the area clear of weeds.  I am trying to upgrade my garlic and as mentioned earlier this year, I kept the larger garlic cloves for replanting, rather than consuming them first.

comfrey, radish and others

Radish is so easy to grow I grow plenty of it, tho I know with the first hard freeze the radish will become soft and inedible.  I had my neighbors over to help with picking and eating the greens.  My neighbor’s wife is industrious and grows many vegetables during the summer (conventionally) and cans them (in bottles) for year round consumption.  I think she may decide to do fall crops as well.  They were intrigued with the comfrey and I promised them some root cuttings.  It grows very well in our area.

Blueberries

I have a reasonable annual yield of blueberries but nothing like the orchards (if that’s the right word) of blueberries I saw in south Georgia and Oregon.  Most of mine are Rabbiteye which is a southern variety.  They seem fastidious with a predeliction for acid conditions and because of their small roots they need food and moisture close to hand.  I decided to branch out and bought 2 Southern Highbush and 2 Northern Highbush.

small
rather small Highbush varieties

Compost

My compost growing is now well established with organisms which thrive on my local mix of leaves and greens.  This year I excluded horse manure from the mix out of concern for the lurking ‘cides which may have been given to the fields and horses.  Now is leaf bag season and my Tacoma pickup makes the Atlanta subdivision rounds gathering good bags which I stockpile at the Atlanta house and transfer to the farm, 12 bags  each trip.  The pickup has >216k miles and is >10 years old and performs very well.  However, rather than wear it out I purchased an alternative more fuel efficient vehicle which I will use when there are no loads to be transported.

leaf bags for the new compost heap and behind is the old heap

shoe repair

I was disappointed when the sole of my very comfortable, relatively new outdoor shoe detached from the upper.  My bad really since I was sideswiping the gravel (see post on gravel drive) into place and they were not designed for this.

right shoe with detached sole

This was the second pair with a detached sole and I decided to try repair them.  I ordered shoe goo and used it for both pairs and it seems to have done a good job.

my tube of shoe goo which is working for me

update – the shoe repair has not held up as well as I had hoped.  I will not malign the glue I used since the cause could be the surfaces being glued were not in pristine condition or my technique was faulty.

ups

No, not the shipping company but uninterruptible power supply.  For both security and convenience.  Security because if there is a local power outage or if bad guys simply switch off the power supply (after breaking through the locked steel cover) and wait 30 mins for the backup security battery to run out, then the house is defenceless – no security system, no internet connection, no security cameras.  And if I am in the house and the power goes out then no internet access since the modem and wireless router will be off.    Below is a pic of my system which I will amend and expand and eventually connect to solar panels.

my ups system
my ups system

I will provide more info on the system at a later date under the “self reliance” tab on the website.  It has several components:

  • a deep cycle battery and smart charger on the bottom shelf with a marine on/off dc switch;
  • the second shelf has an inverter which converts dc power to 120ac household current and a solar power controller.  The controller is to prevent the 3 dc led lights from excessively draining the battery;
  • the 3rd shelf has an automatic transfer switch.  While utility power is on it powers the load (security system, security cameras, modem, wireless router).  When utility power is off, the battery powers the load.  You can also see switches for each of the 3 dc led lights and numerous fuse links – it took some time to figure the best fuse size.
  • the yellow cable on the top shelf goes to the load – it is 12/3 size and I did cable sizing calculations to determine a size which has acceptable resistance loss.

I will provide more info and calculations in the self reliance tab over the next few weeks.

long hibernation ending

My last post was November 25.  As we moved into winter my growing activities were largely shelved.

In November/December I cleared and weeded some beds and planted out, closely spaced, several 100 garlic cloves.  They are all descended from 3 varieties of garlic I purchased from California 4 years ago.  After harvesting last year I strung them together and hung them from joists in the carport.  Fewer rotted compared with previous years where I had stored them in laundry bags hung in the basement.  So this is the way for me to go in the future.

Although I was not actively growing, there was always something to harvest.  Initially the radishes did well but as cold weather and rains set in, most became soft and lost their taste.  The daikon radish also held up well and then deteriorated with the cold weather (below 15 degrees F).  When my family visited over Thanksgiving, I dug up this specimen to show off.

a daikon radish next to a 5 gal container

While we enjoyed eating the small daikon radish we found the big guy above indigestible.  What we should have done is pickled or fermented it, but it was Thanksgiving and it went to compost.  This year I would like to do fermenting and will be planting out more cabbage for sauer kraut, and more daikon.

Apart from some large carrots I unearthed, the main winter crop was purple top turnips which survived the weather well.  Plus, in the leafy greens area, turnip greens, mustard,  kale and collard.  I planted out the spinach too late in the season but they and lettuce are holding on and should do well in the next few weeks.

In the orchard I have tried new pruning techniques and used wires to train the branches horizontal or downward so the fruit will be easier to reach.  There is a theory that when the branches are horizontal or downward sloping, the tree concentrates more on fruit production than vegetative growth.

Past few years I lost my young fig trees to cold weather (below say 12 deg F).  Actually I lost only the above ground parts because after each winter the roots, which survived, produced new growth.  This year for the few days when it was really cold, I pruned the trees to a few ft and enclosed them in commercial grade large trash bags weighted down with stones at the bottom.  I hope the trees survived.

My chicken, 10 hens and a rooster, are all still around.  The two oldest require special attention.  Gimpie has a bad hip and she struggles out to the paddock in the morning with the others and in the evening she waits for me to carry her back.  The Ameracauna, who used to be assertive is now timorous when it comes to eating and so I have a routine where I enclose the others in one section of the coop and allow her to eat undisturbed in the other section until she is done.  I think part of the problem is the rooster, who acts aggressively to her, and she often goes into a nest box to avoid him when they are locked up for the night.

I built the coop a couple years ago and it is robust and immune from drafts.  However on the colder nights, of which there were only a few, I treated them to a heat lamp and a water heater.

heat lamp and water heater for the cold nights

The heat lamp is on a timer to operate only in the night.  The water heater is on continuously during the cold spells.  The summer ventilator has an external cover to prevent drafts and you can see I have raised the feed dispenser fairly high off the ground which reduces the flicking of feed onto the ground.  During winter I supplement the pellets with scratch.

Two of the hens (Wanda and Randa) are fliers and each day they fly over the fence and go everywhere and I will often see them hard at work on the compost heap.  I was very happy to see they now visit the base of the fruit trees and dig up the overwintering pests which despoil and then drop off the fruit in the summer, hibernate over the winter in the ground and climb the trunk early spring for the next summer’s feast.   I must figure a reliable way to get all the chicken out there.

here are Wanda and Randa at the base of a pear tree

Egg production is recommencing.  Apart from the occasional use of the heat lamp I do not use artificial lighting so egg production shuts down for the short days.  From the occasional 1 egg a day we are now up to 4 or 5 and I have now begun supplementing their feed with oyster shells.

I   spent much time during the winter months working my way through an electronics course provided by Georgia Tech on the Coursera MOOC, which was excellent.  In January I began a second course with Georgia Tech and also one on simple robot building offered by Berkeley on Edx.  Since I do not have a background in these areas they require much work and focus.  And the endgame?  I have plans for microprocessors for various of my growing activities.  The first one will be using an arduino controller to keep a tally on the chicken during the day so it will know when they have all returned in the evening and will then lower the coop door.  Presently, the coop door opens on a timer in  the morning and must be human lowered in the evening.  Other applications for the future, in addition to enhancing security routines, will be sensors to monitor humidity, temperatures and maybe ph as well.  To my mind, all part of becoming more self sufficient and using electrons to simplify daily tasks.

I forgot to mention what transitioned the end of my hibernation.  Last week I seeded a germination tray  and now a few days later the kale, lettuce and beet have germinated and I needed to get outside and prepare the 2″ soil blocks for the vegetables to continue growing in the greenhouse.

making soil blocks for new vegetables

So making the soil blocks has galvanized me back into the growing mode.  Here I mixed my compost with soil, peat, building sand and, because I had no lime, ash from the wood stove.  You can see the mold for making the 2″ blocks of which 36 fit in each tray.  I bought more seed at the big DIY stores and specialty/glamor/fancy looking vegetable seed from Johnny’s.  So I am now switched on and looking forward to spring.


remote surveillance – DIY is hugely frustrating

I had a break in and theft a couple years ago and so installed a home security system with a very powerful siren, camera system and dawn to dusk lights.  Being a DIYer I installed them myself.  The programming of the Ademco Vista 20p was challenging.  They work fine but I did not have remote access, which means if the alarm was triggered when I was away, then I depended on my neighbors to call me.  Which they did when the alarm went off last week for the first time in 2 years.  It was a false alarm caused by a loose wire in a new sensor installed a couple days earlier.

Which got me thinking.  Wouldn’t it be nice if I was electronically notified when the alarm was triggered and if I could then use my cameras to verify if there was an intruder.  If there was I could call the police and then head out to the property.  If not, I could reset the alarm and save the trip.

I started with the video cameras which feed into a dvr (digital video recorder).  I have dsl internet service at the property and it is easy enough to connect the dvr to the router with a cable.  But how do I enable the system so I can view the cameras remotely?  The router blocks intrusions from the internet and you have to open certain ports to internet traffic (called port forwarding).  You could also use UPnP (universal plug and play) but I decided against this route.  Since I didn’t really know what I was doing it took ages to set up the addresses and ports, BUT it still didn’t work.  You can tell success by going to a site aptly called “canyouseeme.org” and the site reports back whether it can see you i.e the port is open, or not.  I truly believed I had done everything correctly but I couldn’t be seen.  So I got help from my son who said that the dsl modem through which my router was connected to the internet was actually a 2nd router with a firewall and to get around this I had to establish a “DMZ” (demilitarized zone, reminds me of the Berlin days).  Once I did this canyouseeme promptly reported success.  I installed a neat app called KMEye on my iphone and I am now able to use the video cameras remotely (and also locally) on my desktop/laptop and iPhone.

Next was to have the Ademco security system notify me when the alarm was triggered.  As with the security cameras I went down several cul de sacs before success.  The Ademco can send pager alerts and several postings said this alert could be enabled to call your ‘phone.  I tried programing this and failed and gave up when a poster who provided a very detailed write up of his system=authoritative, said it wouldn’t work.  But I found a neat little module from EyezOn called EnvisaLink3, which was expensive >$90 but installed easily on my system.  You register with  EyezOn and they act as the intermediary between you and your system.  Alerts are emailed or text messaged to you and other selected contacts, and you use the smart phone app to see what circuit or condition triggered the alert and you can arm or disarm very easily using the app.  There is no additional charge for this service, though to register you have to exculpate and indemnify the provider against any loss from their system not properly working.

So I have now, after a week of mounting frustration, successfully established remote surveillance.  Incidentally, my security sensors are all wired to the control panel.  I read this week that wireless security systems can be hacked and neutralized.  Wired systems take a lot of work to install but since they don’t use batteries require less maintenance.


bluetooth & my basic truck

I have a base model Toyota Tacoma 2005 pickup (base means manual shift, windup windows and small but efficient engine) which came with a simple radio and CD player.  The challenge for me has always been playing podcasts (especially during the NPR fundraising season – 4 weeks a year).  I have downloaded my podcasts via my computer to MP3 players and then connected them to a  speaker which I have jammed between my shoulder and ear as I drove along.  Pretty basic, distracting and difficult to adjust while driving, plus the sound was poor.  My next stratagem was to download the podcasts onto CD’s and use the CD player – sound was fine but this took time and I now have a lot of one time use CD’s laying around.

Just returned from my son’s wedding in San Francisco where, in the tradition of exchanging gifts, he upgraded me to the 21st century by giving me a FlexSmart x2, which is a wireless bluetooth FM transmitter.   I have been catapulted into a new listening experience.

The setup steps are relatively simple.  I have an Apple iPhone, so I visited the App Store and downloaded the free podcast app.  I then visited  my favorite source of podcasts – www.permies.com and downloaded the 10 most recent Paul Wheaton permaculture podcasts.  I can simply play the podcasts on my iPhone, which is an improvement on the mp3 route since the downloads are easier to do, I can subscribe for automatic downloading of future podcasts, and the sound is louder than my previous convoluted configuration.  But, this is not as good as playing the podcasts through the car’s audio system.  To do this I use FlexSmart.

I inserted the FlexSmart DC adaptor into the cigarette socket as you can see below.

FlexSMART plugged into cigarette lighter

Then I pressed a button for the device to enter pairing mode and told the iPhone to search for a bluetooth connection.  The two devices quickly found each other.  The play, pause, advance and previous song controls on the FlexSmart operate those functions on the iPhone.  With the two devices in sync, I switched on the radio and instructed the FlexSmart to autoseek a free FM station.  It told me which FM frequency was available and I tuned the radio to that frequency.  And, crystal clear and as loud as I wished, I can listen to my podcasts and control them via the FlexSmart rather than groping for the iPhone and risk an irritable growl or snap from Trudy when the iPhone has settled under her.  I can also take calls via the FlexSmart.  I realize this is old hat for recent model car owners but is a big step forward for me.


I have an Apple iPhone