One of the advantages of keeping chicken is their nutrient supply in the form of poop. Twice a week I gather their extrudences (new word?) in a 5 gallon bucket and head to the apple orchard to gift a lucky tree. This morning, as I was about to upturn the bucket at the base of my favorite apple tree (it provides the best apples), I noticed a little fellow (sex assumed) hard at work on a fallen delicacy. There were a couple of wasps also participating at the meal but they flew off as I neared the camera.
Real summer for me is when the tomato plants begin producing. In the past this was well before July 4th. This year I planted my tomato plants early but an unexpected frost devastated them and this set me back several weeks. So, it was only on July 4th that I was able to pick ripe tomatoes.
my first tomato varieties of the year
For the first time in several years I have been able to grow squash. In past years the squash plants appeared to flourish and bore flowers and began producing little squash and then overnight were felled by the lurking vine borer. The only evidence of its activities was the base of the vine at ground level was cracked and disrupted. Undeterred, I planted more vines this year – some were seeds and some transplants. And they bore squash. Not to say the borer was absent – it destroyed say 30% of the plantings, but the remainder survived (this far) and have provided squash. Why the changed outcome? As I include plant diversity it may be the area is more attractive to predators of the borer; or the borer cannot easily find its victims, concealed as they are among numerous different plants. I also planted the 3 sisters – corn, beans and squash together, and maybe this grouping strengthened the squash or discouraged the borer. I really should pick the squash when they are small – the two larger items in the photo below were camouflaged and I only noticed them too late. Squash has been in active production since mid-June.
squash plants
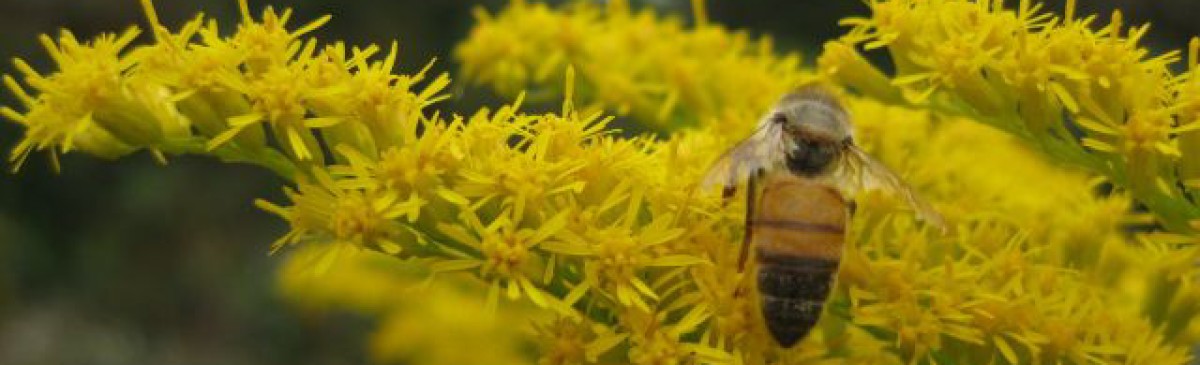
My cucumber plants are beginning to take off. Last year they had full sun exposure throughout the day and did not do very well. This year I am growing them in an area which has afternoon shade, which may be helping them. Lots of little flowers in evidence plus bees and other pollinating insects, so I am hoping for a bountiful supply in coming weeks. Here are a few of the early arrivals.
early cucumbers
In addition to the above, the blackberries and blueberries are producing and various of my apple trees are offering samples. I do not spray and although I took care to remove fallen apples last year, this did not deter the usual pest onslaught. My approach is I suppose philosophical, I don’t use chemicals and so, to enjoy the apples, I share them – i.e. I cut out the good parts and leave the affected areas for those who got there first. Pears are not as affected and I am hoping that the pears, which are approaching ripeness, will be all for me.
Did I mention the garlic harvest – a couple weeks ago I brought in the garlic and they are drying in full shade of the carport and every day some are chopped and diced for culinary purposes.
We think of honey as nutritious and pure, but it ain’t necessarily so. Most of us want to trust others, and then we get burned and keep our guards up and become cynical. Recently my emotions oscillated back and forth and I still don’t know where I come out.
I produced just under 5 gallons of honey last year, which should have been sufficient to carry me through the winter and spring until my next honey harvesting sessions. But it tasted so good and so many wanted a bottle that I ran out of honey early spring and decided to buy some to carry me over.
I bought a container labelled “North American Honey” which tasted ok, not great. (stage 1 – trust, does not contain honey from China).
One day I scrutinized the label more carefully and read the statement “May contain product of the U.S.A and Canada”. This caution surprised me – I thought it would say “Contains product of the U.S.A or Canada”. To me “may contain” means it may or it may not contain. (stage 2 – cynicism).
So the question for me was what percentage if any of the honey was from North America. I visited the packager’s website (to keep my life simple I will not identify the producer) and it extolled the wonders of their honey. I did some googling and found they had some years ago filed a petition against alleged honey dumping from China. My hopes began to rise – these must be the good guys. (stage 3 – neutral)
So I emailed the packager and, to my pleasant surprise, within a few days received a reply that said: “The North American Honey you purchased is 100% USA. Our labels allow us to use Canada Honey in the product, but we have not done so for a few years.” Great news, but why not make this clearer in the label by saying “Contains product of the U.S.A or Canada”. Anyhow, issue resolved as far as I was concerned. (stage 4 – trust, again).
I must clarify my antipathy for honey from China – not because it is sold at a very low price which undercuts U.S. producers – that’s life (actually I have very strong views on the trade deficit and will one day get onto this topic). No, the reason is there are health concerns about Chinese honey as detailed in the American Bee Journal (“ABJ”), June 2011 p.593. So how can you tell from which country the honey originates? By analyzing the pollen in the honey – so called melissopalynology. And what would make it impossible to determine the country of origin? If all the pollen in the honey is filtered out. California and Florida passed laws prohibiting the removal of pollen except where this was necessary to eliminate foreign inorganic or organic matter. Well, recent tests found that a lot of honey sold as U.S. honey has been filtered to remove all the pollen – see ABJ June 2012 p.554. And, guess what, the packager which I have been following is named as one of the producers which has filtered out the pollen from their honey. (stage – heading to cynicism, again).
Now the producers have reasons for filtering out the pollen – the honey looks clearer because it has been filtered to remove particles which make it cloudy, and is less likely to crystallize, etc. But, given all the concerns about country of origin, why not leave the pollen in the honey so everyone knows what they are buying?
Now you may say I am unduly cynical but my experience goes back to a time when my family represented in South Africa one of the best known Bordeaux wine producers, which seeped class and prestige from every pore. Until one day when the wine inspectors made a surprise visit, found cheap wine from another country in their cellars, and instantaneously this famous house was scandalized and destroyed. So I want to trust all the representations and soothing explanations about the origin of some purchased honey, but am not there yet.
I have never had much luck with squash. A clan of squash vine borers benignly observe my squash growing efforts and, just when the squash begins its dash for the finish line, they take up residence in the base of the stem of the squash plant, chew away, and the vine keels over. In previous years I noticed mating stink bugs in the vicinity of the squash plants before their demise and, guilt by association, when I spotted them this morning, I quickly fashioned by bug dispatcher. My bug dispatcher is based on a handy internet tip – a soda bottle, or in my case a plastic dish detergent bottle, sliced horizontally with the top third inverted into the bottom third and secured with duct tape. Add a teaspoon of detergent, some water, shake, and this becomes the final destination for the offenders. To secure the miscreants I use long handled rubber tipped tweezers – the rubber tips have a better grip on hard shelled insects. So in to the soapy mix went the doting, connected couple. Another way is to locate the funnel of the bug dispatcher directly below the bug and then knock it or shake its perch and, with some luck, it will tumble into the funnel. My squash plants are in a new location this year and I hope, probably unrealistically, that they will escape the attentions of the vine borers.
assembled bug dispatcher with long handled tweezers
squash bug dispatcher – vertical view
The leaves of my potato plants were afflicted by all types of bug biters. A biggish, slow moving feaster was easily taken and added to the dispatcher.
a potato plant leaf lover before entering the bug dispatcher
Fig tree
I was concerned when my main fig tree did not sport figlets – my word for little figs, and I thought the tree was taking a sabbatical or I had over fertilized it with manure the previous year. But suddenly, in the past week, figlets have appeared and I am now hoping for a bumper crop, what with the manuring, and having the overflow from my rainwater storage tanks directed at the base of the tree, and the removal of competitors.
future figs
Though there are bug visitors to the tree – large numbers a few weeks ago and just the occasional bystopper now – not sure who they are or their intent.
fig tree visitor – unusual bug
Tomatoes
Last year was not a great tomato year for me. I have again planted out a number of different varieties and will keep an eye on them. When I noticed two strong volunteers emerge from compost spreads I decided to embrace them with wire cages and I will water them well and hopefully in due course, learn their identity and enjoy them.
This is not about environmental remediation, just correcting a few deficiencies in my nu trac environment.
Bees
When I split the hive a few weeks ago by taking bees and frames from hive 1 and creating a new hive 2, I noticed that hive 1 had no brood and apparently no queen. In addition to the new queen I purchased for hive 2, I ordered a second queen for hive 1. The second queen and several attendants arrived in a queen’s cage last Friday from an Alabama beekeeper. After again confirming that hive 1 was queenless, I inserted the queen cage into the hive.
I mentioned in a previous post how observation can be distorted, often by preconceived notions. Hive 1 prior to introducing the queen was noisy, restless and it even looked as if robbing might be in progress. Hive 1 has lots of honey and I am waiting for it all to be sealed before I harvest it, so maybe, with the colony demoralized and on the decline, they were being robbed? Next day the hive seemed very different – no more agitated activity at the hive entrance and no angry responses to the slightest jarring of the hive bodies. So, I concluded, the caged queen’s pheromones were being spread around the hive and the inhabitants were settling down. Sunday I opened the hive to see how the bees were responding to the queen cage – they were gathered around it, could be easily brushed away (which indicates they were not attacking and trying to get at the queen) and seemed content. So this morning, four days after introducing the queen cage, I removed the cork and some of the candy from the hole in the cage. The bees should now remove the rest of the candy and I hope, in a few days when I reinspect, the queen cage will be empty and the queen will be busy egg laying. I should mention that the new queen in hive 2 has settled down well and has laid eggs in a tight pattern on both sides of one of the frames.
Fruit orchard
In February 2011 I began a new orchard and installed 12 different 1 year old trees. This spring I was sure 4 had died but, surprisingly, 2 unexpectedly produced leaves at their bases, so that left 2 victims – a Bing cherry and a Gold Nugett Loquat.
I took my first cuttings last fall and again earlier this year – most did not survive, but the fig cuttings looked strong, so I decided to replace the two dead fruit trees with a couple of cuttings. I began with the Bing cherry – I thought it would lift easily out of the ground as is common when the roots have rotted, but this cherry was anchored. I then found that though the trunk was dead the root trunk was very much alive and well established, so I left alone and hope I will soon be rewarded with shoots. The loquat lifted easily – just a short dead root trunk. I enlarged the hole and added some chicken manure and then compost and then installed the small fig cutting. I will water it frequently and I hope it will survive the transition. Since the fig cutting is from a nearby well established fig tree I know it will thrive in this area.
I used to think observation was the key talent. On trips through the Kruger game reserve in South Africa my siblings and I competed to spot the lion, cheetah, leopard or unusual game first. On a river boat trip through north Australia we competed to be the first in the launch to spot the saltwater crocs (“salties”) lazing on the banks. And for such contests a sharp eye was all that was needed.
But in my interactions with nature, observing the discordant object is only the first step. Understanding why is equally important.
For several years my spring routine has been to spray roundup on the poison ivy alongside my walking paths in the woods. I believe in live and let live, but my dog is an investigator which requires her to explore scents and droppings off the trail, which are often in the poison ivy patches, and she then transfers the poison to all who contact her. So I use roundup for this purpose and this purpose alone. There is a glade alongside the trail where poison ivy thrives, despite repeated attentions from the sprayer. I observe the poison ivy, I drench and then later in the season spray again and the next year, there it is again, and more spraying. This year, as I was about to spray, I received a cell call and so lingered at the spot longer than usual and then happened to notice two snake like vines heading up a tree. Yes, they were poison ivy vines, which explains why, despite my ministrations, the poison ivy continually resurfaced sponsored by seed from overhead. Had I reflected on the persistence of the poison ivy I may have thought to look up and not always down.
poison ivy high in a treepoison ivy vines climbing a tree
Of course, once you know about it, it is a simple matter to identify it elsewhere, as in this other tree, 10 ft away.
a smaller poison ivy vine
But often more is needed than just knowing what to look for. Analyzing what you are looking at and being aware of the changing environment is a necessary skill.
A couple weeks ago as I passed my new orchard I happened to notice that one of the small trees (tanenashi persimmon) was suffering. Half of its leaves had turned brown. I remembered that I hadn’t watered this area for a week and, except for the previous day which had been cold, the spring weather had been in the 80’s. None of the other trees was afflicted but I reasoned this particular tree was probably more susceptible to lack of water, so I promptly irrigated the orchard. I did notice I had planted Russian comfrey too close to the small tree but reasoned this could not be the cause since comfrey is not allelopathic. Then a little later that morning, I noticed that my tomato and cucumber seedlings were also afflicted – in their case I had watered every day, except the previous day which was cold. This seemed unusual hardship for one day’s missed watering. My mind wandered idly over these facts – perhaps there were root nemitodes attacking the one fruit tree and the tomatoes and cucumbers – such selective treatment seemed unlikely. Then I noticed, in a separate planting the cucumbers were doing fine and they also had not been watered the previous day because it had been cold. So why was the one lot ok and the other lot disaster. Then it dawned on me – the previous day had been cold, but how cold – had there been a freeze? I happened to meet my neighbor and he said the water in his hose had frozen the previous morning.
Now it made sense – the fig tree and the tomatoes and cucumbers are cold sensitive and had been hammered by the freeze. And the reason the other cucumber planting was ok was because it is on the crest of a hill with no obstructions below it, so the frost, like water, slid down the hill away from it, which was not the case with the other planting which was on level ground.
All of this conjecturing and misdiagnosing could have been avoided had I, the previous day, just glanced at my min/max outdoor thermometer, which would have told me how cold it had been and then, with this knowledge I would have understood the changes. So I need to remove distractions and attune myself better to my surroundings.
Or pursue a more analytical approach as Bill Mollison suggests in “Permaculture – A Designers’ Manual”: first make value-free non interpretative notes about what is seen; then select some observations and prepare a list of speculations; then confirm or deny the speculations by research, asking others, and/or devising more observations to test the hypothesis; then make a final examination of all the information to hand to arrive at a conclusion; and finally decide how to use the knowledge gleaned. A disciplined approach for me to consider.
I made a false start about a month ago, when the daily temperatures were in the 80’s, and put out a dozen small tomato plants, most of which succumbed to an unexpected frost. So I waited a while and in the past week have begun setting out the plants. I try to rotate to avoid soil borne disease, though the area I have just planted was used for tomatoes for the first time last year. It is on the top of a small rise along the edge where the ground slopes down, running South to North so it has excellent sun exposure and good drainage.
a barrow of tomato plants on their way to planting
compost heap started last fall, center is done, outside needs turning
The negative to the site is bermuda grass which grows rapaciously through the mulches and grips tenaciously to the ground. I prepared the tomato planting area by forking and pulling out the bermuda runners and digging in large dollops of my compost. The compost pile was prepared last fall from leaf bags, surplus vegetation, horse manure and some prior season’s compost for a starter. The inner core has broken down well, is home to many earth worms, and is a good supplement for my future tomato bed.
tomato wire cages anchored by cable secured by two cherry tree trunks
tomato plant in yogurt container awaiting insertion through wire cage into ground
I have two cherry tree trunks on the hill which are the anchors for a cable strung between them. The cable is threaded through 23 tomato cages which I made from metal remesh used for concrete, purchased in rolls 5 ft wide and 150 ft long. Each cage is 5 ft high, has a 6 ft circumference and the interstices formed by the wire are 6 inch squares. At the end of each season I store the cages under cover. I once tried planting the tomato plants first and then placing the wire cages around them but this didn’t work out for me. So the drill now, after preparing the soil, is to line up the cages threaded with the cable and then dig and place the tomato plants, sliding the hand trowel, and the pots through the 6 inch squares. Takes some getting used to.
I grew all my tomato plants from seed some of which is 3 or 4 years old (actually of the 23 planted here, two Big Beef were gifted to me by a neighbor). I have a variety of types and losing some to the frost was not an issue since I grew more than 80 tomato plants and, at the end of the day, will probably plant 50 and give the rest away. In the past I used plastic markers to identify the tomato plants but these invariably went adrift. This year I numbered the cages sequentially South to North and have written the cage number and tomato plant name on a board, which will be attached to one of the trunks.
So today I finished planting the 23 tomato plants. Next steps are to realign my gravity fed irrigation bubblers, then cover the soil between the plants with newspaper to prevent raindrops splashing soil onto the tomato plants and, with aluminum foil wrap, encircle the first 5 inches of the plant’s stem, which also reduces the spread of soil borne problems. So still some work to do but the plants are out of the greenhouse and can now spread their green wings.
The oyster mushroom is one of the easiest to grow. Available free on the internet is a +300 page handbook on oyster mushroom cultivation which has as its central premise that: “Mushroom cultivation has been evaluated as an effective means for poverty alleviation in developing countries due to its possibility of low cost production, high profit and quick return”. A handy insight into mushroom growing around the world.
I purchased grain spawn grey dove oyster (Pleurotus ostreatus) in February and today I harvested some of the mushrooms from my grow box and sauteed them with olive oil and chopped garlic – delicious. In fact the whole meal was delectable – home made whole wheat bread, home brewed dark German style beer, free range eggs (my hens are producing approximately 9 a day) and mounds of garlic, lettuce and other greens from the raised beds.
But to return to the oyster mushrooms. I have two operations going – an outdoor mushroom shelter where I am waiting for them to emerge from tulip poplar logs, and an indoor grow box. For the grow box I submerged a bale of straw in water for several days, then packed the straw (substrate) into a plastic grow container which is 36″ long, 22″ wide and 7″ high, sprinkled with grain spawn.
after thoroughly wetting the straw, time to empty the water
plastic grow container packed with straw sprinkled with grain spawn
grow box incubating in warm, dark enclosure
straw blanketed with mycelium
I enclosed the container fully in a black trash bag for a few weeks in the upstairs room where it is warm, checking that it was moist at all times. The black trash bag prevented cereal seeds from sprouting. When the fungus (mycelium sounds better) had colonized the straw (the straw was covered with a soft white layer), I made a plastic (see through) tent over the container to maintain a high humidity level.
wood frame for plastic tent
plastic tent enclosing grow box
My first mistake was to allow outside light to hit the container. The mycelium staggered from the light onslaught, visibly slowed its efforts and appeared to assume a yellowish pallor – presumably it was thinning and showing the straw underneath . I moved the container to a less bright area of the upstairs room and hoped growing activities would resume, but when activity had obviously abated, I concluded the room temperature was too high (my second mistake). So I relocated the container to the basement where it is cooler and there is some but not much outside natural light. And the mycelium got back into the swing of life and began growing actively. I have also been adding coffee grounds from my cappucino machine (my afternoon indulgence) and the grounds have been colonized but have not yet produced mushrooms.
My land slopes and since I rely entirely on rainwater for irrigation, I catch the rain however I can – in storage tanks or directly into the ground with contour ditches. Contour ditches are similar to swales – built on contour or dead level survey lines to intercept and hold water and to let it infiltrate the ground, therefore they are not compacted or sealed. While a ditch is narrow, a swale can be broader like a basin and, according to the permaculture bible by Bill Mollison, trees are essential to swales and must accompany swaling in arid areas.
I start my contour ditches towards the top of the slope where there will be sufficient runoff (if the ditches were located at the bottom of the slope they could be overwhelmed by torrents of water). Once I decide approximately where the ditch will run I use my transit level and a helper (my rod man) to locate the middle and two ends of the ditch on a contour. I mark these three points with stakes. Usually, by this time, my helper’s patience is exhausted and I am on my own for the rest of the project.
transit level and measuring rod
simple A frame with bubble levels (red) on horizontal and vertical legs
If the ditch is say 200 ft long, even with the three stakes in place, it can be difficult to figure how the ditch should run between the three stakes since the ground is uneven. So I use my A frame, which is simply three pieces of wood connected to form the letter “A”. The two sides of the A are 8ft long and the feet are about 8.5 ft wide. The horizontal piece is 4ft long and all the wood is 1.5″ (nominal) square, so it is not too heavy to carry about. A simple bubble level is attached to the horizontal and one of the vertical legs. I construct the A frame on a level surface and ensure that the horizontal piece (to which the bubble level is secured) is horizontal before bolting it in place.
I gather some rocks and a can of aerosol spray paint and with my A frame start from the stake which marks one end of the future contour ditch. One leg of the A frame is next to the first stake and I point the other leg in the direction of the next stake and move it along the ground until the bubble level tells me the A frame is horizontal and the second bubble tells me the frame is vertical. I place a spray painted stone to mark this spot and then swing the first leg around the second in the direction of the next stake until it too is horizontal and vertical. It is important to advance the legs alternately since this will counteract any inaccuracy in the A frame. I can tell how accurate I have been when my A frame eventually reaches the next stake – if the leg of the A frame is at the same level as the stake, all is well.
Having marked out the line of the contour ditch with the three stakes and painted stones, next step is to dig the ditch. I work mainly by myself – I will not engage paid workers and volunteers are scarce. So I have no qualms using my old machines, which I nurture along. My Takeuchi tracked loader (bobcat) has a stumper attachment, which is good for removing stumps and digging ditches. Digging the ditch becomes quite simple, I simply use the bobcat to carve out the ditch following the trail of spray painted stones and I save the removed soil in a heap for some future use.
I seed the ditch and sides with grass seed to stabilize the banks. And then I make my plantings on either side of the ditch. An earlier (shorter) contour ditch I dug for my muscadines (grape vines) has proven so effective at catching and holding water that supplementary watering will be minimal (the ditch is assisted by a diversion slot cut across an access road which directs water into the ditch). After planting up my new ditch with trees perhaps I will call it a “swale”.
All my irrigation is from harvested rainwater. I used to pump the water from the main storage tanks to an elevated tank near the growing area but since this tank was only a few feet off the ground and the water was moved by gravity, it trickled slowly from a hose. And so I gave up and installed water lines and bubblers and let the water do its own thing at its own pace. An unsatisfactory result, since I wouldn’t notice when individual bubblers clogged and, more importantly, I missed out on the pleasure of observing each day’s advance.
Last year I was able to purchase the adjoining property which sits on a hill. Now, with my gravity feed tanks on the top of the hill, the water rushes out the hose and hand watering the vegetables is quicker and enjoyable. And I look out for all the changes over the past 24 hours.
Last fall I planted acorns in a raised bed with the intention of transplanting the oak saplings in a year’s time (before their taproots grew too long). This morning some of the leaves were shredded and then I spotted the culprits.
shredded oak leaf - yesterday it was fine
the culprit, one of a gang of 5
I located and collected the 5 caterpillars, then googled whether chicken ate caterpillars and the answer seemed to be “no”. So I did them in.
I have a bed of early season strawberries and noticed the berries are forming. Then I spotted one berry ripening quickly and another which will be ready for the eating this weekend. Unlike the supermarket offerings, my strawberries, if the last 3 years are anything to go by, will be deliciously sweet and plentiful.
strawberry beginning to ripen
strawberry almost ready for the eating
The radishes are ready for picking and the big treat each day, the asparagus, are turning up in greater numbers and have to be picked promptly before they get too tall.
radishes intersprinkled with onions
this radish soon ready for the plate
the potato plants in the trench must soon be mounded
I am pleased to see the “three sisters” (corn, bean and squash) are emerging in places. I have never been successful with squash – always foiled by the squash borer which levels the plant at its peak – will it be different this year? Although considered an invasive the comfrey officinalis, which spreads by seed, is seductively attractive.
comfrey officinalis, which spreads by seed and can be invasive