fence repair the easier way

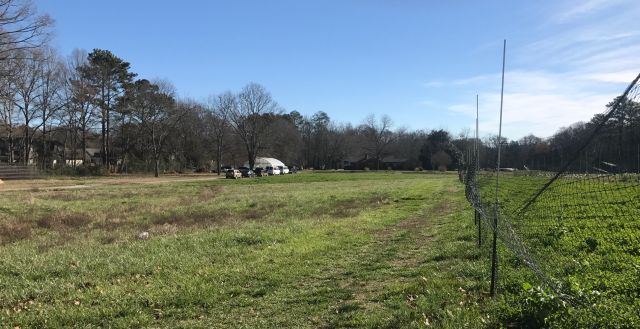
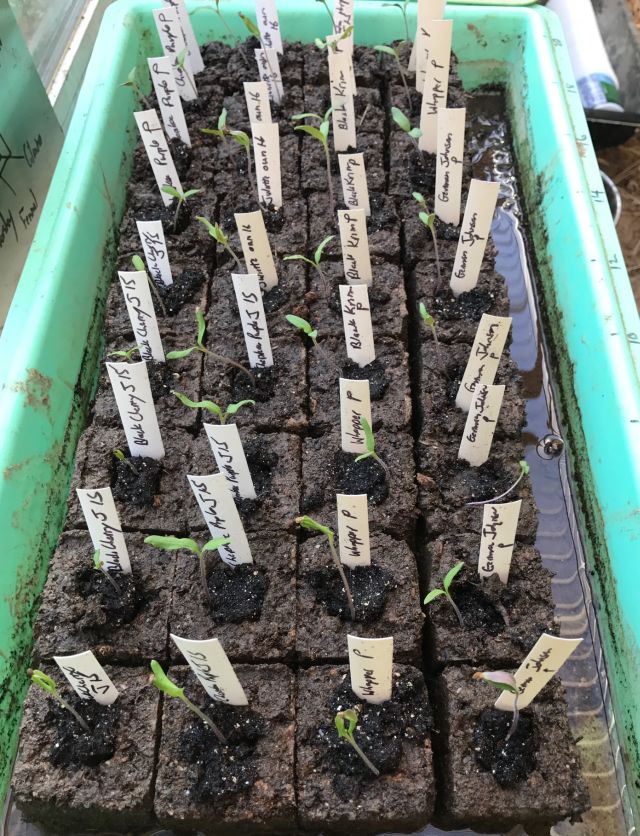
Some time ago I noticed  the perimeter fence was down – a post had rotted at the base and 2 8ft attached panels fell with it.

you can see post rotted at base and 2 attached panels.  also notice left standing post has warped and panel has separated

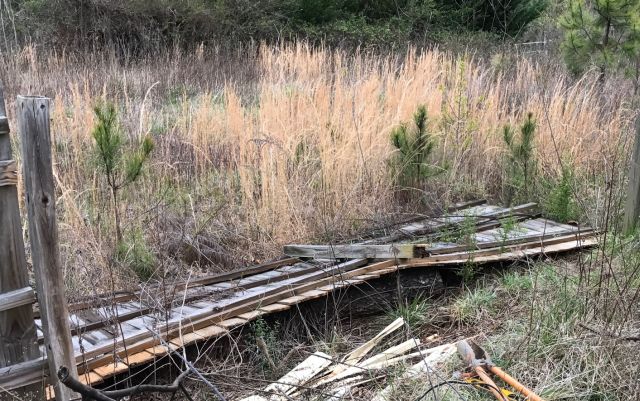
I call them panels because you can buy them that way – 8 ft length with 3 horizontals and 17 attached panels for about $49.  Or you can buy 3 2×4 8ft pieces for horizontals and 17 individual panels and nail them together.  I prefer the latter – easier to transport and move and cheaper but will take much longer unless you have a nail gun, which I happen to have.

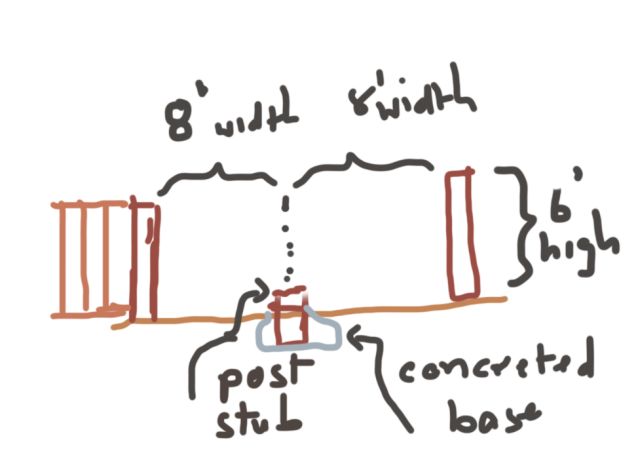
But before considering the panels I had to first figure how to replace the post.  I confirmed its base was concreted into the ground and assumed the rot was because the fence is at the bottom of a hill and soil carried down by the rain covered the post for about 3 inches above the concrete base preventing quick evaporation of rainwater.

One option was to pull out the stump and the concrete base, which would be hard work, take some time and leave a big hole requiring a big plug of new concrete and rocks.  Another concern was I would have to locate the post just right so that each panel could be attached to it.  A post is about 3.5″ wide and since the panels touched each other when in place, each would have to extend across the post by 1.75″.  Too finicky.  Especially if the panels were no longer vertical.


a sketch of the problem

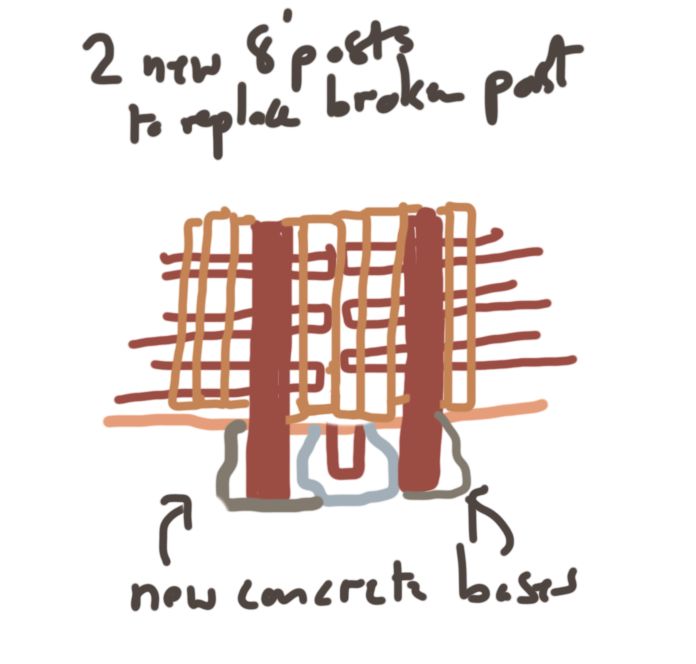
So instead I decided to install a new post on either side of the concrete plug gripping the rotted post.  Advantages:  1) save a lot of work pulling out the old post; 2) would be twice as strong; 3) much easier for attachment of panels since each panel would have its own post rather than sharing a common post.

a sketch of the solution, the old concrete base contributes to holding the new bases in position

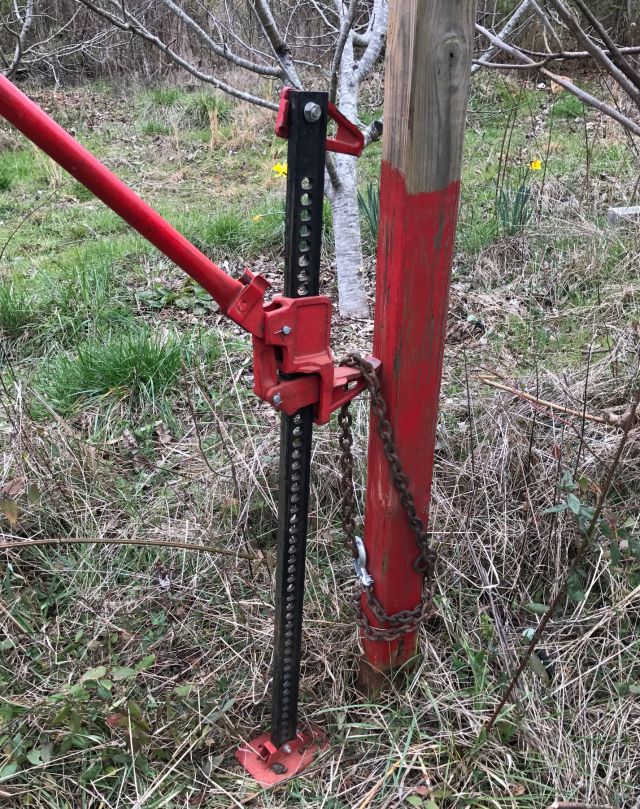
I had 2 unused 8ft posts available – each sunk 2ft into the ground but not concreted.  By pushing and pulling I could have loosened and wiggled them out but why risk the back when I have a farm jack.  With a slip hook on a chain it hauled them out of the ground easily and quickly.

this farm jack which I bought some years ago at a discount store and frequently used has proved its value

Installing the new posts was relatively easy – in addition to the clam shell post hole digger I used a long crow bar for breaking through hard patches and old saw for roots.  And I made sure to concrete above ground level with a bevel to direct water away from the post.  I bolted the panels to the replacement posts to better secure them.  And it was done.

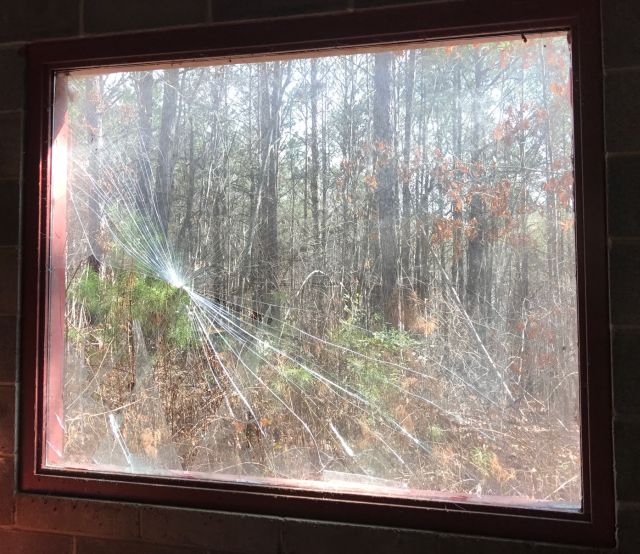
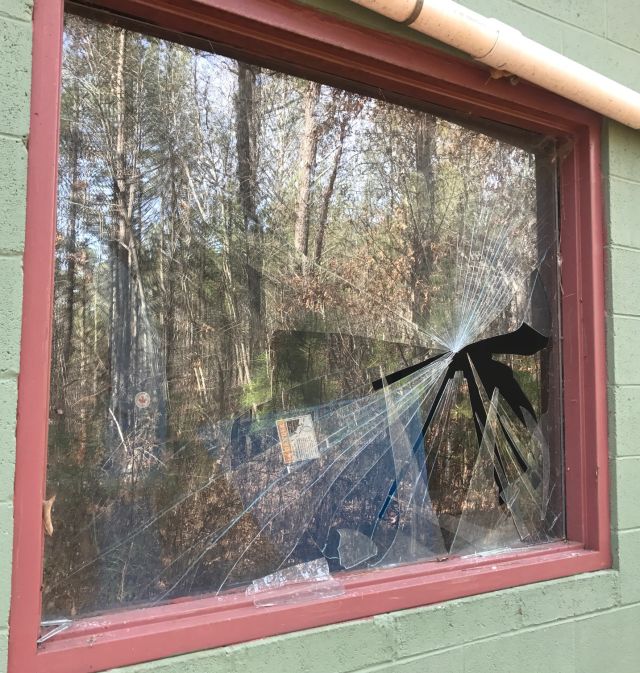
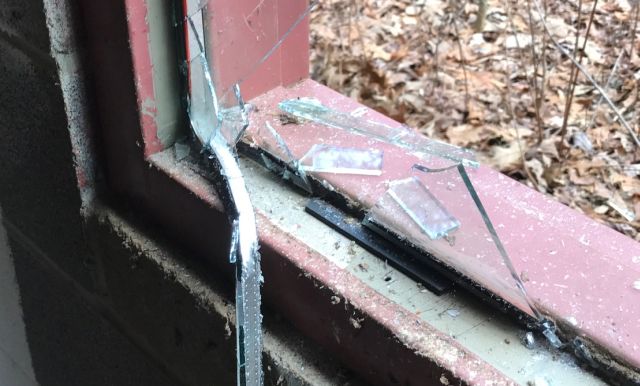
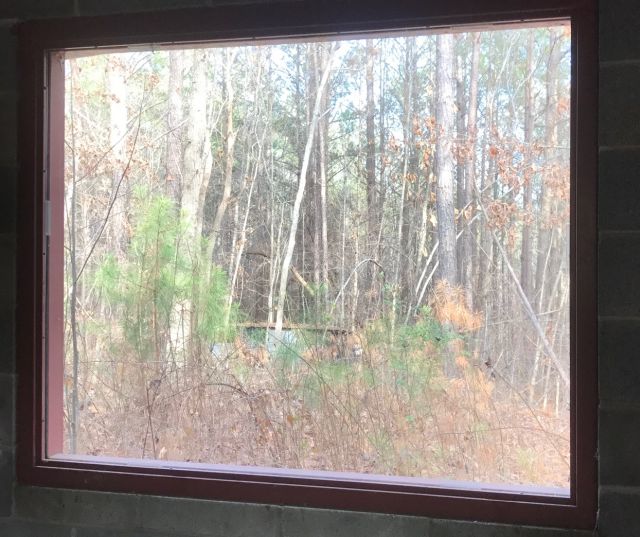
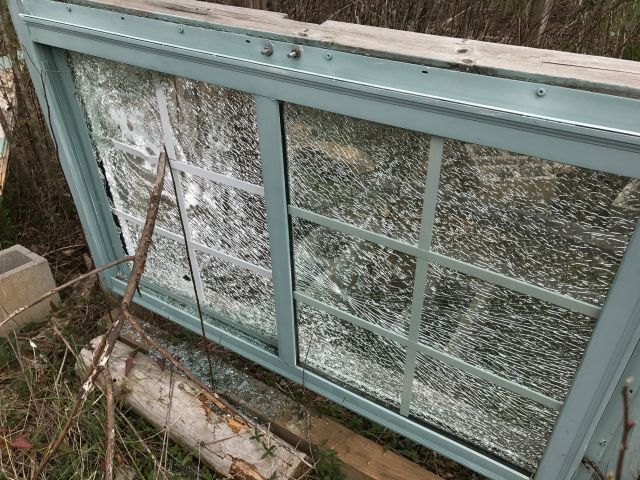
I didn’t mention my sudden motivation to repair the fence.  The fence is an outer perimeter fence and there is an inner perimeter fence and 10ft inside the latter is one of my bee hive locations.  It is shielded from the setting sun by an apple tree and from the north west wind by a glass window I purchased for a few dollars at the thrift store.  Just recently I noticed the window had been shattered either by a catapult or bb gun or maybe .22 – I mention all 3 since in a couple of spots only one of the double windows was broken and in others the projectile penetrated both windows and the frame.

the bee hive was fortuitously located elsewhere or I might have had to also deal with a toppled bee hive

  Made me think of the strategy of Giuliani, former mayor of New York City – if there are a few broken windows more will be broken.  If they are all fixed likelihood of vandalism much reduced.  So the 2 downed panels gave an aura of neglect and repair was necessary.

my wood stove

I was thinking just a few days ago, when winter abruptly descended, how efficient and useful my wood stove has been.  Over the past 3 winters it has lived up to all my expectations and provides sufficient heat for the house except in the evening before retiring when we use supplementary heat to warm the bathroom.  Coincidentally, I received an email with some questions on the wood stove (see below):

Here are some thoughts.  But first, if you are interested in the topic do read my posts, parts 1 & 2 titled “wood stove installation” dated March 2, 2014.  You can easily locate them by going to the search box and entering “wood stove”.  Part 2 ended with a functioning wood stove and gaping hole in the wall.  In my post dated July 27, 2014 (also easily located via the search box) I describe how I completed the job and include a picture of the finished product which you can also see in the picture above.

Fuel

I use wood salvaged from downed trees and my first choice is oak though I will use other hardwoods if necessary.  I never use pine for fuel, instead I add it to my contour ditches to decompose and enrich the soil.  I have a decent chainsaw and electric chain sharpener (never got the hang of doing it with a file)  and I split the wood with a maul wearing eye protection.  Splitting is generally easy unless there are knots and then it becomes a challenge and a puzzle to figure the solution.  Only once have I had to chainsaw an invincible knot infested log.  I generally cut the logs to the length of the firebox.  A few inches too long can be accommodated by inserting diagonally.  The logs in the picture below were cut in the early days and are too short.

satisfying to split firewood, takes practice to deliver the blow repeatedly at the same spot, and takes experience and luck to thwart a knot

I keep all my firewood under cover.  Beats me why  neighbors leave theirs uncovered when a tarp would make such a difference.

Smoking

Smoking is when smoke enters the room, usually when I am starting the fire or when I add fuel.  Both are easily avoided.  Before building the fire I take a single double page of newspaper and twist it as if wringing a towel and I light both ends and place at the back of the firebox in a U position.  The flames heat the flue and this will entice the smoke from the fire to go up the flue.  And when adding wood you just have to remember to open the door slowly so as n0t to distract the smoke from its journey to the flue.

Lighting

Lighting the fire has not been a challenge.  I use a short piece of duraflame quickstart – the packaging says it is “made with wax and a blend of recycled and renewable biomass fibers” and it gets the fire going.  If the wood is wet it will “smoke” as it releases moisture.  In the beginning when this was a problem I used scraps of 2×4’s (untreated) to augment the firing process.  Now all my wood has had time enough to dry.  Although not sanctioned by the manual I leave the door slightly ajar (but latched) and this boosts the firing process and when the fire has achieved momentum I lock it down.

My wood stove does not have a blower , though it is available as an option.  So to circulate the heat I use the ceiling fan, and it works well enough.

And finally, never place anything on the stove to dry.  You turn your back and you have an open fire in the living room!   Oh, I forgot, the chimney installer recommended cleaning/sweeping the chimney at least annually – which is not as difficult as with a fabricated fireplace.  You just access the chimney from the rear (see my pics in earlier post) and remove the cap at the tee and with rods and a brush snare the soot in a garbage bag.  And the wood ash and the soot go into my vegetable growing beds or compost heap. 

update – 1st blossoms, bees and goats

We had (until a few days ago) a very mild winter and blossoms on the pear and peach trees appeared early.  My Kieffer pear was the first to produce and the picture above was taken on March 1.

We have kudzu in Georgia but in the suburbs English ivy is a bigger problem and not every one wants to use glyphosate.  So in the Atlanta suburb where we also have a house, we were intrigued when we saw a temporary electric fence installed.  Our neighbors feel much the same way we do about many things and I asked them if they were renting goats.  They will be here tomorrow, come over they said and the next day we visited.  There were about 30 goats hard at work including a couple very pregnant goats.  My neighbors were hoping a goat would birth during their 2 day sojourn because then they would have naming rights.  Did not happen.  But all the ivy disappeared.  

goats at work with Great Pyrenees guard dog

The Great Pyrenees guard dog was impressive.  Big, relaxed, vigilant but suddenly he accelerated toward one end, he had spotted a threat.  False alarm or the threat decided otherwise, and he returned to his charges. 

And now to the bees.  We harvested honey last year and then my bees swarmed and I had nothing.  So this was the first winter without bees in at least 5 years.  I ordered 2 bee packages and they were available for pickup last Saturday (March 11).  Cost $86 each.  A package has 3 components – worker bees, a gently dripping can of syrup and a cage containing a queen bee.  You only order packages if you have drawn comb for the bees to immediately work on, otherwise you get a nuke which includes frames of drawn comb.  

At the pickup location we chatted with an older guy (probably early 80’s) and he said he used to keep 56 hives among his fruit trees and berries.  And they were gone.  Why were they gone?  Mites he said.  He and his wife believe that when they no longer have bees their time will be up, so he was buying 4 packages to keep them (he and his wife) going for the next year.

A risk with packages is the bees may not accept the queen.  The bees were part of a large colony and now they are confined in a package with a new different queen and if the queen is released too early and they don’t accept her, they will kill her.  So you need to keep them as separated neighbors for a few days for the bees to accept her.  I installed the packages which means I poured the bees into a hive and attached the queen cage in their midst and provided liquid food and closed them up for a few days.  A few days became 5 days because winter returned with a vengeance and we had a number of freezing days.  One hive is protected from the wind on the north and west sides by a window and boarding I installed.  The second hive has no protection.  And since the temps were headed to the low 20’s and no rain in the forecast I draped a thick furniture moving blanket over 3 sides (left the opening south side clear)  and strapped it down to secure from the wind.

temporary protection from the cold and wind

Yesterday, Thursday, I opened the hives, examined the queen cages and yes the queens looked fine, and removed the corks blocking the exits of the queen cages and the queens were released to the waiting bees.  And hopefully all will go well, though these days with bees it seems more goes wrong than just a few years ago.


better air in the country & my standby indicator

Air is generally better in the country because there is less traffic and other emissions.  Unless you are close to a power plant or farm spraying operation.  Atlanta has an air quality index and warnings are issued when the AQI veers from good/moderate to unhealthy and very unhealthy.  Because we have lots of traffic, air quality becomes a problem particularly in the warmer months when smog forms.

I can see the difference in air quality when I walk outdoors – just look at the lichens.  Lichen is a combination of fungus and algae, usually forms on trees or downed branches and trunks and is very sensitive to air quality.  For my purposes there are three basic types – a) the crusty version (crustose) which can tolerate poor air quality; b) the leafy type with lobes (foliose) which can tolerate moderate air quality; and c) the one with the little bushes (fruticose) which only survives where the air quality is good.

No surprise that in Atlanta I only see the crustose version, even when I go north to the Kennesaw Mountain National Battlefield Park where there are excellent running trails.

beautiful surroundings with many trails and streams, but not much lichen

But head further north to the foothills of Appalachia to my little place, and there it is.

it begins with the crusty form but already you can see lobes developing
and then it takes off into the third dimension with little bushes appearing

Wouldn’t it be nice to have good air quality where we live and exercise.


Georgia Organics conference – Feb 17/18 – 2017

Past Friday and Saturday I was at the GO conference.  Friday morning we visited a farm (Emory Oxford College organic farm) about 20 miles east of Atlanta.  The farm has CSA’s and provides food for the campus.  The 2 managers were friendly and experienced and we also listened to the narratives of college interns and volunteers.  There is an impressive barn building on concrete pad where the harvest is cleaned and refrigerated and tractors and equipment serviced.

a drainage trench for the clay soil

I learned a little about commercial organic growing – there is no room for error.  A bug in lettuce can lose a customer or a restaurant contract.  Therefore the aphid infestation in the lovely lettuce in the hoop house meant just one thing – into the compost heap.  I would have washed and enjoyed.  As to why the lettuce was infested – the problem wasn’t identified early enough and in warm humid conditions too much nitrogen produces rapid growth and a buffet for insects. 

the 11 acre farm is in a small town. Drip lines are used for irrigation.

That afternoon I attended an excellent workshop on Cool Season Vegetables under High Tunnels.  High tunnels are popular with commercial organic growers and one speaker, whose farm I visited several years ago, now has 28 structures.  Increasing temperatures mean less growing in the hottest months, but the high tunnel extends the season to enable more growing in the other 3 seasons.  Because the crops are not exposed to rain and receive just enough water for their needs there is little leaching which means that too much nitrogen rather than too little, becomes the problem – hence the lettuce infestation.  Constant observation and timely management is essential as is adequate ventilation and shade cloth in the summer.   Most growing is with transplants.  Automated irrigation is used extensively including fertigation where water soluble fertilizers and amendments are passed through the irrigation system.  Solarization with clear plastic, to burn up weed seeds and diseases is often performed followed first with carrots, which take a long time to germinate.  And lots of soil fertility tests or plant tissue tests.  And cover crops when there is a 1-2 month window, which is infrequent.  I do not think I will need a high tunnel for my limited growing needs, especially with milder winters – my turnips and some other greens to date have been unscathed by winter.

A good lecture on the World of Organic Inputs.  Again, need for soil tests stressed.  I was surprised how much the commercial growers buy inputs and even compost.  I try to be self sufficient and rarely buy any inputs for growing – seed starter mix, peat for the pot soil, and sulfur for the blue berries excepted.  However professional farmers focus on growing and depend on other specialists for their inputs.  My growing operation revolves around my compost but most professionals buy their compost.  Apparently a concern that bad compost can jeopardize their organic certification.  Bad such as prohibited drugs in animal manure or cides in grasses used to make compost, or compost not reaching high enough temperatures and therefore carry over problems.  We were told phosphorous would probably be ok but to focus on potassium (for disease resistance and stress) which is mobile and prone to leaching, and also on calcium (for cell walls and root tips).  We should avoid dolomitic lime because it provides magnesium and we may already have too much magnesium.   Soil tests!

Next was Farm Generated Innovations. The 2 speakers described some of their innovations which were imaginative and resourceful.  And they referenced a website farmhack.org which describes itself as  “a community of collaborators interested in developing and sharing open-source tools for a resilient agriculture”.  Well worth visiting.

Then a lecture on trellising – why we do it and different materials and strategies.  And then a sobering lecture on mistakes and challenges.

Followed Saturday evening with the Farmers Feast prepared by top Atlanta chefs and an attention grabbing lyrical overview of the life of the farmer by the guest speaker, BB Taylor.  You can tell an address is good when, without prompting the >1,000 attendees without hushing gradually stop talking among themselves and tune in to the words.  Overall, a most enjoyable 2 day event.

replacing a glass window

My tractor building has roll-up door on one end and a 4×5 ft window at the other end.  It is insulated glass in a steel frame.  And has been fine until yesterday when I backed my Case tractor with pto chipper into it, and it shattered.

Up till then I had a good morning.  My bobcat started instantly and I turned the compost heap and then I chipped a lot of small trees and branches.  And feeling good about everything I then reversed my chipper through the window.  I designed the building to accommodate a tractor.  Then because I am lazy I left the chipper attached.  But even then there was 10 ft to spare. But now I also put the bobcat into the building with its bucket neatly slotted into the tractor’s bucket and a total of 3 inches to spare.  But 3 inches is insufficient margin when you are tired and edging back  a 9,000 lb old workhorse (Case IH 585 plus bucket plus chipper plus water filled tires).

picture from outside showing steel frame.  the white pipe above the window transfers rainwater from the gutter on one side of the building to the storage tank on the other side

So what to do?  I have not been successful cutting glass and decided rather than do it myself to call a professional.  I tried 3 local outfits which all had decent websites.  I sent a pic (see above) to one and they said $589 with 50% upfront deposit.  Another estimated $340 for plate glass and $370 for tempered glass, 0.25″ thick, but there was a wait of at least 2 weeks.   The third estimated $365 and a 3 day wait.  The 2nd and 3rd quotes did not see a pic of the window and I was concerned that their cost would be higher.

So I decided to research.  What about acrylic rather than glass?  I learned the pros and cons of plexiglass vs glass.  Glass is cheaper, scratch resistant, easier to recycle.  Plexiglass is more transparent (lets thro more light), lighter, more resistant to breaking and shattering and easier to work with.  I became interested in plexiglass.  An internet provider could cut plexiglass to my dimensions to .0625″ accuracy for $180.  But shipping was an additional $125.  I asked if I could pickup from their Atlanta location and avoid the delivery charge, but did not hear back.  I web visited Lowes and HD,  and HD had 4×8 ft acrylic sheet 0.25″ thick for $185.  I would have to do the cutting myself.  I googled how to cut plexiglass and different methods were suggested.  I decided to use my circular saw with fine tooth blade and a straight edge secured with G-clamps to guide the saw.

This morning at HD I bought 4×8 ft plywood sheeting 19/32″ ($20) and the 4×8 ft acrylic 0.25″ thick sheet ($185) and a 7.25″ 140 teeth circular saw blade ($6) – all before taxes.  And got to work.

First to remove the broken glass.  With thick gloves and eye protection I was still disconcerted when the glass would suddenly shatter and spray.  So with an 8 ft 4×4 I just smashed out the glass.  Removing rusted Phillips screws, which secured steel u-channels holding glass in frame, was initially difficult.  Then I figured a solution – full weight on heavy portable drill with newly inserted Phillips driver heads and quick nudges on the trigger got them turning.

you can see the spacer which separated the two panes of glass

The metal u-channels were wedged in tightly but with patience they came out and the remaining glass shards and the spacer which separated the original 2 panes of glass.

I cautiously approached the cutting of the acrylic sheet.  How this one 4×8 ft 0.25″ acrylic sheet could cost $185 (before taxes) boggled my mind.  Since I only had one chance to get it right, I didn’t want to mess up.  The metal frame measured 48 & 1/16″ by 60 & 1/16″.  The acrylic sheet was 48 & 1/16″ wide.  So I pre-cut some surplus wood panel to 48″ but it didn’t fit.  I know the recommendation is to deduct 1/8″ from width and length.  But I also wanted room for expansion in summer.  The u-channels are 0.5″ high, so with all this considered, I decided to cut to 47.75″ by 59.75″.  But first I practiced on surplus plexiglass and then after lots of scratchings and calculations, I went for it.  And it fitted just right. 

I had to ground down each end of the 4 u-channels so they could fit comfortably in the frame

However the u-channels were too tight to fit so I ground down each end on my grinder.  I added some spacers between the u-channels and the acrylic.  All that remains is to seal the acrylic edges with silicone and add permanent spacers.  And remove all the broken glass which according to an online calculator weighs 120 lbs.  Broken on Monday and replaced on Tuesday, with a significant cost saving, some satisfaction, and a more resilient solution.

the acrylic replacement is very clear

And for the time being I fitted the bobcat closer to the tractor by placing its bucket above the tractor’s bucket rather than inside it.  But I will detach the pto shredder from the tractor and store it elsewhere so I have more space in the building.

you can spot the pto shredder at the rear of the tractor

tomato plants

Each year around this time I start my tomato plants.  For germination I use 3/4″ soil blocks (purchased seed starter mix) and incubate, and once germinated I transfer to 2″ soil blocks in my greenhouse and  later into 32 oz bottom drilled yogurt containers.  I have described the procedures in detail elsewhere on this site.  With each passing year I have become more casual with the mix for the 2″ soil blocks and yogurt containers.  I used to carefully measure out the different ingredients.  Now I just sift ground soil, fully broken down compost and peat, and then add some lime to compensate for peat acidity.  And they do well.

Of more interest is the varieties.  Previously, most of my seed was from Johnny’s but last year I bartered 6 plants for one of my neighbor’s Park’s Whoppers.  This outstanding producer was disease resistant and was the first and last to bear tomatoes.   Taste was not as good as my heirlooms but you can’t have everything!  So I decided to buy more from Park Seed and this January I bought their Whopper; Black Krim Organic; German Johnson; Cherokee Purple Organic and Chocolate Cherry.   I also used Johnny’s Black Cherry and Cherokee Purple purchased Jan ’15.  And also seed collected from my plantings – Oxheart; Sugar Cherry and Juliette.  I seeded Jan 24 and almost all the seed germinated.  My collected seed may have been cross-pollinated and may not run true.  But it’s fun to experiment and see what does well.

The photo above is of one of my 2 seed trays and holds 36 – 2″ seed blocks.  It’s on 3/4″ plywood base which protects the tray when I move it.  Since my greenhouse  is not heated I bring the tray in when temp is projected below 35 degrees, as it is tonight.  I have a min/max thermometer in the greenhouse and I leave the other, less important, tray in the greenhouse so I can observe the effect of sub freezing temps.  It seems when the plant is <1″ high it is unaffected down to the mid 20’s.   I will probably start up another batch of tomatoes in March to see, if by replacing the plants, I can achieve a longer harvest.

tire puncture repair

As a kid I repaired bicycle tire flats – check the tire stem is not leaking, remove tire, remove inner tube, pump and locate hole, buff the area around the puncture, apply glue, allow to tack, apply patch, reinstall inner tube and tire, and you are good to go.

The tires on my lawn tractor are bigger and wider and removing the rim/bead is more difficult.   The treads are worn and all 4 tires should be replaced.  The right rear tire is always flat.  I have a portable compressor (see above picture) so it is simple to inflate the tire every 4 weeks or so when I need to mow.  Time for a fix I thought and since I have never inserted a plug I decided to give it a try.

From the noise of the escaping air it was easy to locate the hole in the sidewall.  Mechanics will not repair the sidewall of a car tire but since my lawn tractor has a maximum speed of 5mph and I sit just a few feet off the ground, I decided to go ahead. 

the repair kit contains a rasper tool, a plugger tool, 3 plugs and rubber cement

The instructions are straight forward.

simple instructions, however using the rasp tool and the plugger tool require directed force

After plugging the sidewall I pumped the tire and decided to check back the next day.  Tire was flat.  I was puzzled – 3 possibilities – leakage through stem, leakage through repair, another puncture somewhere else.  Escaping air was not audible so I applied soapy water and discovered 2 punctures in the tread.  In for a penny, in for a pound I thought and plugged the other 2 holes and repumped.  A day later the tire was still fine.  Problem solved.  All that remains is to cut excess plug material flush with tire and see how well my repairs hold up with use.

the two tread plugs and one sidewall plug can be seen

how to produce a 3d picture

I have taken several MOOCs (internet courses)  given by University of Illinois on 3D printing and the most recent was on 3D printing software.  The software, which was free to students, was provided by Autodesk and included Sketchbook (for sketching), Tinkercad (an easy to use CAD design tool) and Fusion 360 (sophisticated computer design, modeling, etc. software). 

Tinkercad and Fusion 360 convert ideas into 3D models.  Scanning creates a 3D model from a physical object such as if you wished to make a replacement part or copy an artifact in a museum or a miniature bust of friends.  Once you have the 3D model you create a physical replica by  printing it with a 3D printer.  The scan can be made with sophisticated structured light scanners or by photogrammetry using photographs taken with a regular camera.  I will outline how I proceeded with my iPhone, but to do it yourself you should take the course, which is free, or $79 if you wish to participate in the assignments and earn a certificate, which is what I did.

The picture at the top of the post shows the rooster model which I scanned to produce a 3D print.  If you follow this link – 

you will see the 3D model I produced.  You can rotate and look at from all directions.

I took 44 pictures of the rooster with my iphone from all angles except from underneath.  Important not to move the rooster or change the lighting or lens zoom, so that the software which stitches all the pics together can use the constant background to figure from where the pics were taken.  Since I could not take pics from below, the bottom of the model appears unfinished.

I uploaded the pics to Agisoft Photoscan Pro, which is available free for 30 day trial.  There are several steps  – align the photos, build a sparse point cloud, delete extraneous background, build a dense point cloud, delete extraneous material, build a mesh and build texture.  I then exported to NetFabb for more procedures and then exported to Sketchfab where I published it, which means it can be seen by anyone with the internet link.

The MOOC was fun (relatively easy assignments) and interesting and I will use the techniques for my own 3D printer.

remember your undersink water filter

In July 1998 I installed an undersink filter.  I know the date because I kept the original installation instructions.  I remember the accompanying written warning but paid little attention:  “To prevent costly repairs or possible water damage we strongly recommend that the housing be replaced periodically: every five years for clear tanks, and every ten years for opaque tanks.  If your housing has been in use for more than the recommended period, it should be replaced immediately”.

Imagine my surprise and dismay in November 2016 when, upon returning to the house, we noticed water in the garage coming from the entrance way which leads to the kitchen, and the kitchen and most of the dining room floors covered with water.  Yup, as the above picture shows, the bottom of one of the housings had separated and its failure produced a mini flood.

Busy I was with a commercial carpet cleaner vacuuming up the water on a non stop basis for several hours.  Then with fans and the heaters to dry the carpets.  Over the next 24 hours we were reasonably successful, except for the entrance where the underlay and the concrete floor were so wet they stayed damp and began to smell.  I lifted the carpet and underlay/pad and continued heating the area until the foundation had dried.  Then installed a new underlay and re-installed the carpet.  So normalcy returned and we were fortunate we had carpet and tile rather than wood floors.

My communications with the manufacturers made little headway.  The new housings they carried would not fit the old base so they could not offer a goodwill replacement.  And they courteously reminded me of the warning to replace the housing within 10 years of installation.  I could not argue.

I bought a new undersink filter with just a single cartridge.  We had previously needed a 2 cartridge system but with sediment no longer an issue, a high quality chlorine eliminator filter was all that was needed.  And the water bill for that month showed unusual usage of close to 1,000 gallons.  So, if you have an undersink filter, remember to replace the housings timely.