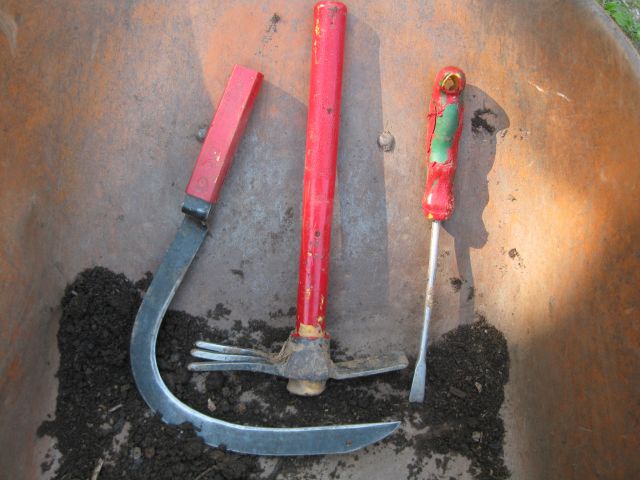
I use several hand tools for my weeding and mulching operations. They are easily misplaced in the high grass and surrounding weeds and not discovered until, accidentally, days later. It occurred to me that a cause was their lack of distinctiveness (blame the tools not the workman). Their handles are either natural wood color, yellow or, the logic for this beats me, green. So, easily camouflaged. The solution was a small pot of cherry red paint and now, with their distinctive coloring, they come easily to hand.
my red painted hand tools – the green colored weeder however, is resisting this solution
Pump timer
When I established my irrigation system I thought it would be neat to have an automated process with the pump starting and stopping at given times whether I was there or not. So I incorporated a digital timing system which produces a low volt output when switched on which was connected to a relay which switched on the 110 volt circuit to power the pump.
the previous timer – overkill and unnecessarily complex
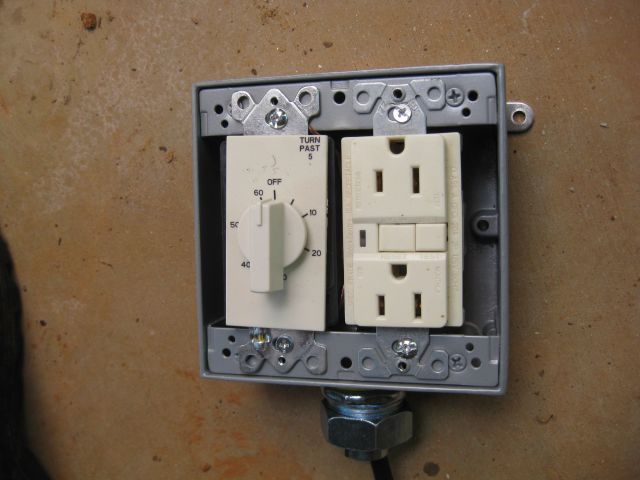
For the past year I have been manually starting the timer and mainly hand watering and the timer would switch off after the set period. The timer no longer works and I really don’t need a 4 station device when I am pumping only one line. Rather then buy another digital timer with surplus features which could fail, I decided to buy a simple mechanical timer like you see in some hotel bathrooms. Since it is a simple timing device it is unlikely to fail soon and its output is 110 volts so the circuitry is simplified. I bought a double gang box and wired it to a 3 prong outlet – and it works great. No longer do I have to press several buttons on the digital timer, I simply turn the timer handle to the desired time period and the pump starts up.
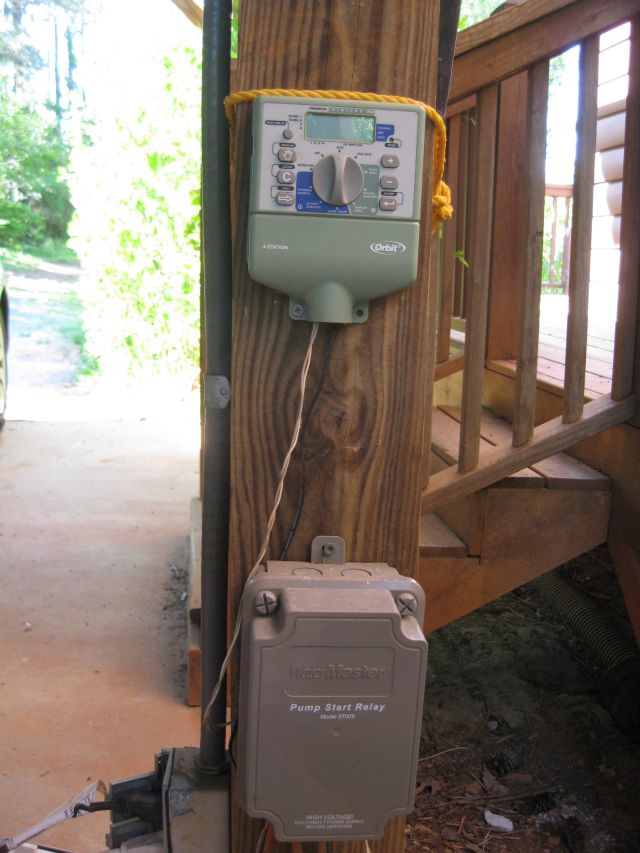
the new timer – all it needs is a cover plate and to be mounted on the post
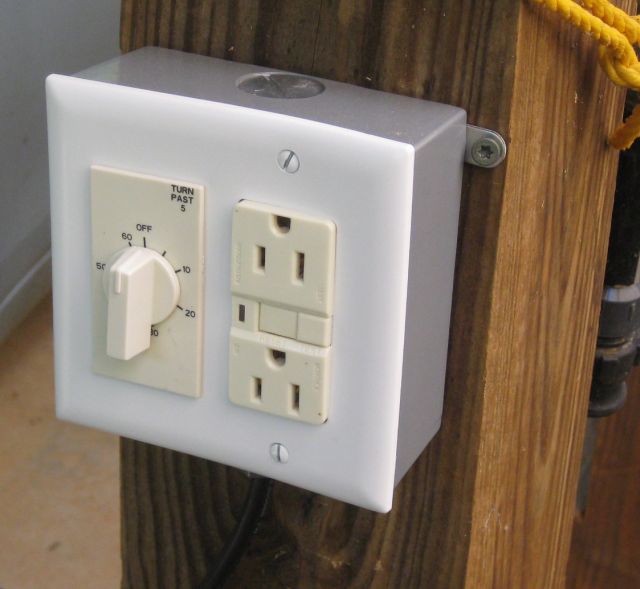
And here is the finished product
the timer with cover plate mounted on a post in the carport
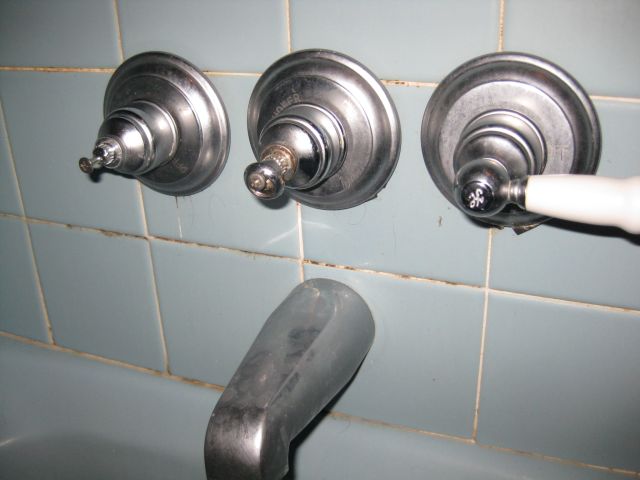
I do not promote brands or permit advertising on my site. But when credit is due – I give it. Some 10- 15 years ago I replaced two defective bath tub/shower faucets which had washer valves with new identical faucets which used ceramic valves. Coincidentally both developed problems in the past few months. I did not have receipts but knew I had purchased them from Home Depot.
The first problem was a dripping faucet which needed a new ceramic valve – cost about $6. I am always interested in how companies service their customers so I decided to pursue this with HD. I was placed in touch with the Store Support Center, Resolution Expediter, who requested 4 photos of the faucet to identify the brand and model. Within a few days the parts arrived and the leak was fixed.
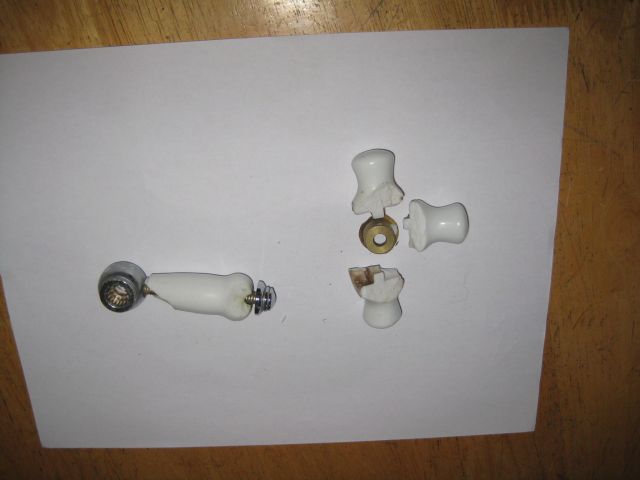
The second problem with the other faucet was that the ceramic handles on the faucet had broken – don’t ask me how, this is my son’s bathroom. The replacement parts would have cost >$50 and would not have matched exactly. Knowing the drill and whom to contact it was a quick process to snap 4 photos and email them off – see below.
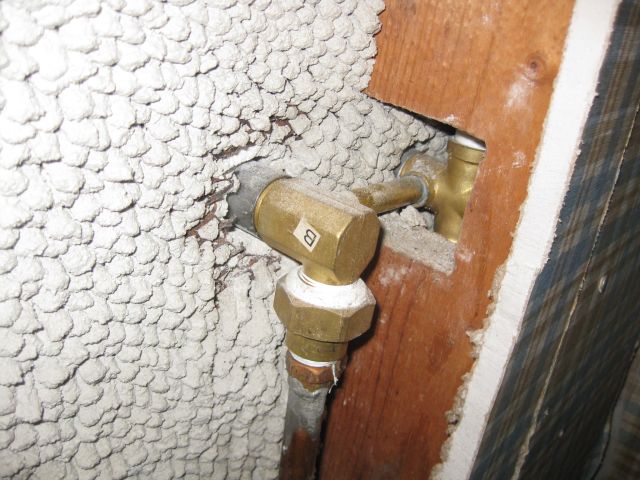
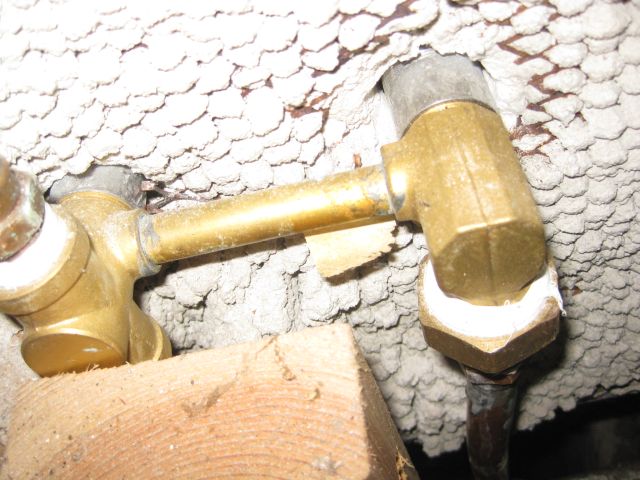
faucet in bathroom – front view – the broken parts are the left handle and the center mixer handlefaucet in bathroom – left rear viewfaucet in bathroom – right rear viewthe broken parts which I wished to replace
When I originally installed the faucets I had to cut out a rear access panel which I had screwed into place when the job was done, so it was easy to remove the panel and snap the rear photos. Two days after my email I received a call saying they had identified the faucet and I would receive replacements within 6 business days. In the event, I received the replacement parts within a week of my emailing the photos, talk about service. The parts matched exactly and a couple of extras were included as well.
An effortless, costless repair which leaves a good feeling toward a major retailer.
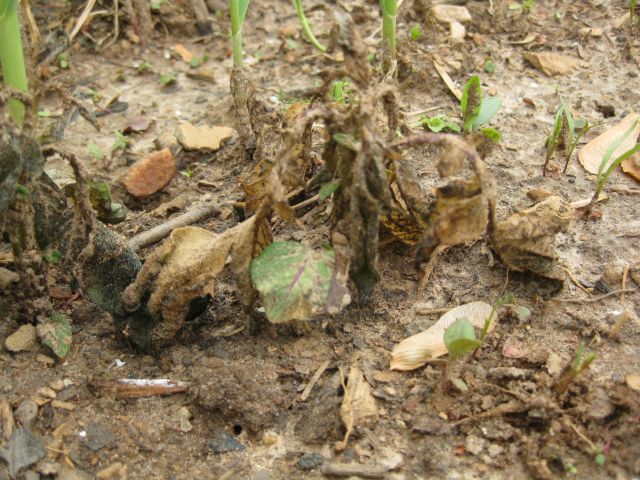
The average date for last spring freeze where I grow should be after March 30 and before April 10 based on a map provided by the National Weather Service. On April 16 the temperature in our area fell to 30 deg F and caused some damage. The potato plants suffered – the volunteers on the ground surface were almost wiped out –
freeze damaged potato plant
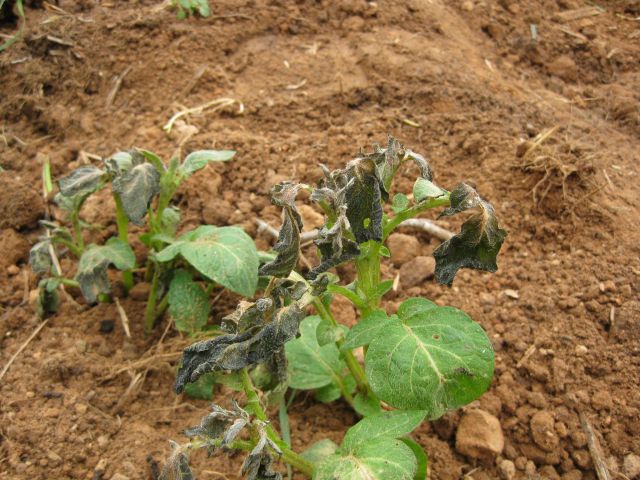
While the potatoes I had planted in a trench had less extensive damage –
potato plant in trench showing some freeze damage
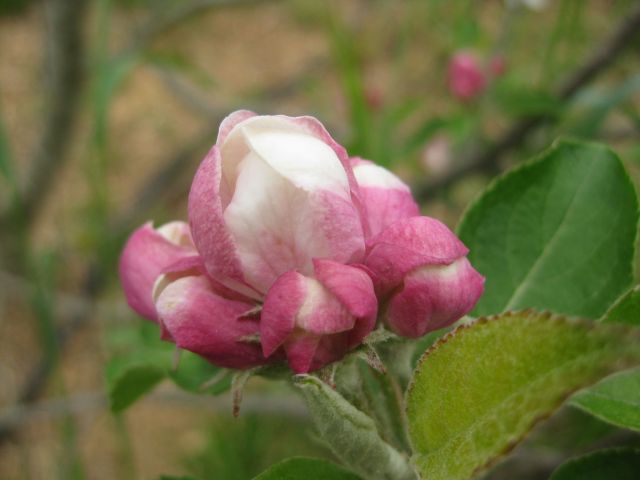
I was concerned about my apple trees some of which are in blossom but they seem fine –
this apple blossom a couple of days after the freeze was unaffectedand this apple blossom seems happy too
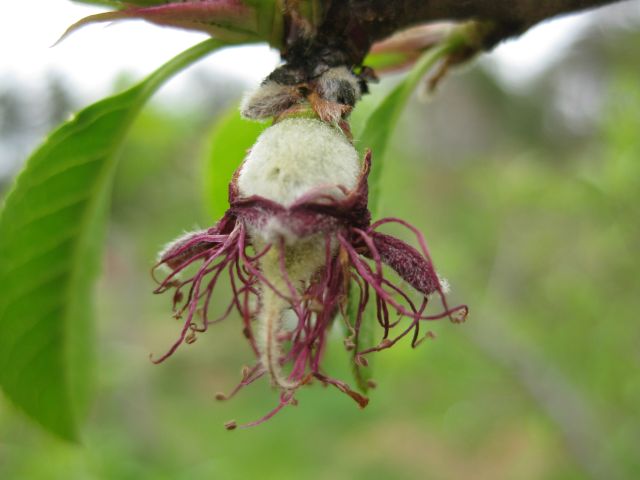
But there were many signs elsewhere of freeze damage such as kale plants showing whitened or yellowed leaves. My pears and peach had already blossomed and set so they were past danger.
usually my peaches are nailed by late frosts/freezes but this time the freeze was too late and this will be a peach in the summer
And my blueberries appear unaffected, tho some gardeners in Atlanta complained of damage. And my muscadine are now accelerating growth.
muscadine are hardy, greening well and with long growing horizontal roots seem to do well anywhere in this area
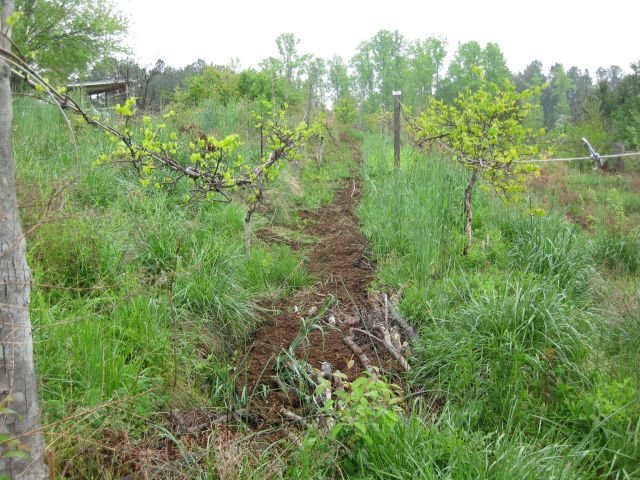
Black locust
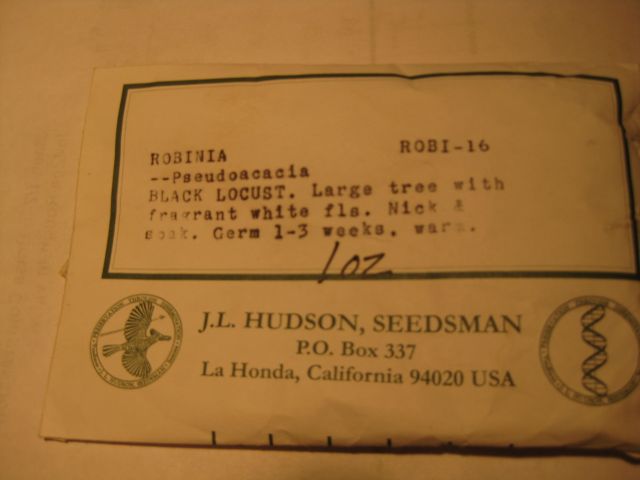
A couple years ago I bought Black Locust seed and germinated 10 seeds. I decided a few weeks ago to transplant the saplings to my orchard where I am increasing the diversity. The roots fix nitrogen and the tree is popular with bees. There must have been 100 seeds in the packet I received.
my source for unusual seeds including recently quinoa, stinging nettle, epizote and 3 varieties of Amarinthe
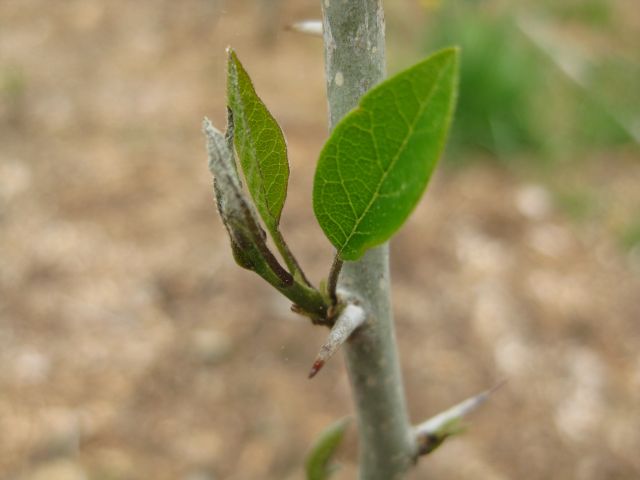
I decided to try germinating more black locust since I have spots on the hill which I seldom visit where they will thrive. The “seldom visit” caveat is important – they have nasty thorns as you can see on this young specimen.
Young black locust with thorny protection
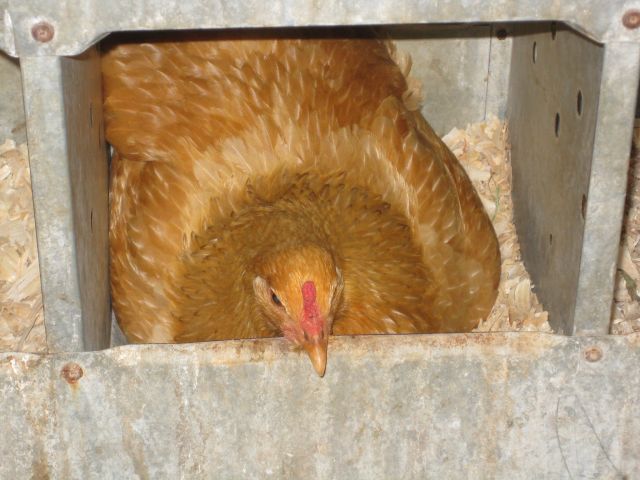
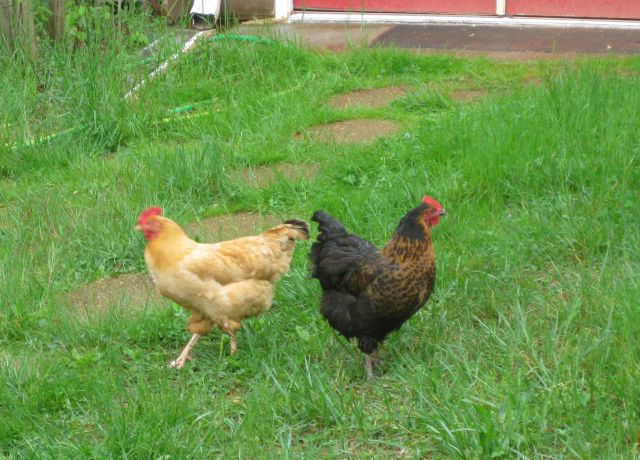
Broody hen
I have kept chicken for several years but this was my first encounter with a broody hen.
broody hen
She refused to leave the eggs she was guarding, pecked sharply, fluffed out her feathers and made an unusual warning sound. I was undecided what to do. Part of me recognized this is natural and far more natural than incubating the eggs which I have done successfully on two occasions. But there were other considerations. When I incubated the eggs four viable chicken of which one was a rooster, were produced each time. I was lucky there were only two roosters and doubly lucky that a nearby farm agreed to take them both and I now see them in the field whenever I drive past the farm. But what to do with more roosters? Our one rooster takes good care of his 10 hens and a 2nd rooster will create considerable stress as occurred previously. A second factor is the hen is the daughter of the rooster and the eggs she was sitting on were hers or her sisters so with this inbreeding there is an increased likelihood of non viable chicken. In the end I removed the broody hen from the 5 eggs she was guarding and cracked them open over the compost heap. Four of the 5 eggs would have produced chicken – my bad – I should not have waited as long as I did. I temporarily separated the broody hen but as soon as I released her she gobbled down some food and headed to the nest box to sit on more eggs. I shall have to keep an eye on her and remove her from the eggs each day until the habit is broken.
Other hen news
Two of the hens are fliers and wanderers. They have discovered the grass is greener on the other side and they regularly fly over the 5ft fence. The first to do so was the black hen who we call Wanda being a wanderer and the second is named Randa.
Wanda and Randa
The cold weather did not affect the chicken except that the points of the rooster’s comb turned black. I massaged them with vaseline – since he has fierce spurs you have to grab him quickly when he is eating and grip him between the knees – he seemed to appreciate the ministrations and quickly forgot the indignity when released. When spring arrived the black tips either fell off or were removed by one of the hens. He now has a rounded comb.
rooster with rounded comb
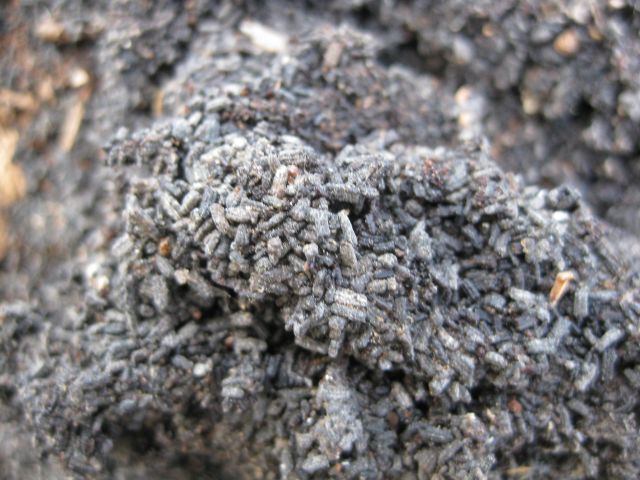
Frass
Frass is poop of insects. In this case the larva of the wax moths which colonized the honey frames I put into storage. I had placed the honey frames in contractor grade black bags securely tied. Didn’t help. What I should have done was to freeze the frames and then place in storage – next time. The black bags were ripped in many places and the wax on the frames mainly gone and replaced with black frass on the lowest surface. The frass I collected and added to the compost heap, maybe it will do some good there.
frass derived from wax and honey
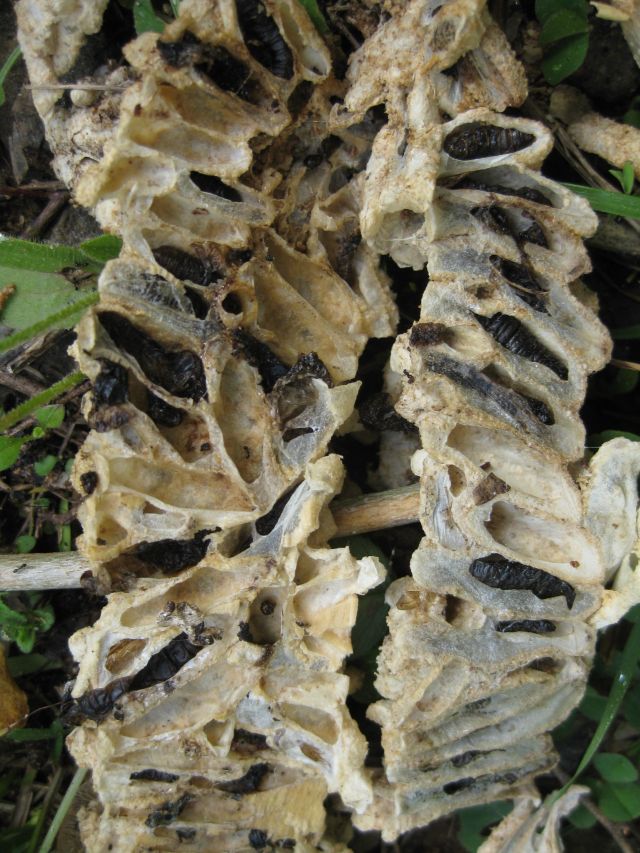
The frames were covered with cocoons and in each one there was a black slug, maybe from the larva as it grew – reminded me of a belt for machine gun bullets.
underside of larva cocoons scraped off my honey frames
I removed the plastic foundation from the frames and spent considerable time scraping and scrubbing them clean. I decided to discard some of the badly damaged wood frames.
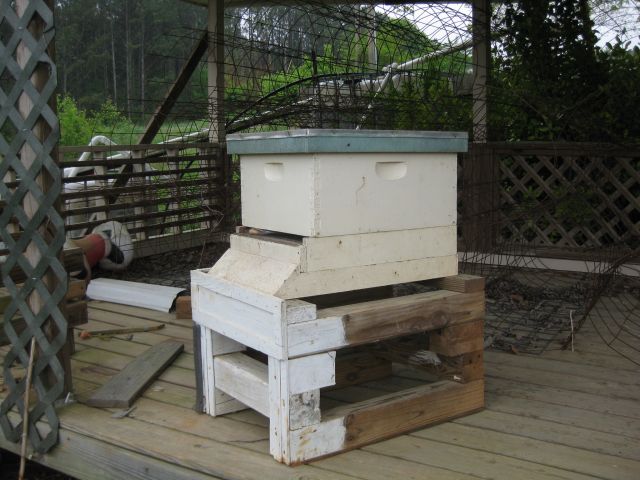
I used a salvaged deep, 9 frames and foundation to make a swarm lure hive. I bought swarm lure last year and had a couple surplus refrigerated vials. I added the contents of one vial to a small piece of paper towel inserted in a small ziplock bag held open by a stone at one end. Hopefully this hive will attract a swarm.
The occasional cold temperatures in March dissuaded the plants from growing. This was evident from an experiment with peas. I moistened the peas and those which appeared to be growing the fastest I planted outdoors and the remainder I planted in a soil container in the greenhouse. Until a week ago very few of the peas planted outdoors had broken surface. Those in the greenhouse grew steadily. Today I transplanted the greenhouse peas.
the pea plant on the left was planted in March, on the right are two siblings from the greenhouse planted today
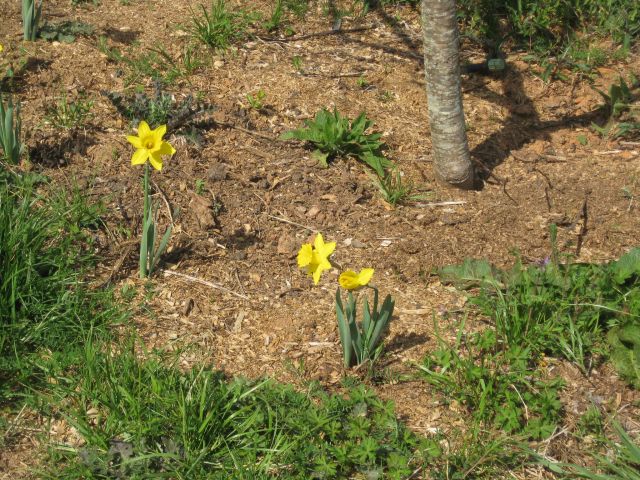
Of course the daffodils are out and my comfrey plants have surfaced from the root fragments I planted in December.
the comfrey is the small plant to the left of the apple tree trunk
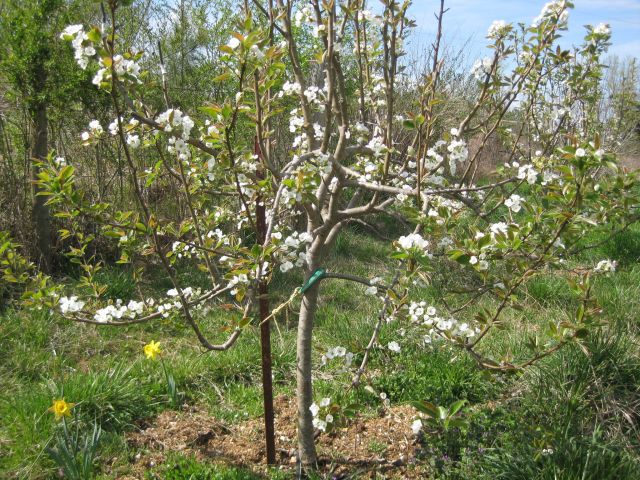
The pear and peach trees are the first to blossom – here is a well bedecked pear tree.
white blossomed pear tree
A couple days ago I again sprayed the trunks of the fruit trees, but not the blossoms, with neem oil and will keep a good look out for pests. I probably mentioned that my bees survived the winter. They are now very active together with many other types of pollinators.
busy bees arriving and departing
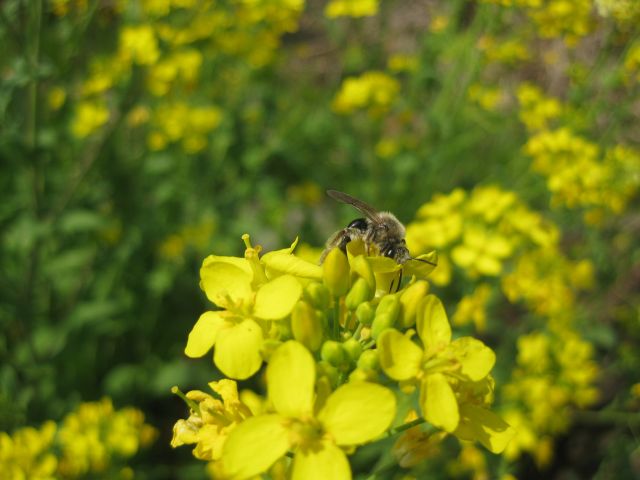
The precocious kid next door looked at them and said “buzzy bees” and then with a smile looked at me and said “get it?” Some of the greens are flowering.
a mass of yellow flowers beckoning pollinators
And if you step closer you see the pollinators.
a bee at work
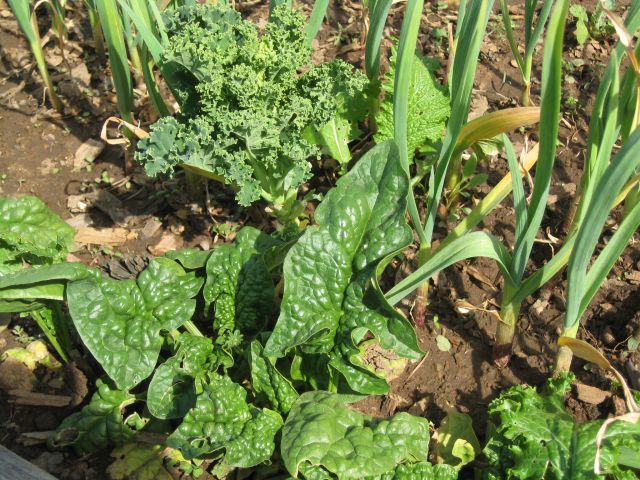
The spinach, kale, mustard and garlic are now beginning to grow.
spinach kale and garlic are stepping up, all are transplants
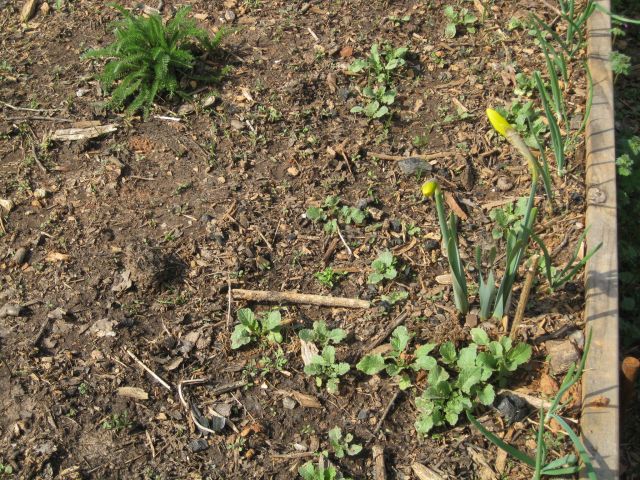
Of the vegetables seeded this year, the radishes are doing best. Here they can be seen with yarrow and some daffodils to add cheer to the scene.
a sparse array, though many other vegetables such as lettuce and collard have now germinated in the soil
Last year I grew yarrow from seed and it did so well in January I took root segments and planted them in each of the raised beds. They have all surfaced and are growing well. Plus the many onion bulbs I planted out in January. I will replant the daffodils. A big annual event for me is releasing the ladybirds. For whatever reason each year they hibernate in the one bathroom – they disappear in the crevices and then suddenly one day, there they are. I collect them by tipping/knocking them into a yogurt container and then I cap the container and walk them to the vegetable area. The photo below is horribly blurred but I kept it since it records the date the ladybirds arrived – all of them within a two day period.
some of the ladybirds in a yogurt container
I made 5 trips and with approx 20 ladybirds in each container, I guess I added 100 beneficials and I was pleased to see one of them this morning sunning on a leaf.
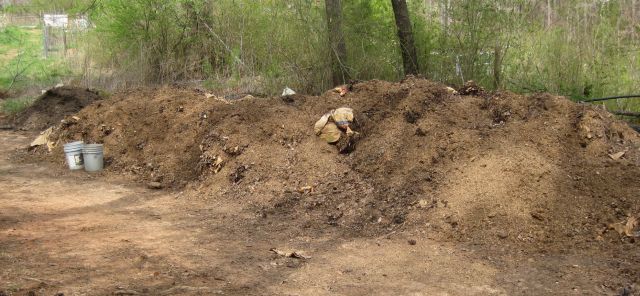
I built a large compost heap this year from approximately 200 leaf bags. I previously commented that I have too much brown and too little green ingredients, so I added horse manure which comes with straw to help balance it out.
assembled compost heap – it should be ready by August and then look like the finished heap at the end
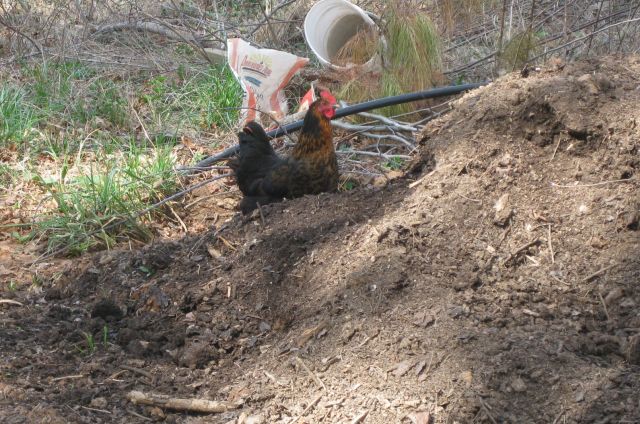
And the chicken are producing – an average of 8 eggs a day from 10 hens two of which are seniors. Two of the younger hens frequently fly over the paddock fencing to explore and feed. Today I noticed Wanda (abbreviated from wanderer) had discovered the compost heap. She is the daughter of our Buff Orpington rooster and her mum is a New Jersey giant. The only trace of dad is the gold coloring on her neck.
It takes some skill to see or observe things and then a lot more experience and skill to interpret what you see. With me it is a drawn out journey. There were signs along the way which I ignored and am only now, with hindsight, piecing together. I remember when I purchased the land some 4 years ago and my sceptical neighbor, now deceased, wagered his tomatoes would outgrow mine. And in that first year I had the most amazing huge tomatoes and he admitted, sheepishly that he had snuck in to take a few baseball sized specimens to give to a friend who lamented (until he received the gift) that the days of really good tomatoes were past. That was my first year and, altho I subsequently religiously rotated growing areas and weeded and watered, I never replicated those first heady moments when the harvest was unceasing and delicious.
Never, until last year when if you go to my 8/22/13 post you will see that I marveled at the prodigious production of a single 4ft sq. raised bed. Marveled, but never stopped to consider why!
A few weeks ago I read again about compost teas and decided to head down this road and purchased Teaming with Microbes by Lowenfels, which discusses compost teas and intelligibly leads the reader through the soil web and bacteria and fungi. And as I read I concluded that my compost, which in my untutored opinion was excellent, was really deficient because its components are mainly (90%) comprised of brown material such as leaves and woodchips and minimal green materials. So as I read further I realized my compost is best suited for shrubs and trees and not for vegetables. And then the penny clicked! In my first year I had used compost from our Atlanta house which has a 50:50 ratio of brown and green (the green is grass cuttings from our lawn – at the farm there are no grass cuttings). And then I also remembered that the 4ft sq raised bed which performed so stellarly last year had also incorporated compost from the Atlanta house. So I asked myself – could the solution be in the compost I was using? I decided on two steps – use Atlanta compost to make compost tea for the raised beds to try upgrade the compost in place, and use Atlanta compost for the future tomato growing areas. Such usage required negotiation with the Atlanta compost maker and the logic I am using is that my farm prepared fungal dominated compost is better suited for the roses and shrubs that dominate the Atlanta garden than the bacteria dominated compost which I will accept in exchange and use on the vegetables for our common benefit.
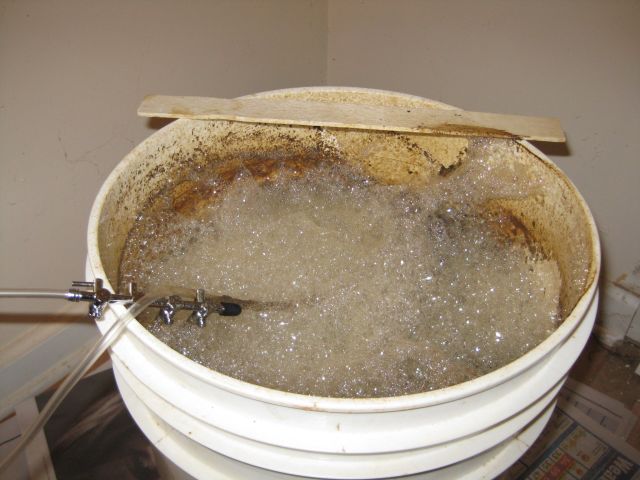
Compost tea
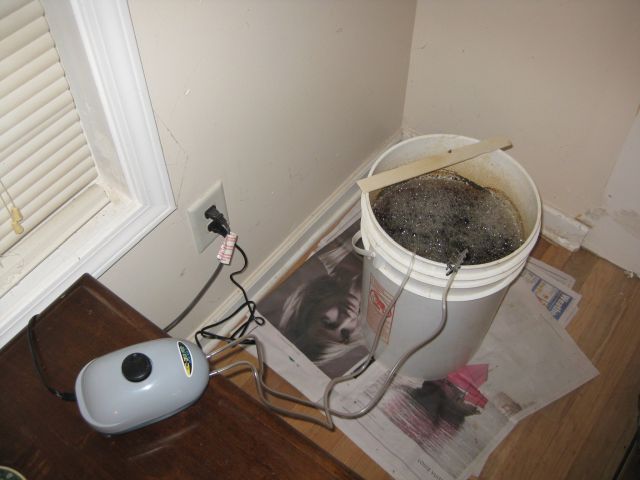
To simply add compost to water will fail. Bacteria, the good guys, need air to survive so you have to add air to the water and this is done using an aquarium pump connected with tubing to “stones” pinned by real stones to the bottom of the 5 gal container which is filled with (in my case) well water maintained at a reasonable temperature. Chlorinated utility water will kill off the bacteria. I then add 2 quarts of Atlanta compost. So the bacteria are now receiving air and will survive and hang out in the compost unless induced to leave. And the daily bribe is 2 tablespoonfuls of molasses, diluted in warm water and added to the brew.
compost making operation – aquarium air pump, tubing to the stones and 5 gal container
Such is the logic, and formation of bubbles and brown/black slime is supposed to evidence the proliferation of bacteria.
a lot of bubbling and slime on the rim – hope this proves the presence of beneficial bacteria
I sprayed my first batch on the raised vegetable beds, except for my control bed which is 4ft by 10 ft with 10 ft seed rows running south to north. I demarcated a 5 ft midpoint and sprayed the compost tea on the southern half of this bed. The northern half catches slightly more sun than the southern half so it has a slight advantage which I am hoping the compost tea will overcome. Since both halves have the same seed species planted at the same time it will be interesting to see if the southern half outperforms the northern half. I used my second brew for several days to water my tomato seedlings in the greenhouse. I topped the container with water and added the molasses meal each day.
So now wait and see – the author of one of my fruit tree books says the jury is still out on compost teas. I understand the logic of the process but am I really producing viable bacteria which will proliferate and alter the dynamics of my soil? The concept has a resemblance to the biodynamic approach – I attended a workshop last weekend where we added formulated cow manure to a pail of water and created a vortex (oxygenation?) before sprinkling the solution on the growing areas. What I should really do is have a thorough scientific analysis prepared of soil samples from my beds and use that as my starting point, but I like to meander along and try figure it all out myself.
My orchard is beginning to blossom. First are the peach and the pear trees and then the apple trees with some earlier than others. I noticed that my little peach tree which last year provided its first delicious peaches (unfortunately inhabited with visitors since peach is tough to grow without ‘cides) was dead! The other peach tree, a shadow of the first, was doing fine. I feared root nematodes or some other nasty affliction which would spread to my other fruit trees, so I hauled the tree out of the ground. I could have dug it out but it was easier to chain it and lift it vertically out with my bobcat and this way get most of the roots out at the same time.
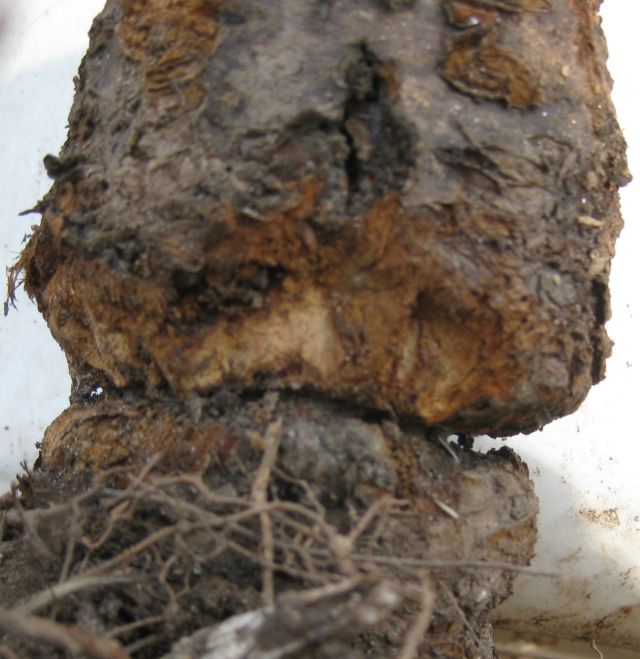
And then I noticed why it had died. When I planted my trees I engraved their salient details on thin aluminum plates which I loosed tied around the trunks. With time the string loops (actually nooses) were buried by mulch and disappeared from sight and the trunks expanded. Of course I used synthetic long lasting string which does not deteriorate and so, as the tree grew bigger it slowly strangled itself. The nutrients could not pass between the roots and the above ground tree and the tree died.
the base of the peach tree – you can see how tightly the string had constricted and cut into the trunk and completely cut off the supply of water and nutrients
I was somewhat upset! And then immediately began examining my other trees and found 5 other restricting nooses which I cut with a chisel and pulled loose with pliers. These trees had not fruited last year and I had assumed it was because of competing growth from weed thickets which I since removed. So easy to draw the wrong conclusions – it was possibly because they were deprived of nutrients. I hope they will all now do well. I had to gauge one so deeply to remove the name plate that I left a sizable hole which I decided to douse with with antibacterial spray and plug with grafting wax to keep out invaders.
Since peaches are tough to grow organically I decided to replace the peach tree with 2 apple trees. I wanted low chill varieties since, despite this recent cold weather, I believe the long term trend is to warming and a low chill variety requires fewer cold hours. My googling produced 3 varieties – Dorsett Golden, Fuji and Pink Lady aka Cripps Pink. Gilmer county is just north of my farm and is apple country in Georgia and has a decent nursery where I previously bought some of my apple trees.
The manager (he may also be the owner) was very helpful and confirmed that peach trees are self pollinating and my remaining peach should be fine, but got a little upset when I said I wanted low chill varieties and mentioned Dorsett Golden. Heated because he felt my logic was faulty and also because he said, with a smile, that he did not carry Dorsett Golden. But he approved and had in stock Cripps Pink and Fuji. I boarded his golf cart and we drove to the Fuji and had wide ranging discussions on growing topics – he is trying to adopt organic practices and uses neem and spinosad (I occasionally use neem and have never used spinosad) and he makes his own compost. But he says for his container plants he has to use a slow release fertilizer and will not call himself organic because that would be misleading.
The Fuji was in a container, the Cripps Pink was bare root and in a moist indoor location and looked very vigorous – he said it was a 2:3 which he explained meant the the scion was 2 years old and the root was 3 years old. On the way back to the office he elaborated on his global warming views that if it was happening (he stressed the “if”) then he was sure we on earth would act to limit it and anyhow, in his view it would take many years before it became an issue. I did not want to debate and upset what was a pleasant visit, so we settled up and parted harmoniously and a few hours later the new arrivals were bedded in their new home.
The electric water heater in the basement began leaking water – a lot of water by the time I discovered what it was up to. Most of my neighbors in this rural area have propane tanks and use propane for water heating, cooking and warming their houses. My house has a heat pump for heating and cooling and uses electricity for cooking and water heating. This is one of the reasons I recently installed an efficient wood stove.
The electric water heater was corroded, and beyond repair so, after researching various brands I bought a new Whirlpool 50 gals 9 year warranty replacement from a big DIY store. Their website said the 12 year warranty model was in stock but on arrival I was told their website was not accurate (they really should get this fixed), so I bought the cheaper 9 year warranty version and saved $100 plus, and then trucked the heater home. The installation had two complications – the soldered in place gate valve was defective and the conduit had 4 wires and the heater required only 3.
Gate valves are good for controlling water flow but if you have to shut off the water completely a ball valve is the way to go. Soldering a new valve would have been time consuming since water kept dripping down the pipe which lead to the floors above. Also my soldering skills have become erratic. In London I soldered numerous copper connections with hardly any fails – here my success is mixed and I attribute this to my using Mapp gas which is too hot compared with propane, and perhaps to the old flux I was using. Note that, consistent with the saying “a bad workman always blames his tools” I exculpate myself. And in London the way I solved a dripping pipe was to push bread up the pipe and this detained the drops long enough for me to get the job done. Anyhow, I have been wanting to try out a “SharkBite” and this was my opportunity.
A SharkBite is a push fit connector (no soldering required) and I bought one which combined with a ball valve. It cost just less than $20 which is a lot for one connection. However I was staggered at the cost of the fittings I usually use – both big DIY outfits wanted over $6 for a 3/4″ female copper connector (come on!) and if I had bought this, plus 3 male connectors plus a ball valve the cost saving against the SharkBite would have small – and it would have taken longer, may not have taken and may have been a frustrating installation. The SharkBite worked perfectly and the plumbing was resolved.
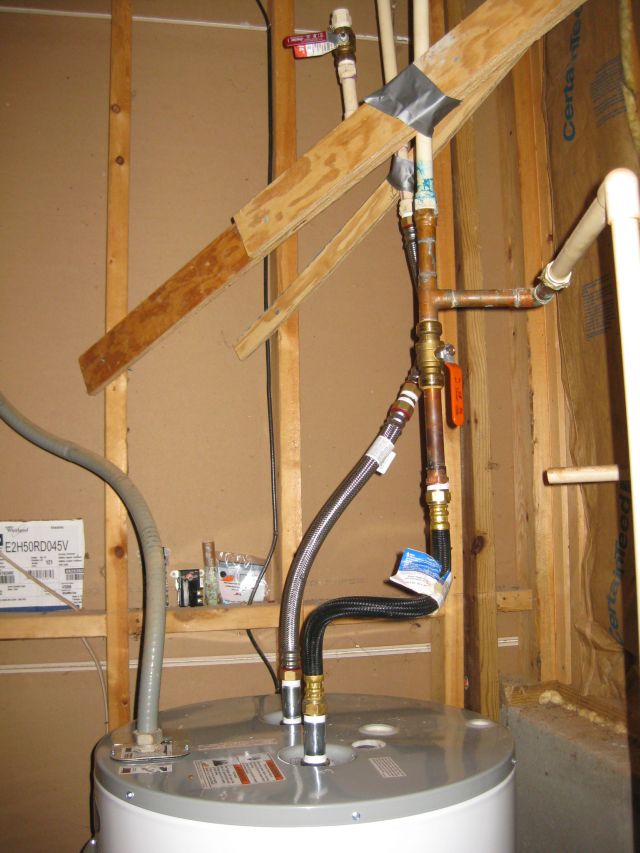
new electric water heater – the SharkBite valve is on the right with red handle pointing down
I should explain some of the other features in the above photo. The new water heater is 48″ high compared with the old heater which was 60″ high. So I needed to extend the connections and opted for the flexible connectors shown rather than copper pipe – a more expensive alternative but easy to install and will save time on future replacements. At top left you can spot another ball valve in the off position. This is one of my innovations – a problem with well water is that if it is allowed to cool it can develop a stinky sulphur smell and the way to treat it is to add H2O2 (hydrogen peroxide) and also to not let the water cool. The top left valve is where I used to add the hydrogen peroxide – simply open the valve and drain half the water out the tank through the valve at the bottom of the tank, then with a plastic funnel add the peroxide through the top left valve. I haven’t had to do that for years since I now always keep the water at around 120 deg and the smell has not recurred. The wood battens are to secure the pipes against movement.
The second complication had to do with the wiring – both heaters required 240 volt service and the cable had 4 wires which had connected to various parts of the old heater, but the new heater only required 3 wires. I googled and learned that the 4 wires in the conduit consisted of 2 power wires, a neutral and a bare earth/ground. The new heater required the bare earth/ground to be connected to the body and had terminals for the two power wires. But what about the 4th wire which was neutral – surely that was needed, don’t you always have to have a neutral? Well apparently not – the 2 power wires produce the 240 volts and you only need the neutral if you have a 120 volt circuit, which a range has but not the new water heater. So I connected the three required wires, terminated the neutral and was done.
My first visit to a recycling yard
I loaded the old water heater into my ever so useful truck and, rather than go to the landfill where there is a $20 minimum charge, I visited a nearby (5 miles) metal recycling yard. I asked the office attendant if they accepted water heaters and the young girl said she had only been there a couple weeks and I should ask someone in the yard. I saw this old bod (my age) strolling towards me and he said he did not work there, had no idea, and had just finished helping his mate drop off some iron. I noticed that his mate had pulled the truck and trailer onto the truckscale/weighbridge. I found someone knowledgeable who said sure, so I returned to my truck and waited for the old bod and his mate to be paid. When they drove off the truckscale the driver stared at me very hard and I wondered what that was about. So I was weighed, then unloaded the heater then was weighed again and the attendant gave me a check for $14 since the heater weighed 140lbs and they paid $1 for each 10 lbs. It was only when I was driving away that I figured out the scam. The old bod sat with his buddy in the cab when they arrived and were weighed, then when the truck and trailer was being weighed after offloading the iron, the old bod was walking back from the dump to the office. So the truck was 150 lbs lighter, assuming that was his weight, and so they made an additional $15. I suppose if you are sneaky you could have also plugged the water heater and filled it with some water and this would also have increased the payout.
One of my running buddies just had his water heater replaced. Prior to the replacement he told me it would not cost him any since the heater was under warranty. When I next spoke to him he told me the cost was close to $1,000. His is a gas heater, he was not present when the work was done, and the repairman had solicitously asked his wife if they had grandchildren and upon learning they were proud grandparents, said that the flue connections were defective and leaking exhaust could cause serious harm to the grandkids and the defects should be fixed as soon as possible. My buddy who was hooked in to the call drew the line at paying $100 to have the old water heater removed and so I have volunteered to do this for him and will make another $14 and earn some goodwill along the way. He said that when I am older and no longer a DIYer and have grandkids I will be suckered just like him!
The installer said to expect him between 8am and 9am. He arrived shortly after 8 and finished the job by 11.15am – just over 3 hours. And to a professional standard. Mind boggling.
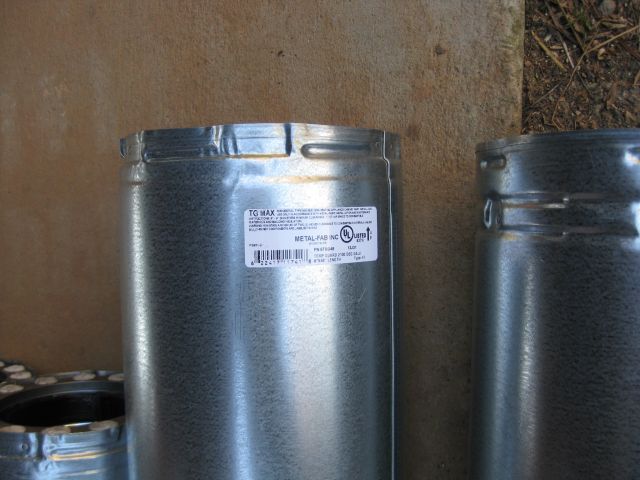
He offloaded the new chimney components and I noted all were new out of unopened boxes and bore UL compliance labels.
insulated flue pipe for installation
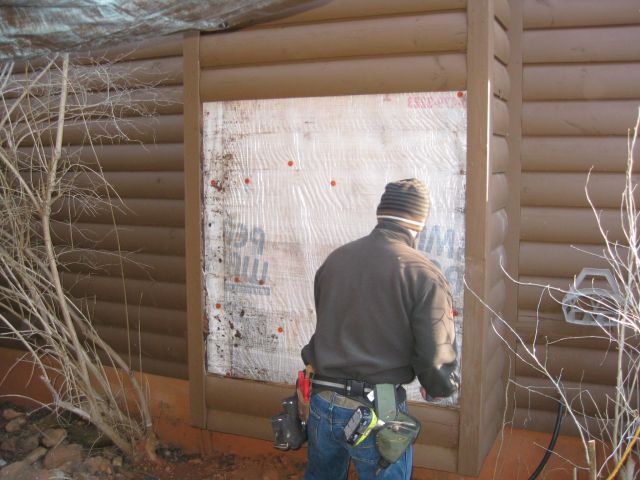
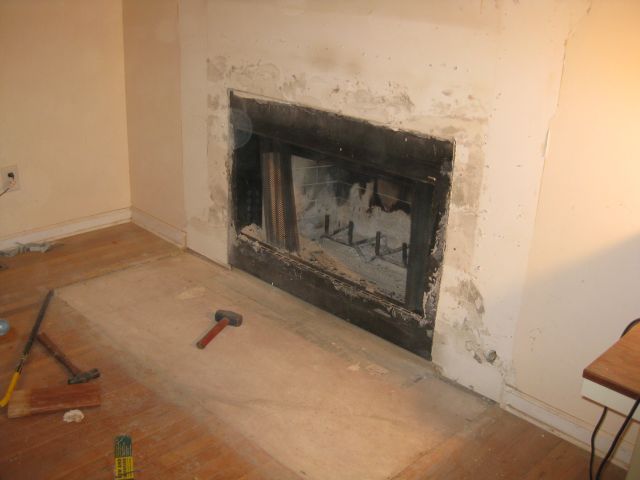
He began first with removing exterior wood siding from the chimney and then the 7/16 OSB (oriented strandboard).
an opening is made to extract the fireplace
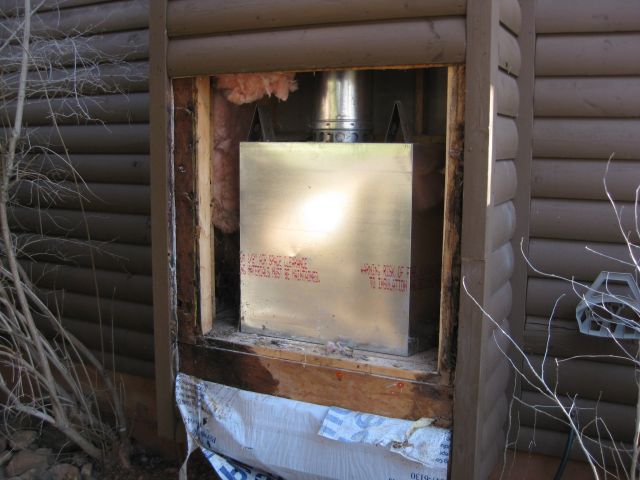
With the OSB sheathing removed the rear of the fireplace is visible.
the fireplace and the flue are visible
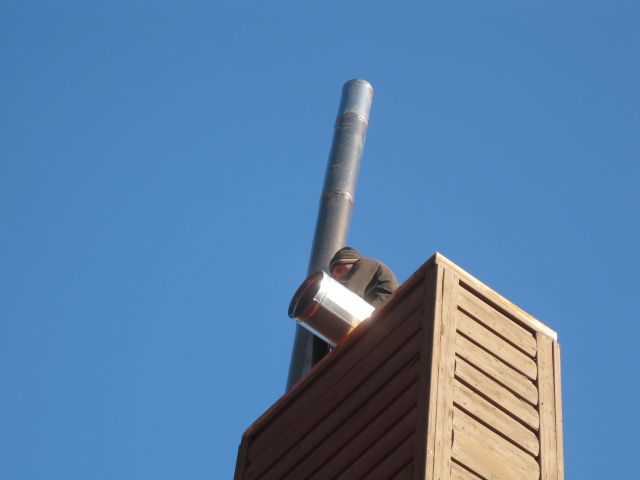
He loosened and extracted some of the flue through this opening and then climbed to the top of the chimney to remove the chimney cover and cap and the rest of the flue.
there he is on top of the chimney removing the old flue
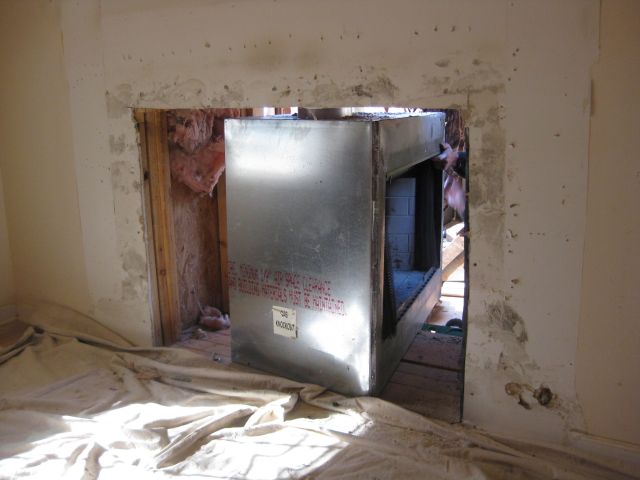
He had an assistant who received and passed him pieces as needed. Next he and his assistant pulled out the old fireplace.
the old fireplace on its way out through the rear of the chimney stack
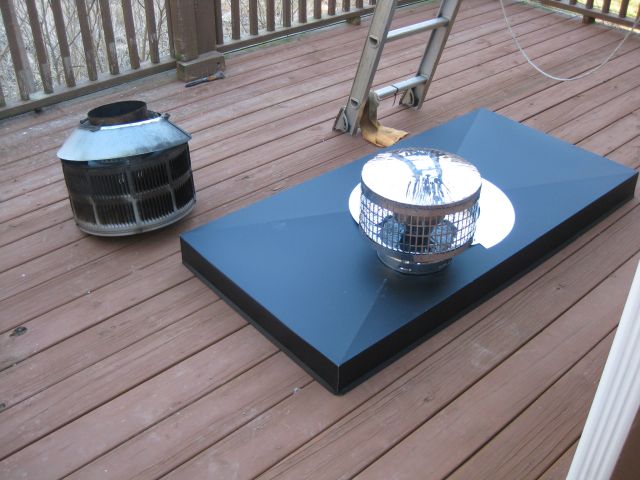
He installed the new flue and a new chimney cover and cap – here are the latter two items awaiting installation.
the new chimney cover and cap awaiting a hike to the top of the chimney
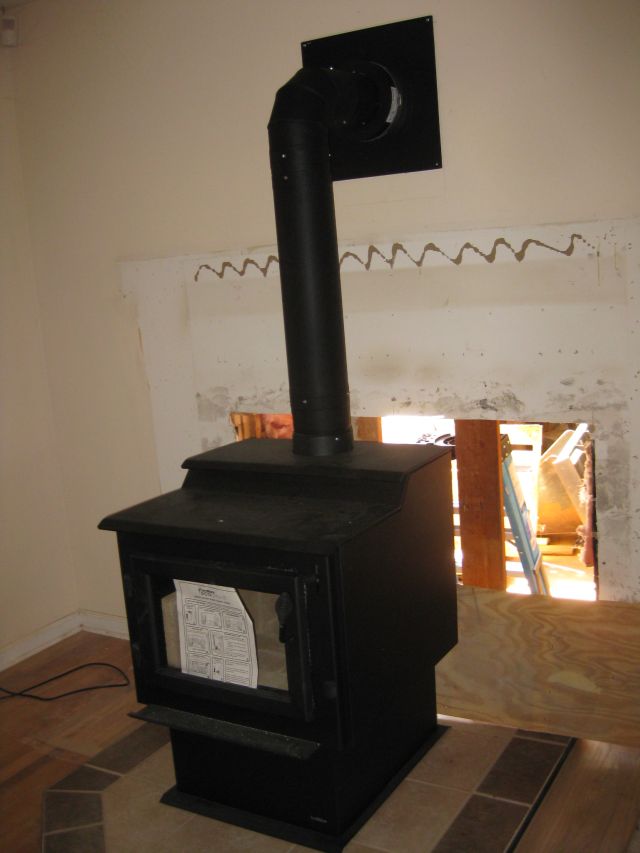
Then he and his assistant brought in the new hearth pad and sited the wood stove on the hearth pad and connected the stovepipe so it went through the wall to the new flue.
and here is the new wood stove connected and ready to fire
And all of this done in just around 3 hours. I fixed plywood sheathing to the chimney exterior and the room interior and over the next week I will repair the chimney exterior and install a tile surround behind the wood stove.
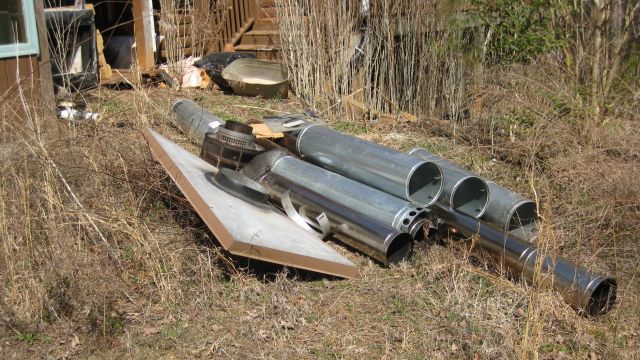
My neighbor asked if he could have the old fireplace and flue which I set aside for him.
old fireplace (rear left), flue and components set aside for neighbor
And last night I lit the wood stove and marveled how long it took to consume my oak logs and the radiant heat it provided. I should mention, in conclusion, that a good reference for me was “The Woodburner’s Companion” by Dirk Thomas.
I have always wanted a wood stove. Think of a box with 6 sides. If the box is inserted into the wall of a room only 1 side faces the room. The other sides are buried in the wall and face up, down, to the left and right and to the rear – this is the fireplace in our living room. Now I know that a lot of the heat comes out the front of the fireplace into the room, but more goes straight up the chimney – what a waste. My other problem with our fireplace is all the particulates it releases into the room – after a good fire the surfaces of tables and objects have a gritty film, and I can only think what is inside my lungs which recirculate the air more efficiently than the air passing the table tops. Plus a fireplace releases high emissions into the environment. So it was always my intention to change out the fireplace for a good wood stove, but this was action deferred until the recent arctic vortexes got me moving.
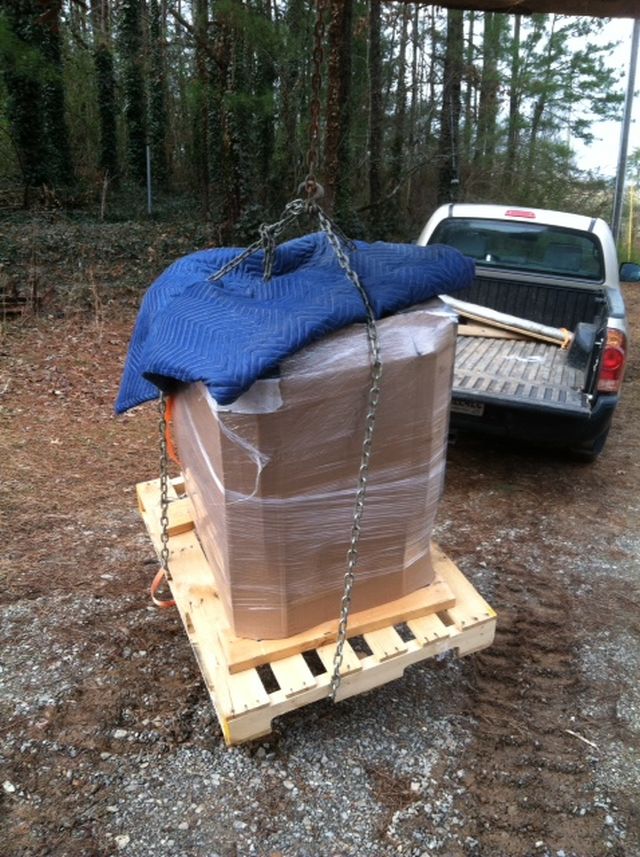
First the research – I called a well rated chimney firm and they wanted $99 for a consultation visit and would not provide any estimates either for installation or stoves until the visit. No thank you! From their website I noted they use the Heatilator brand and two sizes WS18 and WS22 got my interest – I have no interest in pellet stoves since I wish to be self reliant and have access to lots of trees. The NYT carried a recent article on stoves and mentioned one stalwart with emissions of just over 3 grams per hour. The WS22 is better and has EPA certified emissions of 2.7 grams per hour. I googled Heatilator for my area and located a dealer who informed me they were no longer a dealer and had a WS22 in their showroom, brand new, which they would sell for a discount. They are in Ellijay which is our apple growing area located in the Appalachian range and just 20 miles away. They agreed to strap the stove to a pallet and loaded it into my truck.
the palletized, shrink wrapped, strapped down stove at the start of its journey to a new home
The stove weighs over 400 lbs, too much for me to offload, but a simple matter for my bobcat using chains.
the pallet and a moving blanket protect the stove from damage from the lifting chains
Some things I won’t do, and climbing roofs and chimneys is one of them. I made several calls and located an installer who seemed to know all about wood stove installation. I suggested that all that was needed was to pull out the fireplace, leave the existing flue in place and connect the stovepipe which rises above the stove through a 90 degree bend and through the wall, to a tee which would connect to the existing flue. He said this was not code compliant and could not be done. Instead he said the whole flue would have to be removed and replaced by a flue designed for wood stoves. He visited (no charge), impressed me and gave me a reasonable quote. I called his insurer to confirm coverage, called his reference which is someone who works at a major fireplace/stove retailer and was very positive, and drafted a simple agreement confirming insurance coverage, that I would not be responsible for any injuries, that all materials were new and UL compliant, that the installation would be code compliant and that work and materials were warranted for 1 year. He signed in his personal capacity and as owner for his company and we were set to go.
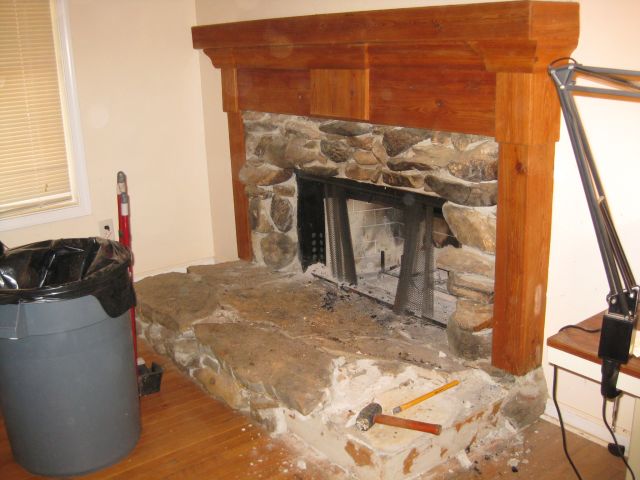
His quote detailed separately the cost of removing the stone surround and the cost of framing up the hole remaining after removing the fireplace but not to tape or mud the drywall. I decided to do these tasks myself. Removing the stone surround and mantle was a big job.
the fireplace has/had a nice stone surround and attractive mantle – demolition has commenced
There were lots of stones and the mantle included a lot of wood.
a bigger job than I initially thought
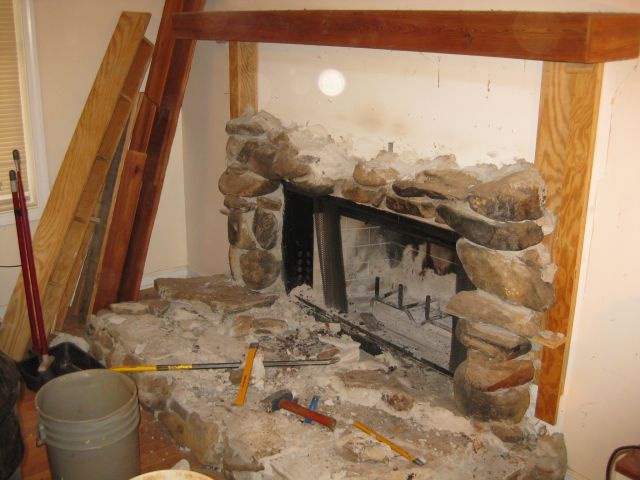
The floor stone was on a wood frame and the big question for me was whether the oak flooring in the room extended under the frame or terminated at the frame.
there was no flooring under the frame
Unfortunately the oak floor terminated at the frame – so now I had to install new flooring. The floor is 3/4″ thick and 2.25″ wide and HD sold it by the bundle. After googling instructions and using my pneumatic finish nailer and miter saw, I installed new flooring which matched its surroundings. And now I was ready for the wood stove installer who arrived the next day and which I chronicle in part 2.
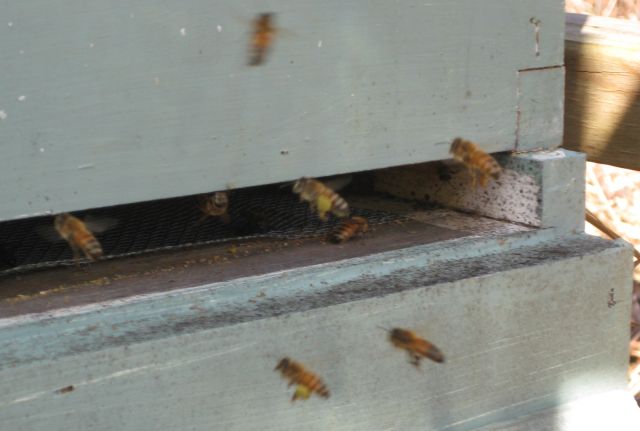
The happiest sign of spring for me is when bees emerge from the hive. Bees collect honey to nourish them through the winter. Many beekeepers will harvest most of the honey and then feed the bees with concentrated sugar water (three parts sugar to two parts water) at the end of the season to provide nourishment for the cold months. I prefer to harvest less in July and leave them honey and several remaining summer months to replenish their stores. You could ask why not check up on their honey reserves in December and January and if they are slight, then feed them sugar water? Bees huddle around their queen to maintain a high temperature and opening a hive on a cold day is stressful for them. A bigger problem is if food arrives in the middle of winter they may conclude that spring has arrived and encourage the queen to produce brood. I have an Italian queen and this species is well known for beginning brood production early. You could ask what is the harm if they start brood production too early. It requires a lot of energy for bees to keep themselves warm in cold weather and if they have to warm themselves and the queen and the brood in the cells as well, this will be additionally stressful, and bees have too much stress already and too high a winter mortality rate for me to stack the deck further against them. So I abide and hope to see them on a warm day, especially if they have successfully foraged food, and so it was yesterday.
bees approaching the landing strip, some with bags of pollen
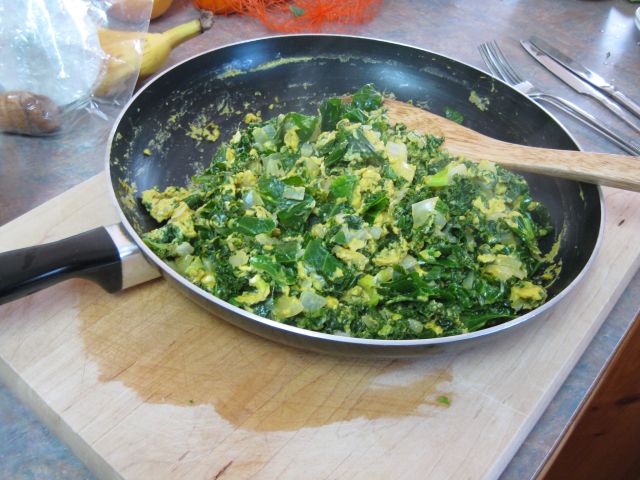
Another gratifying sign is my own greens on the food plate – here a medley of greens (primarily mustard, spinach and kale) sauteed and mixed with scrambled eggs ready for the eating.
home grown greens and free range eggs
And these greens really do taste better than the hoop produce from Georgia farms or the long shipped immaculates from drought ravaged California. My ten hens (two of whom are elders) are now producing 7 eggs a day, another sign that spring is almost here.
And now for the chores – weeding. I have concluded that my training as an accountant has helped me become a better weeder. An oddball theory it seems but here is the reasoning. My upfront standard for a competent accounting operation is that it reconciles its cashbook to bank statement to the penny. I am all for taking a big picture and have produced reports rounded to $1, $100, $1,000 or even $1 million, but even with the biggest organizations my test is still the same – did they reconcile their bank statements to the penny. Having done such reconciliations myself numerous times, and audited and investigated such reconciliations, I guess I have developed a fastidious and somewhat boring mentality. But since I now have the gift (or handicap) it certainly is useful when it comes to thoroughly weeding a vegetable patch. Unless you clear out all the weeds you leave trouble brewing for next time which means more work. Once the weeds are out it is simple maintenance to quickly scarify the soil every few days and bring to the surface the small white roots of infant weeds and thus forestall their attack. But if you leave a few behind and just concentrate on the big uns, why then it becomes an unremitting slog.
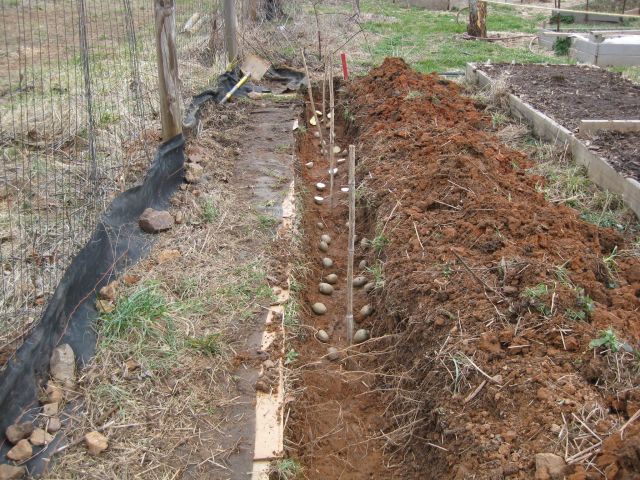
Other work is not a chore such as digging the trench for the potatoes – I planted out four varieties.
a potato trench with 4 varieties identified with bamboo sticks and soon to be lightlycovered with compost and soil
And planting out cool season vegetable seeds is a satisfying investment in future months. And to keep track of what I am doing I label each row with the variety and date of sowing.
labels for the vegetable rows
I tend to hold onto items I have replaced thinking I will find a new use. I had damaged venetian blinds sitting in the corner of the basement for a year before I could figure out a new use which was to cut the slats into small pieces and use them as labels for my vegetable rows. Since the slats are designed for sun exposure I am sure they will not deteriorate but they are flimsy and so I locate them at the edge of the beds where they are better protected.
My next project is to make compost tea which is need to dynamize (I am thinking along the lines of bio dynamics) some of the recently built raised beds. I have ordered an air pump and piping and “stones” and when I am successful will make a future post.