replacing IBC tote valve

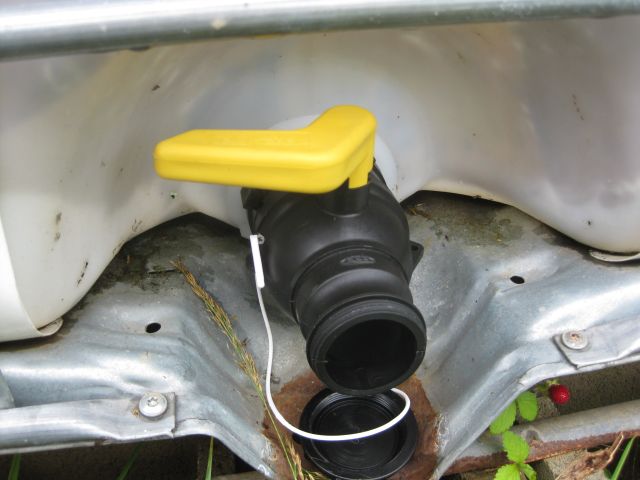
My rainwater harvesting system includes 5 IBC (intermediate bulk container) totes, each with a 1,000 litre (280 gal) capacity.  It was inevitable that the valve at the bottom of one would misfunction – in this case a crack developed at the handle shaft housing and water came out steadily.

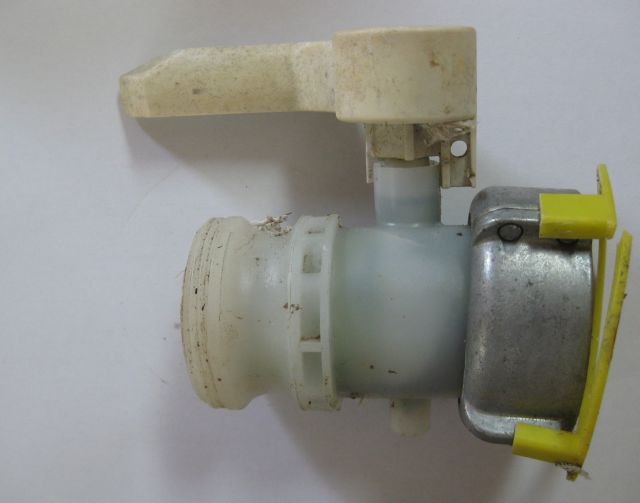
This meant I had to study up on how to replace a tote valve.  The valve is removed by turning anti clockwise the ridges on the metal coupler shown below.

the female thread on the right fits into the tank

There are ibc valve spanner wrenches offered at around $80 which seems steep for a simple tool.  Instead I requisitioned my basin wrench tool which was able to undo the defective valve.


my basin wrench tool on display gripping a marker

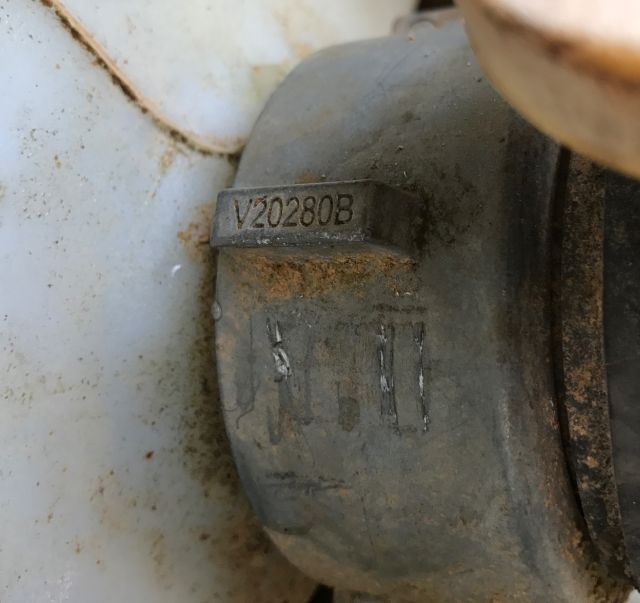
When the valve is removed you clearly see the male thread of the tank.

male thread of tote - this is called a buttress thread
male thread of tote – this is called a buttress thread

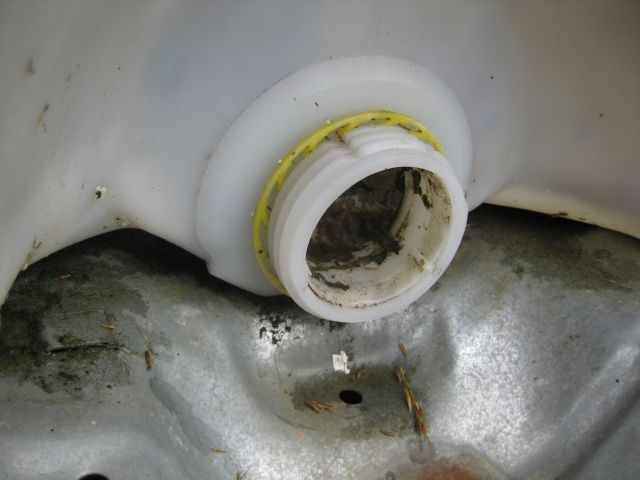
The thread is called a buttress thread which means the thread has one side that is vertical, the other side is inclined and a flat top and bottom.  The water exits the tank through the male thread above.  There were various female buttress threads on internet offer such as S60x6 and S75x6.  Which was the right one for me?  The “60” or “75” refers to the outside diameter in mm of the male thread or, equivalently, the inside diameter of the female thread.  The inside diameter of my defective valve is 75mm.  The “6” refers to the pitch or distance between threads – since the products on offer had the same pitch I didn’t worry about this.

I ordered the new valve through Amazon since a) I know if a problem Amazon will fix it; and b) although the product cost the same on the suppliers website the Amazon delivery charge was less.

The part arrived in 2 days (impressive) but it did not fit – the female thread was too large.  Had I messed up?  I checked and rechecked my measurements and it appeared that the valve I received was an “80” dimension rather than the “75” I had ordered.  What was frustrating was there were no markings on the valve body to identify what size it was.  With the Amazon trump card up my sleeve I called the supplier whose sales rep initially gave me a hard time but when I said that I would simply file a complaint with Amazon there was a sea change and he assured me the replacement part would be shipped that day.  When it didn’t arrive 4 days later (Tuesday) I called again and he, being adroit, thanked me for calling and said he didn’t know how to contact me (duh!) so my call was welcome and they were going to ship that day and I would receive it that Friday plus they would let me keep the wrong part for no change.  I called the following Monday and he said it would arrive that day and IT DID.  And it fitted!

new tote valve installed

So the Amazon viaduct was helpful, I was not seriously inconvenienced by the delay and I have an extra wrong sized valve which I may be able to cannibalize when the next valve fails.

Follow up

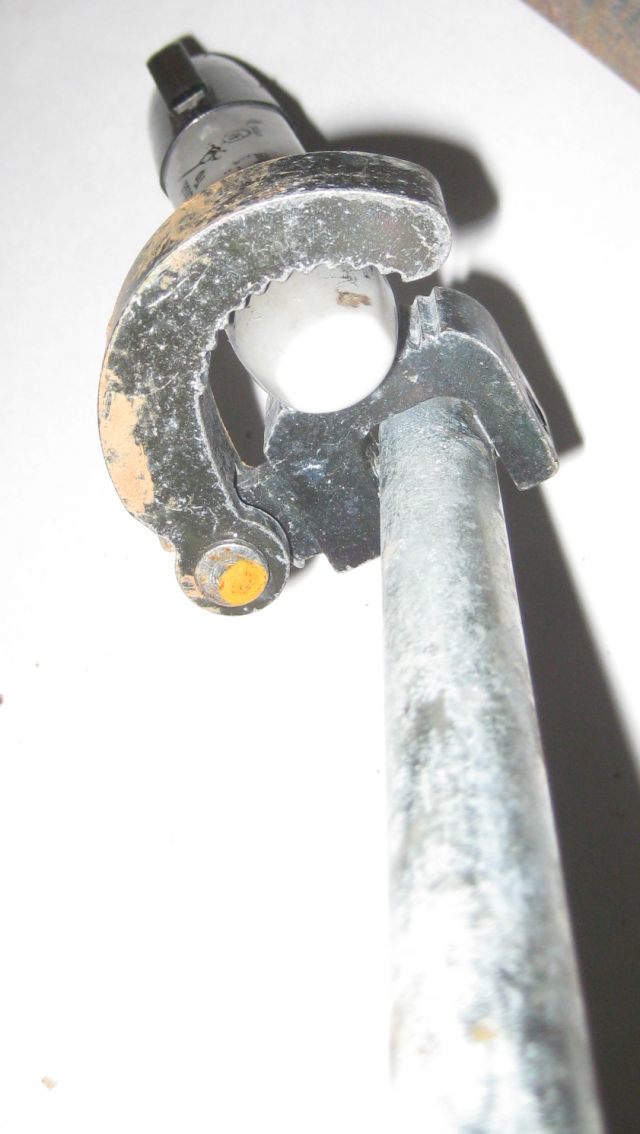
I received 2 comments – 1 below and 1 which I managed to lose, sorry, – questioning whether the basin wrench shown in the photo above could actually grasp the ridges or lugs of the valve.  So I decided to go back to the tank with my basin wrench and take photos of it accomplishing this task.  And I made a discovery – it does grasp the ridges of the valve shown in the first picture but not the ridges of a more recent valve.

Below is a pic of the basin wrench gripping (just) the ridges of the valve with sufficient force to turn it.

fully extended basin wrench can grip both ridges

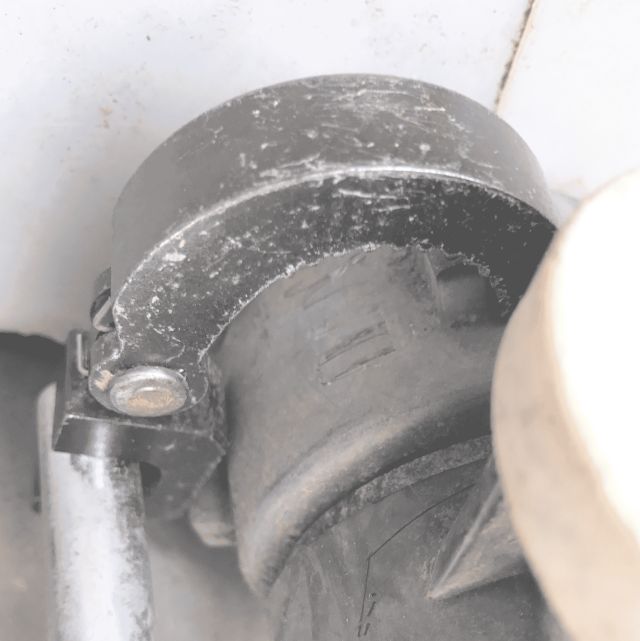
The reason why it works on some valves but not others has to do with the width of the ridge.  If you think of 2 ridges, one on the left and one on the right, the wrench has to extend from the left side of the left ridge to the right side of the right ridge.  So, if the ridges are equally spaced on the circumference of the valve, the wrench has to cover a lesser distance with narrow ridges (which it can) than with wider ridges (which mine cannot).  Below are pics of a narrow ridge and a wide ridge.

this is a narrow ridge and my wrench is wide enough to grasp 2 narrow ridges
and this is a wide ridge and my wrench cannot simultaneously grasp 2 such ridges


2 simple fixes

Hand tools

I use several hand tools for my weeding and mulching operations.  They are easily misplaced in the high grass and surrounding weeds and not discovered until, accidentally, days later.  It occurred to me that a cause was their lack of distinctiveness (blame the tools not the workman).  Their handles are either natural wood color, yellow or, the logic for this beats me, green.  So, easily camouflaged.  The solution was a small pot of cherry red paint and now, with their distinctive coloring, they come easily to hand.

my red painted hand tools
my red painted hand tools – the green colored weeder however, is resisting this solution

Pump timer

When I established my irrigation system I thought it would be neat to have an automated process with the pump starting and stopping at given times whether I was there or not.  So I incorporated a digital timing system which produces a low volt output when switched on which was connected to a relay which switched on the 110 volt circuit to power the pump.

the previous timer - overkill and unnecessarily complex
the previous timer – overkill and unnecessarily complex

For the past year I have been manually starting the timer and mainly hand watering and the timer would switch off after the set period.  The timer no longer works and I really don’t need a 4 station device when I am pumping only one line.  Rather then buy another digital timer with surplus features which could fail, I decided to buy a simple mechanical timer like you see in some hotel bathrooms.  Since it is a simple timing device it is unlikely to fail soon and its output is 110 volts so the circuitry is simplified.  I bought a double gang box and wired it to a 3 prong outlet – and it works great.  No longer do I have to press several buttons on the digital timer, I simply turn the timer handle to the desired time period and the pump starts up.

the new timer - all it needs is a cover plate and to be mounted on the post
the new timer – all it needs is a cover plate and to be mounted on the post

And here is the finished product

the timer with cover plate mounted on a post in the carport


locating a buried 4″ drainage pipe

About 20 years ago I dug a 100 ft trench for a 4″ drain pipe, which led from a concave area of the yard where the rainwater gathered, to a nearby creek.  Over the years I planted many trees and shrubs in this area.  The pipe worked well until the past few months when it completely ceased functioning.  With downpours seemingly more intense than ever, I decided I had to fix the problem.

I have a 50 ft plumber’s snake and I inserted it in the hole and it moved along easily for 45 ft and then hit a blockage.  I pulled the snake and inserted a contractor grade hose to the blockage and turned on the faucet thinking/hoping the water pressure would clear the blockage.  To no avail, even after several days attempts.  I concluded I should dig up and replace the blocked section of the pipe.

plumber's snake and damaged pipe
plumber’s snake at top and the blocked pipe. section on left had completely collapsed and section on right was a few feet further downline and was partially collapsed, all from roots of the same tree

Problem was I didn’t know exactly where the pipe ran under the ground since, over the past 2 decades the landscape had changed.  I tried digging a 5ft trench perpendicular to the supposed run of the pipe, but did not find it.  The pipe is about 1 ft underground and digging a 1ft deep trench should not take much effort or time.  Problem is the whole area is interlaced with the roots of good trees including a Japanese maple,  Harry Lauder’s walking stick, and other worth preserving species.  Plus some pretty thick pine roots as well.

How to locate the underground pipe?  Plumbers use a transmitter on their underground probes, but they are expensive for a one time use.  I googled personal locator devices and saw there are two options for the absent minded – with the cheaper device you attach a transmitter to your keys or other often lost items (not a cell phone because you just dial your # and it will ring) and, when lost, you press a button on the locator and the transmitter will flash and make a noise and you should find it.  This wouldn’t work for an underground scenario.  So I had to spring for the more expensive device (loc8tor lite) which has red and green directional lights on the locator as well as a beeper.  You press the button, the locator calls the transmitter, the transmitter responds and then, with the locator in your hand you do a little circle and when you are nearer to the location of the transmitter, the locator becomes excited and even more excited with red and green lights glowing and noisier as you get nearer to the transmitter.

the locator is credit card sized and the transmitter on the left much smaller and worked for locating buried pipe
the locator is credit card sized and the transmitter on the left much smaller

I placed the transmitter in a secure waterproof container (actually an old cylindrical 35mm film container) secured it with duct tape to the end of the plumber’s snake and sent it down the pipe.  Initially my locator failed completely to detect the transmitter.  So I figured its range must be limited when the transmitter is underground and to ensure I had the locator as close as possible to the position of the transmitter, I pushed the snake exactly 10 ft down the hole and measured exactly 10ft ground distance and, after removing some topsoil, I  was able to locate the transmitter when it was directly below the locator separated by about 8″ of soil.  The cheerful chirping and flashing green lights after hours of fruitless work was recompense enough.  From there on it was easy going – measure out 10 ft distance on the ground, advance the snake 10 ft, clear the soil and the magical beeping and light flashing re-commenced.  And so I continued until I located the blockage which was about 10 ft away from where I had thought the pipe ran and also much deeper than I had imagined.  A worthwhile $68 investment and no doubt it will be handy for locating my often lost keys.

earthworks – terraces, contour ditches and tree trunks

My permaculture readings have focused me on developing an edible forest garden and earthworks figure prominently in my designs.  Although I already have a number of different fruit trees in my orchard I decided to expand the selection and expect, by the end of November, to receive 2 goumi, 2 pawpaw, 3 kiwi (2 female, 1 male), and a medlar, aronia, sour cherry, and juneberry.  With these pending arrivals I have been at work preparing their planting sites on the side of the hill.

The earthworks are dug by my scruffy Takeuchi tracked bobcat.  My approach is to terrace the slope with the terrace canted to the slope and with a contour ditch in the middle of the terrace.  So rainwater on the terrace will move to the contour ditch and that which misses the contour ditch will move to where the terrace intersects with the   slope.  I fill the contour ditches with logs, for several reasons: a) my readings suggest that grasses promote bacteria and trees promote fungi and since the slope was grass covered, by filling the ditches with rotting tree trunks I am hoping to accelerate beneficial fungi in the soil; b) the contour ditches are a couple feet deep and without infill it is easy  to fall in; c) if the ditches are left as ditches, they are quickly invaded by vegetation which competes with the tree roots and hides the location of the ditches (facilitating (b) above);  d) parallel with (a) the tree trunks will provide nutrients to the soil as they degrade and will absorb and retain water for the benefit of the plantings.

terrace earthwork
earthworks – a view of my new terrace showing the grading toward the slope and the cut made into the face of the slope

After grading the terrace I planted winter rye and crimson clover on the exposed earthworks and watered every couple of days with rainwater.  I have marked the location of the future tree plantings with stones – they will be at least 15 ft apart.  And, since my comfrey did so well this year, I have planted out root snippets from a couple of my comfrey plants.

contour ditch earthwork
earthworks – terrace and contour ditch – looking north you can spot the winter rye seedlings. interspersed amongst them are crimson clover seedlings
terraced earthworks
earthworks – terrace and contour ditch – I am fortunate to have degrading tree trunks for filling the ditch

I created a second terrace as an extension to the terrace and tree plantings I made last year.

 earthworks - terrace with contour ditch and tree trunks
earthworks – terrace with contour ditch and tree trunks, follows the same principle as the one above and the two together will accommodate the new arrivals

And while I was at it I went back to last year’s terrace, deepened the contour ditch and filled it with tree trunks which had been left on the property by a previous owner.

terrace with contour ditch earthworks
earthworks – last year’s terrace upgraded to include tree trunks in the contour ditch. The cosmos and aster are still in bloom and the air is heavy with bees

rainwater harvesting – vigilance needed

As a matter of principal (or is it pride) I try do all my irrigation with rainwater collected in storage tanks.  Total storage capacity exceeds 6k gallons.  The design is fairly simply – I collect directly into 3 large storage tanks and then pump to two temporary tanks at the top of the hill, from which the water gravity feeds to the watering areas (see tab at top of website for full details).  I also collect rainwater at two remote locations (the chicken coop and tractor building) and pump the water to the storage tanks.  The rainwater entering the 3 large storage tanks passes through basket filters before entering the tanks.  The rainwater at the two remote locations goes directly into the three temporary tanks, each with about 280 gallons capacity.

Unlike municipal or well water, rainwater arrives with debris.  I have learned that I have to vigilantly check the water is flowing to the watering areas since algae or vegetation can easily clog the works.  With a low pressure gravity system this invariably occurs whenever you don’t check.  I am used to the routine and while observing water flow I also monitor the health of the plant or tree and look out for problems.  Yesterday there was silver tracery around the base of a blueberry and a little investigating with a small stick unearthed a large slug which was then ejected to a less hospitable area.  And I found numerous caterpillars demolishing my kale and hop plants and egg clutches of many more in waiting.  They were consigned to a soap water container.

But this morning I had a new problem.  I was pumping from the temporary tanks at the tractor building to a storage tank and after the pump had been in action for a few minutes I decided to check on water flow and noticed nothing was flowing.  If there is air in the pump housing this can be the cause so I released the priming screw and made sure the housing was full of water but this did not solve the problem.  The pump engine was working so I assumed the problem was with the impeller which the engine spins and the spinning of which drives the rainwater.  As mentioned above, the temporary tanks do not have water filters and so I guessed that debris had clogged the impeller.

my rainwater pump
my portable rainwater pump with convenient carrying handle, water enters from the right and goes out through the top

The part of the pump through which the rainwater moves is called the volute and can be clearly seen below.

top view of rainwater pump
the volute of the pump into which the rainwater enters, is pressured by the impeller and exits

The rainwater is pressured by the impeller which is spun by the motor.  The water enters through the hole in the middle of the impeller.

part of rainwater pump
the rainwater enters through the hole in the center of the impeller

Centrifugal forces created by the spinning of the impeller eject the rainwater through vanes on the circumference of the impeller as can be seen below.

rainwater impeller
when the impeller is spun by the motor, rainwater is forced out through the slits in the circumference of the impeller

It was a simple repair.  I removed the housing (volute) and then cleared the twigs which had gathered at the entrance hole to the impeller.  I carefully replaced the housing and the pump was vigorously back in action.

My conclusions from this episode are that I should:  a) filter the rainwater entering the temporary storage tanks to eliminate debris; b) not pump all the rainwater out of the storage tank since the debris comes out last and if I had left 3 inches of rainwater at the bottom of the chicken coop tank the problem would likely not have occurred when I transferred the then clogged pump to the tractor building tanks,  or (c) replace the standard pump with one designed to pump trash water.  A trash water pump has a larger centrifugal impeller which will not clog as easily.


rainwater from coop roof

When I built the new coop in October last year I fitted  a gutter which directs rainwater to an adjacent 250 gallon storage tank.  My thought was to (a) collect all rainwater landing on impervious surfaces, and (b) use the water to irrigate a chicken food growing area.  To grow food for the chicken I would have to cordon off a growing area and maintain it with vegetables and irrigation, which involves extra work, so instead I now give them excess vegetables from the vegetable garden.  And the storage tank, which has been full almost since it was installed, now overflows each time it rains.  A waste of water!

With the coop “summerized” with a powered vent fan, insulation and two semi-automatic coop doors, I turned my attention to the rainwater storage tank, which may also be the culprit for the mosquitoes which hang out in that area.  I have a portable electric water pump and it was a simple matter to run a 1″ diameter water pipe from the coop to the barn where two large storage tanks are parked.  For the water to flow as easily as possible, I avoided sharp turns and led the pipe in a gradual sweep and rise from the coop along the ground to a gradual turn to the barn and then, gaining altitude, up to a gutter on the barn which feeds into the rainwater collection system.  I may decide to trench the pipe when the ground is soft after the next decent rainfall.

The exit pipe from the storage tank and the pipe to the barn are fitted with Norwesco fittings, as is the electric water pump.  It is a simple operation to couple the pump to the two pipes, open the tank valve to flow water from the storage tank to prime the pump and then power the pump with electricity already cabled to the coop.  Some 20 minutes later all 250 gallons have been transferred to a large storage tank from which it will be pumped, as needed to irrigate my crops.

east side of coop showing gutter, downpipe to tank, overflow pipe from tank and exit connection to pump
closer up view of conection from storage tank to pump to water pipe to barn
view of the water pipe run from the coop initially on the ground then climbing higher along paddock fence, surmounting gate and ending in gutter


water conservation – “Heart of Dryness”

I just read Heart of Dryness by James Workman about the plight of the Bushmen in the Kalahari desert when the Botswana government cut off their water supplies and how they adapted and how we can learn from them. I was interested in the book because I am originally from South Africa which abuts Botswana, and also here in Georgia we are engaged in legal water wars with neighboring states.  Workman interlaces the story of the Bushmen with a narrative on the use and abuse of water worldwide and his view that water shortages will result in increased conflicts across the world as the world grows hotter.  He does not believe dams are the solution in arid countries -dry heat and wind result in massive evaporation and build up of sediment reduces storage capacity.  He suggests that artificial aquifer recharge where water is pumped and stored underground is more sensible, akin to the Bushmen burying their water in evaporation proof containers. Some of his findings are counter-intuitive, for example during holidays one Botswana school leaked nine times what it used while in session, due to pressure build up forcing water leaks through cracks.   The 250 page book has 50 pages of notes/bibliography and appears well researched.

His reference to water wastage got me thinking of my own rainwater harvesting system and, since rain was in the forecast, I inspected and found several issues.  Two gutter downpipes were blocked and no water would have been collected from them.  Even more significant – the 4″ pipe which transfers water from my main collection point (the house roof) to my barn storage tanks, had again opened a leak where the 4″ corrugated pipe attaches to the 4″ pvc pipe.

The advantages of corrugated drainage pipe are that it is flexible so it will fit easily in a trench which isn’t straight or which has bends different from the available 90 deg, 45 deg or 22.5 deg fittings.  And it is much cheaper, both the pipe itself and not needing expensive fittings for bends.  Which is why I had used it for a section of the  water run.  Its disadvantages are that it does not make a tight fit when joined with pvc pipe and therefore can leak if there is a small shift in the moorings and, because it is corrugated, debris collects in it and causes blockages.  Now I had to bite the bullet and replace the corrugated pipe with pvc pipe.  I had used 4″ Sch 40 pvc pipe for the exposed overhead run – this is a thicker more expensive pipe.  For the section I was replacing, which runs in a trench, I opted to save money (on the pipe and the fittings) and bought the considerably cheaper DWV pipe.  DWV pipe (drain, waste and vent) is for non pressurized applications and because the pipe will be buried, fully supported by the ground and not sun exposed, this seemed a reasonable choice.  It took some time digging a new trench (the old one was gradually curved and not usable) and aligning the pieces and fittings since the direction change was closer to 80 deg than an easier 90 deg. But now it is done and, with a dry season looming, I hope to be  make every drop count.

newly replaced rainwater pipe

rainwater harvesting – making every drop count

Blockages in the rainwater harvesting system

With rainwater harvesting whatever can go wrong does.  After fall I cleared my gutter of leaf debris and left it at that.  Silly me!  I didn’t consider that the 2″ pipe from the downspout outlet to the storage tank might be clogged with leaves.  It was only when rainwater collection by the one tank was less than expected and when, during a downfall, I saw rainwater cascading over the gutter, that I figured I had a problem.

Clearing the blockage was not too difficult.  I removed what I could by hand and then expelled the rest with water pressure from the hose.  I decided in future to use a mesh screen in the outlet to catch leaves before they enter the pipe.  However, I also needed a simple means for identifying and preventing the recurrence of future blockages.

rainwater

Rather than spray water from the hose onto the roof and let it dribble into the gutter I cobbled together a simple fixture which is attached to a hose and, with the aid of a long stick (or broom), hoisted in place over the gutter. The hose is switched on and water enters the gutter, the downspout and then (audibly) the tank. The bottom left link (in the picture) is attached to the hose. The top left link is sealed and its purpose is probably redundant. Water enters from the bottom left, veers right at the tee and then down at the elbow into the gutter.


How a drip of rainwater produces a flood

The other problem I encountered with my rainwater harvesting was unexpected rainwater loss.  During my 7 day vacation to the West Coast there was 0.5″ of rain.  I expected all my catchment tanks to rise.  However, the carport tank level did not go up, in fact it fell.  I did not give this too much thought until I noticed how wet the gravel was around the lower level storage tanks and I then noticed that a connector at the lower level was copiously leaking rainwater from the higher level carport tank.  I measured the rainwater loss and it was 250ml in 1 minute (metric is so much easier to use).  Which equates to 1 litre in a 4 minutes and therefore 15 litres in an hour.  I was gone 7 days which is 168 hours (7×24) which is 2,520 litres (168×15) which is 665 gallons (2,520x.264).  So in 1 week I lost approximately 670 gallons of rainwater.

The carport has a length of 27 ft and a width of 24 ft.  So the capture/catchment area is 648 sq. ft (27×24).  There are 7.48 gallons of water per cubic ft.  The recent 0.5″ of rainfall on the carport produced 27 cubic ft of rainwater (648 sq ft x 0.5″/12) which equates to 202 gallons (27 cu ft x 7.48 gal/cubic ft).  When I left on vacation I had approximately 500 gals and with the rainfall there should have been say 700 gals and when I returned there was barely any water because I had lost almost 700 gals from leakage.

rainwater
measuring water loss with graduated beaker + stopwatch
rainwater
new valve components before ptfe tape assembly


My solution was two fold: 1) tighten the clamp  at the fitting; 2) since the fitting was at the bottom of the hill where water pressure is greatest, I inserted a second valve at the top of the hill where psi is less and therefore there is less pressure to force a leak.  For the second valve I used a steel insert into the high pressure end rather than a plastic insert since steel inserts are longer and provide a tighter fit.  Hopefully this ends my rainwater losses and my rainwater harvesting will be more efficient.