my 4 mowers, and mower deck repair

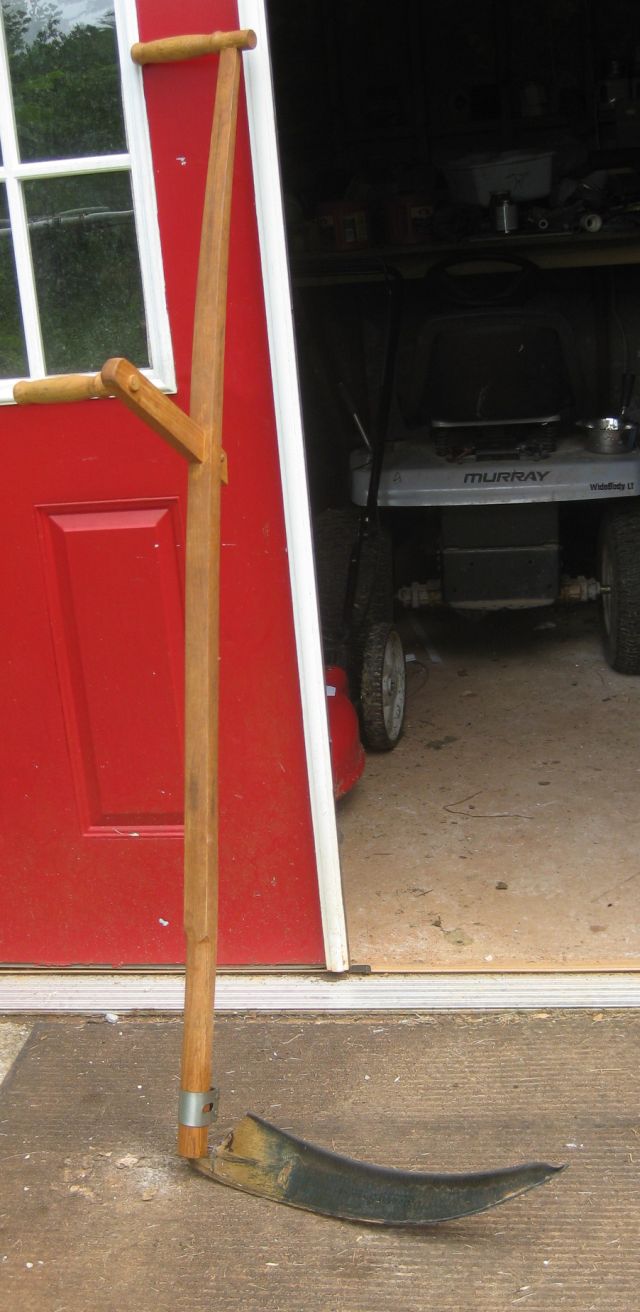
I have 4 mowers.  I use a scythe (21″ blade)  to clear the growth under  fruit trees for which it is ideal.  Extend the blade to the near side of the trunk and pull sharply toward you and the weeds are leveled, all while standing a distance away without worries of snagging branches or snakes (I refer to the venomous ones – copperheads or occasional rattler).  It is also useful on a hillside where riding a mower is iffy. For how I peen my scythe and hand sickle, search “peen” on this site.

scythe
scythe good for clearing fields, if you are up to it, otherwise handy for difficult to access spots

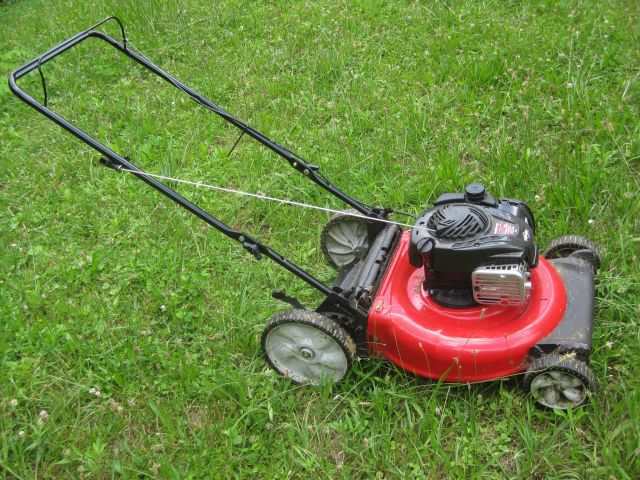
Next up is my 21″ push mower, basic model purchased new this year from a big DIY store.  Note the large rear wheels for rough ground.  I use it for cutting and mulching the walkways between the raised beds.  It has a sophisticated Briggs Stratton motor which does not require use of a choke and starts (so far) on first pull.

handy gas powered push mower

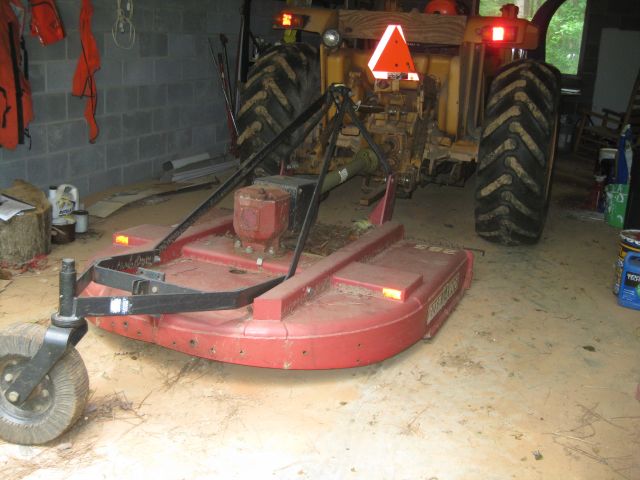
The biggest mower is the Bush Hog, which is 5 ft wide and shown here attached to my tractor.  I bought it used and use it to clear fields and heavy growth and it seems indestructible.

Bush Hog attached to Case tractor

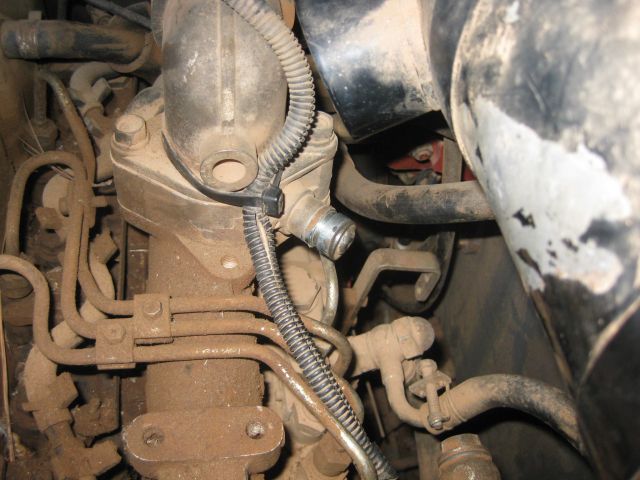
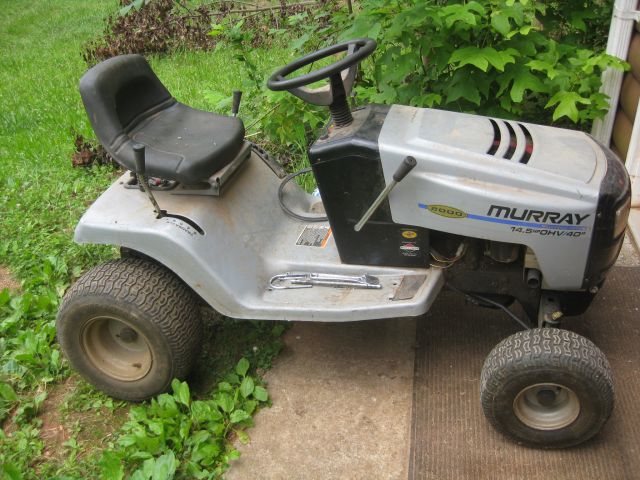
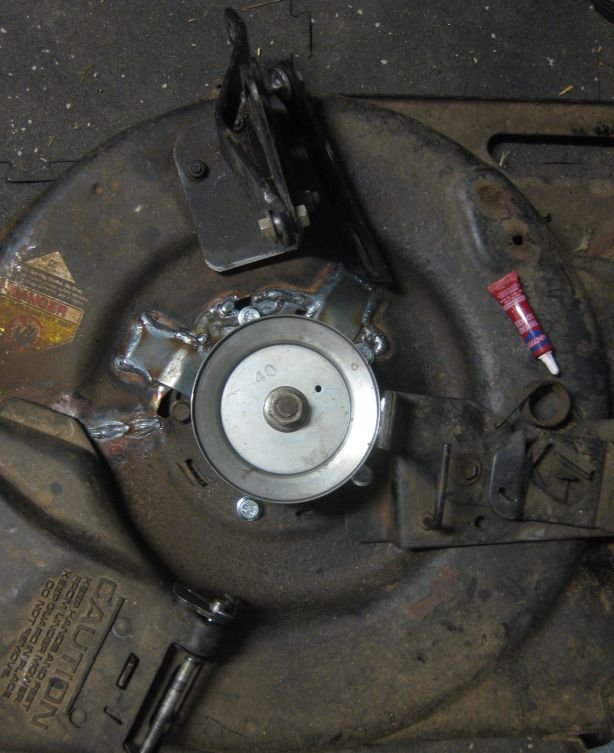
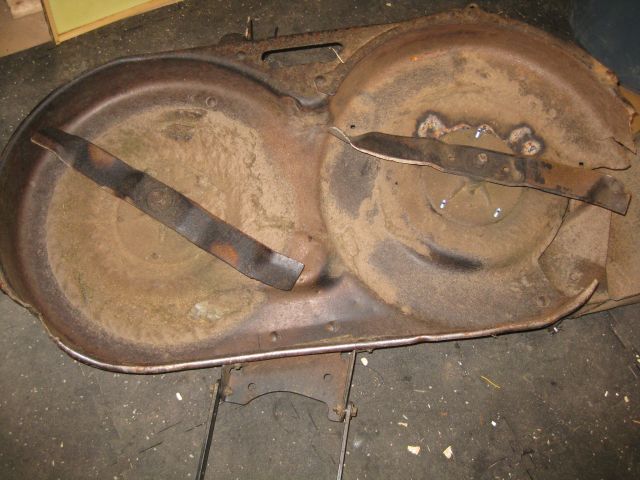
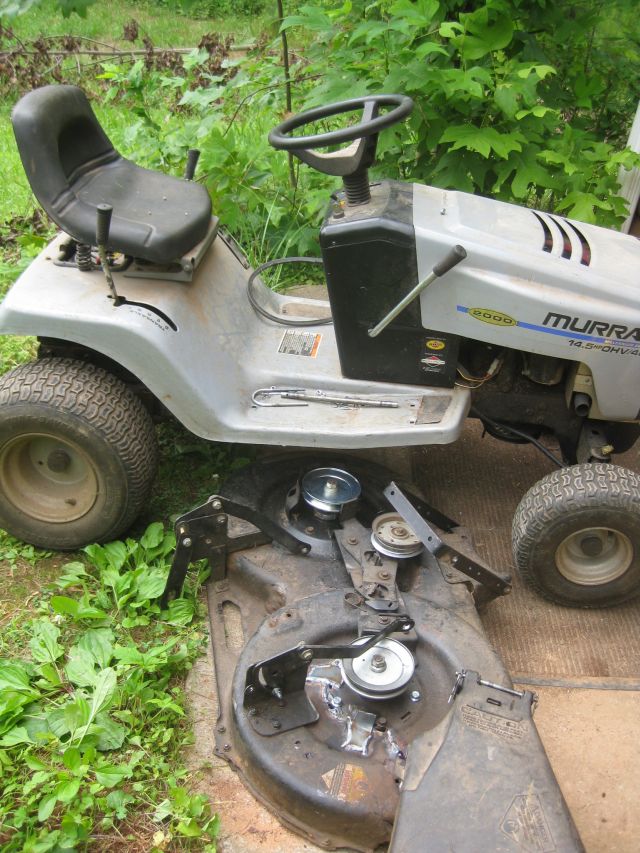
Finally, and the topic for this post, the Murray 40508×92  40″ mower which I bought used and damaged 7 years ago from a neighbor and have kept going with occasional ad hoc repairs and replacements.  Until last week when the mower drive belt kept slipping off the pulleys and all came to a halt.  The engine turns the drive belt and the belt turns two pulleys which are connected to the two blades which do the cutting.  So what was the problem?  Each pulley turns a jackshaft which turns a blade.  The shaft is held in position by a mandrel secured by 5 bolts to the mower housing/deck.  3 bolts on one mandrel were missing  and the 4th was loose.  So when the belt applied torque to the pulley the pulley lifted and the belt slipped off.  Replacing the bolts wouldn’t work – it was apparent that as individual bolts loosened the vibration of the blade had torn the metal housing to which the other bolts were attached, and as each bolt came off the vibration and damage increased.  A stitch in time would have saved nine.

Murray mower with mower housing removed

It seemed I had several options – buy a new deck; buy a used deck; buy a replacement mower or have the deck fixed.  Internet search showed no new decks matching this part #, though comparable new decks >$400 before shipping.  On Craigslist I could buy a newer more powerful mower for $400.   eBay showed similar decks used for $70 to $100 before shipping cost of say $70.  And they probably would not fit and would have to be adapted.  So, could it be repaired?  Welding, regrettably, is a skill I do not (yet) have.  But there is a local shop which I previously used which does good work for reasonable cost.  I took it in and they said sure.  I asked cost and they said $30 if it took 30 mins. but not to exceed $60.

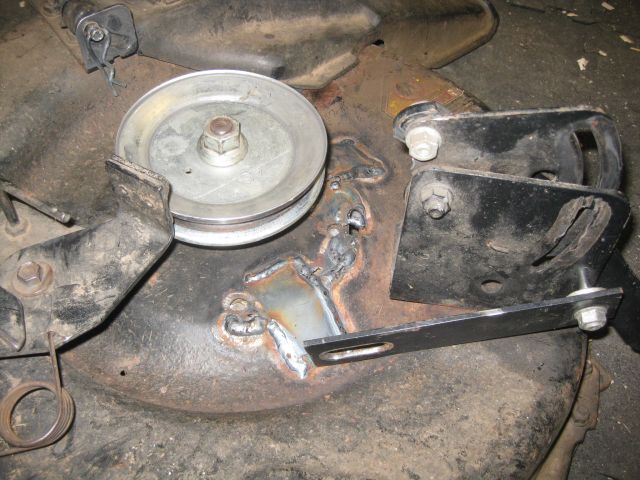
Two days later it was ready.  They decided that in addition to welding the torn housing together it was prudent to weld on two plates – total cost $55.

a view of the mower housing removed from the lawn tractor.

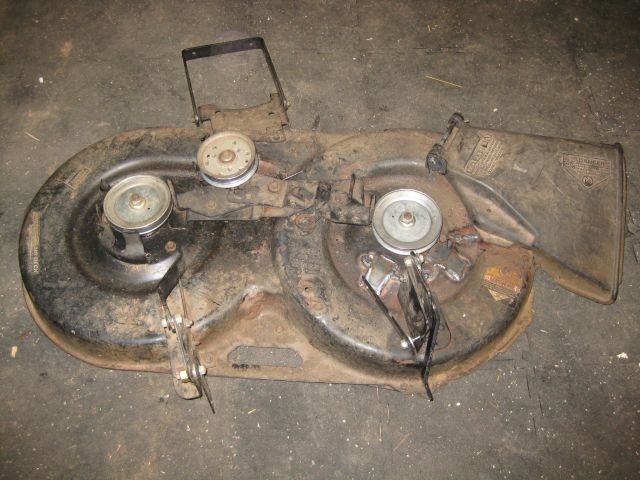
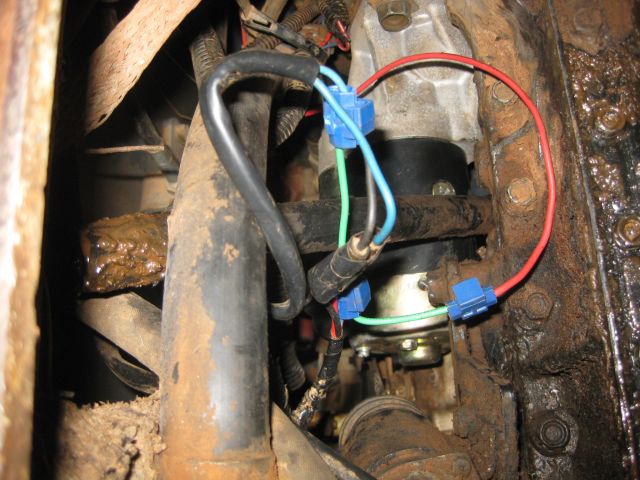
The welding was done to the housing to which the right pulley is attached.

this close up shows the 2 plates and the stitching of the torn material

I really felt foolish for having allowed this damage to progress but the welder, noting my embarrassment, said he does 4 to 5 mower decks a week and he showed me a newly arrived patient.  This was larger than mine with 3 pulleys driving 3 blades and the housing for the one pulley had completely disintegrated and major welding plate surgery was now needed.  So I felt a bit better.

I purchased new bolts and coated the threads with Loctite to discourage them from loosening.

close up showing all the bolts in place
close up showing all the bolts in place, there are 5 of them

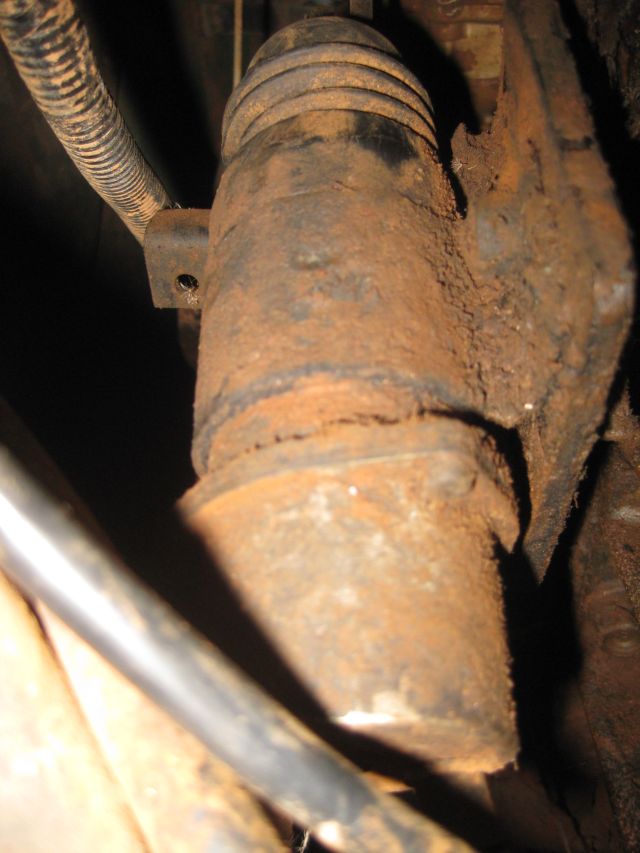
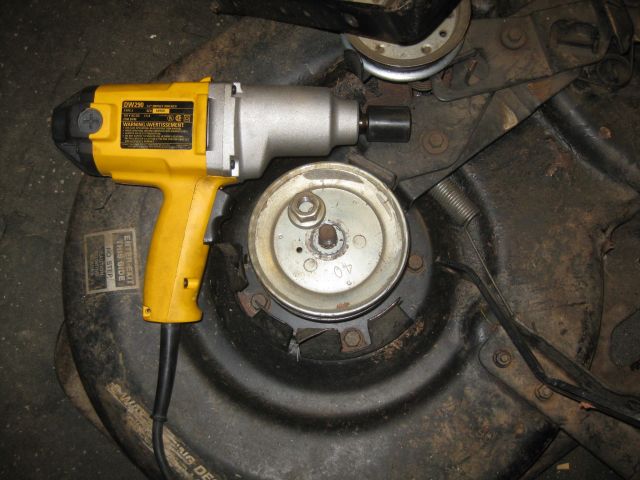
The other drive pulley was distorted and so, while I was at it, I installed a new pulley.  The nut on a pulley can be difficult to remove because the pulley shaft turns as you apply pressure on the nut.  I remember in the 90’s I was unable to undo the nut on a generator so I took it to an auto shop and in a few seconds it was off – they used an impact wrench.  I bought an electric impact wrench and it has been invaluable for removing nuts on shafts.

impact wrench, loosened nut and new pulley

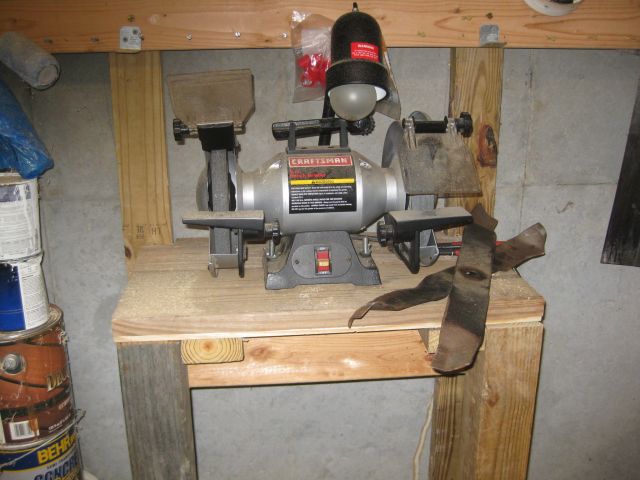
So I decided to also examine and sharpen the mower blades.

underside of mower housing with blades revealed

The impact wrench loosened the two nuts securing the blades.  Since I had a balancing jig I decided to use it.

a jig to test if the weight of the blade is balanced, otherwise undue vibration

My father-in-law bought me my first bench grinder and instructed me how to use it.  They can be very dangerous if misused – if a fast revolving grindstone shatters, there will be injury.  I always wear extensive eye protection from my experience some years ago when I was grinding the valves of an Accord and a metal speck flew under my conventional glasses and lodged in my eye and this necessitated a visit to the emergency room.

my bench grinder - if a fast revolving grindstone shatters, there will be injury
my bench grinder mounted on a platform in the basement

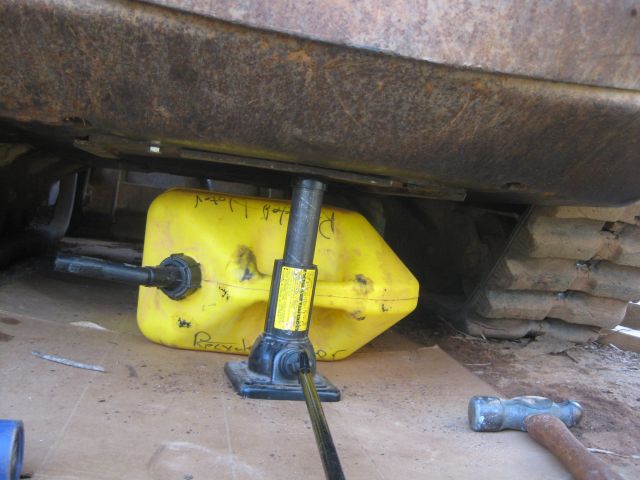
All that remained was to re-install the mower housing.

re-installing the housing

And it works just fine!

the Takeuchi bobcat saga (part 3)

Caution – this is a long tale and will only be of interest to those who have similarly suffered from malfunctioning engines!

In my November 25 post I described how I replaced the starter and that the bobcat started fine but then would not switch off.  Sporadically during the subsequent months I tried diagnosing the problem but it was only with the return of spring and serious bobcat chores awaiting, that I focused on the issue.   The immediate bobcat task was turning and consolidating  my 100 plus leaf bags so the composting process could advance.

2 piles of leaf bags awaiting consolidation and mixing


Diagnosing why the diesel engine would not switch off was not easy and I tried various remedies which were a waste of time.  With hindsight I should have considered events preceding the problem and methodically eliminated the possibilities.

For example I thought the problem might be a faulty ignition switch.  I had installed a new replacement switch a couple years ago and it had 5 terminals and should have had 6 but I satisfied myself at the time that 5 would be fine based on the wiring diagram.  And it did work fine until I replaced the starter motor and the engine would not turn off.  Logically therefore the ignition switch had nothing to do with the problem and there was no need to order a new 6 terminal ignition switch.

So with new switch and re-charged battery and partially refilled diesel tank I tried starting up the bobcat.  After a brief period of turning, it started – delay probably the pumping of diesel to the engine which I had run dry in November. But now in the on position there was a whining noise which was the starter not disengaging. In the off position the whining stopped but the engine kept running. To switch it off I had to turn the emergency shut off knob near the carburetor clockwise to the stop position.

you can spot the shut off knob it is the shiny cylinder in the center of the photo

It took some time before the engine strangled to a stop with a lot of black smoke coming out which made me think of oil being burnt, not a good way to stop the engine.

So now I had a new problem – starter not disengaging after the engine was running.  I checked a lot of wiring and re-examined the connections  to the starter, to no avail.  The only conclusion I could come to was that I had incorrectly wired up the new ignition switch.  The light green red wire (LGR) at the ignition switch is the wire which switches on the starter motor. Could the LGR be connected to the wrong terminal at the ignition switch – should be C terminal. Worth checking.
I pulled cab forward, disconnected battery cables,  pulled cab back, opened control box and examined wires at ignition switch and yes I had mixed (LGR) light green red with (GR) green red. Crazy I should have made such a silly mistake, but the wires are old and discolored. I corrected the mistake, pulled cab forward, reconnected battery cables and started and it started ok and no whining from starter BUT it still did not switch off at ignition and fortunately this time just shuddered to a stop. At least I had corrected a fundamental mistake through logical analysis which made me feel better about my chances going forward.
I tried restarting the engine.  The engine turned ok but now would not start. Seems no fuel getting to the combustion chambers.   I now had a new problem – a fuel problem – how to bleed the fuel lines. A nice thing about Takeuchi is that the operator’s manual (but not the workshop manual) is available for online download. The operator’s manual referred to a manual pump located near the fuel injection body. It is hidden from view but I managed to locate it, and after turning  clockwise to free it I pumped several times until diesel emerged at the top. I tightened it (clockwise) and the bobcat started easily and seemed to switch off at the ignition key but a second try had it continuing to run. So I still had a problem with being unable to switch off the engine and the fact it shut down once at ignition but not a second time indicated some intermittent failure.
I decided to do some internet research. Apart from some vehicles which have a vacuum switch-off like the Mercedes, it seems most diesel engines have a fuel shut off solenoid. The solenoid can cut off the fuel by either pushing or pulling on a protruding pin/shaft.   From this point on there are many mind confusing possibilities:

  • the action of the solenoid can be to push or pull on the shaft, and when the solenoid is not acting, the position of the shaft will be determined by a spring in the solenoid ;
  • one process could be that when the solenoid is not activated and the shaft is positioned by the spring then fuel does not flow, and activating the solenoid moves the shaft against the pressure of the spring and fuel flows.  Deactivating the solenoid permits the spring to return the shaft to original position which cuts off fuel flow.
  • or fuel flows when the shaft is held in position by the spring, activating the solenoid cuts off the flow for a short period of time which shuts down the engine and then with engine off the spring returns shaft to fuel on position.
  • there are 3 wires to solenoid – 1 is earth, 1 is direct from battery and 1 is from ignition switch.  Another possibility is the wire from the battery activates the solenoid all the time and  the wire from ignition via a relay deactivates the current from the battery.  This would mean the solenoid is continuously powered which is wasteful.  So I rejected this possibility (I also found later that when engine is off, the solenoid spring positions the shaft).
  • If wire from ignition switch via a relay connects wire from battery to solenoid to power it then it would seem that when wire from ignition is switched off then power from battery will be off and engine will shut down.  But engine was not shutting down when wire from ignition was switched off!   This didn’t make sense – instinctively I felt the problem was there was intermittent failure of the wire from the ignition switch to the solenoid and this wire had to be intact to switch off the solenoid.  The logic doesn’t really hold for example if the wire was interrupted then the engine should shut down but it was continuing to run (perhaps some kind reader can explain this for me).  Nonetheless, a break in the wire was what I would look for.

I thought it was about time I found the solenoid. On the web I saw images of what the solenoid for Takeuchi should look like – a round device with 3 wires emerging from the rear and a movable pin on the other side and it should be connected to the fuel body. I spent a lot of time looking for the solenoid both visually and feeling with my hands for any wires coming out of the fuel injector body. And I couldn’t find it even with my inspection mirror and there was nothing in the workshop manual showing where the solenoid was attached to the fuel injector body. I still had the access cover off from underneath the Takeuchi so I looked from underneath and there it was – it was located near the bottom of the engine with a long shaft running vertically to near the fuel injection body.

start solenoid near bottom of engine with shaft at top of picture

One suggestion had been that the solenoid might have jammed in the on position so I moved the shaft up and down and it was in the up extended position held there by a spring in the solenoid housing so therefore the solenoid had not jammed and presumably did not have to be replaced.  The wires to the solenoid were located below the starter motor and I had quite likely pushed against these wires as I removed the old starter and maneuvered the new one into place. But again, if a wire had disconnected then the engine wouldn’t start and my problem was that it started but wouldn’t switch off. When I purchased the machine I noticed that someone had run a red wire from the cab control panel down to the innards of the engine. I now saw that the red cable was attached to one of the solenoid wires. Why?

So I decided to investigate the red wires. I loosened the instrument panel box and saw the 2 red wires coming in and they headed to a push button.

red wires added post factory to a push button in the control panel

With a voltmeter/continuity tester I established that the push button was normally open which means when you press the button the circuit closes.  So the red wires had to do with the shut off solenoid and the circuit was open until the button was pushed.
I figured that engine shut off must have been a problem for the previous owners and they had this circuit rigged to shut down the engine which I vaguely recalled the dealer telling me about. So, thinking I had found the solution I started the engine then switched off the key and it kept running, then pressed the button and it kept running. Then, thinking the key had to be on for the switch to work I turned the key to the on position and pressed the button and the engine kept running.  I was pissed. I tried switching it off by turning the shut off button above the injector but this time it ignored me. I did not want it to run dry as I did last time and then it occurred to me – why not get under the engine and pull on the shaft from the solenoid. I work by myself so if something goes wrong there is no one to hand which is a sobering thought. But what could go wrong?  So under the engine I went and via the access gap I reached up, found the vertical shaft from the solenoid and pulled down on it  and the engine promptly shut down.

So the push button added to the control panel was not shutting down the engine.  Back under the bobcat I went to the access hatch and carefully studied all the wiring leading to the switch solenoid.  And then I saw it – what appeared to be a break in the insulation of the LGR wire which I must have caused when I worked on the starter.

damaaged wire
can you spot the break in the wire in the center of the picture to the right of the yellow connector

Perhaps the break in the wire was more than insulation but some of the strands as well.  This would explain why sometimes it did or did not shut down.  There is very little space under the bobcat and I could only effectively use one hand.  I snipped the wire at the break and tried splicing it but it was too high up to do effectively with one hand.  Eventually after a lot of back and forth I added 3 connectors.

because of space constraints I had to add additional wiring and connectors to reattach the wires

The fix seemed to work – the engine shut down at the ignition switch!  Now to re-attach the access cover.  But this also was not straight forward – it did not go back into place.  I recalled that when I undid the cover it seemed to spring out.  So the cover or the port into which it fitted was out of shape.  And force would be required to get it back into position.  My tractor bottle jack was too large but I found my pickup jack would fit and so with this smaller jack I raised the cover.  But it came up .5″ out of line with the bolt holes.  After several attempts of raising, trying, lowering, adjusting and raising I got it right.

the yellow plastic container was to hold the access plate in place while I made the adjustments. the jack was invaluable


With all this done I cleared the tools, started the Takeuchi, and consolidated the compost heaps.  And when I was finished and the bobcat was back in its berth, the engine did turn off!

mission accomplished! leaf bags consolidated and turned


a lucky save – rescuing my bobcat

Luck shouldn’t factor into daily events – maybe it has a role in investing, or coincidental meetings, but surely not when it comes to my tracked Takeuchi bobcat.  The way I am feeling right now is lucky and this is probably because I acted carelessly and was able to extricate myself from a sticky jam, actually muddy patch, without much loss.

I mentioned previously a trail I cut through the woods which ran close to a spring.  The spring fills a small pool from which it saunters down the hill, mostly unseen, below the surface of a dry stream bed.  My thought was to cut an access path from the trail to the spring and then enlarge the pool.  Because this is rough terrain my friend Mike volunteered to be on hand for the unforeseen.  Cutting the access path was relatively straightforward – we agreed on the route, then highlighted the route with yellow rope, then me with the bobcat and Mike with the machete, cut the path to the spring.

How to deepen the pool.  The lowest side of the pool was on the northwest but it was barred by briar necklaces.  So I initially approached with the bobcat from the higher west bank and quickly realized the incline was too steep.  So I backed out the bobcat and we hacked an approach from the northwest which shouldered between two large trees.  The bobcat loader made quick work of thick roots and, because I was tired from my previous attempt and lack of sleep the previous evening (to sleep at 1am and up at 5am to drop a relative at the airport), I was impatient and did not widen the new ramp or cut it for a more gentle approach angle.  I headed down the ramp in the bobcat, loaded the bucket with mud backed out and dumped the contents.  That was easy, so without pause I went in again, deeper.  As I backed out the bobcat’s tracks began to spin.

I have learned a lot the past 24 hours.  Tracks are great and provide much, much more traction on wet soil than wheels.  But, if the front of the bobcat is in water and you are backing out, the mud covered track at the front moves to the rear and slathers the dry soil under the rear tracks with water and mud.  The first, primeval instinct is panic, I gotta get out, so you increase the throttle and more mud and water are rapidly transferred to the back and the front of the bobcat settles deeper into the mud because it is digging a hole by the tracks scooping up the mud and water in the front, and transferring it to the rear.  I plunged the loader edge vertically into the mud and tried to use the leverage of the loader to push the bobcat backward up the ramp.  To no avail.

trapped bobcat
machete Mike and a mud ensnared bobcat

So I cut the engine and together with Mike we strategized.  When a vehicle is trapped in soft sand you place sticks and branches and rough material behind or in front of  the engine driven wheels for the treads to grip and, with some luck (again the “luck” word) you can get out.  We cut lengths of 4″ to 6″ diameter trunks (lots of trees around) and jammed these under the tracks – this was possible because using the loader I was able to move the bobcat forward onto its front edge and expose the rear tracks.  Then with full throttle and using the loader for leverage I powered the bobcat backwards – and barely moved.

I suggested to Mike that rather than place the trunks parallel and under the tracks we should place them at right angles to the tracks.  A lot of work and full bore throttle and – no progress.

bobcat trapped in mud
bobcat trapped deep in the mud

We thought the rear of the bobcat was catching the ground and so with long handled shovels we dug out the dirt and, with a lot of throttle, gained a few inches to freedom.  At this point, with 4 hours invested to little avail, Mike had to leave and kindly agreed to return the next day and his parting words were “you are tired, leave it for tonight, you can get injured.”  Which is good advice when you are deep in the woods with no one around.

Getting stuck in the mud, especially with a tracked vehicle, which should not get stuck anywhere, is an insult to ones sense of independence, self reliance, and ego.  Needless to say, I spent another hour digging, investigating and throttling and concluded a) remnants of the roots of the biggest tree were snagging the bobcat (revenge of the tree whose roots I had savaged); b) pushing wood under the tracks was a bad idea – the wood became slippery from the mud and water and because it did not span the width of the tracks, a good part of the gripping surface of the tracks was not getting traction; and c) the spring, which I had thought was a dribbler seemed more of a gusher and the water from the spring was transforming the area into a mud bath.

my trapped bobcat
a trapped bobcat is not much to grin about, except its a photo

After a really good night’s sleep and early next morning I was back at the muddy site – my hope was to single handed retrieve the situation and save Mike a trip.  I replaced the new chain on my chainsaw with an older chain and cut through some of the blocking roots – their diameter was 4″ to 6″ and I decided the old chain would be temporarily sacrificed cutting roots surrounded by soil and pebbles (until I could re-sharpen it).  This helped  and I got the bobcat back about 6″.  I then decided the rising water was a problem and with the machete cleared a path down the dry stream bed and then with shovel and pick axe dug a 40ft trench in the stream bed.  The bed appeared dry on the top but the holes dug by the shovel quickly revealed the water running just below the surface.  This helped to remove the water which had been building up around the bobcat.

But it still wasn’t moving.  I was convinced that the bobcat was snagging on concealed obstacles and, as I dug deeper around the rear of the bobcat and its tracks, these came to light.  By this time Mike had arrived and together, with an array of tools from long handled edgers, mattock, grubbing tools, hand saws and the rapidly blunting chain saw we cleared a path to the rear.  With the benefit of a night’s sleep we agreed that the tracks would grip better if they were not covered with mud and that spinning the tracks quickly in frustration just dug the machine in deeper.  So the new modus operandi after clearing obstacles, including belatedly all the wood we had the previous day shoved under the tracks, was to use our gloved hands to pull the mud out of the exposed treads in the track.  Then, in a frequently repeated sequence, with hopes high, I would fire up the bobcat, apply throttle and slowly power the bobcat rearwards and gain a few inches more to freedom.  Unlike the previous day we were thinking rather than just acting and we were following a procedure that appeared to have traction.  It was surprising how many times we were sure it would get out and it didn’t.  But, eventually, with Mike yelling encouragement I escaped the clutches of the mud and got to level ground.

Was it luck?  Probably not, but an education into new techniques, the importance of thinking it out and a good night’s sleep.

trail through the woods

The past few weeks I have been preoccupied with cutting a new trail through the woods.  The northwest part of the property slopes down a hill and its face is creased with contour ditches and berms installed I know not by whom or when.  There is a small spring which forms a stream which slides off the property.  My new trail is designed to give me access to the spring and to meander among the fast growing tulip poplars.  Since this is the north facing slope, which is sheltered from the sun and benefits from the contour ditches, it also has ferns and mosses and a wildness of growth.

lush wild area at base of hill

My trail is  maybe half a mile long.  I marked its intended route a year ago with yellow rope.  Two weeks ago I began construction.  Initially my thought was to make a road which my tractor could access, but my tractor is 7 ft wide and when hitched with a chipper cannot make sharp turns.  So the road would have had to be fairly straight.  My tracked bobcat on the other hand is 5 ft wide and can turn on a dime, which means it can easily dribble among the larger trees.  So I settled on a trail rather than a road and saved a lot of larger trees and a lot of work.

beginning of the trail

From previous experience I know not to leave any stumps, especially the smaller ones which upset the unwary, so instead of chainsawing and pulling the trees out of the way (and leaving stumps in place),  I used my tracked bobcat to clear the way.  Two alternative procedures.

For those trees with diameters up to 3″, I simply lifted them up out of the ground with a chain and slip hook.  A slip hook allows the chain to run freely through it so as the bobcat pulled on the chain the hook tightened on the trunk of the tree.  The other end of the chain was secured to the bobcat body with a grab hook which gripped onto a link of the chain.  The slip hook worked fine on most of the trees except for one kind where the bark peeled off easily.  In this situation I had to revert to the second procedure.

example of slip hook


example of grab hook

The second procedure, primarily for the larger trees, was to attempt to push the tree over with the bobcat loader pushing the trunk at about 5 ft off the ground.  If the tree refused to budge I would cut the roots on either side of it with the loader teeth and then it usually could be pushed sufficiently to expose the base of the tree.  Then, with the loader at ground level I would bulldoze the tree out of the ground and push it sufficiently far to sever its roots.  The trees are interlocked by vines, mainly muscadine (grape vines) and they would have been hung up if I had merely chainsawed them.  So the assistance of the bobcat was invaluable.

trail along slope of hill

Once the trees were down I limbed and bucked the trees, that is to say I cut off the branches where they joined the trunks, and I cut the trunk into 5 ft lengths.  The 5ft lengths of the hardwood trees fit into the bobcat’s loader and I brought them back to the log cabin and stored under shelter to dry for firewood use at year’s end.  The pine trees trunks I will leave to degrade and return nutrients to the soil.

small spring at base of hill

I made several additional trips with the bobcat – down the trail to collect the rootballs and dump them in a large gully at the foot of the slope, and up the trail to collect the 5ft wood lengths for transport to the storage area.

5 ft lengths of future firewood

Finally my tractor came into play.  I attached a woodchipper  to the rear, which is driven by the tractor’s engine, and I have begun chipping the branches and odd wood lengths.  The chippings will be spread along the trail.

trail along base of hill

So much strenuous pleasurable work and a good result to date.  I must acknowledge the contributions of Mike, who assisted on the first day with lassoing and removing the trees, and Simon, who on two days worked hard amidst the mosquitoes and diesel fumes to help me complete the task.  On the way back this morning along the trail almost stepped on a baby turtle – it was on 1″ long – see below.

the 1 inch turtle

wildflower seeding

Last fall I collected a large quantity of wildflower seed and stored it in a cloth shopping bag.  Now that I have planted out my tomatoes and with rain in the offing, I decided to sow the seed – cosmos, sunflower, marigold and zinnia.  I was gifted two old cultivators – they are 5 feet wide and connect to the three point hitch at the back of the tractor.  The tines are spring tensioned.  I have a 60hp tractor which typically would pull a larger cultivator and so I had to make some adjustments to fit the cultivator to the tractor.  But the hitch fitted without a hitch, so to speak, and with my tractor in its lowest (slowest) gear I made several passes on contour across the sloping field.  The tines did a great job making furrows in the field and displacing stones.  I then hand sowed my collected seed in the furrows.  I probably should have finished the job dragging large planks with chains, which came with the cultivator, to bury the seeds.  I am hoping we get rain, but not too much, and the rain will settle the seeds in the soil.  Below is a ‘photo of the cultivator.

contour ditch construction

My land slopes and since I rely entirely on rainwater for irrigation, I catch the rain however I can – in storage tanks or directly into the ground with contour ditches.  Contour ditches are similar to swales – built on contour or dead level survey lines to intercept and hold water and to let it infiltrate the ground, therefore they are not compacted or sealed.  While a ditch is narrow, a swale can be broader like a basin and, according to the permaculture bible by Bill Mollison, trees are essential to swales and must accompany swaling in arid areas.

I start my contour ditches towards the top of the slope where there will be sufficient runoff (if the ditches were located at the bottom of the slope they could be overwhelmed by torrents of water).  Once I decide approximately where the ditch will run I use my transit level and a helper (my rod man) to locate the middle and two ends of the ditch on a contour.  I mark these three points with stakes.  Usually, by this time, my helper’s patience is exhausted and I am on my own for the rest of the project.

transit level and measuring rod

simple A frame with bubble levels (red) on horizontal and vertical legs


If the ditch is say 200 ft long, even with the three stakes in place, it can be difficult to figure how the ditch should run between the three stakes since the ground is uneven.  So I use my A frame, which is simply three pieces of wood connected to form the letter “A”.  The two sides of the A are 8ft long and the feet are about 8.5 ft wide.  The horizontal  piece is 4ft long and all the wood is 1.5″ (nominal) square, so it is not too heavy to carry about. A simple bubble level is attached to the horizontal and one of the vertical legs.  I construct the A frame on a level surface and ensure that the horizontal piece (to which the bubble level is secured) is horizontal before bolting it in place.

I gather some rocks and a can of aerosol spray paint and with my A frame start from the stake which marks one end of the future contour ditch.  One leg of the A frame is next to the first stake and I point the other leg in the direction of the next stake and move it along the ground until the bubble level tells me the A frame is horizontal and the second bubble tells me the frame is vertical.   I place a spray painted stone to mark this spot and then swing the first leg around the second in the direction of the next stake until it too is horizontal and vertical.  It is important to advance the legs alternately since this will counteract any inaccuracy in the A frame.  I can tell how accurate I have been when my A frame eventually reaches the next stake – if the leg of the A frame is at the same level as the stake, all is well.

Having marked out the line of the contour ditch with the three stakes and painted stones, next step is to dig the ditch.  I work mainly by myself – I will not engage paid workers and volunteers are scarce.  So I have no qualms using my old machines, which I nurture along.  My Takeuchi tracked loader (bobcat) has a stumper attachment, which is good for removing stumps and digging ditches.  Digging the ditch becomes quite simple, I simply use the bobcat to carve out the ditch following the trail of spray painted stones and I save the removed soil in a heap for some future use.

I seed the ditch and sides with grass seed to stabilize the banks.  And then I make my plantings on either side of the ditch.  An earlier (shorter) contour ditch I dug for my muscadines (grape vines) has proven so effective at catching and holding water that supplementary watering will be minimal (the ditch is assisted by a diversion slot cut across an access road which directs water into the ditch).  After planting up my new ditch with trees perhaps I will call it a “swale”.

attachment for stump removal/digging ditches
Takeuchi with attachment digging a contour ditch

TGFI – tractor top link

“TGFI” – you may have thought this was a typo and should be “TGIF” – Thank God its Friday, but for me it is Thank God for Internet.

Most tractors have a three hitch system, which means the heavy implements at the back are hitched or connected to the tractor at three points, two horizontal at the bottom and one at the top. The top point is connected to the tractor with a top link. I damaged my top link and needed a replacement – one of the arms of the top link was bent, which meant I could not adjust its length in situ and so had to remove it each time I needed to adjust it. The top link I damaged was a replacement which cost <$30 from a local tractor dealer, now unfortunately out of business. So I was thinking in the $30 price range. With the local dealer out of business, the next closest dealers are about 30 miles away and, to avoid a wasted trip, I called ahead. I was flummoxed when told the replacement would cost $109 (before taxes). So since this wasn't time critical, off to the internet I went - even if it had been time critical I would not have paid that price!. I do not know whether the part they were selling was U.S. made or imported, and I will pay up to 20% more for U.S. made, but the price quoted did not merit further discussion. [caption id="attachment_1706" align="aligncenter" width="640" caption="damaged top link on top - note bend on right side, replacement below"][/caption]

A top link has holes on each end through which pins are inserted to connect it to the implement and the tractor. The size of the holes is determined by the size of the tractor – larger tractors have larger holes. My tractor (Case 585) is 60hp which makes it a category 2 tractor (category 2 tractors have horse power ranging from 40hp to 100hp), and the holes are 1″ and 3/4″. I found a top link with 1″ diameter holes for $24 and for $2.20 I purchased a bushing kit, which reduces the internal diameter of the 1″ hole to 3/4″ diameter. Shipping was $11, and so for $37.20 and a 4 day wait, I had a new replacement top link.

It takes a couple minutes to replace a top link and, below, you can see the new top link in place.

new (shiny) top link in place connecting top of yellow box blade to tractor

Now Georgia is about to pass new tax laws which will probably tax internet sales but even an 8% tax will not diminish the benefit of having an alternative source of supply for uncommon parts. TGFI!

new growing area and contour ditch

In a previous post I mentioned the repercussions experienced from locating my muscadine grape plantings too close to my vegetable beds.  Just as the vines of the muscadine grow interminably so do their roots and the raised beds, tomato planting sites and other vegetable sites were mined by muscadine roots.  I relocated half (6) of the muscadines earlier in November and have now prepared a site for relocating the remainder.

contour ditch
new terrace with contour ditch after recent rain

The site is on the slope of a small hill which has blueberries at the top and a fruit tree orchard lower down.  I decided to carve out a terrace between the two, approximately 8 ft wide and 100 ft long, with my bobcat.  Terracing the first 50 ft was uneventful and then I hit the rocks.  It seemed the slope was made from rocks.  With the teeth of the loader I jiggled the rocks loose and then manually lifted the rocks and stacked them above the terrace.  Seemed interminable.  Eventually a terrace appeared.  But it sloped from the north end to the south end, which meant the intended contour ditch would be more drain than a container of rainwater.

I hammered in 6 – 4ft  metal rods equidistant along the terrace and then with my transit level and surveyors tape tied to the rods, I identified the grade (you can see some of them in the above ‘photo).  With my bobcat I then pretty much leveled the terrace, though there is still some dip from the north end to the south end.

Next step was to dig a trench/ditch down the middle.  I replaced the loader on the bobcat with a trencher/stump remover attachment and after pulling out more rocks had a rough ditch.  A lot more work with a shovel was required to make it presentable.

contour ditch
some of the rocks embedded in the slope which had to be removed

Now I had bare clay earth and the prospect of oncoming wintry rains and erosion.  I discussed with the owner of the local farm supply store whether I could still seed with clover.  He suggested winter rye grain was a better bet for a cover crop.  So I sowed the rye and hope it will germinate.

With the terrace now done, next tasks will be chain sawing some anchor posts for the cables for the muscadine grapes.  There is a toppled maple tree which I may use – though toppled, it is off the ground and its wood hasn’t rotted.  Also a poplar which needs to come out since it blocks my tractor when I go chipping in the woods.  Oak would be a better bet for longevity but I cannot justify (yet) cutting down a good oak for fence posts.

transplanting muscadine and fixing a mistake

Muscadine grapes (vitis rotundifolia) grow in the wild throughout the Southeastern United States. There are well known varieties and my favorite is the Scuppernong. When I established my vegetable garden 3 years ago I had a small growing area and, in my wisdom, ignored the instructions to “set the plants 20 feet apart in 10 foot rows”. Instead, I set up 3 horizontal wires, 5 ft high, 1 ft apart, and ran this down the middle of my vegetable garden. I figured the horizontal wires would give the plants adequate sun exposure, the 1 ft spacing would allow air circulation and my heavily composted soil would support a larger number of closely planted muscadines. Sounds good in theory. What I did not know is that muscadine roots can travel long distances (I heard one grower say up to 70 ft). I suppose the roots are a bit like the vines, which also grow interminably. Result was the muscadine roots began invading my raised beds, my tomato plantings, in fact all my plantings.

So I waited until first frost (a few days ago) and am now replanting 6 of the vines. Not a simple task. It is easy enough to trim the vines to 10 ft lengths, but extricating 10 ft lengths of root without damaging them is more difficult. Where the root forks you have to be careful not to tear off and strip of the root.

I previously had run a 5 ft high cable between my fruit trees to support tomato cages for my tomato plants. Also not a good idea. While the vegetable garden is circled by a 5 ft fence which keeps out squirrels, deer etc. my fruit orchard is not protected and a lot of wildlife visitors enjoyed my tomatoes this year. So I removed the tomato cages, dug a ditch below the cable and aligned the roots of the muscadine down the trench, covered with compost and soil, and watered. And I hope the muscadines will survive and grow. This took care of 3 of the 6 muscadines, but I had to develop a location for the other 3 muscadines.

I decided to extend the cable further down the orchard which meant inserting another post to carry the cable. I attached the augur to my tractor and used a large drill to dig a 3 ft hole. Then with a chain attached to my tractor bucket I hoisted my post (an 8 ft cherry tree trunk) into the air and lowered the trunk into the hole. Remaining steps are to extend the cable and transplant the remaining muscadines. A lot of work to correct a mistake made 3 years ago.

muscadine
muscadine awaiting transplanting
muscadine
muscadine with trimmed vines and roots prior to going into trench
muscadine
muscadine in situ with roots along trench
muscadine
tractor driven augur drilling hole for post
muscadine
tractor transporting cherry trunk to hole
muscadine
cherry trunk in vertical position prior to being moved to and lowered into hole
muscadine
new post installed to carry cables for muscadine
muscadine
new muscadine plantings
muscadine
simple contraption made out of 4x4's to support augur when not in use

cutting a ramp with Takeuchi

Last year I bought a Takeuchi TL26 track loader.  This machine was made in the 90’s and because it has tracks rather than wheels is ideal for grading or re-shaping the ground surface.  It has 61hp, which makes it a mid-size loader and just right for my limited needs. In the article on the fading battery I mention some of the repairs I have made to it.

Since the temperature tomorrow is expected to be back in the 90’s and today we are only in the 80’s, I decided to cut a ramp down to the lower field.  My tractor access to the lower field is blocked by the fences I installed for the chicken coop and I figured it would be cheaper to make a new road to the field than to purchase two 10 ft gates for access through the chicken free range.

I like thickets for the cover and food they provide to the wildlife.  However, this morning it was necessary to cut a road through vegetation.  The process took less than a couple hours.  I placed the cutting edge of the loader’s tooth bucket a few inches below ground surface and ripped the bushes and small trees out of the ground. Once the roots were free I climbed out of the loader and manually pulled the branches out of the way and stacked them in a pile to be chipped at a later date.  The roots will be stacked in a pile for slow decomposition and to be added to the compost heap.

top of hill before grading
top of hill after grading


Grading the hill i.e. cutting a ramp down to the lower field was more of a challenge. I work by myself and try to avoid situations where I get into trouble, though I always keep my cell phone at my side in case I have to call for help. So I proceeded with care filling the bucket of the loader with soil as I cut a decline into the ground and then advancing to the edge and dumping the contents down the hill. In this way I fashioned a road down the hill. Then it was a matter of leveling the ramp and removing some of the boulders embedded in the hill. My loader is 5ft wide and the tractor is 7ft wide (it has wide rear wheels which increase the width from 6ft to 7ft), so I widened the ramp a bit for future access by the tractor and pickup truck. After it has rained and the soil re-settled I will smooth out the ramp one more time with the loader and then bring the tractor down to bushog the field, chip the branches and small trees, and augur post holes for the new insulated coop I will be building towards the top of the field where it catches the winter sun.

bottom of hill before grading
bottom of hill after grading