I have spent time with 3 organic growers in the area and hope to expand my circle when I am able to participate in the local Saturday morning markets. I visit often with one grower who, tho good at growing, is less interested in repairing equipment. His riding mower and his push mower are both out of action. Though I use a scythe in the hilly and restricted areas, I also make frequent use of a riding mower (see my posts on various repairs) so I sympathized with him. I tried starting his push mower with starting fluid and the engine fired and then immediately cut off. Must be carburetion I said and suggested he could find full repair instructions on the internet. He was not enthusiastic, so several weeks later I volunteered to fix the mower for him.
With the push mower in my basement I made a start – first thing is to find the model # and google for parts diagrams and utube videos. But the part # related to the mower frame not the engine, so I then found the Briggs Stratton model # concealed under a shroud. The model # 10H902 tells you a lot about the engine. The “10” is the cubic inch displacement, the “H” is the design series, and of most interest the “9” tells you it has a vertical shaft pulsa jet carburetor. “Pulsa jet” I thought, I wonder how it operates? Well, with the resources of the web you can download detailed information on the pulsa jet carburetor, which is very simple but clever in operation.
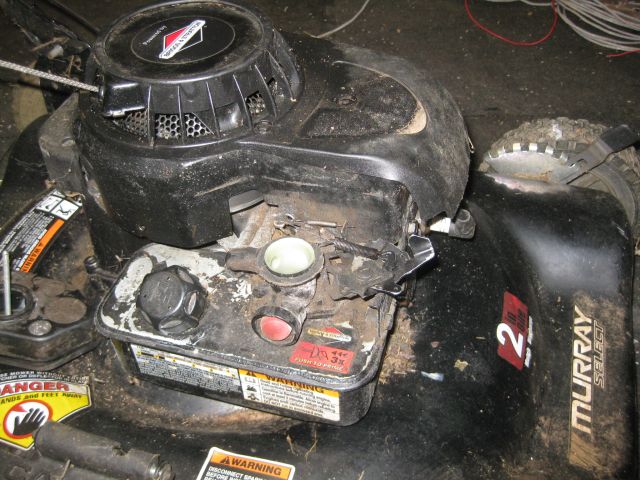
here is the mower with the air filter cover removed
The carburetor and fuel tank are removed as one unit.
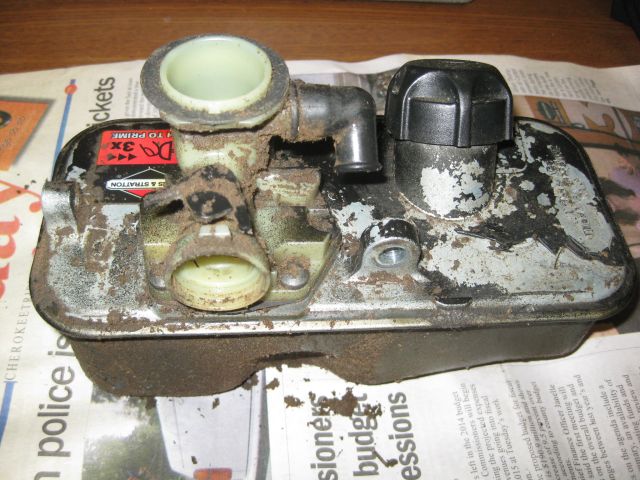
the carburetor and fuel tank before disassembly, still looking dirty after I removed several coats of grime
And here is the carburetor separated from the fuel tank, with the tank mating surface facing the camera.
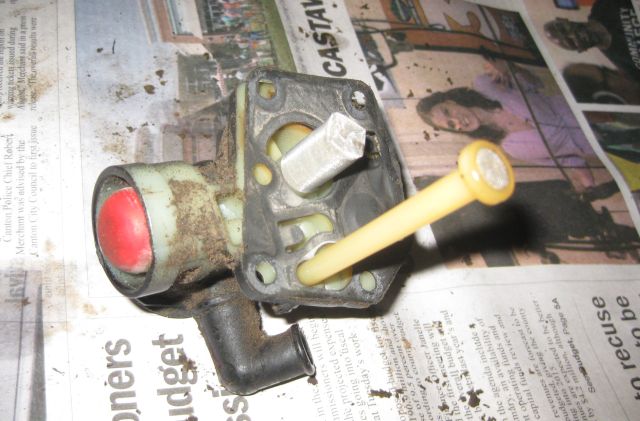
the red button is the primer button which you press a few times to fill the carburetor with gas.
The long yellow tube is immersed in the fuel tank and when you press the primer button, gas is sucked into the carburetor. The short silver tube interested me – what was this for?
When the engine is running, the downwstroke of the piston lowers air pressure in the carburetor and this causes a diaphragm to move which sucks gas liquid into the carburetor and also fills a little reservoir above the gas tank. This reservoir maintains constant fuel supply to the engine because if it was not there then as the level of the gas fell in the tank, the flow of gas would be affected. And the silver tube sits in this reservoir and the silver color is actually a fine strainer filter for the gas. Knowing how and where the fuel moved in the carburetor I was able to blow all the passages clean with carburetor cleaner fluid. There are no jets to disassemble, it is a simple carburetor. The diaphragm appeared in good condition, so, after cleaning out particles in the gas tank as well, I put everything back together again and started up the mower. And it worked.
I had a break in and theft a couple years ago and so installed a home security system with a very powerful siren, camera system and dawn to dusk lights. Being a DIYer I installed them myself. The programming of the Ademco Vista 20p was challenging. They work fine but I did not have remote access, which means if the alarm was triggered when I was away, then I depended on my neighbors to call me. Which they did when the alarm went off last week for the first time in 2 years. It was a false alarm caused by a loose wire in a new sensor installed a couple days earlier.
Which got me thinking. Wouldn’t it be nice if I was electronically notified when the alarm was triggered and if I could then use my cameras to verify if there was an intruder. If there was I could call the police and then head out to the property. If not, I could reset the alarm and save the trip.
I started with the video cameras which feed into a dvr (digital video recorder). I have dsl internet service at the property and it is easy enough to connect the dvr to the router with a cable. But how do I enable the system so I can view the cameras remotely? The router blocks intrusions from the internet and you have to open certain ports to internet traffic (called port forwarding). You could also use UPnP (universal plug and play) but I decided against this route. Since I didn’t really know what I was doing it took ages to set up the addresses and ports, BUT it still didn’t work. You can tell success by going to a site aptly called “canyouseeme.org” and the site reports back whether it can see you i.e the port is open, or not. I truly believed I had done everything correctly but I couldn’t be seen. So I got help from my son who said that the dsl modem through which my router was connected to the internet was actually a 2nd router with a firewall and to get around this I had to establish a “DMZ” (demilitarized zone, reminds me of the Berlin days). Once I did this canyouseeme promptly reported success. I installed a neat app called KMEye on my iphone and I am now able to use the video cameras remotely (and also locally) on my desktop/laptop and iPhone.
Next was to have the Ademco security system notify me when the alarm was triggered. As with the security cameras I went down several cul de sacs before success. The Ademco can send pager alerts and several postings said this alert could be enabled to call your ‘phone. I tried programing this and failed and gave up when a poster who provided a very detailed write up of his system=authoritative, said it wouldn’t work. But I found a neat little module from EyezOn called EnvisaLink3, which was expensive >$90 but installed easily on my system. You register with EyezOn and they act as the intermediary between you and your system. Alerts are emailed or text messaged to you and other selected contacts, and you use the smart phone app to see what circuit or condition triggered the alert and you can arm or disarm very easily using the app. There is no additional charge for this service, though to register you have to exculpate and indemnify the provider against any loss from their system not properly working.
So I have now, after a week of mounting frustration, successfully established remote surveillance. Incidentally, my security sensors are all wired to the control panel. I read this week that wireless security systems can be hacked and neutralized. Wired systems take a lot of work to install but since they don’t use batteries require less maintenance.
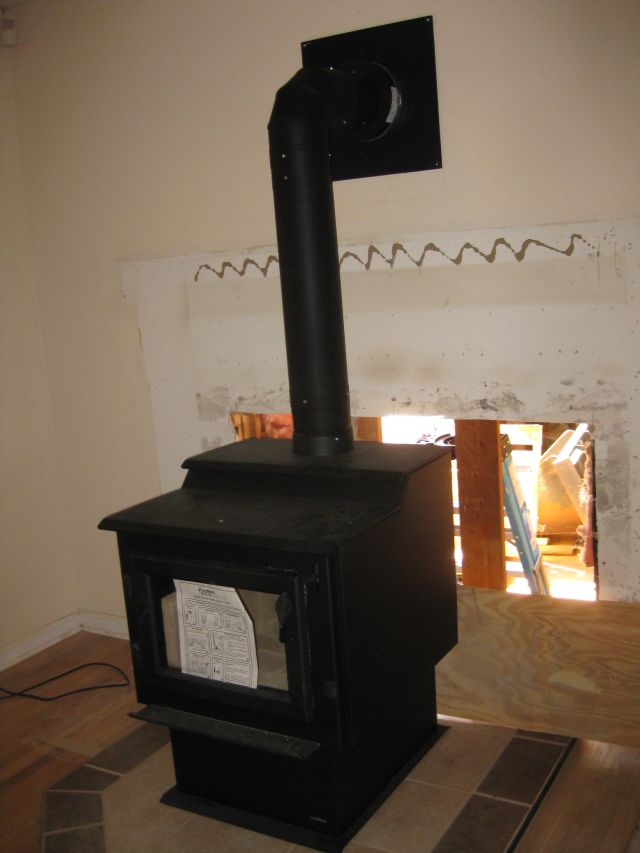
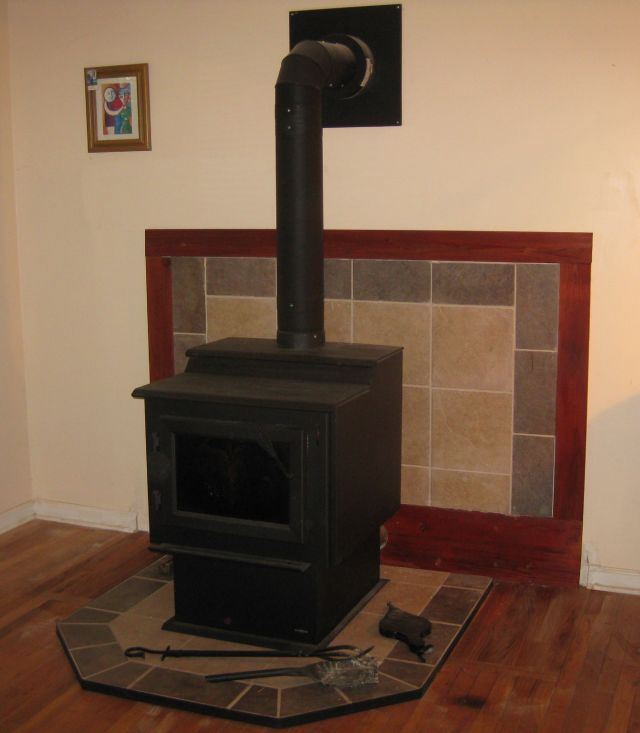
In March 2014 I dedicated two posts to the process of removing the old fireplace and installing a new, efficient wood stove. In the last post the stove was fully functional but looked “bleh”.
installed wood stove but a lot of finishing is needed
I had a lot of work to do – on the exterior the wood siding had deteriorated and had to be replaced and caulked. And then on the inside the question was to either replace the sheetrock, not a real skill of mine, or do something extra. I decided to tile the wall behind the stove, since the tiling would look nice and is not combustible. So I installed cement backer board and spent ages looking for tiles which would match the new hearth pad. I mentioned that the mantle of the old fireplace included good wood, which I decided to re-use for the surround.
So here is the finished product.
wood stove and surround
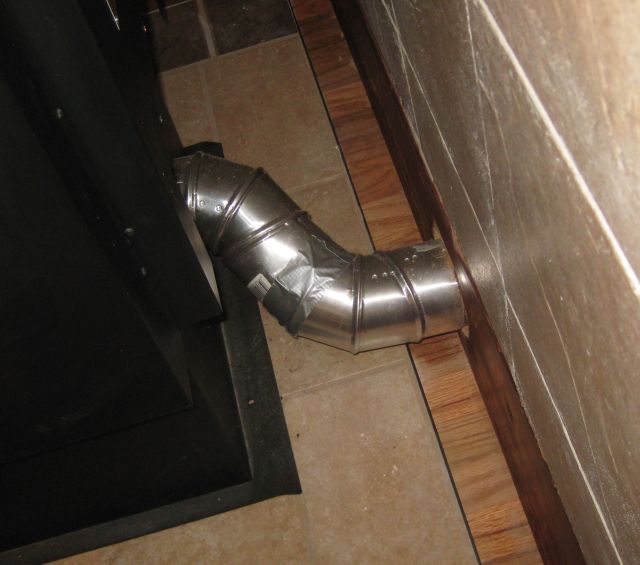
To reduce heat loss I connected the air inlet pipe at the rear of the stove to the exterior so the stove will not consume heated air from the room.
4″ inch piping to duct exterior air to the stove
Initially I used the concertina type ducting you install for clothes dryers, but I concluded that the concertina crinkles impeded the air flow and so I replaced that with standard duct piping, which seems to work well.
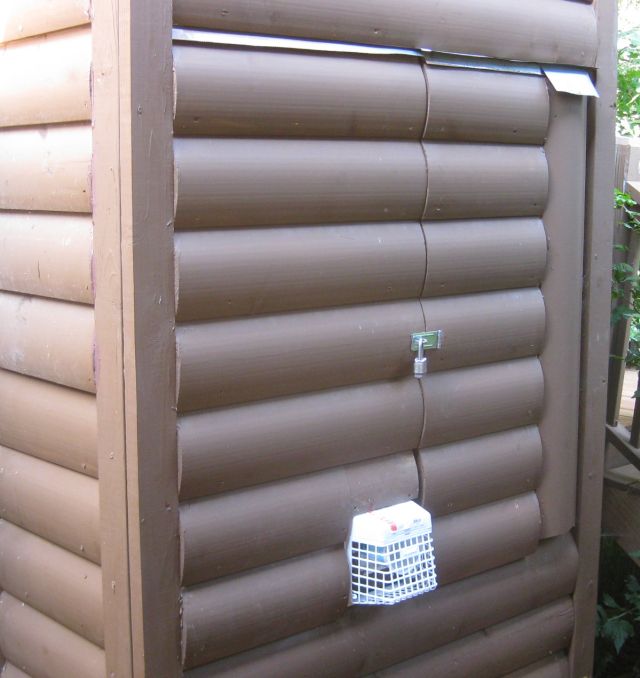
And on the exterior air inlet, I fitted a plastic grate to keep out animals. It is hinged and during the summer, when the stove is not in use, I have also plugged the interior pipe with an empty 1qt yogurt container.
chimney exterior all of which had to be replaced
Whilst I was at it, I also installed a small door which provides access to the interior of the chimney chase so I can brush clean the chimney flue pipe, as needed.
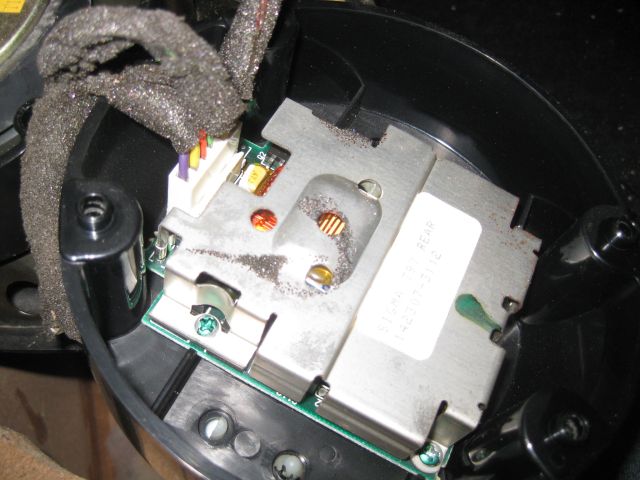
In the past, when a bathroom fan failed, I simply removed the cover, unscrewed and unplugged the insert and installed a replacement – this was the NuTone brand and the replacement cost <$15. However, at the log cabin it was not so simple. The fan was manufactured in Canada and a replacement blower assembly was not available locally or at Amazon. It could be purchased from the manufacturer but the cost plus shipping was greater than the $70 cost for a complete unit from Amazon.
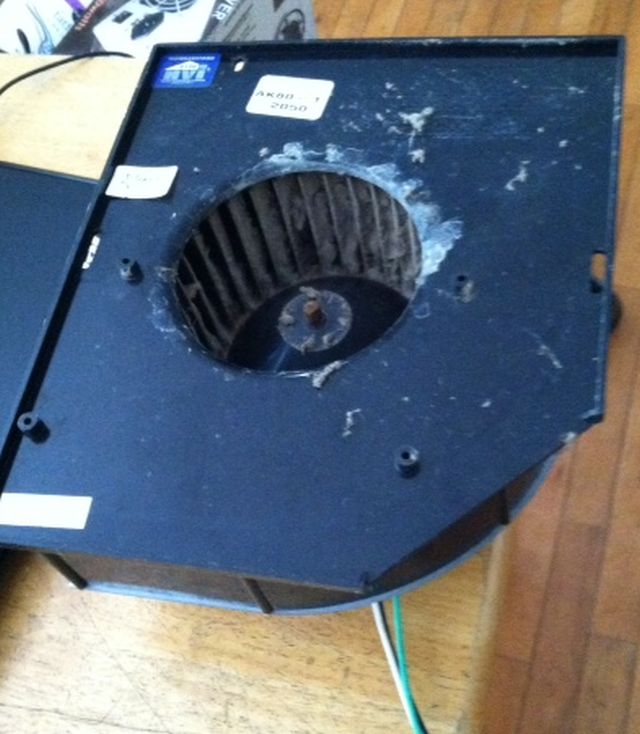
Since the manufacturer touted the reliability of its product I considered whether I could simply repair the fan. When I removed the unit I noticed that the vanes of the blower were clogged with dust and debris. This was why the fan had sounded weaker and weaker with the passing months – the motor had been struggling to turn the blower. And perhaps this had burnt out the capacitor or the motor was defective. If the motor was bad I would have to buy the Amazon unit. I tested the capacitor with a capacitor meter and it seemed ok. However this did not mean it was ok.
I could buy a new capacitor for <$4 from the manufacturer but with flat rate shipping of $11 this would be close to $15. Or I could buy a similar capacitor with the same farad spec from Amazon for approx $5 with no shipping cost add on. I invested $5 and when I installed the new capacitor the motor turned slowly. Then I cleaned the vanes and the fan spun to life. Fixed. NB – don’t try this unless you know what you are doing, it can be dangerous.
why it failed – you can clearly see the accumulated dust and grime on the inlet vanes of the blower
And the lesson – clean the blower vanes with a sized, soft paint brush regularly and you can avoid a lot of aggravation down the road.
In addition to my nu trac life north of Atlanta, we also have a house in Atlanta. The gas company decided to install new gas lines in the subdivision where our house is located. They called in the “locators” who with different colored sprays identified the electricity, water, telephone, sewage and gas lines. Then with a sophisticated omni-directional drilling machine they bored small diameter tunnels underground from one excavated point to another. When the drill bit reached its destination they attached the new flexy gas line to it and hauled the drill bit and the new gas line back to the starting point.
The excitement began mid day July 2 – it was a Wednesday and 2 days before July 4, which was on the Friday. A loud bang was heard in the kitchen accompanied with a burning plastic smell and the house lost power. The local power company restored power within 3 hours. However 2 desktops, a Bose CD player, the telephone and other items no longer worked. Thursday 8am I walked over to the subcontractors who are installing the new gas lines and asked the supervisor for their claims department contact information. The supervisor denied responsibility because, although his crew hit the power line (he couldn’t deny that) , the power line location had allegedly not been accurately marked. We are not responsible the supervisor said, the blame lies either with the power company for not mapping the power line or the locator for not accurately marking it. He added that this would take weeks to resolve. Nothing like a challenge to fire me up. I called the power company and the gas company and left numerous voice mails – it being the day before July 4, many folks were not at work.
2 Dell computers destroyed by power surge
I figured that the desktops might just need a new power supply and, on my way to the farm, I stopped at Fry’s, which is a very impressive electronics store, and bought a new power supply for $12 (a bargain, actually $21 less $9 rebate). The desktops which had shown no life at all after the power surge now sorta switched on with the new power supply and there was a cursor on the screen but nothing else. So I decided to buy a new low end desktop and began reinstalling software from CD’s I had kept. I won’t go into the details except for one challenge I encountered. The information on the 2 destroyed desktops had not been backed up recently so I wanted to transfer from the old desktop hard drives to the new desktop. When I bought the new desktop I had asked if it had a bay for a 2nd hard drive and was advised that it did and, when I opened up the new desktop it did have a bay for a 2nd hard drive. But – there were no connectors to attach to the 2nd hard drive. In other words I could not simply attach my hard drive to the new computer and transfer the files. A hard drive needs two connectors – one to provide power for it to spin and the other to save or retrieve information. I was thinking of powering the hard drive with the new power supply I had purchased and temporarily using the connector to the CD/DVD drive for the hard drive. But I was concerned this could do damage. And then I was given the solution – it’s great to have family or friends who know something about technology.
The Sabrent connected to the hard drive. On the left is the power cord and on the right the USB connection. All for $15!
There is a very nifty device manufactured by Sabrent which costs just $15 and it both provides the power for the hard drive and also, via a USB hookup transfers information back and forth between the hard drive and the computer. The device arrived within a few days and, with a lot of googling help, I was able to identify and transfer all the files on the 2 hard drives and the browser book marks and the desktop icons. And life was back to normal.
And what happened with the claim? The following Monday, when folks were back at work, I had lengthy calls with the claims departments of the power and gas companies. They were just 2 of the 4 parties involved since there was also the locating service and the sub-contractors who were installing the new gas lines for the gas company. But I wanted to keep things simple and so I said to the two utility companies that since their head offices were in our county, if the matter was not quickly resolved, rather than pursuing claims against them individually and the locating company and the sub-contractors, I was simply going to name the 2 big companies as joint defendants and proceed against them in small claims court, and by the time we were finished, their legal costs would probably exceed my damages, which I estimated at $1,600. Two days later (Wednesday) the power company called and said if my damages were still around $1,600 they would settle up. On the Thursday, I emailed a very detailed claims analysis with photos and Amazon cut outs and lengthy notes. On the Friday they said they would pay, and on the following Monday, less than 2 weeks after the incident I received my check for approximately $1,600.
Moral – by DIY I was able to keep the downtime and my costs to a minimum, and keeping my costs low made settlement attractive (a computer technician would have increased the costs significantly). Also by suggesting small claims court (another DIY resource, I suppose) I was able to motivate the parties to move quickly.
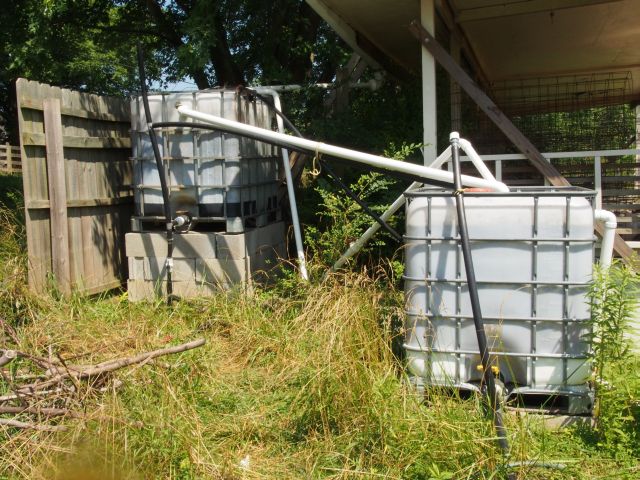
All my irrigation is from harvested rainwater collected from impermeable surfaces, stored in large tanks at the bottom of the hill and then pumped to 2 tanks at the top of the hill for gravity feeding to the orchard and crops. Today I added my 9th valve to the pipe system for the 2 gravity feed tanks. Are 9 valves used and are they necessary? I have concluded – yes.
Here is a ‘photo of the 2 tanks:
2 gravity feed tanks with numerous valves and pipes
And here is a schematic of the pipe system:
You can see the 9 numbered valves. Here are some combinations:
Pumping to tank A – 3C, 4O, 9C (i.e. valve 2 closed, valve 4 open and valve 9 closed)
Pumping to tank B – 3C, 4O, 9O
Harvesting deck roof water – 7O, 6C, 8C (when A is full, water moves via 2 routes)
Water to tree nursery – 7O, 6O, 5O, 3C, 1C, 2C
Gravity feed to downhill from B – 😯
Gravity feed to downhill from A – 7O, 6O, 5C, 3C, 1C, 2O
Gravity feed to tophill – 7O, 6O, 5C, 3C, 2C, 1O
Pump feed to tophill – 4C, 3O, 5C, 6C, 2C, 1O
One of my best innovations is the last combination. I previously gravity fed my blueberries at tophill with an in situ bubbler system but, because pressure was slight, the distribution was uneven and unreliable. Now, with the last combination I can switch on the storage tank pump timer at the bottomhill and directly pump and distribute water via a hand held hose to the tophill plantings, which means thorough quick daily watering with daily inspection.
So now, in addition to my daily soduku exercises, I also challenge my mind with correctly setting the various valve combinations for the changing tasks.
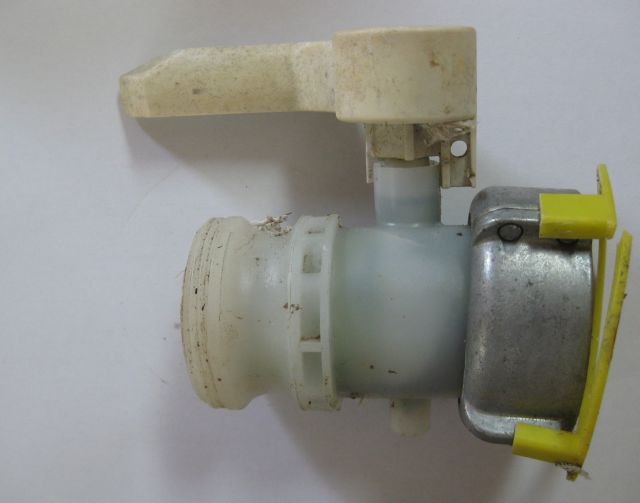
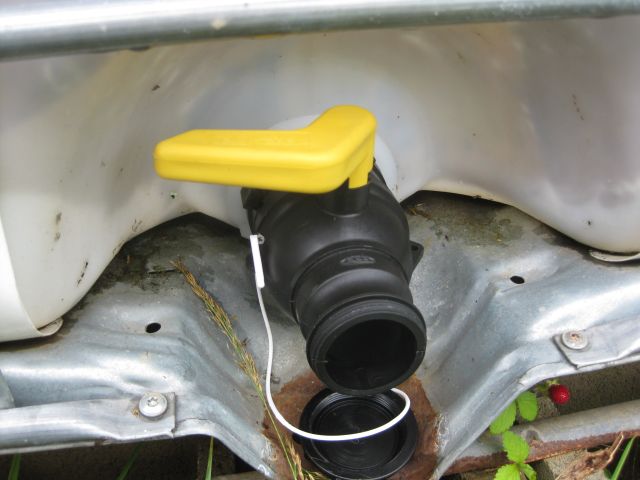
My rainwater harvesting system includes 5 IBC (intermediate bulk container) totes, each with a 1,000 litre (280 gal) capacity. It was inevitable that the valve at the bottom of one would misfunction – in this case a crack developed at the handle shaft housing and water came out steadily.
This meant I had to study up on how to replace a tote valve. The valve is removed by turning anti clockwise the ridges on the metal coupler shown below.
the female thread on the right fits into the tank
There are ibc valve spanner wrenches offered at around $80 which seems steep for a simple tool. Instead I requisitioned my basin wrench tool which was able to undo the defective valve.
my basin wrench tool on display gripping a marker
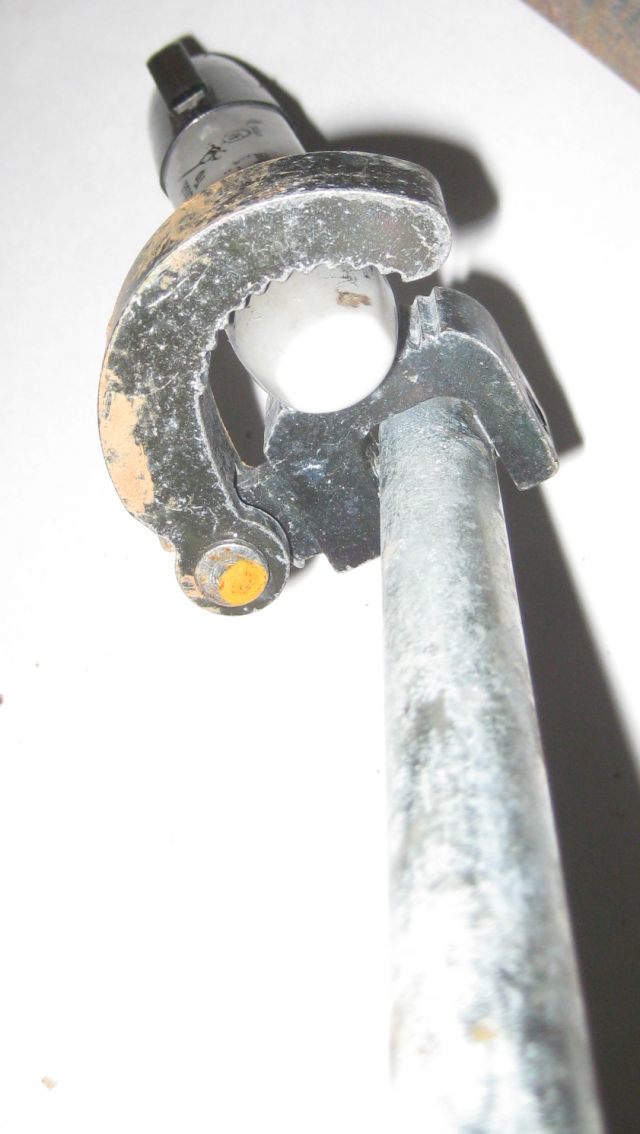
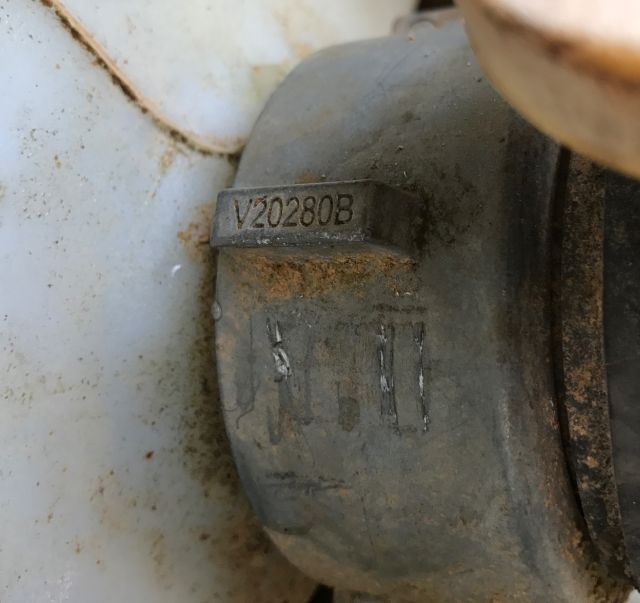
When the valve is removed you clearly see the male thread of the tank.
male thread of tote – this is called a buttress thread
The thread is called a buttress thread which means the thread has one side that is vertical, the other side is inclined and a flat top and bottom. The water exits the tank through the male thread above. There were various female buttress threads on internet offer such as S60x6 and S75x6. Which was the right one for me? The “60” or “75” refers to the outside diameter in mm of the male thread or, equivalently, the inside diameter of the female thread. The inside diameter of my defective valve is 75mm. The “6” refers to the pitch or distance between threads – since the products on offer had the same pitch I didn’t worry about this.
I ordered the new valve through Amazon since a) I know if a problem Amazon will fix it; and b) although the product cost the same on the suppliers website the Amazon delivery charge was less.
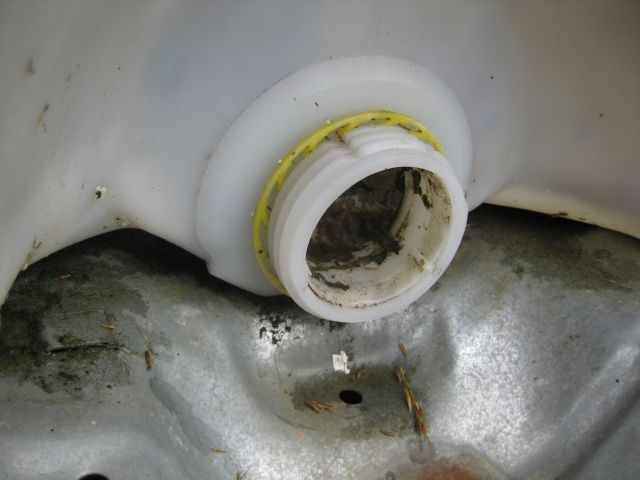
The part arrived in 2 days (impressive) but it did not fit – the female thread was too large. Had I messed up? I checked and rechecked my measurements and it appeared that the valve I received was an “80” dimension rather than the “75” I had ordered. What was frustrating was there were no markings on the valve body to identify what size it was. With the Amazon trump card up my sleeve I called the supplier whose sales rep initially gave me a hard time but when I said that I would simply file a complaint with Amazon there was a sea change and he assured me the replacement part would be shipped that day. When it didn’t arrive 4 days later (Tuesday) I called again and he, being adroit, thanked me for calling and said he didn’t know how to contact me (duh!) so my call was welcome and they were going to ship that day and I would receive it that Friday plus they would let me keep the wrong part for no change. I called the following Monday and he said it would arrive that day and IT DID. And it fitted!
new tote valve installed
So the Amazon viaduct was helpful, I was not seriously inconvenienced by the delay and I have an extra wrong sized valve which I may be able to cannibalize when the next valve fails.
Follow up
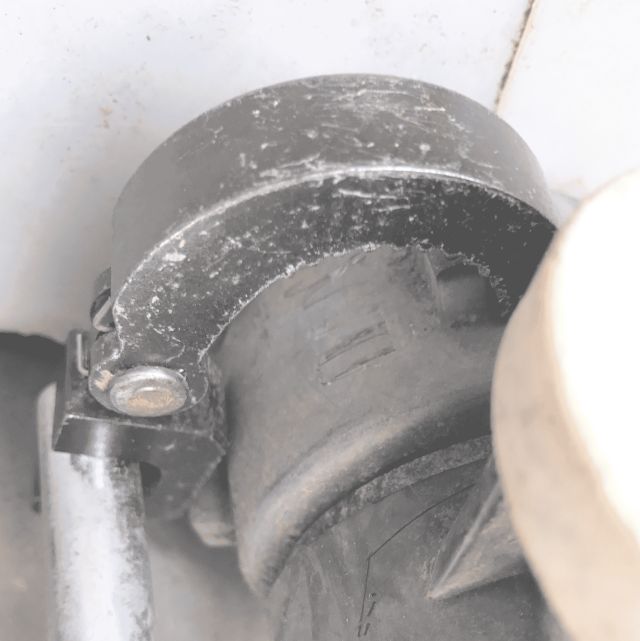
I received 2 comments – 1 below and 1 which I managed to lose, sorry, – questioning whether the basin wrench shown in the photo above could actually grasp the ridges or lugs of the valve. So I decided to go back to the tank with my basin wrench and take photos of it accomplishing this task. And I made a discovery – it does grasp the ridges of the valve shown in the first picture but not the ridges of a more recent valve.
Below is a pic of the basin wrench gripping (just) the ridges of the valve with sufficient force to turn it.
fully extended basin wrench can grip both ridges
The reason why it works on some valves but not others has to do with the width of the ridge. If you think of 2 ridges, one on the left and one on the right, the wrench has to extend from the left side of the left ridge to the right side of the right ridge. So, if the ridges are equally spaced on the circumference of the valve, the wrench has to cover a lesser distance with narrow ridges (which it can) than with wider ridges (which mine cannot). Below are pics of a narrow ridge and a wide ridge.
this is a narrow ridge and my wrench is wide enough to grasp 2 narrow ridgesand this is a wide ridge and my wrench cannot simultaneously grasp 2 such ridges
During my working days I owned a luxury used car which I purchased with 28k miles on the clock and traded in at 140k miles 10 years later – a decision I regret, since it had character (a big wrestler looking badge for the front grill) and I should have kept and nurtured it. At about 110k the Bose sound system deteriorated and I arranged for an audioshop to replace the tuner/CD player and, since they said the Bose speakers were incompatible with the new system, the speakers as well. But I requested they set aside the 4 Bose speakers for me, and for the past 12 years the speakers have sat on a shelf in the garage awaiting their destiny.
I enjoy most music genres and at my log cabin I incorporated various audio components into an acceptable sound system. Since I did not have speakers, I purchased a pair at the local thrift store – they seemed decent quality.
my thrift store speaker purchase
And for $18.91 what had I to lose.
caveat emptor – sold “as is” with no warranty implied
Actually, $18.91! I have bought solid wood desks ($6) and paintings ($8 – $25) at the thrift store and been very happy, but then I was able to inspect all the components of the purchase. A pair of good looking speakers on a shelf unconnected to a sound system can be a pig in a poke – after all why would anyone donate good quality, working speakers. Desks and paintings you can outgrow but good speakers are always useful. When I connected the speakers up at the house one worked fine and one was buzzy and noisy. I suspect the speakers were hammered at high volumes and the one was damaged.
this is the main speaker I replaced – you can see the damaged apron
So I have used just the one speaker until, with the advent of hot weather, I had time during mid-day heat to ponder a solution.
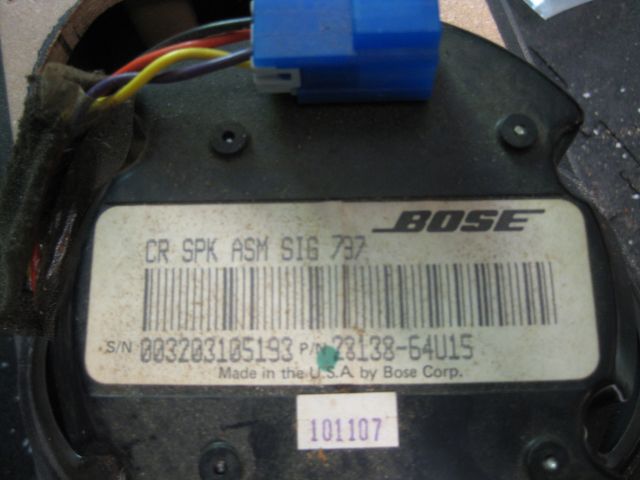
And then the Bose speakers came to mind. Why not replace the damaged speaker with one of the Bose speakers. But there is a problem – for whatever reason the Bose has a receptacle for 4 speaker wires while I have only 2 to provide.
see the blue box above the specs – it is anticipating 4 wires
I powered the sound system and tried touching my 2 speaker wires to all combinations of the 4 speaker tabs but no response. Then I inspected the Bose more carefully and saw that when all was said and done, just 2 wires headed for the speaker.
2 wires lead to the speaker
So I touched the speaker wires from the sound system to these 2 wires and the speaker came alive and sounded decent. I could have connected the speaker wires to these 2 wires and job finished but I thought it would be more elegant to connect to the interior tabs and I was curious to see how 4 input wires became 2. So I disconnected the back cover plate.
as I suspected 4 input wires did not simply become 2 wires, there is a circuit board and presumably fancy electronics fine turing the input from the speaker wires
Since I am a bit of a novice I decided to commit a travesty and sidestep all the embedded electronics and connect directly to the 2 wires going to the speaker. I reasoned that the Mitsubishi speaker box had its own electronics and these would have to suffice. So I made a short extension with connectors for the Bose tabs and a screw on connector for the 2 wires from the speaker box, ensuring I maintained polarity.
But first I had to fit the Bose speaker into the speaker box and since its profile was elliptical/oval it would not fit the rectangular shape of the speaker being replaced. I needed a template to mark out the shape on the speaker box so I could cut with my Skil jigsaw. I measured the length and width of the speaker where it would fit into the box , but how to draw an elliptical circle. Fortunately for my permaculture design course I have been working with Inkscape, freeware software, and so I produced the shape with the software to actual size, printed the circle, then copied it onto cardboard which I trimmed and then used the cardboard to sketch the shape on the speaker box.
the printed elliptical shape on the white paper and the cardboard template to which it was transferredI
With the jigsaw I cut out the pattern, the Bose speaker fitted well into the box, I connected the wires and fitted the lid cover and tried it out on my system and it sounds fine. Job accomplished.
my refurbished speaker – you can see the oval shape of the Bose speaker through the grill
The log cabin was built in 2002. I call it “the log cabin” actually its a house with basement and two levels and the exterior is “D” siding which makes it look like it is constructed from logs. An attractive finish but it requires annual care with repainting flaking spots and replacing bits of siding which have deteriorated. I purchased it in 2008 and have maintained it and upgraded it such as the wood stove recently installed. It appears well constructed but there are tells that some of the work was not up to grade. For example the concrete pad for the carport was a couple inches too short so the posts which support the roof are only partly seated on the pad.
concrete base incorrectly sized, so half supported carport post
But this is a fact not an aggravation. The leak in the steel roof and the ill designed gutter which poured water on the chimney exterior and caused a lot of damage was aggravation but the fixing is a story for another time.
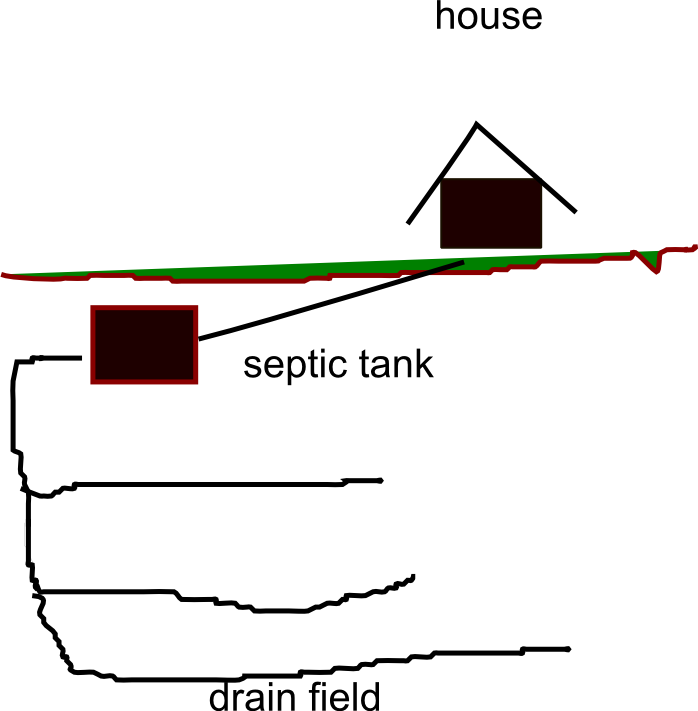
The two slip ups subject of this post were not quickly identified. The house has a septic system which means the waste water and contents are channeled to a septic tank where they biodegrade and then move to the leach field where they enter the soil via perforated pipes (the sketch below should not be interpreted to mean the perforated pipes are below the tank, they are to the side of the tank and a few feet below soil level). The tank is a rectangular concrete constructed box with a concrete lid and the lid is about 3 ft below soil surface. The sewer pipe from the house enters the tank about 2 ft below lid height so it is 5 ft below soil surface.
Recently the septic system stopped working. Quite easy to determine if you visited the area of the basement toilet and noticed the floor was wet. I ‘phoned Lenny (not his real name) who is the respected county expert on septic tanks. With his backhoe he quickly uncovered the septic tank lid and removed it with a chain fastened to the backhoe bucket.
removing the lid of the septic tank
The good news was that the tank contents were at normal level which meant there was no problem with the tank or the leach lines. I had been concerned that the many volunteer trees had directed their roots to infiltrate the leach lines and that these had clogged. So therefore the problem was either a clog in the sewer pipes in the house or a clog in the pipe between the house and the tank. Lenny donned his elbow-high work gloves and with a “snake” vigorously attacked the pipe.
trying to clear the blockage
Almost immediately something gave and with a whoosh the dammed contents flooded the tank. But, while I was relieved Lenny was dissatisfied. He had me flush the toilets numerous times and worked the snake up and down and informed it it wasn’t right and there was a problem and I should call in a plumber. He refused to accept more than $50 for his work since he “hadn’t fixed the problem”. His parting words were “get a plumber”.
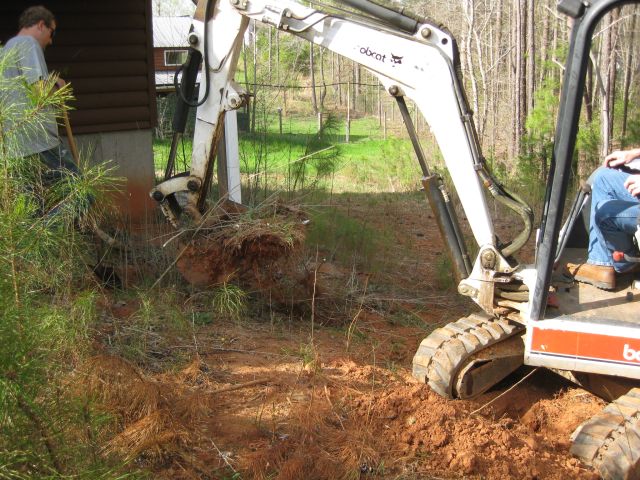
Well, the system seemed fine and I felt he had been over cautious and so naturally I did nothing until 2 weeks later when the problem recurred. Lenny had given me two references and one came over with a snake and in line camera, call him “Pete”. Even before starting, Pete said he was sure the line had parted and the pipe would have to be dug up. Nonetheless, at my urging he sent in the camera which did not give clear video since the line was filled with liquid. Next he sent in the powered snake which kept hitting something hard and was ineffective. Pete explained that the line had separated and the teeth of the snake were hitting the lip of the parted line. A few days later he returned with his backhoe and crew.
trying to locate the sewer pipe from the house
I showed Pete where the tank was buried. Between the house and the tank was a post supporting the deck (more about this later). The question was did the pipe run uphill of the post, under the post or downhill of the post. I was concerned the pipe had been buried under the post and that it was the weight of the post which caused the pipe to separate. I also noticed that the post was not vertical as though something had knocked the bottom of the post a few inches downhill. Pete first dug uphill of the post – he went down 4 feet but no pipe. With a backhoe digging a trench is quick and effortless. Then he dug downhill of the post and located the pipe.
the sewer pipe is located and uncovered
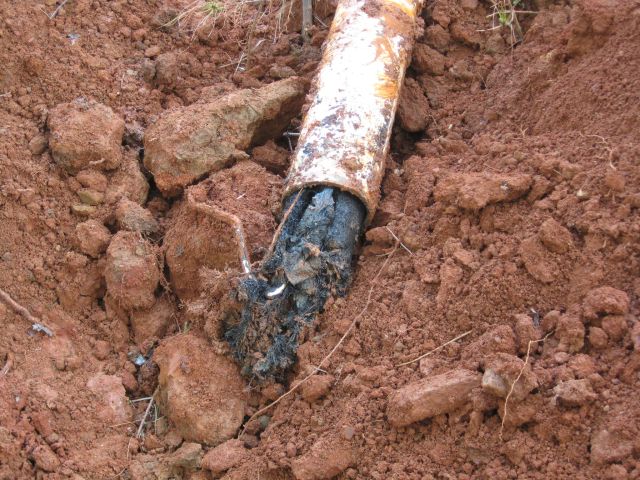
Prior to Pete beginning work I had wondered, idly, what he would do with the contents of the pipe – could be messy if it involved pumping or transferring. Actually the answer was simple – just dig a deeper trench next to the pipe and allow the contents to fill the trench and it all disappears when the excavation is backfilled. Towards the end of the pipe a couple feet from the tank we saw the problem – the pipe had been coupled with a collar to a short pipe which entered the tank, the two pipes had separated and a tree root had entered and grown in the pipe.
tree root gorged on sewer nutrients
Pete said immediately that the “old boy” who installed the line had not glued the collar to the pipes and that was why the pipes had split. We looked at the collar and it had never been glued. So this was slip up #1 – 20 cents of glue (a small can is a few dollars and a couple brush strokes would have sufficed) would have avoided the aggravation. Pete had brought with him an inspection port which he connected to the new pipe and then he and his crew backfilled the trenches and the job was done.
new inspection port
The inspection port is the white object to the right of the post. If I have a sewer problem again the first thing to do will be to unscrew the lid and look inside. If the chamber is empty then the blockage is in the house, if it is full (need to step back when you do this just in case!) then the blockage in either in the line or the tank is not discharging. For his two visits Pete charged a very reasonable $450 and I gave him and each of his crew a dozen fresh eggs from my free range chicken.
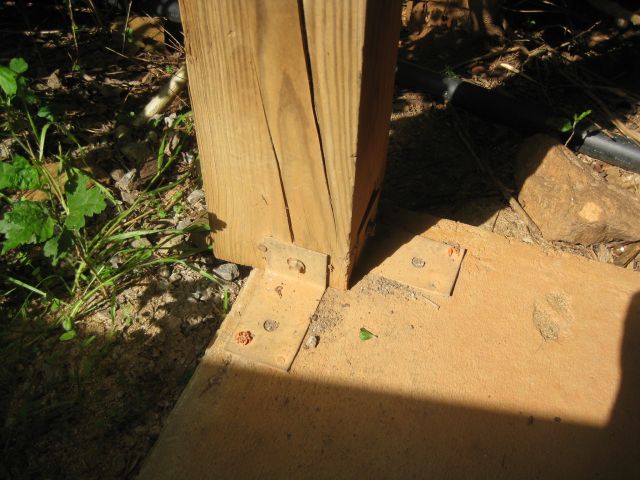
Finally, a quick note on construction slip up #2. Before purchasing the house I accompanied an inspector and one of his procedures was to ensure every post was on a solid foundation and he accomplished this by prodding the soil adjacent to the posts with a long half inch steel probe. All posts seemed fine. Yet during the sewer line work we discovered that the post near the sewer line was resting on soil, was not vertical and the deck, when I tested it with a level, was sloping down (slightly).
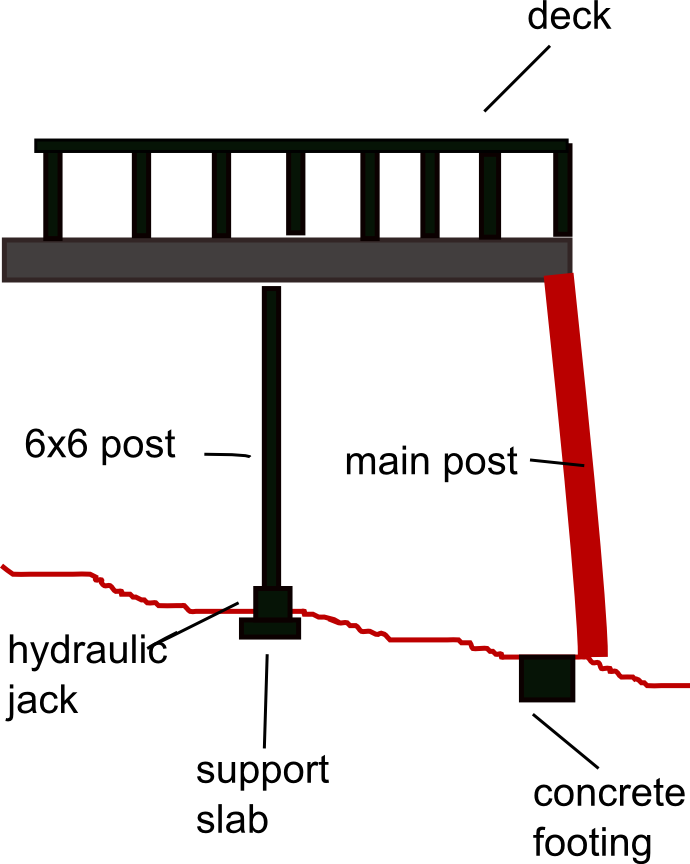
I have a hydraulic jack for working on my tractor.
20 ton hydraulic jack
I devised a plan to raise the deck and then I would straighten the post and place a concrete support below it. I purchased an 8 ft 6″ by 6″ post and some concrete slabs and dug a level base for the concrete slab, placed the jack on the slab and with the help of a buddy placed the post vertically on the jack and directly under the deck joists. I always have a buddy around when I am doing something potentially dangerous – in this case with the full weight of the deck on the new post on the small jack on the slab a miscalculation or sudden shift could explode out the post and jack and cause personal injury and property damage. I forgot to take a pic so here is a representation of the manoeuver.
With the main post raised a few inches I began digging under where it had stood to make a level pad for a new concrete block. And it was then I discovered that there was already a concrete footing – only problem it was about 4″ off from where it should have been. So when the house was built the post may have been located on the edge of the footing and had slipped off. This was construction slip up #2 located the concrete footing in the wrong place – carelessness I suppose and inadequate supervision. I placed a solid base under the post and hope this takes care of it.
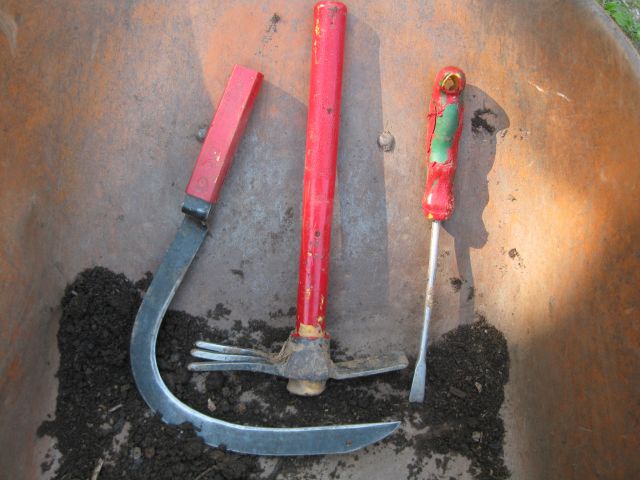
I use several hand tools for my weeding and mulching operations. They are easily misplaced in the high grass and surrounding weeds and not discovered until, accidentally, days later. It occurred to me that a cause was their lack of distinctiveness (blame the tools not the workman). Their handles are either natural wood color, yellow or, the logic for this beats me, green. So, easily camouflaged. The solution was a small pot of cherry red paint and now, with their distinctive coloring, they come easily to hand.
my red painted hand tools – the green colored weeder however, is resisting this solution
Pump timer
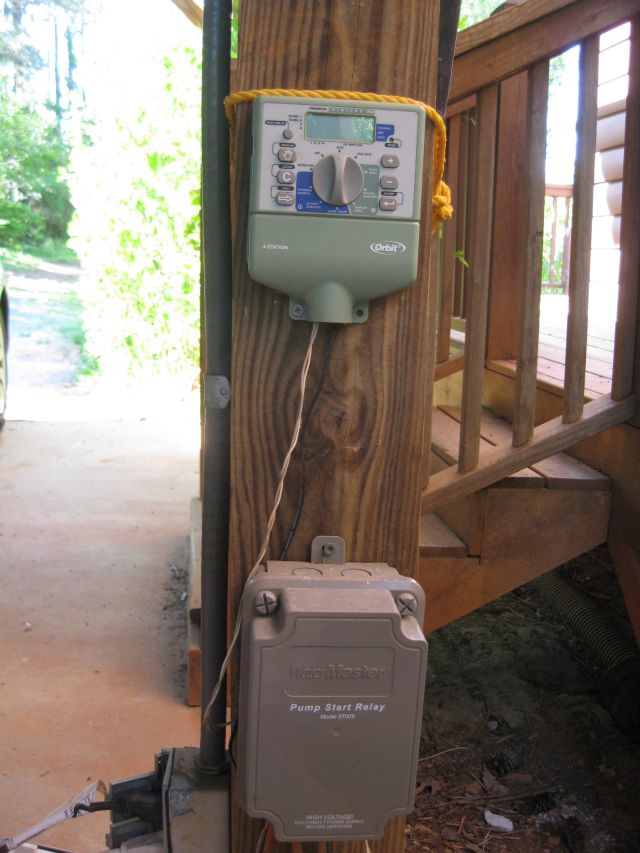
When I established my irrigation system I thought it would be neat to have an automated process with the pump starting and stopping at given times whether I was there or not. So I incorporated a digital timing system which produces a low volt output when switched on which was connected to a relay which switched on the 110 volt circuit to power the pump.
the previous timer – overkill and unnecessarily complex
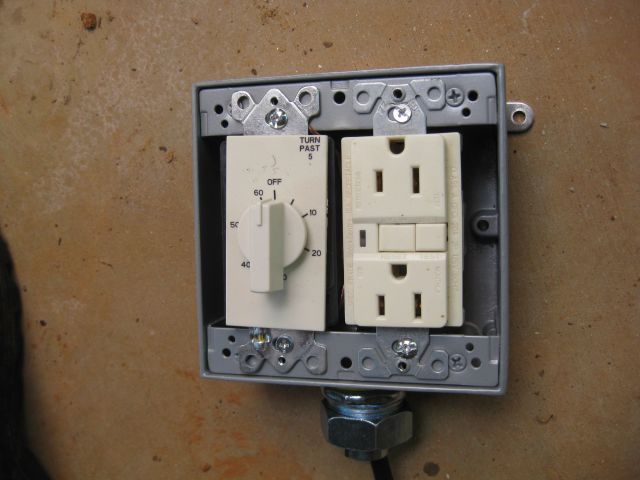
For the past year I have been manually starting the timer and mainly hand watering and the timer would switch off after the set period. The timer no longer works and I really don’t need a 4 station device when I am pumping only one line. Rather then buy another digital timer with surplus features which could fail, I decided to buy a simple mechanical timer like you see in some hotel bathrooms. Since it is a simple timing device it is unlikely to fail soon and its output is 110 volts so the circuitry is simplified. I bought a double gang box and wired it to a 3 prong outlet – and it works great. No longer do I have to press several buttons on the digital timer, I simply turn the timer handle to the desired time period and the pump starts up.
the new timer – all it needs is a cover plate and to be mounted on the post
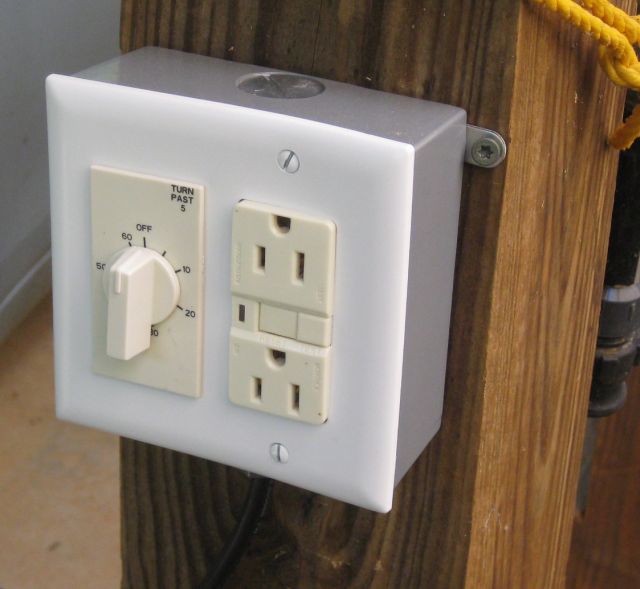
And here is the finished product
the timer with cover plate mounted on a post in the carport