Spring is production season and my hens are producing 6-7 eggs a day. Although there are 10 hens, 2 are retired (Gimpie and Ameracauna) and 2 are matrons (Onyx and Lady MacBeth) so the main producers are the 6 offspring. My running group certainly enjoy the free range eggs with deep orange colored yolks, as do my neighbors who watch out for me when I am elsewhere. But we had 5 dozen extra and this morning we tripped to CARES (Community Assistance Resources and Emergency Services) a local charitable organization, which was happy to receive our contribution.
a local community food bank
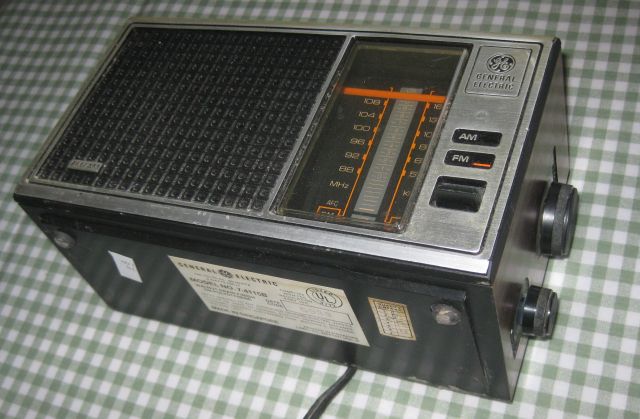
And, whilst in the area why not visit the Thrift Store which has revolving usual and unusual items. Today’s visit resulted in a General Electric FM/AM radio model 7-4115B circa 1981 which cost $1. When I have time on my hands I will explore and test the circuitry and rehabilitate it.
an older radio to tinker with, which will be much easier than today’s devices
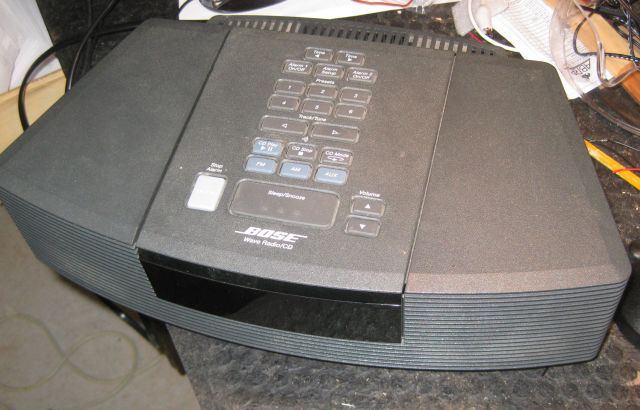
In July 2014 a power surge incapacitated a bunch of electronic equipment – see my tale of 2 destroyed desktops. One of the affected items was our Bose Wave Radio – a small package with good sound, for which Bose is well known.
the Bose radio/CD player
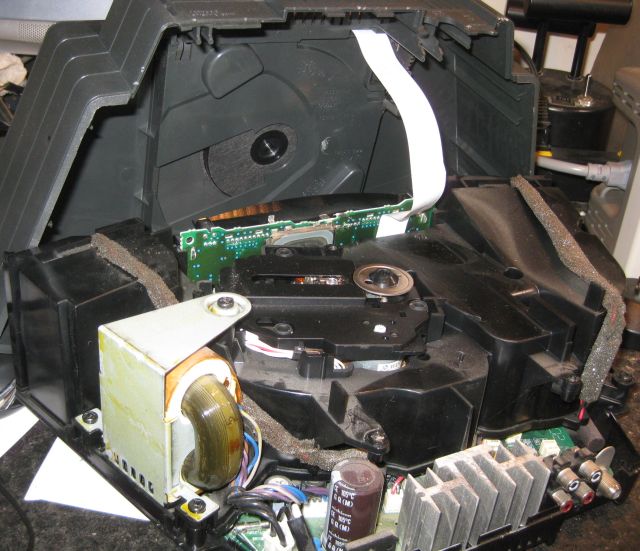
I stored the radio in the basement until I was ready to work on it. Caution – if you are not competent working with electricity, leave well alone. I was prepared for the worst – having to test and replace defective components but was hoping for the best – a shorted fuse. I removed the 3 top screws and carefully lifted the cover taking care not to pull on the ribbon which, if damaged, would substantially increase repair costs.
with the cover lifted the inside is revealed
But where is the fuse. I found it front left. I tested it and it was defective. It was soldered to the board. Some dismantling of components was required to access it. I snipped one end of the fuse and rotated it out of the way and soldered a short piece of wire (22AWG) to connect the 2 points which the fuse had bridged.
you can see the old fuse and the new wire shunt
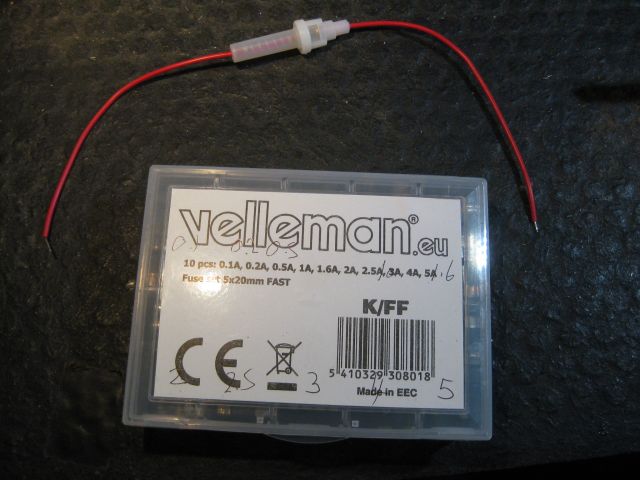
I reassembled the Bose and it played fine. But I was bothered – it no longer had a fuse and would be damaged if there was another power surge. So I ordered a fuse holder and a box of replacement fuses.
a fuse holder and replacement fuses
And I again opened the Bose, disconnected the shunt wire and soldered the fuse holder in place together with an appropriately sized fuse. And it still works fine and is now protected from power fluctuations.
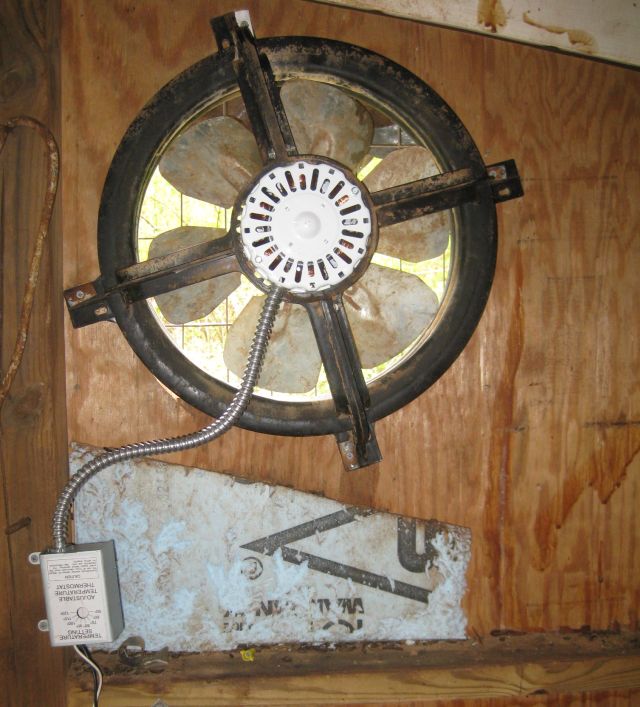
With temperature in north Georgia back in the 80’s it was time to summerize the coop. On the south and west facing sides I atttached the pre-cut tarp pieces from prior years, silver side facing the sun to reflect heat away from the building. Then I plugged in the cord to the gable fan – and there was no response. I examined the cord from the power socket to the thermostat and noticed that the white (neutral) line had been chewed by rats (now why didn’t they chew on the positive line?). I replaced the cord, plugged it in and there was a hum from the motor but no rotation. The fan blade did not turn freely. Time for a new motor. I had purchased the gable fan at least 4 years ago for close to $100 from a big DIY store. Was there a cheaper option? Amazon to the rescue – their #1 best seller was $57 with Prime (so just sales tax on top of the cost). A click and it arrived 2 days later. And then my problems began.
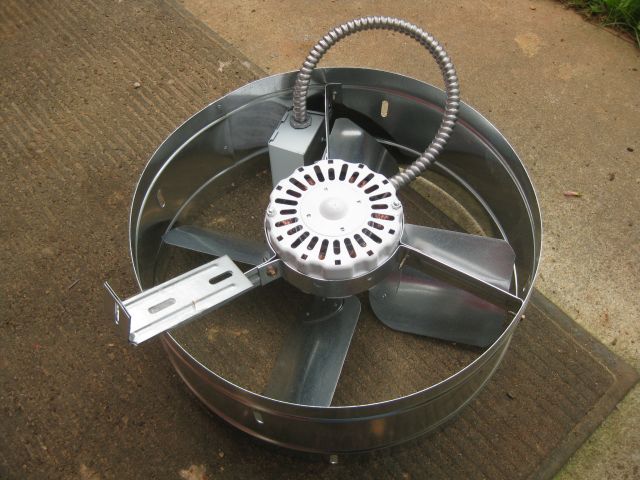
new gable fan consisting of motor with fan blade in housing, cable to a thermostat box and right angle brackets to be attached to the housing and then to the exterior wall
WARNING – WORKING WITH ELECTRICITY CAN BE DANGEROUS – IF YOU ARE NOT COMPETENT IN THIS AREA, STAY WELL CLEAR
As may be seen above, the fan housing is attached to the wall with 4 brackets but there were no bolts in the package to attach the brackets to the fan housing. Also the fan has a 14″ diameter and the existing fan was 13″. The housing of the old fan could flex with the spinning of the fan so there would be less vibration, but the new housing was rigid – I guess that’s why it all cost much less.
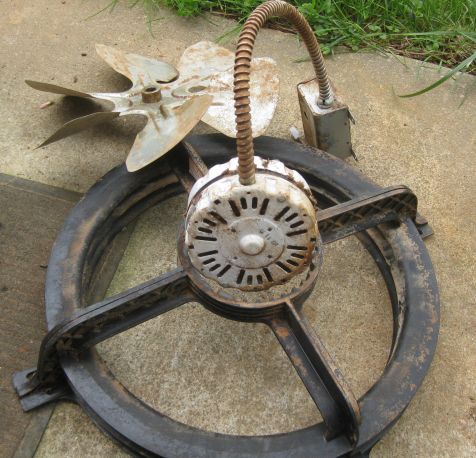
old fan disassembled – you can see the housing has built in brackets and a cushioning design
I didn’t want to delay to locate or buy bolts to attach the brackets to the new housing or to have to cut a larger hole in the exterior wall to accommodate the larger diameter fan. The old and new motors appeared identical. Which got me thinking – why not simply replace the motors and use the old fan blade?
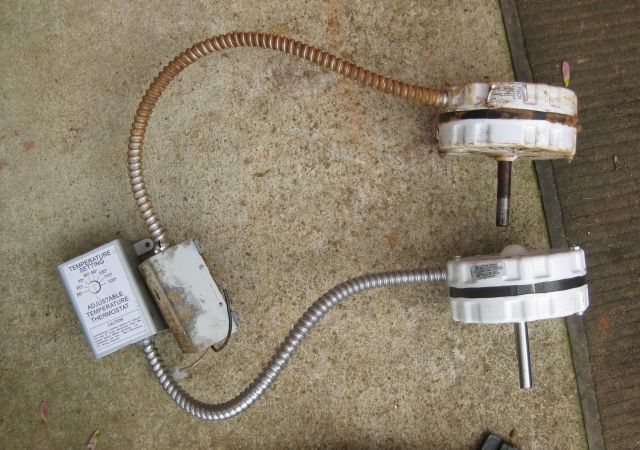
So I removed the old fan from its location and with oil and sand paper removed the fan blade from the motor shaft and then extracted the motor from the housing and placed the old and new motors side by side.
the motors appear identical
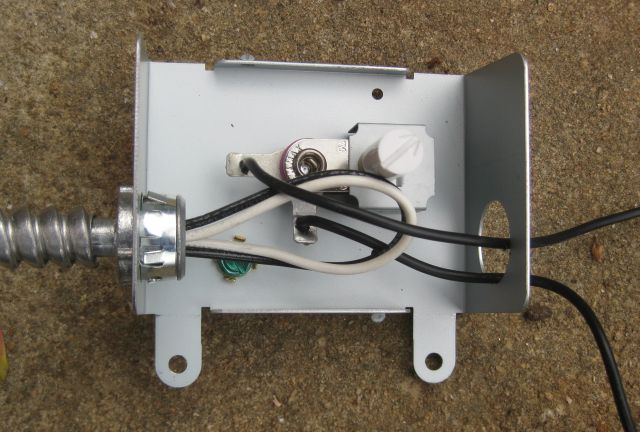
I installed the new motor in the old housing and attached the old fan blade to the shaft of the new motor. The thermostat wires were in the thermostat casing so I fished them out and connected them to the new cord and switched on the outlet. All was silent and I realized the thermostat was set too high so I turned it down and – pop. The socket shorted. How was this possible – could a new purchase arrive with a malfunctioning motor. I disassembled my installation and tried to open the motor to locate a wiring short. No luck. Then I noticed it was manufactured in Texas – got to be decent quality inspection procedures. So either the wire in the armored cable to the thermostat or the thermostat was the problem. I opened the thermostat housing and there was the answer.
mystery solved
The 2 wires I had fished out were the wires to and from the thermostat and that’s why it kept shorting. Silly me – them being the same color should have told me. And you can see the black and white wires from the motor doubled over. It was a simple matter now to connect the black wire from the motor to a black thermostat wire and lead the white wire and the other black thermostat wire out the housing to the power supply. I reassembled all the parts and installed the fan back in the coop.
the new motor, old housing, old fan blade installed in the coop. note the black and white wires emerging from the thermostat housing
And, of course it worked. Some simple lessons there for me. It also would have been nice if the new fan purchase had come with some instructions and the nuts and bolts to attach the brackets to the housing. And the old motor – I will disassemble it some day and see if I can fix it.
Caution – this is a long tale and will only be of interest to those who have similarly suffered from malfunctioning engines!
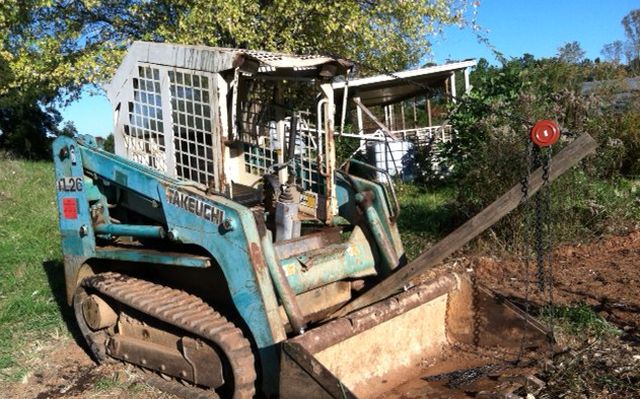
In my November 25 post I described how I replaced the starter and that the bobcat started fine but then would not switch off. Sporadically during the subsequent months I tried diagnosing the problem but it was only with the return of spring and serious bobcat chores awaiting, that I focused on the issue. The immediate bobcat task was turning and consolidating my 100 plus leaf bags so the composting process could advance.
2 piles of leaf bags awaiting consolidation and mixing
Diagnosing why the diesel engine would not switch off was not easy and I tried various remedies which were a waste of time. With hindsight I should have considered events preceding the problem and methodically eliminated the possibilities.
For example I thought the problem might be a faulty ignition switch. I had installed a new replacement switch a couple years ago and it had 5 terminals and should have had 6 but I satisfied myself at the time that 5 would be fine based on the wiring diagram. And it did work fine until I replaced the starter motor and the engine would not turn off. Logically therefore the ignition switch had nothing to do with the problem and there was no need to order a new 6 terminal ignition switch.
So with new switch and re-charged battery and partially refilled diesel tank I tried starting up the bobcat. After a brief period of turning, it started – delay probably the pumping of diesel to the engine which I had run dry in November. But now in the on position there was a whining noise which was the starter not disengaging. In the off position the whining stopped but the engine kept running. To switch it off I had to turn the emergency shut off knob near the carburetor clockwise to the stop position.
you can spot the shut off knob it is the shiny cylinder in the center of the photo
It took some time before the engine strangled to a stop with a lot of black smoke coming out which made me think of oil being burnt, not a good way to stop the engine.
So now I had a new problem – starter not disengaging after the engine was running. I checked a lot of wiring and re-examined the connections to the starter, to no avail. The only conclusion I could come to was that I had incorrectly wired up the new ignition switch. The light green red wire (LGR) at the ignition switch is the wire which switches on the starter motor. Could the LGR be connected to the wrong terminal at the ignition switch – should be C terminal. Worth checking.
I pulled cab forward, disconnected battery cables, pulled cab back, opened control box and examined wires at ignition switch and yes I had mixed (LGR) light green red with (GR) green red. Crazy I should have made such a silly mistake, but the wires are old and discolored. I corrected the mistake, pulled cab forward, reconnected battery cables and started and it started ok and no whining from starter BUT it still did not switch off at ignition and fortunately this time just shuddered to a stop. At least I had corrected a fundamental mistake through logical analysis which made me feel better about my chances going forward.
I tried restarting the engine. The engine turned ok but now would not start. Seems no fuel getting to the combustion chambers. I now had a new problem – a fuel problem – how to bleed the fuel lines. A nice thing about Takeuchi is that the operator’s manual (but not the workshop manual) is available for online download. The operator’s manual referred to a manual pump located near the fuel injection body. It is hidden from view but I managed to locate it, and after turning clockwise to free it I pumped several times until diesel emerged at the top. I tightened it (clockwise) and the bobcat started easily and seemed to switch off at the ignition key but a second try had it continuing to run. So I still had a problem with being unable to switch off the engine and the fact it shut down once at ignition but not a second time indicated some intermittent failure.
I decided to do some internet research. Apart from some vehicles which have a vacuum switch-off like the Mercedes, it seems most diesel engines have a fuel shut off solenoid. The solenoid can cut off the fuel by either pushing or pulling on a protruding pin/shaft. From this point on there are many mind confusing possibilities:
the action of the solenoid can be to push or pull on the shaft, and when the solenoid is not acting, the position of the shaft will be determined by a spring in the solenoid ;
one process could be that when the solenoid is not activated and the shaft is positioned by the spring then fuel does not flow, and activating the solenoid moves the shaft against the pressure of the spring and fuel flows. Deactivating the solenoid permits the spring to return the shaft to original position which cuts off fuel flow.
or fuel flows when the shaft is held in position by the spring, activating the solenoid cuts off the flow for a short period of time which shuts down the engine and then with engine off the spring returns shaft to fuel on position.
there are 3 wires to solenoid – 1 is earth, 1 is direct from battery and 1 is from ignition switch. Another possibility is the wire from the battery activates the solenoid all the time and the wire from ignition via a relay deactivates the current from the battery. This would mean the solenoid is continuously powered which is wasteful. So I rejected this possibility (I also found later that when engine is off, the solenoid spring positions the shaft).
If wire from ignition switch via a relay connects wire from battery to solenoid to power it then it would seem that when wire from ignition is switched off then power from battery will be off and engine will shut down. But engine was not shutting down when wire from ignition was switched off! This didn’t make sense – instinctively I felt the problem was there was intermittent failure of the wire from the ignition switch to the solenoid and this wire had to be intact to switch off the solenoid. The logic doesn’t really hold for example if the wire was interrupted then the engine should shut down but it was continuing to run (perhaps some kind reader can explain this for me). Nonetheless, a break in the wire was what I would look for.
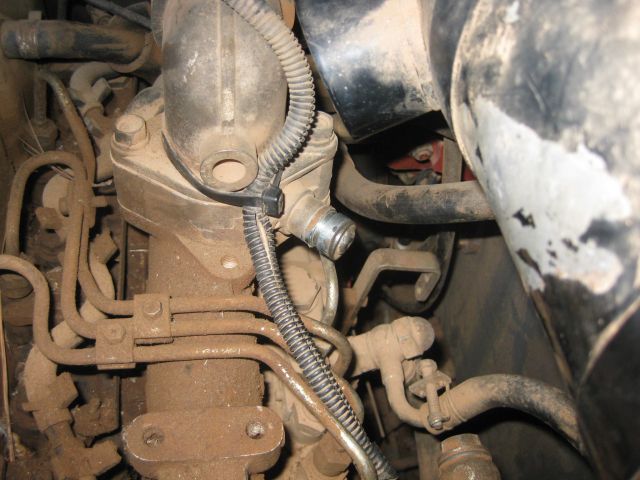
I thought it was about time I found the solenoid. On the web I saw images of what the solenoid for Takeuchi should look like – a round device with 3 wires emerging from the rear and a movable pin on the other side and it should be connected to the fuel body. I spent a lot of time looking for the solenoid both visually and feeling with my hands for any wires coming out of the fuel injector body. And I couldn’t find it even with my inspection mirror and there was nothing in the workshop manual showing where the solenoid was attached to the fuel injector body. I still had the access cover off from underneath the Takeuchi so I looked from underneath and there it was – it was located near the bottom of the engine with a long shaft running vertically to near the fuel injection body.
start solenoid near bottom of engine with shaft at top of picture
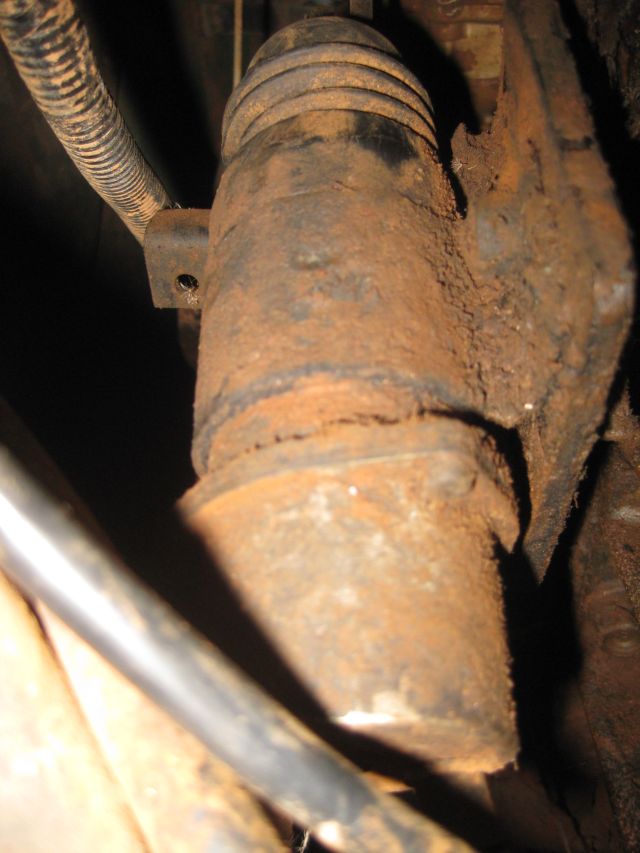
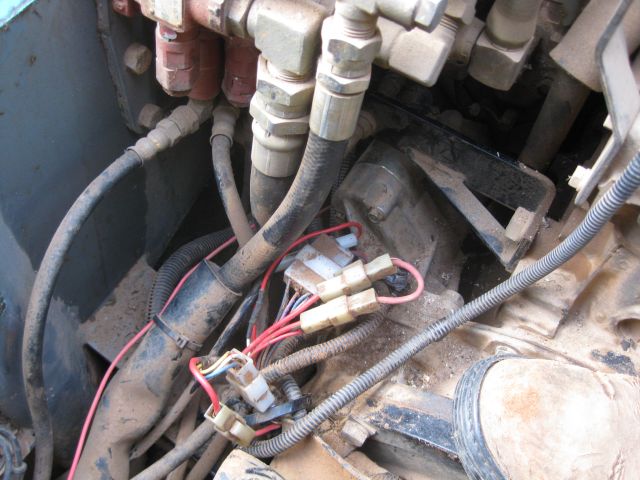
One suggestion had been that the solenoid might have jammed in the on position so I moved the shaft up and down and it was in the up extended position held there by a spring in the solenoid housing so therefore the solenoid had not jammed and presumably did not have to be replaced. The wires to the solenoid were located below the starter motor and I had quite likely pushed against these wires as I removed the old starter and maneuvered the new one into place. But again, if a wire had disconnected then the engine wouldn’t start and my problem was that it started but wouldn’t switch off. When I purchased the machine I noticed that someone had run a red wire from the cab control panel down to the innards of the engine. I now saw that the red cable was attached to one of the solenoid wires. Why?
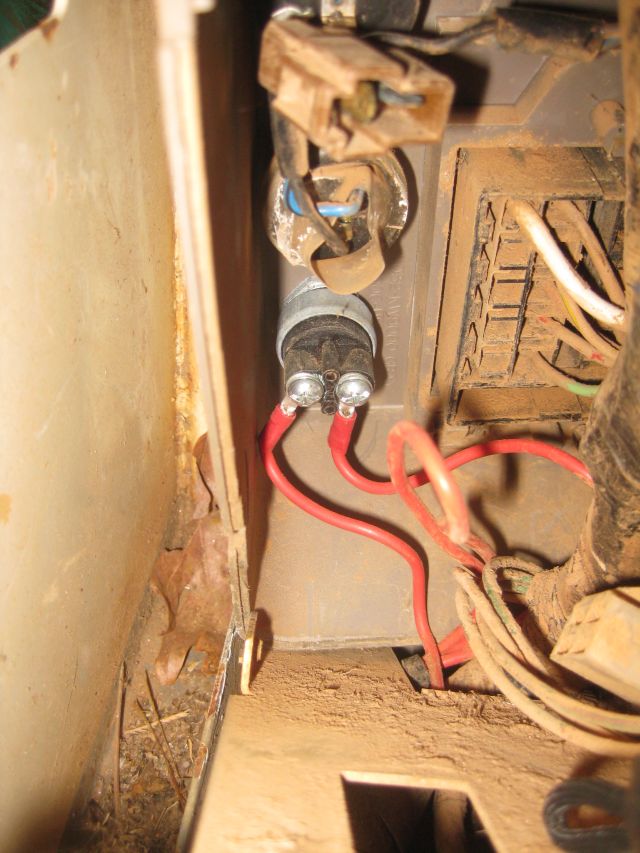
So I decided to investigate the red wires. I loosened the instrument panel box and saw the 2 red wires coming in and they headed to a push button.
red wires added post factory to a push button in the control panel
With a voltmeter/continuity tester I established that the push button was normally open which means when you press the button the circuit closes. So the red wires had to do with the shut off solenoid and the circuit was open until the button was pushed.
I figured that engine shut off must have been a problem for the previous owners and they had this circuit rigged to shut down the engine which I vaguely recalled the dealer telling me about. So, thinking I had found the solution I started the engine then switched off the key and it kept running, then pressed the button and it kept running. Then, thinking the key had to be on for the switch to work I turned the key to the on position and pressed the button and the engine kept running. I was pissed. I tried switching it off by turning the shut off button above the injector but this time it ignored me. I did not want it to run dry as I did last time and then it occurred to me – why not get under the engine and pull on the shaft from the solenoid. I work by myself so if something goes wrong there is no one to hand which is a sobering thought. But what could go wrong? So under the engine I went and via the access gap I reached up, found the vertical shaft from the solenoid and pulled down on it and the engine promptly shut down.
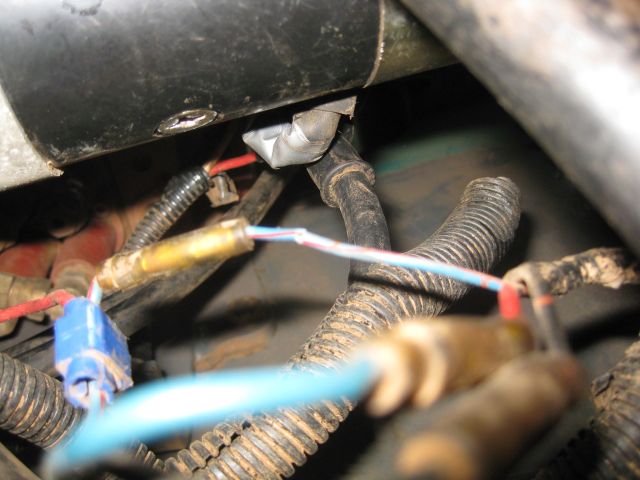
So the push button added to the control panel was not shutting down the engine. Back under the bobcat I went to the access hatch and carefully studied all the wiring leading to the switch solenoid. And then I saw it – what appeared to be a break in the insulation of the LGR wire which I must have caused when I worked on the starter.
can you spot the break in the wire in the center of the picture to the right of the yellow connector
Perhaps the break in the wire was more than insulation but some of the strands as well. This would explain why sometimes it did or did not shut down. There is very little space under the bobcat and I could only effectively use one hand. I snipped the wire at the break and tried splicing it but it was too high up to do effectively with one hand. Eventually after a lot of back and forth I added 3 connectors.
because of space constraints I had to add additional wiring and connectors to reattach the wires
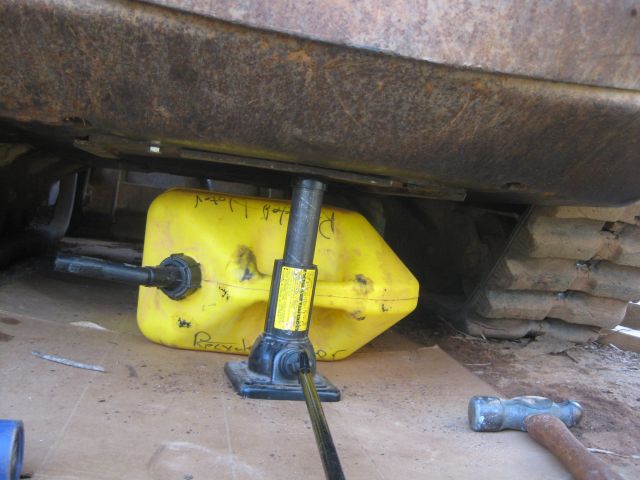
The fix seemed to work – the engine shut down at the ignition switch! Now to re-attach the access cover. But this also was not straight forward – it did not go back into place. I recalled that when I undid the cover it seemed to spring out. So the cover or the port into which it fitted was out of shape. And force would be required to get it back into position. My tractor bottle jack was too large but I found my pickup jack would fit and so with this smaller jack I raised the cover. But it came up .5″ out of line with the bolt holes. After several attempts of raising, trying, lowering, adjusting and raising I got it right.
the yellow plastic container was to hold the access plate in place while I made the adjustments. the jack was invaluable
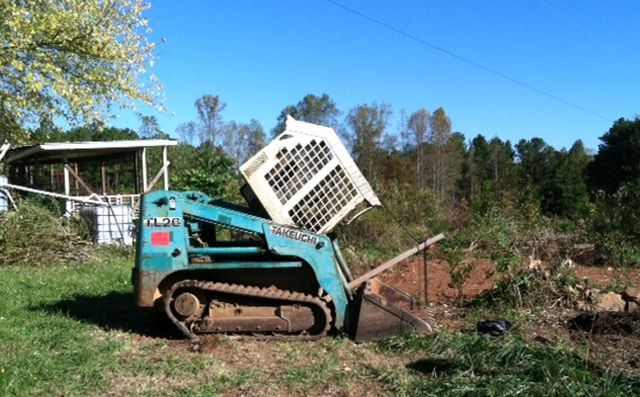
With all this done I cleared the tools, started the Takeuchi, and consolidated the compost heaps. And when I was finished and the bobcat was back in its berth, the engine did turn off!
mission accomplished! leaf bags consolidated and turned
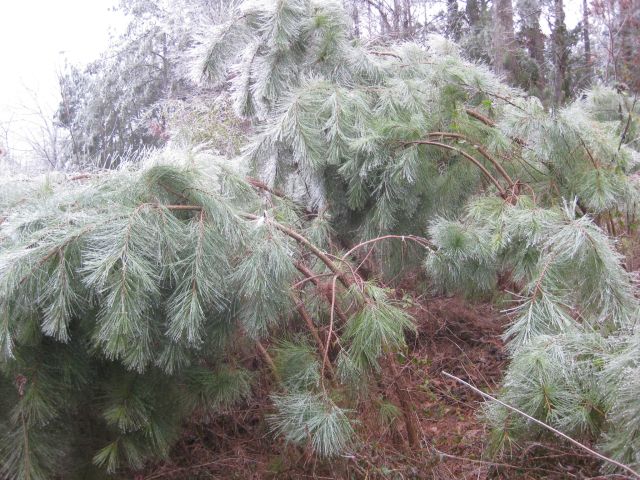
I won’t complain about the cold, not when I know what is going down in the north east, I will just comment on conditions and how I am responding. We had freezing rain 2 days ago and the result was more aggravated where my farm is 50 miles north of Atlanta, than Atlanta itself. The trees off the highway look normal as you head north on the 515 from Atlanta until you pass Canton and then you notice a silvery, icy sheen on the branches. Georgia has lots of pine trees and the pine needles are adapt at catching the freezing drops and making icicles, the weight of which bows down the younger trees and snaps the branches of the older trees.
I wonder if these youngsters will be able to right themselves
And when you look closer you see the icy fingers.
thoroughly ice coated
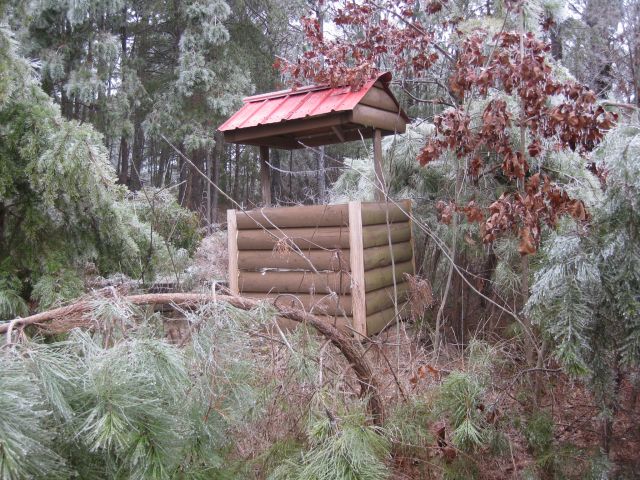
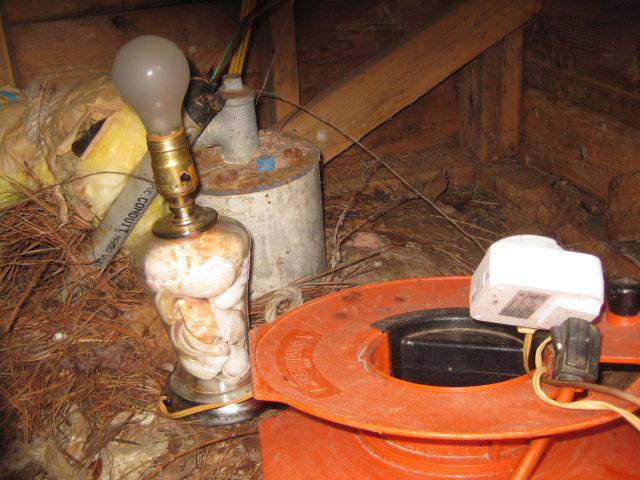
In the coop I have a water heater and each day of freezing temps I have to refill the 2 gal container which sits on a thermostat controlled warming base. Monday night during the freezing rain, the log cabin and surrounding area had an 8 hour power outage. I know the hours because my security system emails and texts me with unusual events such as the dsl modem losing power. Since there was extensive black ice on the hilly road to the farm, I did not visit on Tuesday and my neighbor let the chicken out of the coop and locked them in the evening. A wonderful neighbor. My coop door is set to open automatically at 9am and I texted her in the evening whether she had reset the timer. She had not and went back to the coop and the door had opened after she had cooped the chicken. Whatever can go wrong will go wrong and an open coop door in the night is how I lost my favorite chicken a couple years ago. Another consequence of a power outage is the lamp bulb in the well house no longer warms the well pipes. This is my well house.
well house, you can see the corner uprights I replaced last year
From the inside of the well house I noticed chinks of light and I caulked every occurrence to make the structure more air tight. A savvy neighbor tells me that because of power outages he uses oil lamps for heating his well house. He bought his at an estate sale. I traversed Amazon and found two 12″ lamps, one for $11 (red) and one for $15 (blue).
2 paraffin powered hurricane lamps
I tried them both out and the blue one was still burning the following morning, the red one was extinguished (there was still oil in the base). So, when I am at the property and the temp will fall below say 15 F the next morning, then I light an oil lamp. If I will be away for several days, then I use a light bulb (base 50c at the Thrift store) and a timer to switch current on during the cold hours.
my electric lamp heater in the well house with timer and cable run from the house
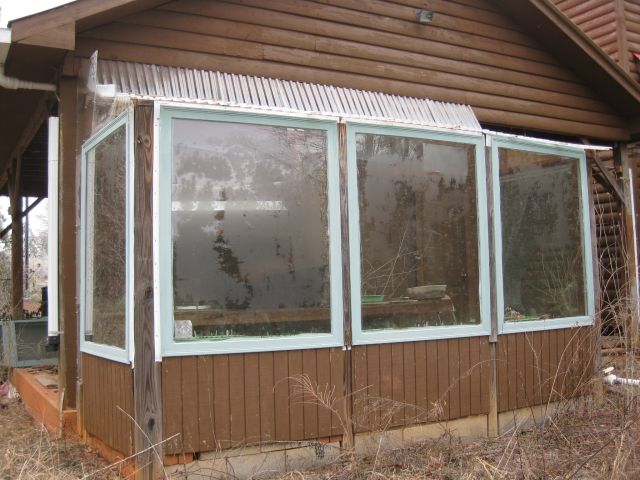
I have a small greenhouse I built on the south side of the carport. It is passive heated (sun only) and the cold temps have hammered some of my seedlings. The warm weather vegetables (pepper, cucumber, eggplant) have been annihilated, but the cool season (kale, collard, lettuce etc.) are holding on. The situation is exacerbated by an uninvited guest, a feral cat which ripped a hold through some sheeting near the top and beds in a pine straw box (I use the pine straw for my bee smoker). I have not the heart to deny the visitor entrance and I do not have a rodent problem (except in the coop), but when the weather improves I will make the greenhouse cat proof.
small greenhouse for developing vegetables,especially later, tomatoes
And finally, my wood stove, which was installed last year, is a boon – it has some mass and really helps out in the living room and keeps my utility bill down.
Past month I have been fixing electrical things in the Atlanta house which >35 years old. The garage opener went dead so I replaced the whole caboodle (quaint word lodged in the past) – motor, track, chain plus the new required sensors to prevent the door closing on an infant. Took a good few hours to figure out the components and how they fitted together and to come to the conclusion that the sensors have to be used and there is no override. The new opener operates very smoothly and before the old opener failed there was a lot of clattering, which I now realize was due to a loose chain and this probably caused the failure. A stitch in time saves nine.
Then the exhaust fan in the bathroom failed. I ordered a replacement motor and the supposed quick 10 minute change out took ages. The motor ($15) arrived with “reverse mounting instructions” – it seems it was incorrectly assembled at the factory and the bearings had to be reversed. Then when I attached it to the mounting plate it would not fit in the receptacle – the spindle was too long. It took time to craft a satisfactory fix. But now it purrs happily.
The subject of this post is the refrigerator. It’s a GE Profile Arctica, 36″ wide, large top freezer refrigerator (24.6 cu ft) which they no longer make in that size since most who want a large refrigerator go for the double door configuration, which my house boss categorically does not want. So I was dual motivated (money and peace) to get it working again after it suddenly died this past week.
Actually why it died is very interesting. Tuesday of last week the lights began flickering and the flourescent fixtures would dim and then brighten. I have a UPS (uninterruptible power supply) which beeps when the voltage changes and it was beeping incessantly. The boss blamed it on old wiring and everything going wrong in the house and the world. But when I noticed that lights on unrelated circuits were also blinking I figured this was a general problem. And then, Wednesday am we both identified a distinct burning plastic smell at the garage entrance. We figured all hell was about to break loose. That evening I examined the main fuse board for loose wires – all were tight. I removed an access panel and examined the area where we had smelt the burning – all was fine, cable insulation had not been gnawed by rats ( a wild supposition) and no sign or smell of burning. I called the utility company and their automaton said the problem had been called in and they were on it. Thursday I had a voice message (and I listened carefully) that power at the house was fine and a work crew would not be dispatched. The message did not say there had been a problem which was fixed, but maybe this is the protocol to avoid being sued. Sued for what? Well our refrigerator no longer worked and the voltage surges could have been the cause, the proverbial last straw. But the flickering has not recurred, the UPS is silent and we have consigned the burning plastic smell to the imagined.
Note – before working with a refrigerator always unplug it from the power source and discharge the capacitor. If not competent with electricity, leave alone.
Prior to the refrigerator failing I heard a lot of clicking so I thought the issue was a bad capacitor (it usually is) and I extracted the capacitor and tested it with my capacitor tester and it was fine.
the small capacitor which starts the compressor motor of the fridge
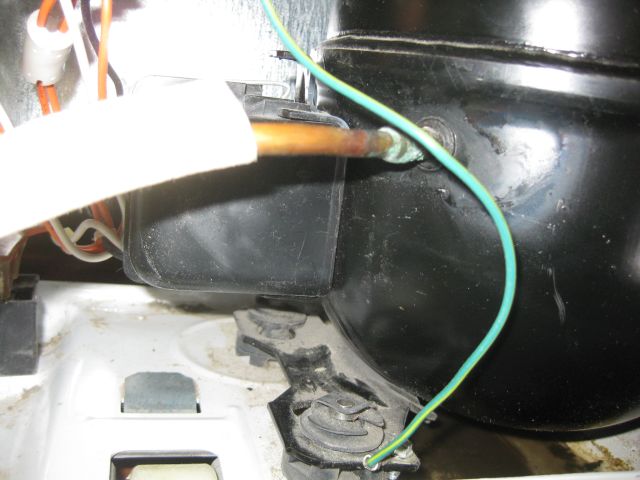
My next thought was the starter relay – it is hidden behind a black plastic box.
behind the black covering is the starter relay
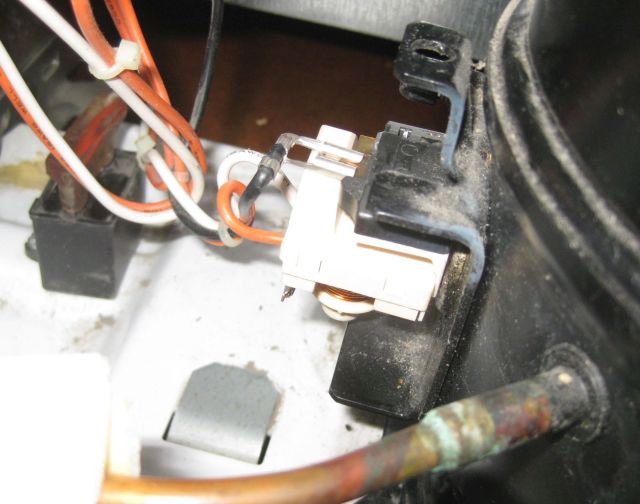
You can see it clearly once the cover is removed.
relay switch exposed
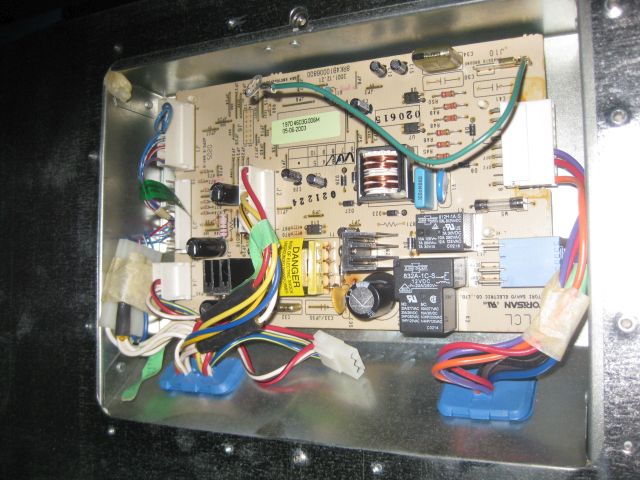
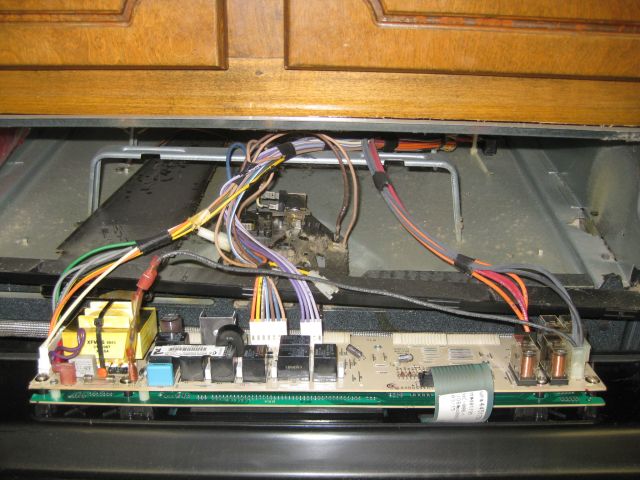
But it was also ok. And then I opened the fridge door (the interior lights came on) and looked at the electronic panel for setting the fridge and freezer temperatures, and it was dead. So I silently cursed, since this was the first thing I should have checked and I could have saved myself time. If the control panel is dead then the problem is most likely the motherboard. So I exposed the motherboard and it looked fine though there were signs of age and heating.
old motherboard in situ
In for a penny, in for a pound. From the GE website I located the motherboard for our model and the new part # and via Amazon I scrutinized the various suppliers both for price, delivery time and delivery cost (the cheapest supplier wanted an exorbitant fee for quick delivery). I placed the order Saturday am and the part arrived today, Tuesday (refrigerator main control board for GE WR55X10942) cost including shipping <$70. I carefully detached the wire clips from the old board, connected them to the new board, attached the earth and panel and plugged in the power and it works!!
I had been concerned the motherboard failure was because of problems with the compressor or relay starter so I also purchased a Supco 3 ‘n 1 start combination ($13) in case the refrigerator had difficulty starting and 2 new GE sensors ($9 each) since there were prior complaints about unsatisfactory temperatures. The 3 ‘n 1 I will keep for another day and I may have to replace the sensors if the temperatures are out, though I hope the new motherboard will resolve any issues.
Some final comments – the reverse side of the motherboard has a black scorch mark from a failed component which theoretically I could have unsoldered and replaced, though this would have taken more time, may not have fixed the problem and time was of the essence. The clicking noises I heard before the fridge failed was probably the compressor trying to start on reduced volt supply when we had intermittent power. And I have just been informed “it seems to be cooling” so peace reigns again.
My last post was November 25. As we moved into winter my growing activities were largely shelved.
In November/December I cleared and weeded some beds and planted out, closely spaced, several 100 garlic cloves. They are all descended from 3 varieties of garlic I purchased from California 4 years ago. After harvesting last year I strung them together and hung them from joists in the carport. Fewer rotted compared with previous years where I had stored them in laundry bags hung in the basement. So this is the way for me to go in the future.
Although I was not actively growing, there was always something to harvest. Initially the radishes did well but as cold weather and rains set in, most became soft and lost their taste. The daikon radish also held up well and then deteriorated with the cold weather (below 15 degrees F). When my family visited over Thanksgiving, I dug up this specimen to show off.
a daikon radish next to a 5 gal container
While we enjoyed eating the small daikon radish we found the big guy above indigestible. What we should have done is pickled or fermented it, but it was Thanksgiving and it went to compost. This year I would like to do fermenting and will be planting out more cabbage for sauer kraut, and more daikon.
Apart from some large carrots I unearthed, the main winter crop was purple top turnips which survived the weather well. Plus, in the leafy greens area, turnip greens, mustard, kale and collard. I planted out the spinach too late in the season but they and lettuce are holding on and should do well in the next few weeks.
In the orchard I have tried new pruning techniques and used wires to train the branches horizontal or downward so the fruit will be easier to reach. There is a theory that when the branches are horizontal or downward sloping, the tree concentrates more on fruit production than vegetative growth.
Past few years I lost my young fig trees to cold weather (below say 12 deg F). Actually I lost only the above ground parts because after each winter the roots, which survived, produced new growth. This year for the few days when it was really cold, I pruned the trees to a few ft and enclosed them in commercial grade large trash bags weighted down with stones at the bottom. I hope the trees survived.
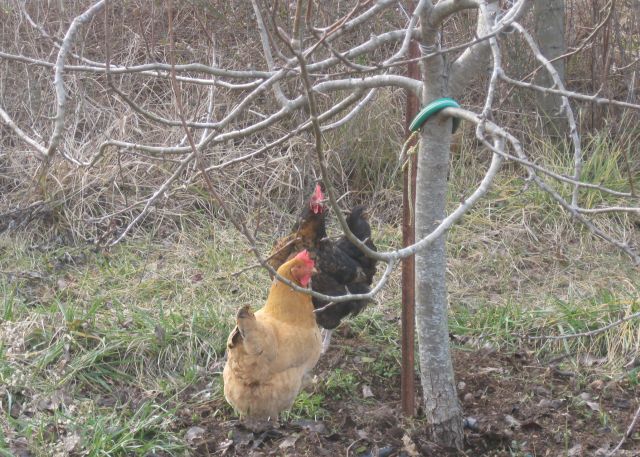
My chicken, 10 hens and a rooster, are all still around. The two oldest require special attention. Gimpie has a bad hip and she struggles out to the paddock in the morning with the others and in the evening she waits for me to carry her back. The Ameracauna, who used to be assertive is now timorous when it comes to eating and so I have a routine where I enclose the others in one section of the coop and allow her to eat undisturbed in the other section until she is done. I think part of the problem is the rooster, who acts aggressively to her, and she often goes into a nest box to avoid him when they are locked up for the night.
I built the coop a couple years ago and it is robust and immune from drafts. However on the colder nights, of which there were only a few, I treated them to a heat lamp and a water heater.
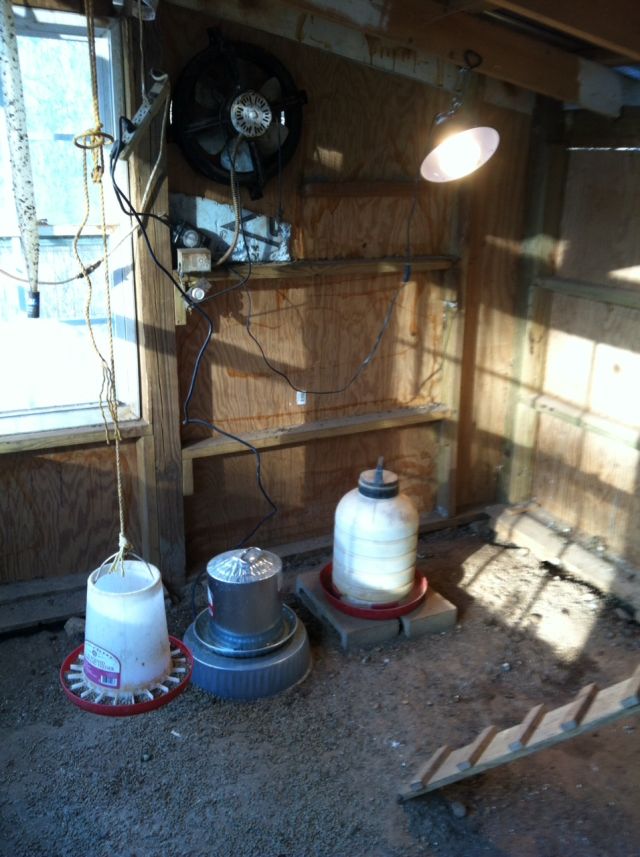
heat lamp and water heater for the cold nights
The heat lamp is on a timer to operate only in the night. The water heater is on continuously during the cold spells. The summer ventilator has an external cover to prevent drafts and you can see I have raised the feed dispenser fairly high off the ground which reduces the flicking of feed onto the ground. During winter I supplement the pellets with scratch.
Two of the hens (Wanda and Randa) are fliers and each day they fly over the fence and go everywhere and I will often see them hard at work on the compost heap. I was very happy to see they now visit the base of the fruit trees and dig up the overwintering pests which despoil and then drop off the fruit in the summer, hibernate over the winter in the ground and climb the trunk early spring for the next summer’s feast. I must figure a reliable way to get all the chicken out there.
here are Wanda and Randa at the base of a pear tree
Egg production is recommencing. Apart from the occasional use of the heat lamp I do not use artificial lighting so egg production shuts down for the short days. From the occasional 1 egg a day we are now up to 4 or 5 and I have now begun supplementing their feed with oyster shells.
I spent much time during the winter months working my way through an electronics course provided by Georgia Tech on the Coursera MOOC, which was excellent. In January I began a second course with Georgia Tech and also one on simple robot building offered by Berkeley on Edx. Since I do not have a background in these areas they require much work and focus. And the endgame? I have plans for microprocessors for various of my growing activities. The first one will be using an arduino controller to keep a tally on the chicken during the day so it will know when they have all returned in the evening and will then lower the coop door. Presently, the coop door opens on a timer in the morning and must be human lowered in the evening. Other applications for the future, in addition to enhancing security routines, will be sensors to monitor humidity, temperatures and maybe ph as well. To my mind, all part of becoming more self sufficient and using electrons to simplify daily tasks.
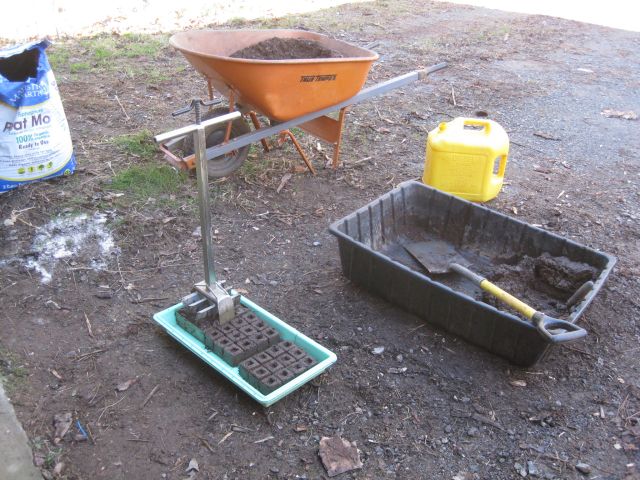
I forgot to mention what transitioned the end of my hibernation. Last week I seeded a germination tray and now a few days later the kale, lettuce and beet have germinated and I needed to get outside and prepare the 2″ soil blocks for the vegetables to continue growing in the greenhouse.
making soil blocks for new vegetables
So making the soil blocks has galvanized me back into the growing mode. Here I mixed my compost with soil, peat, building sand and, because I had no lime, ash from the wood stove. You can see the mold for making the 2″ blocks of which 36 fit in each tray. I bought more seed at the big DIY stores and specialty/glamor/fancy looking vegetable seed from Johnny’s. So I am now switched on and looking forward to spring.
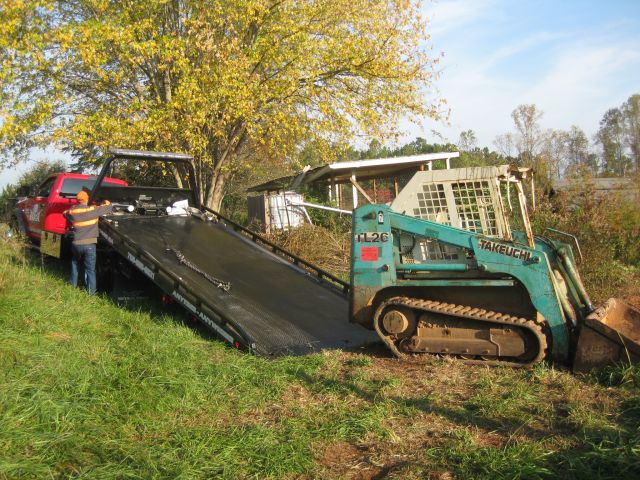
I agreed a $75 fee with the towing company and next day, probably because it was early morning and they were not yet busy (or because bobcats are fun) a big tow truck and a couple guys in a pickup came out. They winched the bobcat onto the back of the truck using ingenious pulleys located at varying places on the bed to bring it in at an angle.
the bobcat was at an angle to the bed so a pulley was located halfway down the left side of the bed so the bobcat was winched initially to the left side and then, when on the bed it was winched up
Getting it off was more difficult – they raised the bed up and jiggled it and the bobcat slowly slipped down, but slowly is the word. So they hooked a pulley to the end of the bed where it met the ground and winched the bobcat down the deck. Clever.
the bed was jiggled to slide the bobcat down but it was slow progressyou can see the pulley with 1 wire to the winch and the other to the rear of the bobcat to encourage it down
Cost was the quoted $75 and I topped it to $100. And now I had the bobcat away from the curious and possibly mischievous and all to myself. I was sure the starter had jammed but how to remove it. The engine is surrounded by plate metal underneath and to the side. A starter has 2 bolts. I could reach the top bolt by raising the cab.
you can spot the starter just above the wires and, to the right of the top reverse C loop wire, the top bolt of the starter (also my shoe, bottom right)
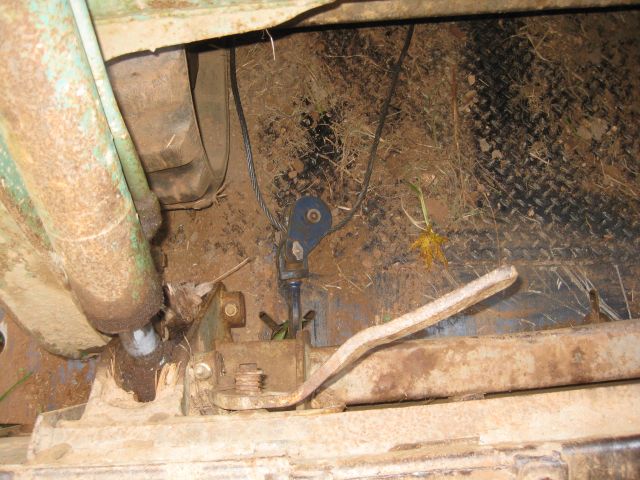
But the bottom bolt was inaccessible from the front. I dismantled some components on the top of the engine but couldn’t reach the bottom bolt. Then I tried from the rear – no success. Time to watch utube. And there I found a video of how the owner of a Takeuchi excavator (same manufacturer, different kind of machine) removed his starter. In his case he could access the bottom bolt of the starter but not the top bolt. So he pulled out the engine! Wow, definitely not for me. But unfortunately for him he did not get a new starter, he had his repaired, and 6 months later when it failed (again) he went a different route. He cut through thick plate metal to access the top bolt and succeeded. I was beginning to think this was all too much for me and then the penny dropped. How did he access the bottom bolt (which was my problem)? He mentioned there was an inspection hole in the plate metal which covers the underbelly. So I dived under my bobcat to look again and under the caked mud and dirt I discovered two bolts and a plate (19″ by 21″, pretty heavy) which I removed, and there a short way up was the bottom bolt of the starter.
the underbelly with the plate removed allowing access to the bottom bolt of the starter motor
After first disconnecting the battery cables, I was able to remove the starter without trouble. A very encouraging event was as it came away from the engine I heard a metallic zing, which I knew must be the stuck gear disengaging, so proof that the starter was the culprit.
here is the old starter which had evidently previously been pulled and worked on – note one of the 3 screws surrounding the gear is missing
I ordered a new starter on the internet for $260 and when it arrived I connected the various cables and bolted the starter motor to the engine. The process actually took some time since I had to figure which way to push the starter up to the engine (space around the engine is limited) and how to attach the cables (cables had to be secured before the starter was bolted to the engine because once the starter was in place it was not possible to reach the nuts securing the cables). And then I reconnected the battery cables turned the key, the bobcat started immediately and I drove it to under the cover of the carport.
I wish I could proclaim success and say I switched off the engine, dismounted from the cab and cracked a celebratory beer. But no such luck – when I turned off the key the engine kept running. I siphoned off about 5 gals of diesel and had to leave the engine idling until it used up the remaining diesel and stopped. So now I have another project – to figure out which wires or whatever I must have knocked loose while working on the starter and then make the repairs so I can have a normal functioning bobcat.
This is a long discourse on engine repair- so if you aren’t interested in this subject you should skip or you will find it incredibly boring.
It began a few weeks ago. My Takeuchi TL26 track bobcat has always had an iffy battery. Even with a new alternator it often struggled to start the engine and the last few occasions I had to charge it before it would start the engine. I bit the bullet and bought a new tractor size battery from the local Tractor Supply Store. The next couple days were flawless (in terms of starting the bobcat), and I cleared an area of brush and privet in preparation for a planting of chestnut and hazelnut – yes I know chestnut is plagued by blight and Georgia is probably too hot for hazelnut but what the heck, so I bought 15 of each from Badgersett Research Corporation and will take my chances.
Now I digress again – I remove small trees, roots and all, by winding a chain round the trunk at the bottom and securing with a clevis slip hook – it’s a hook which allows the chain to slip through as you pull on the other end of the chain, thus tightening the grip. I secure the other end of the chain to the bobcat loader about 4 ft off the ground and I then drag the tree out. I keep the loader high off the ground so that if the chain snaps it will go over the bobcat not at me. I was using a lighter chain than usual and it did snap (first time for me) but it did not whiplash. My buddy, who was an engineer with the army in Germany, told me of men being killed when cables used for dragging heavy equipment snapped. Both a cable and a chain stretch however when a cable snaps it shrinks like an elastic band and that creates the whiplash. When a chain snaps the links which are stretched retain their shape so it appearsthere is little or less whiplash. I tried this theory on my buddy and he understood the argument but said stretched chains can be very dangerous, so be careful.
Anyhow, my bobcat was performing so well I decided to switch it off while I did some cleanup before heading back to base. Big mistake, I should just have left it idling. When I tried to start it for the ride back to the house nothing happened, zilch. Absolutely dead. Even the gas gauge did not move.
raising the cab requires 2 average sized guys and since I work alone, I devised a winching system using a fence post wedged between the body and the loader
Over the next 3 days I tried everything. First thoughts were the wires to the ignition switch had come loose. I unbolted the control panel and inspected the wiring, all screwed tight. Then I thought a fuse had blown, so I pulled out all the individual fuses and tested them for continuity and they were fine. Then I thought the battery cables might be loose, but they were fine. So I visited the local Kobota distributor and discussed the problem with an obliging workshop foreman, Jeff. He said it was obviously electrical and I should recheck the battery cables for cleanliness and the functioning of the ignition switch. He also gave the ‘phone number of Steve, a local mechanic experienced with Takeuchi. I disconnected the battery cables and checked the functioning of the ignition switch with a continuity tester – it was fine. I thought I might have a bad earth so I connected a jump start cable from the negative terminal of the battery to the chassis – nothing. Next day I brought out with me a battery tester which applies a load across the battery, thinking the battery may have suddenly failed. The battery was fine.
here is a snap of the cab raised forward which exposes the engine, hydraulics and battery (but not the starter motor)
So time to call Steve, First thing he said was he had a 2 week backlog. But he was prepared to listen. When I told him the battery was fine he said check the fusible link in the wire which leads to the starter solenoid and if this was ok then apply a hot wire (wire direct from the positive battery terminal) to the starter solenoid. I couldn’t find the fusible link but I tried and retried various ideas to no avail. To get smart I decided I needed a workshop manual. There are typically 3 types of manuals – operator’s manual, parts manual and workshop manual. Parts manuals are easy to come by and have a wealth of information and are provided free by several online parts sellers. The operator’s manual is usually available free from the manufacturer. I had both of those. I mulled signing up with a website in Asia which offered the workshop manual under a bonus points plan. But I fortuitously discovered, before I went down that road that 3 years ago I had purchased a workshop manual which had been gathering dust for some time. (Memory, memory?) So I pored over the workshop manual for advice. Unlike the Chilton/Haynes auto manuals this one did not provide procedures on how to do things. It had a perfunctory troubleshooting section on electrics and a lot more on hydraulics, which was not the problem. So that was Friday, Saturday and Sunday gone.
Monday, my buddy Mike was between jobs and came out to visit. I dug around the wiring near the starter and found the fusible link, hooray – it looked fine and I tested it with the continuity tester and it was fine. This was a setback since I had hoped I had a bad fuse which had deteriorated with age. No such luck. I did not want the engine to suddenly start while I was perched above the engine compartment below the raised cab so I devised two long wires with alligator clips at the ends connected via a 15 amp fuse to a press switch. Then I connected one of the wires to the battery positive terminal and the other to the wire to the starter solenoid. I stood back and pressed the switch and expected it to start – zilch. Then Mike and I thought the wire might not be thick enough and we used a lower gauge (thicker wire) – nothing. I retested the battery with the battery tester – it was now a bit weak. I had noticed that when I turned the ignition key occasionally the gas gauge needle would move and once I heard a click. So I was now coming to the conclusion that I had a bad solenoid or starter. The solenoid is attached to the starter and its main function is to take the current from a small wire from the ignition switch and use that to connect the big wire from the positive terminal of the battery to the main terminal of the starter. The problem could be the solenoid was not working or it was working but the teeth of the starter were jammed or the brushes of the starter were faulty. What intrigued me was that I had never had a problem with the starter and when they start to fail there is usually good warning, so this seemed unusual. Anyhow – what to do next.
I thought extra current might help so I drove my truck up and tried jump starting the bobcat. I heard a click and that was all. My neighbor across the road, Greg, is an automobile bodywork specialist and he said tapping the starter with a hammer might loosen a jammed part and get the starter to work so I could drive it back to the house. I used a steel hammer to hit a 2 by 6″ piece of wood onto the starter – nothing happened. Greg later that afternoon said it had to be steel on steel not wood on steel, and not too hard. But I had had enough for the day.
Greg suggested I contact a wrecking service and have them lift the bobcat onto the back of a truck and move it to my house where I could work on it at my leisure. So I called Steve, the local mechanic expert, and he still had a 2 week backlog but, on questioning said that the starter could be replaced in the field and it did not have to be done in a workshop. He also said that if/when he came out he would have the starter repaired rather than buy a new one. I asked him about towing and he said that the tracks do not move if the engine is not running and while it could be winched onto the back of a truck, getting it off could be difficult. I contacted a wrecking service and they initially declined thinking the bobcat was out in a field but agreed when told it was easily accessible from a gravel road. They said they had lots of experience loading and unloading track bobcats.
Growing my own food, harvesting rainwater, using a well are part of being self sufficient, and so too is maintaining and repairing the house, automobiles and appliances. So when, a couple weeks ago, the wall oven showed no sign of life, no beeps, no noise, no lights, nada, I began thinking why. And with me about to leave for Australia and the Thanksgiving meal fast approaching, I felt pressured.
the wall oven which went dead
Usually there are warning signs before a shut down, but not in this case. I checked the fuse box – it was fine. I located the paperwork – purchased October 1999 and the control panel was replaced within a year of purchase under warranty because of intermittent problems. And since then, for the past 14 years, it had been fine. I checked current prices and figured a new one would cost >$1,800. I scoured the internet and concluded the problem must be with the power supply to the control panel or the control panel itself.
Before I go further – WARNING -this can be dangerous stuff – the oven uses 240 volts which is lethal so if you are not competent with electricity, leave well alone. I noted that there was 120 volts at the panel, so power to the panel was ok. A panel operates on 24 volts and often there is a transformer separate from the panel which steps down from 120v to 24v, but there was no separate transformer. I noted that the transformer was located on the panel.
control panel with transformer on left
So probably the transformer or the connections had failed. If I was not leaving for Australia within 4 days and if Thanksgiving was not less than 3 weeks away I would have tried to locate and fix the problem myself. But I did not have this option. Buy a new one? No such luck no new panels were offered anywhere on the internet. And then I found an interesting website “fixyourboard.com” where they specialize in repairing control panels. Lots of good references supporting their work.
My panel model # was not listed on their website so I emailed and within a few hours they replied they could fix it for a flat fee of $190 which included a 2 year warranty and return shipping. The day of my departure to Australia I sent it off via UPS, 2 days later they emailed they had received it, and within 3 working days they emailed it was on its way back. I received the panel today (mailed Tuesday and received Friday of the following week). It was accompanied with an analysis stating their diagnosis (failure in power supply circuit), and that they had replaced additional components “shown to be failure prone as a preventative measure” and had fully tested the control board. I attached the cables, reinstalled and switched on at the fuse box and it works. And the atmosphere of dread in the house has lifted.