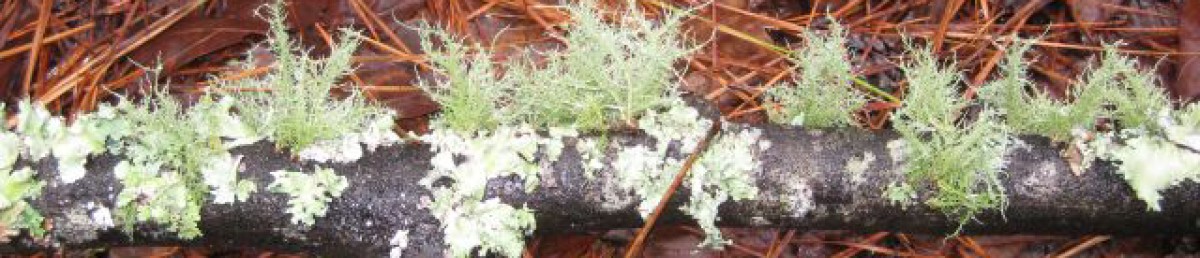
Unlike July which was hot and dry, August has been tempered with rain showers and cloudy days. My property 50 miles north of Atlanta has received a lot of rain while Atlanta very little – could this be the heat island effect? The rain has filled out my muscadine, including the golden scuppernong, shown above and throughout the day they are visited by yellow jackets, wasps and hornets, and me in the earlier morning.
With the exception of the Parks Whopper, most of my tomatoes are done. The Whopper has been an exceptional producer – the first to produce large size tomatoes and the only one still producing, though taste not comparable with the heirlooms.
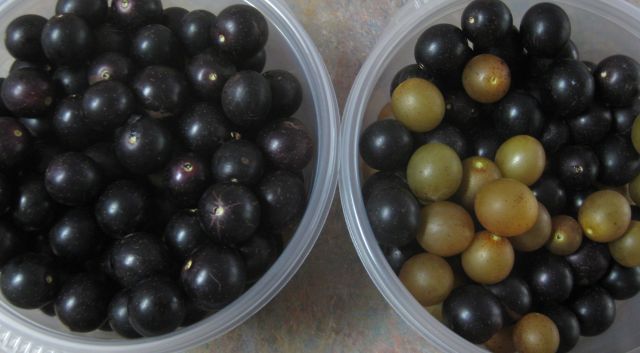
a day’s collection
My colored sweet peppers and okra are flourishing. Now the cantaloupe and watermelon are ripening, and tasting good. Cucumbers and beans are winding down. After removing the tomato plants I have been seeding the tomato cages with peas – will see how this works out. And planting greens in the raised beds – turnips, mustard, kale and collard, and soon the radishes.
As mentioned in my previous post, lot of pears and muscadine grapes. Some apple varieties still to produce and jujube should be edible in a few weeks although we have begun snacking.
Lang Jujube ripens to a mahogany red color. I planted opposite it a Li Jujube which is not yet fruit bearing.the Kieffer pear (top right) is v. large and sweet. Top left a Giant Korean pear, bottom left a Paduckah apple and bottom right the Anna Apple from Israel with low chill hours requirement
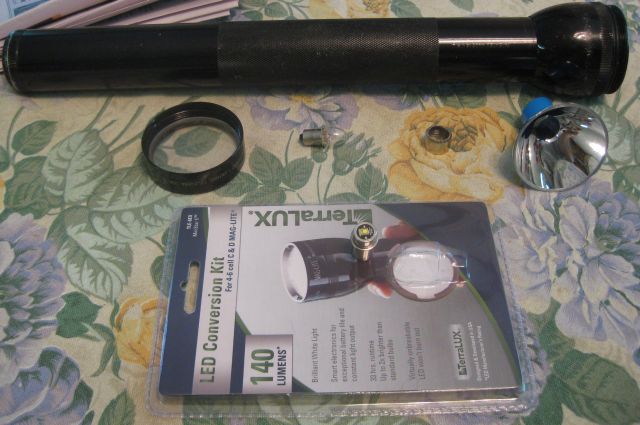
maglite led conversion
With the boxy yellow Eveready LED floating lantern available for <$5, it is difficult to rationalize holding onto the mag-lite flashlights. Except they are so well made and I really did not want to toss my large 4 D cell mag-lite. So I ordered the TerraLux LED conversion kit (140 lumens, $17.48) and it is easy enough to replace the bulb.
a quick replacement of conventional bulb with new LED
Battery life and brightness are greatly increased and I have a handy club, if needed.
Recent good rains have juiced my crops. We thought by now the tomatoes would be done, and some are, but others keep producing. Most everyone complimented the taste of the small tomatoes. We feel the larger tomatoes are less tasty probably from too much rain.
Muscadine season has almost arrived and the black ones above although sweet, will be sweeter still when they roll into my hand and do not have to be tugged. But then there will be many yellow jackets at the smorgasbord and M. developed a nasty reaction when 2 yellow jackets, apparently without provocation, stung her ankle.
And the apples and pears are abundant. In my 7/31 post I criticized the Paduckah apple as a good producer with little taste. Now these apples have fully ripened they really are tasty. I locate fully ripened apples not by feeling for which nudges easily free but by selecting from those that have fallen to the ground. Very few pests this year probably because of my kaolin spraying.
the two bottom apples are Paduckahs, top left is the Matsu (tastes great), 2 on the right are Ein Shemer (not yet ready), Kieffer pear in the middle, and at the top the Giant Korean pear, which needs a few more weeks.
Recent reads
I finished reading 3 interesting books. The Dark Forest by Cixin Liu (tsih-sheen leo) apparently China’s top science fiction writer, is the sequel to The Three-Body Solution. One of my sons read the Mandarin originals, recommended them, gifted them to me, encouraged me persistently, and once I was into it, it was a good read. Another book he recommended The Mandibles by Lionel Shriver, is a dystopian finance drama, very well written and much easier to access. And finally I enjoyed the short stories in The Periodic Table (1984) by Primo Levi – gentle instruction, humor and sadness.
And, a first. My running/walking group has good-naturedly tolerated my digressions on nutrition – that you are what you eat. Yesterday at breakfast after our stint on the river trail, I noticed there were more oatmeal settings (5) than bacon and eggs (4). My comment that this was a first, caused some embarrassment. It seems more folks are correlating health outcomes with what they eat. Good!
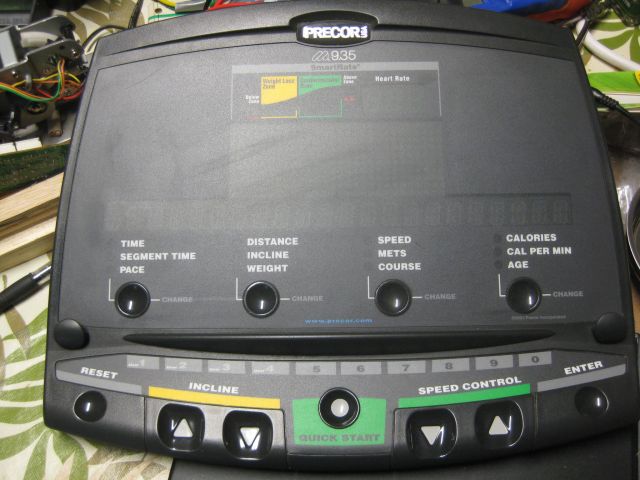
You may well ask – ” I thought this site was about organic growing and permaculture, why so much electronics?” I want some control over my life and surroundings. Perhaps I could work and pay others to maintain the yard; repair my house, car and everything else that fails; administer to my health; and grow my food. But, I like self reliance and making effective inputs to what goes on around me provides satisfaction. Which brings me to the treadmill which failed.
My usual caveat – working with electricity can be dangerous or even deadly, so stay clear if you are not experienced.
Around 2003 I bought a good quality Precor 9.35 treadmill, which M. and B. often used, and then it went on the blink – literally its various lights would blink but nothing happened. Some quick checks brought the conclusion that the circuit board was defective. Previously, when the wall oven and refrigerator failed, I located via the internet, outfits specialized in those circuit boards and sent them the board and received a working board a few days later (cost <$200). And the appliances worked and continue to work.
But wouldn’t it have been great to repair the board myself?
My first venture down this route was fixing the simple board on my scroll saw. It was frustrating, took a long time but I learned techniques along the way and succeeded. The treadmill board is more sophisticated.
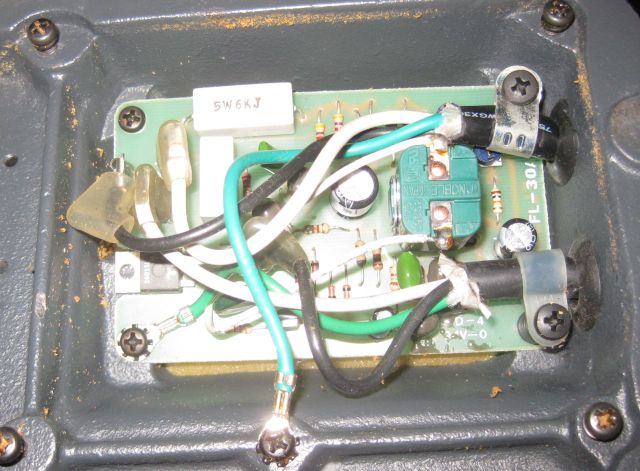
the control panel of the Precor 9.35
Here is the underside of the circuit board – not much going on.
this view shows some of the traces or connections between the components but not all of them. some are buried in layers of the board
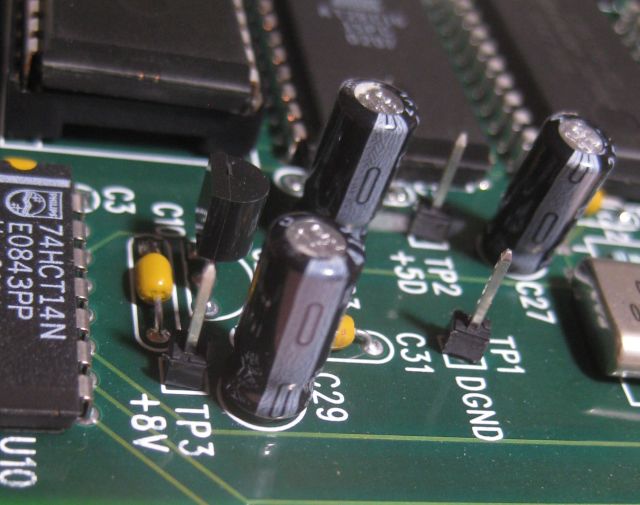
And here is the component side of the board. My starting point is to test the capacitors, cylindrical objects, of which there are 8.
can you spot the capacitors?
Here is a close up view of 3 capacitors.
all the capacitors have the same value 47uF @ 25v. when replacing polarity must be observed – the light grey band identifies the negative leg
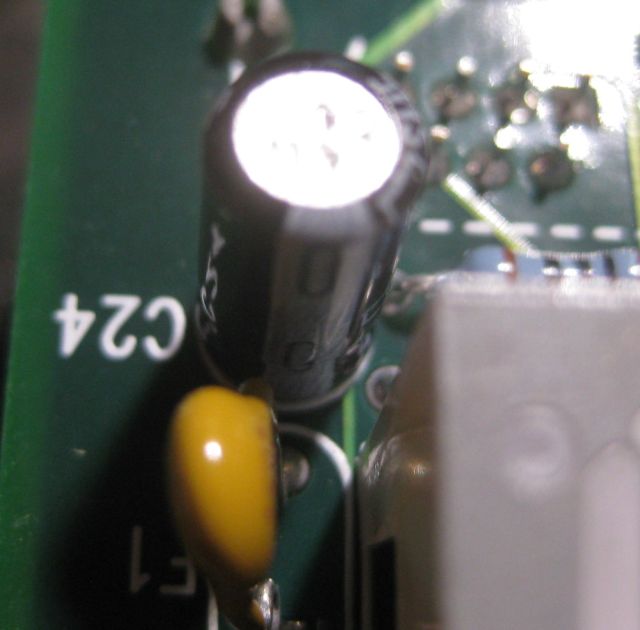
With my ESR meter I established that one capacitor was defective – 7 had an ESR of<0.31 and the defective cap had an ESR of 1. Here is the bad guy.
the photograph was to remind me which side was negative. no indication from its external appearance that it is damaged
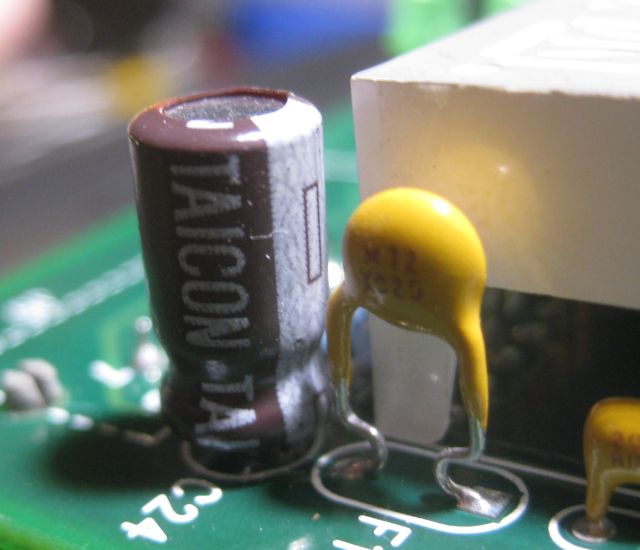
Diagnosis was quick. The actual replacement was difficult. Previously, to desolder a component I heated a soldered leg and with my other hand wiggled it free. But this was a multilayered board and it did not wiggle free. I figured lead free solder was used and raised the iron’s temperature. I was concerned too much heat would destroy the board. Touch and go. Eventually I was able to extricate the component but the holes, through which their legs had been inserted, promptly blocked up again with solder. With various diameter wires I was eventually able to clear the holes. Then I soldered a new component (same Farad rating, higher voltage, cost before shipping 15 cents), and it was done.
the new capacitor with polarity observed
But was it fixed? That evening M. tested it and it worked – “significant event” she said!
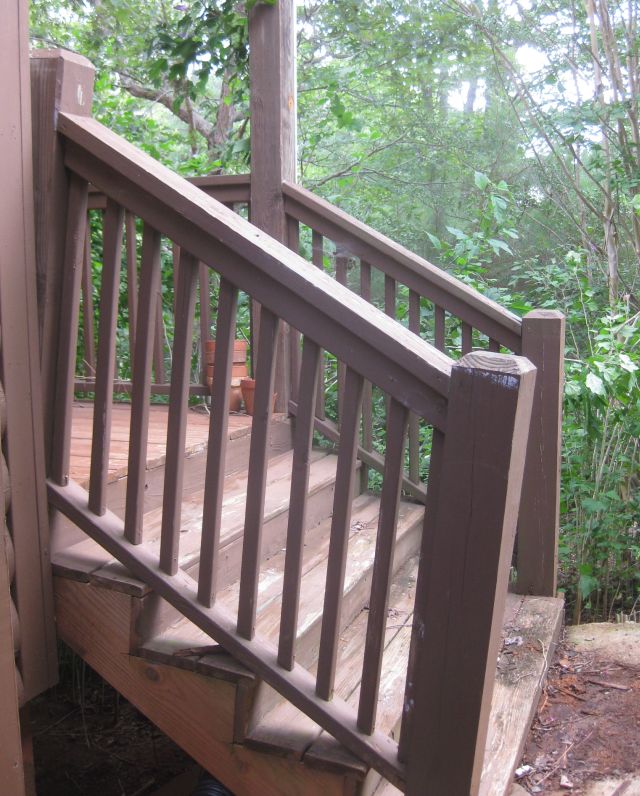
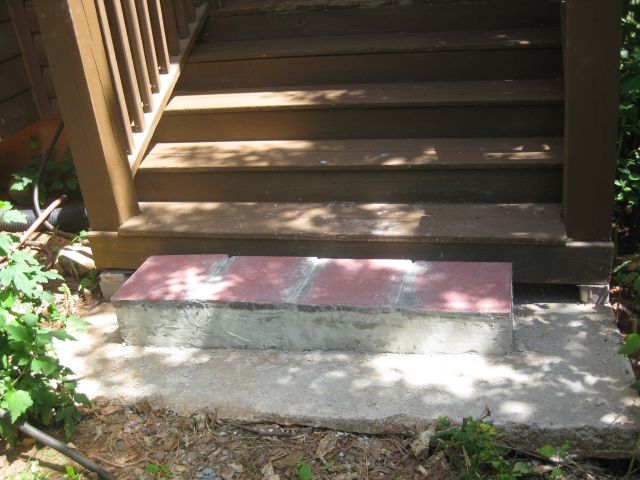
We always access the house through the kitchen door since this is most convenient to the carport. The steps to the porch to the front door are neglected and have sagged miserably as the concrete base on which they rest settled into the ground.
the post at bottom right has sagged the most and you can see how it has pulled the top post, to which it is connected, off vertical
My neighbor is a builder and his suggestion was to remove the stairs and then level the concrete base and then re-attach the stairs. I notice professionals prefer to remove what is defective and begin from the beginning, which is logical since everything will look good and plumb and, with adequate manpower is quicker, though with more material cost. I however wanted a quick fix with my own resources, and so I decided to raise and level the stairs and later I can pour concrete to level the concrete base.
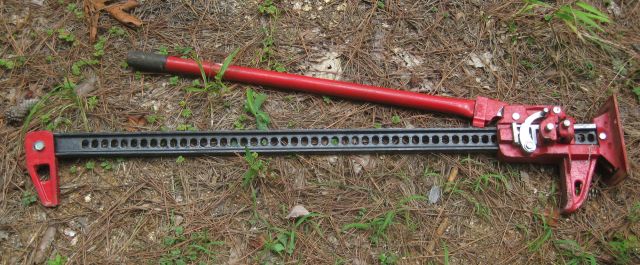
But how do I single-handedly level the stairs? Not enough space for a bottle jack or car jack. And then I thought of my farm jack, also called a Hi-Lift jack which I last used 5 years ago to hoist railway ties, also called sleepers, out of the ground. It cost <$30 and now is about double in price.
Ok, the farm jack would be the lifter but how do I attach it to the stairs? I thought of screwing a 2×4 horizontally to the ground level posts and use that for the jacking point, but then I saw the posts were nailed to the stair risers and the jack would just lift the posts off the stairs. Not what I wanted. The connection had to be to the stair risers, but how?
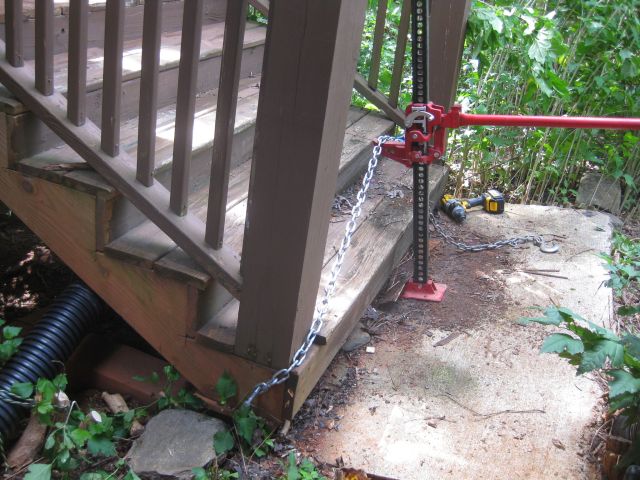
the solution – a chain bolted to the bottom of each of the risers
I then used the farm jack to raise the stairs.
farm jack in action with bottom of stairs raised off the ground
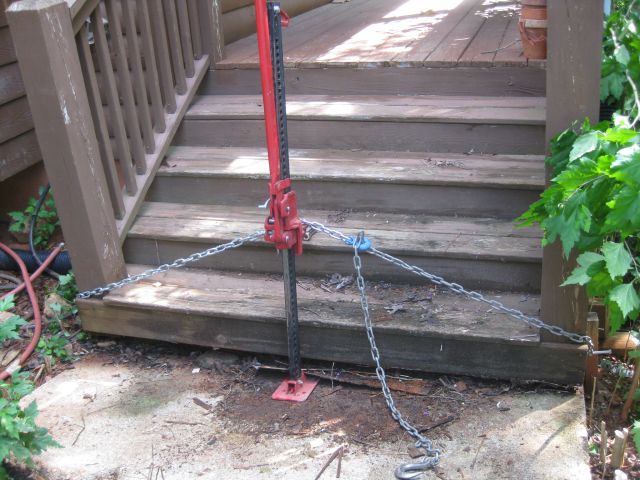
I had two lengths of chain which was handy since I was able to use a grab hook (shown in blue) to adjust the length to what I wanted.
I leveled the stairs with concrete blocks and used flashing to protect the wood from rising damp
Since the top left corner of the slab had settled most, that end of the stairs needed the most adjustment – thick concrete slab and treated 2×6 and flashing for damp protection.
Next steps are to scrape, prime and paint the stairs and then pour a level concrete step on top of the existing base.
a few weeks later – here is the finished product:
I made a simple mould, poured concrete which self-leveled and topped with 4 red flagstones, and the result (to me) is acceptable
The manual is dated October ’92 so I must have purchased the scroll saw in the early 90’s. It worked fine though I did not use it much. Recently I had need for it but there was no response when I plugged it in.
Notice: If you are not competent with electricity do no attempt anything mentioned below – serious harm or death can result – instead seek professional assistance for your electrical problem.
I removed the base plate to expose the circuit board and checked: a) was power reaching the circuit board (yes); b) was the on/off switch functioning (yes); c) was there a fuse which may have shorted (no); d) was power being output to the motor (no). Conclusion – the circuit board was receiving power, no fuse had shorted, the on off switch worked fine and no power was output to the motor which drives the saw. So the motor was fine and there was a problem with the circuit board.
Elsewhere on this website I describe how I shipped circuit boards of an oven and a refrigerator to a specialist firm for repair. Also how I have replaced capacitors of air conditioning units. And how I replaced the fuse of a Bose cd/radio. But I have never repaired a circuit board. So time for a new challenge.
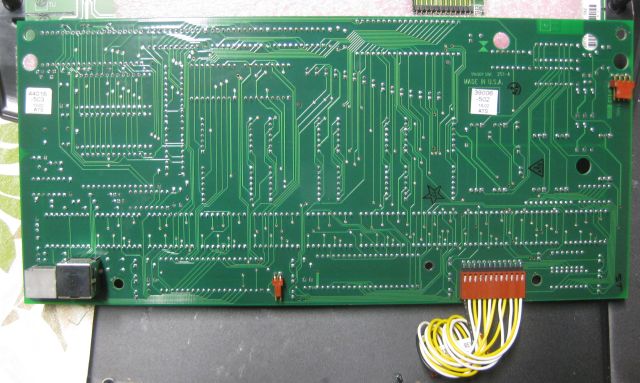
The beauty of old appliances is their circuit boards appear simple and are easier to work with than the modern stuff. The pcb (printed circuit board) of the Scroll Saw has relatively few components:
the pcb attached to the base of the saw. AC volts come in top right and DC volts go out bottom right
Here is a better pic with the connectors removed:
topside view -you can clearly see the components and there are not too many of them
Some pcb’s have a numbering system for each of the components – not this one. The big green device on the right is the on/off switch. The 3 barrel looking devices with the silver tops are the capacitors – there usually is a problem with one of them. Then there are a number of resistors and diodes and several transistors (some covered in glue) and on the left, just above TOTY a thyristor with 3 legs. The rectangular horizontal white object at the top is a resistor and the rectangular vertical white object is a capacitor. Plus other items such as a varistor and pots.
You will notice on bottom right a number E1?9744. I hoped to find a schematic of this pcb on the web and fruitlessly googled this number which I thought was E119744 or some other combination. To no avail. Testing and replacing components is ok but I would much rather understand how the power supply actually works. I have a 1991 Radio Shack booklet on “Building Power Supplies” (compatible lineage) which was helpful explaining the principles of PWM etc. but even then I could not figure out how this particular pcb worked.
I thought the only way to test a capacitor is to unsolder and remove one of the legs from the circuit. I did this with the large cap (470 micron Farads) next to the switch, and it was fine, but what a pain for testing. Then I learned about ESR meters which can test caps seated on the pcb. Much easier. And guess what – the cap at the bottom (47 micron Farads) was defective. I placed an order for a replacement cap and got instead a 4.7 micron Farads cap. So I found an old pcb (one of my sons collected them) and unsoldered a 47 micron Farad cap and it tested fine and I installed it.
Here is an underside view of the pcb:
the object on the right is a shaft connected to the on/off switch. when pulled up it switches on the motor and when rotated it alters the speed of the motor
My next focus of interest was the thyristor the rectangular white object visible through the board cutout on the left of the picture. I surmised that the cut out was to allow the thyristor to be attached to a heat sink which would dissipate the heat generated during operation and therefore the non presence of a heat sink could have contributed to its failure. Design flaw?
From the topside view you can see the thyristor has 3 legs – a collector, emitter and base. No current flows unless voltage is applied to the base. When this occurs the thyristor should latch which means that when the voltage is removed from the base, the current continues to flow from collector to emitter. I unsoldered the thyristor and tested it and when base voltage was removed current stopped flowing from collector to emitter. It was defective. I ordered and installed a new thyristor (fortunately the defective component had sufficient information for identification).
I thought the pcb should work but it didn’t. I was stumped. I retested the components – all fine. Rather than mess with 120 VAC I connected the pcb to 24VAC – less chance of electrocution. And, unexpectedly instead of getting <1 VDC I suddenly got 16 VDC. I re-installed the pcb connected the power and, it didn’t work, back to <1VDC. A lot of head scratching and I concluded that one of my soldered joints must be faulty. Reconnected to 24VAC and gently pressed with a gloved finger each of the components – the voltmeter stayed below 1VDC. Then I pressed the thyristor and the meter showed >16VDC. Solution. On examination one of the legs was cold soldered so I resoldered it and got my >16VDS with the 24VAC supply. Reinstalled the pcb and connected to mains power and it works. The scroll saw is back in operation!
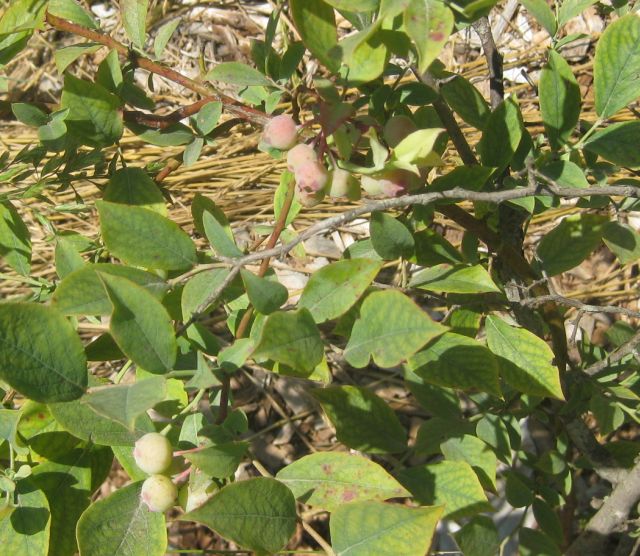
I showed M. the berry laden blueberry plants and ventured they would be ready for picking within a few weeks. But why are the leaves yellow? she asked and drew my attention, as she usually does, to what I had missed. Yellow leaves with green veins can indicate the plant is not receiving enough iron (iron chlorosis) since iron produces cholorphyll which makes the leaves green which enables photosynthesis, sugar production and growth. Blueberries thrive on acid soil (between 4 and 5) and if the soil is not sufficiently acid they cannot uptake iron.
Following my pH experiments last week I decided to sample the pH of my blueberry plants. I selected a sample from each of 3 plants, mixed each sample in a separate container with distilled water, and followed my testing protocol: 1) rinse meter in distilled water; 2) put meter in 4.0 buffer solution – it read 4.1 great; 3) rinse meter in distilled water; 4) put meter in 6.9 buffer solution – it read 6.9 great; 5) rinse meter; 6) put meter in soil sample 1 – it read 6.6; 7) rinse meter; 8) put meter in soil sample 2 – it read 7.4; 9) rinse meter; 10) put meter in sample 3 it read 6.3. Each immersion was for 1 minute and water temp around 65 deg F.
this plant has never really grown over the years, has few berries and has 7.4 pH, no surprise
I was expecting lower pH readings since earlier in the year I had purchased and added sulfur powder to the soil of the blueberry plants. I mentioned to M. that when taking the samples I had noticed sulfur powder in the soil (it is very yellow and easily seen) and she said that was because it had not been absorbed. The sulfur powder I am using does not dissolve in water.
sulfur powder floats on top of the water or in clumps below the surface even after vigorous stirring
I mixed some sulfur powder with distilled water and the pH was 6.6 about what it would have been without the powder, so the sulfur powder was not interacting with the water. M. explained that sulfur loving bacteria, which are equipped with the necessary enzymes, are needed to transform the sulfur powder into soluble form. So the sulfur I added in spring had not yet been transformed and apparently this is a slow process which takes time. It would be quicker if we found some sulfur loving bacteria and added them to the soil, but this is an unlikely route.
So what to do in the meantime? There are synthetic iron chelates (a chelate is a soluble form of the mineral which makes it accessible to the plant) which will work quickly but this is at odds with my organic philosophy. The yellowing blueberry leaves do not presage a good blueberry harvest. Short term remedy – we researched and ordered an organic iron foliar spray which will work directly on the leaves and with some luck (if I don’t over apply or under apply) may get them normal looking and back to their photosynthesis work.
Also, if you look carefully at the leaves you may notice some red blotches which could indicate magnesium deficiency so I will provide an epsom salts drink to the plants as well.
The pH (acidity/alkilinity) is an important must know for growing vegetables, fruits and berries. Blueberries notoriously love acid conditions. Tomatoes like a pH range between 5.5 to 7.5. Since pH can range from 1 (very acid) to 14 (very alkaline) it follows that 7 is neutral. I have tried over the years to independently determine my soil’s pH, with little success. I have sent samples to the extension service for general soil analysis but have always wanted to determine pH myself.
The pH strips I purchased were little help to me since I had difficulty confidently matching the color on the strip after it had been dipped into the liquid I was testing, with the pH graded color chart. An inexpensive pH meter was also little help to me.
I decided to go upmarket and purchased a laboratory grade meter and 7.0 buffer, electrolyte cleaning and storage solutions and I again got unusual results. This may be because I purchased the meter for a discounted price from an alternative supplier and the electrode bulb may have dried before it reached me (I subsequently learned that a dried out bulb doesn’t work) or after it reached me due to my inexperience.
I probably needed a new replacement electrode but this cost >$60 and I was not motivated to go this route. Then it occurred to me that a) I do not need laboratory grade equipment; and b) a whole lot of decent electronic instruments have been flooding the market at much lower prices than the well known brands and should work decently.
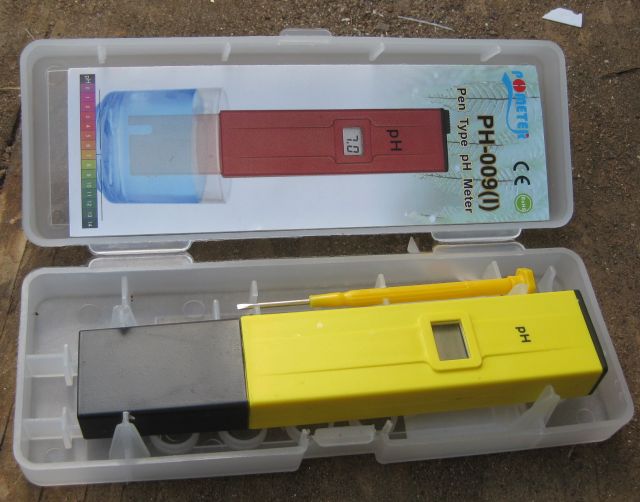
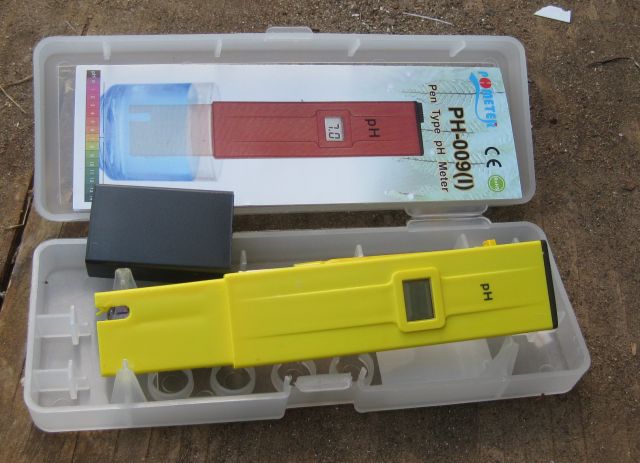
So I studied the options and purchasers’ comments on Amazon and purchased the pH tester below for $11.10 total which included 2 packets of buffer powder.
my new ph meter
I purchased a gallon of distilled water and made up the 2 buffer solutions by dissolving each packet into a separate container holding 250ml of distilled water. The instructions said to use deionized water for preparing the buffer solutions and to use distilled water for rinsing the electrode. I figured nothing could beat distilled water and I had no deionized water available so I made up the solutions with distilled water (more about this later).
my 2 buffer solutions – pH 4.01 and pH 6.86
Now the moment of truth – as instructed I rinsed the electrode with distilled water and then immersed it into the 6.86 pH solution. The meter read 6.7 and with the small screwdriver provided, I adjusted the reading to 6.9. I rinsed the electrode again and put it into the 4.0 pH solution and it read 4.0. I was seriously impressed – this $11 instrument really worked. I rinsed it again and measured the pH of distilled water expecting 7.0 (neutral) and it read 5.5 what the !!!!. Surely distilled water is neutral! Back into the 6.86 solution and it read 6.9, rinsed and back into the 4.0 solution and it read 4.0 and back into the distilled water and again it read 5.5. The meter appeared consistent.
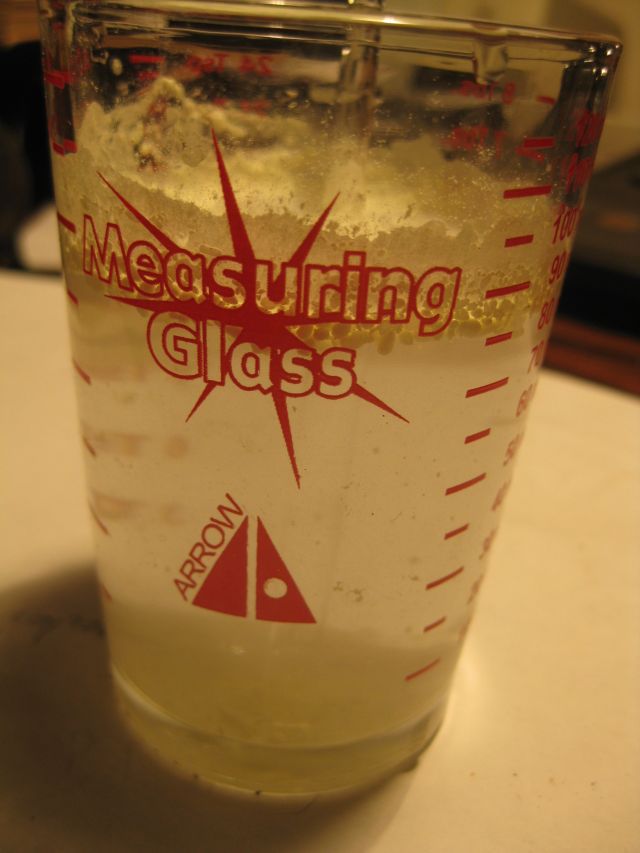
So I pressed ahead. My rainwater measured 4.9 (acid rain?) and my well water 6.0. Time to do the tomatoes – I took 3 soil samples from 3 different tomato beds – 2 samples from beds prepared this year and 1 from a bed I have used for several years. Each sample I mixed with distilled water and then filtered the solution to remove large abrasive particles.
some of my utensils – a glass stirring rod, a measuring beaker and a jar to hold the solution being tested
Samples 1 & 2 both read 6.7 and sample 3 read 7.8. Wow! – a big difference. Then I remembered that I had copiously applied lime and wood ash to the existing bed in previous years so the high alkaline reading made sense. My conclusion was that none of the beds required liming.
The next day I began over again. The 6.86 buffer solution read 6.8, and the 4.0 solution now read 4.3 so I adjusted it to 4.0. and then rinsed and retested the meter on both buffer solutions and they both read true. I mixed coffee grounds with distilled water and the pH was 6.0. My comfrey and coffee compost tea was 5.5 – made using rainwater which had read 4.9 so this made sense. And I took 2 more samples from the bed which read 7.8 the previous day and they read 7.0 and 7.3 so the bed was too alkaline.
It all seemed to make sense except for one big and growing concern – why was the pH of the distilled water 5.5 and was this low pH affecting all the readings of the samples which had been mixed with distilled water. For example if with a soil sample and distilled water solution I get a pH of 7.3 and the distilled water by itself has a pH of 5.5 does this mean the soil sample if mixed with water with a neutral pH (7.0) will have a much higher pH reading?
And why does distilled water have such a low pH? Apparently distilled water when produced has a 7 pH but it reacts with CO2 (carbon dioxide) to produce a mild carbonic acid which lowers the pH of the water. It appears that the pH of distilled water is easily influenced by what it mixes with. My analogy is a shopping cart – if empty and you push with a finger it will move some distance. If heavily loaded then a 1 finger push will barely budge it. If the distilled water is the empty cart and the CO2 moves it one direction then the pH of a soil sample (I would like to think as a one handed push) will overcome the 1 finger push and get it to where it should be. Very simplistic and unproven.
I bought another gallon of distilled water from another large chain and its pH was 5.0. Now I could resolve matters by buying deionized water but it cost >$25 a gallon vs. $1.72 a gallon for distilled water. There is another solution – how about using bottled drinking water. I tested one sample and its pH was 7.4 – much closer to the neutral 7.0. If I mix the soil sample with drinking water with a 7 pH will it give a more accurate result than if mixed with 5.5 pH distilled water?
So a simple test. I filled a container with 200ml of distilled water and another with 200ml of bottled drinking water. And added a small quantity of lime to both and stirred and measured their pH’s. Lime is alkaline so you would think the lime mixed with the 7.4 pH drinking water will have a higher pH than the lime mixed with the 5.5 pH distilled water. And the result?
The drinking water had a pH of 8.4 and the distilled water a pH of 9.7! (Repeat tests with 2 drinking water solutions and 2 distilled water solutions gave pH’s of 8.6 for the former and 9.4 for the latter – a similar trend). So distilled water with a lower starting pH gave a higher pH result when mixed, compared with the drinking water which has a higher starting pH. Using my analogy, the distilled water is a very light cart with well greased wheels and the drinking water is heavily laden and moves sluggishly. I am not scientifically trained so don’t rely on my findings – if this is important to you do your own tests.
For my purposes I will continue using distilled water for my soil pH testing and will not fork out for deionized water.
FYI – a friend who is qualified in this area, says this is a long boring post; not using deionized water for the buffer solutions invalidates my readings; the shopping cart analogy is stupid; and he/she is sceptical of the results but acknowledges that for my purposes distilled water is probably ok for mixing with soil samples.
Additional note: I noticed that distilled water when first poured has a lower pH than when subsequently poured and I hypothesize that the carbonic reaction at the surface of the water, which produces the acid, does not diffuse through the whole solution (unless stirred) but I did not test this by withdrawing a sample from the bottom of the container.
I just completed the 4th and final semester of BJC MOOC via edX hosted by Berkeley, San Francisco. What a great course! And I learned so much about basic programming, computer science and technology trends. All for free if you wish, though I contributed some. For teaching purposes it uses blocks which you re-arrange called Snap! which is based on Scratch developed by MIT. A fun exercise was the Tower of Hanoi puzzle.
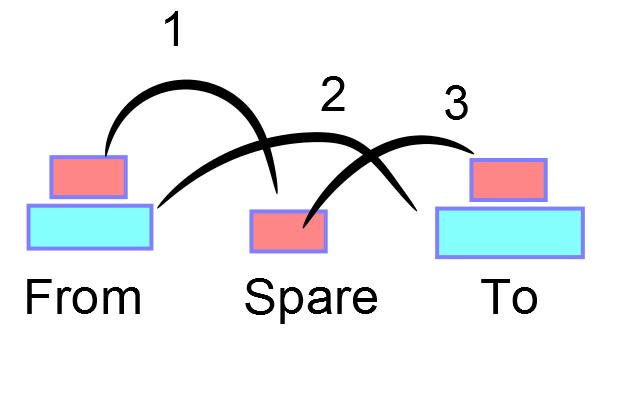
The rules are simple. There are 3 pegs labelled left to right “From”, “Spare” and “To”. The puzzle begins with various sized disks, smallest on top, stacked on the leftmost “From” peg. The object is to move the disks over to the rightmost “To” peg subject to 3 rules: 1) only move 1 disk at a time; 2) take the top disk from one peg and place it on top of another peg; 3) you can never place a bigger disk on a smaller disk.
So if there are just 2 disks on the “From” peg, the solution is simple – just move top disk to “Spare” peg, next disk to “To” peg and then disk on “Spare” peg to “To” peg.
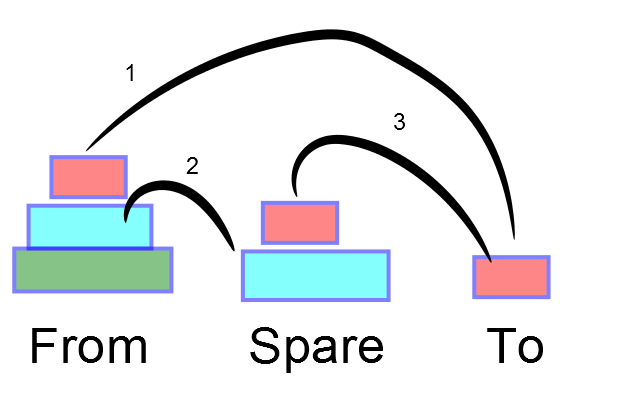
With 3 disks it is a bit more complicated. First:
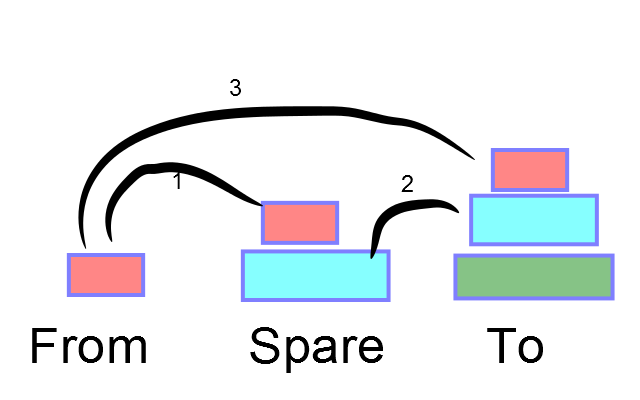
Then with red and blue at “Spare”, green is moved to “To”. The final step is:
I cut wood rectangles of descending sizes and practiced the puzzle beginning with a few pieces and progressing to 5 pieces. When I found the recurring sequences I used a technique called recursion to implement the sequences. Berkeley provided the backdrop and software to move the disks, all I had to do was figure which disks to move when and where. My program is not fully automated (a remaining challenge) but it works and here is a video showing the solution to a 5 block puzzle.
So what has this to do with growing and sustainable living? During the very cold and very hot months when outside work is unpleasant or unfruitful and you have time to spare, a MOOC on basic electronics or programming should be a good investment. Once you understand a bit about electronics and software you will feel confident to install and program your own security system; install strategically placed cameras connected to a DVR to which you set up remote access via a smart phone; and with the expanding world of IoT (internet of things) you can also install perimeter sensors to provide early intruder warning, or an automated chicken coop door opener. And you can diagnose and repair things which you might otherwise have tossed. And becoming self reliant makes you feel good.
With the beginning of winter I now always ensure that I have disconnected my water pumps and drained the water. My carport pump (moves 2,400 storage gals) started fine, but my 1hp Water Ace (moves 2,800 storage gals) just made a humming sound when I tried pumping today. Another challenge!
Probably bad brushes I thought but usually there is warning – a lot of spluttering and starting in fits. Not this time and why should it fail to start after the winter break? I moved it to the workshop and removed the front end where the centrifugal impeller is – it turned with difficulty.
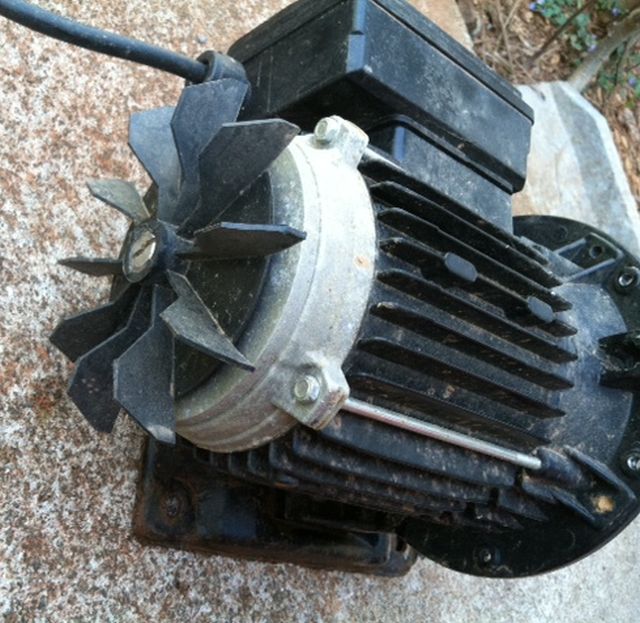
the pumping end -the motor spins the disc which has slits in it to catch the water and force it through the center hole
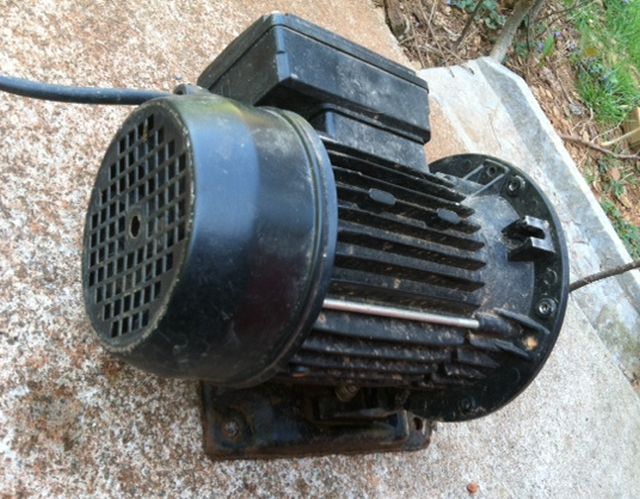
Odd, I thought something must be jammed. While it was open I removed some small stones caught in the slits. So what could it be? I happened to look at the rear end and the cover was not seated properly. Beneath the cover is the fan which is also driven by the motor.
cooling fan with cover removed
Now, with the cover removed, the impeller and the fan (they are connected to the same drive shaft) turned easily. I carefully replaced the fan cover and the front end cover and the pump started fine and pumped without leaking. All done!
pump fan cover replaced
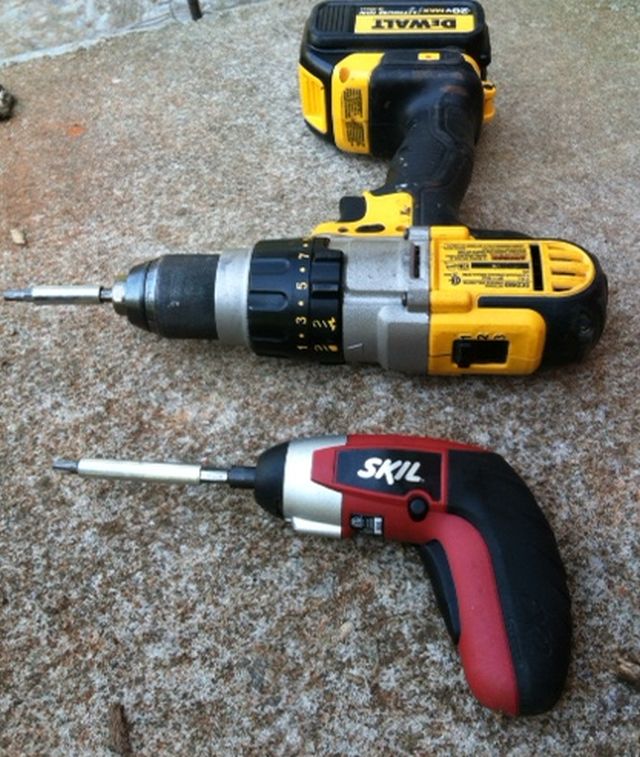
To remove the bolts I looked for my battery powered screwdriver, could not find it and so used my drill at lowest speed and torque setting. Mistake! Even at the lowest settings it is too fast and too powerful. I more determinedly looked for the powered screwdriver, found it and then removing the remaining bolts and re-assembly was fine. Moral – don’t rush.
the small powered screw driver turns more slowly and with less torque – why strip bolt heads needlessly?
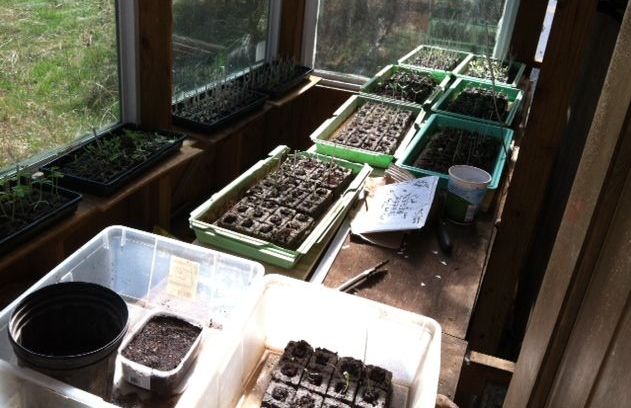
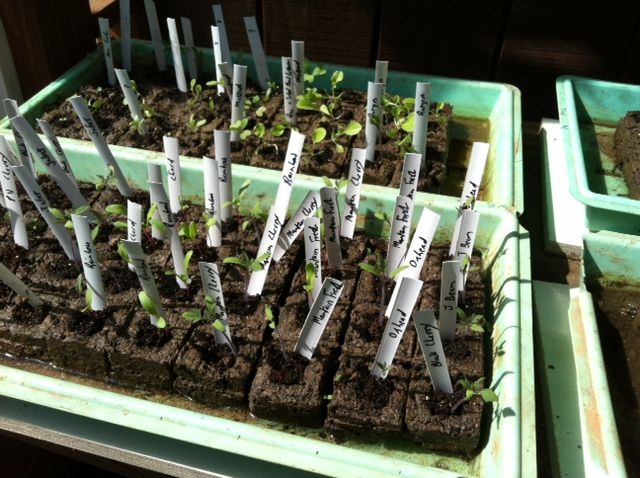
My seedlings are progressing well – below is a snap of some of my tomatoes in 2″ soil blocks in the greenhouse.
some tomatoes identified with venetian blind plastic strips
Recent bad weather discouraged outdoor activity. So I used my time indoors to tackle a BJC.3 (Beauty and Joy of Computing – Berkeley, CA) project. We were recently instructed on web scraping which means using Snap! (a block programming language derived from Scratch) to go to the internet and scrape selected data from websites.
From Spring to Fall a daily decision is whether to water my crops and, if so, how much. To make this analysis I need to know current soil moisture, expected precipitation (rainfall) in the next 12 hours and local average temperature. If there is sufficient moisture in the ground or rain is imminent then it is not necessary to irrigate. The need for irrigation is increased if temperatures are high since this will accelerate evaporation and unnecessary if temperatures are low. At some point I will install sensors which will report ground conditions. In the meantime I had some fun and devised my “Irrigation Adviser”. Click on the following link and you can see the message given me on 2/16/2016 @ 2.10pm.