When not using the truck to transport materials, I use M’s 2007 Camry which now has 155k miles. It is more comfortable and uses less gas. Apart from regular maintenance it has required little extra expenditures – new front rotors @ 98k; new upper engine mount @ 138k; new alternator @141k.
But for some time brake vibration has been an issue- the brake pedal pulsates and the steering wheel shakes when I forcefully apply the brakes. Because the steering wheel shakes this indicates the problem is the front rotors and I had replaced both rotors at 98k. I decided that rather than again replace both rotors (new ones cost about $25 each), I would identify which was the problem and try determine why this was re-occurring.
The brake rotor, also known as the disc, (therefore the term “disc brakes”), is mounted just inside the wheel and rotates with the wheel. The rotor rotates between 2 brake pads held in place by a caliper and braking occurs when the piston in the caliper applies pressure to one of the pads. Since the caliper can move laterally (but not with the rotation of the rotor) the pressure is effectively applied evenly to both pads, which engage the rotor and slow its rotation and vehicle movement. The vibration occurs because there is variation in the face of the rotor on one or both of its sides. This is called runout and for lighter vehicles such as the Camry, runout should not exceed a few thousandths of an inch.
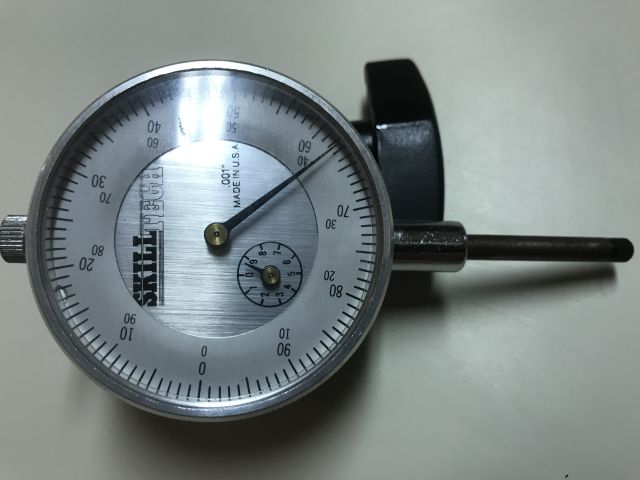
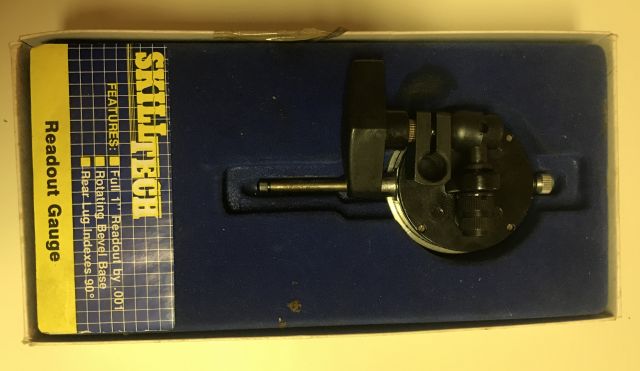
I have a read out gauge -see above and below pictures.
purchased some years ago for $23. the picture shows how it can be connected to a rod for vertical or horizontal mounting
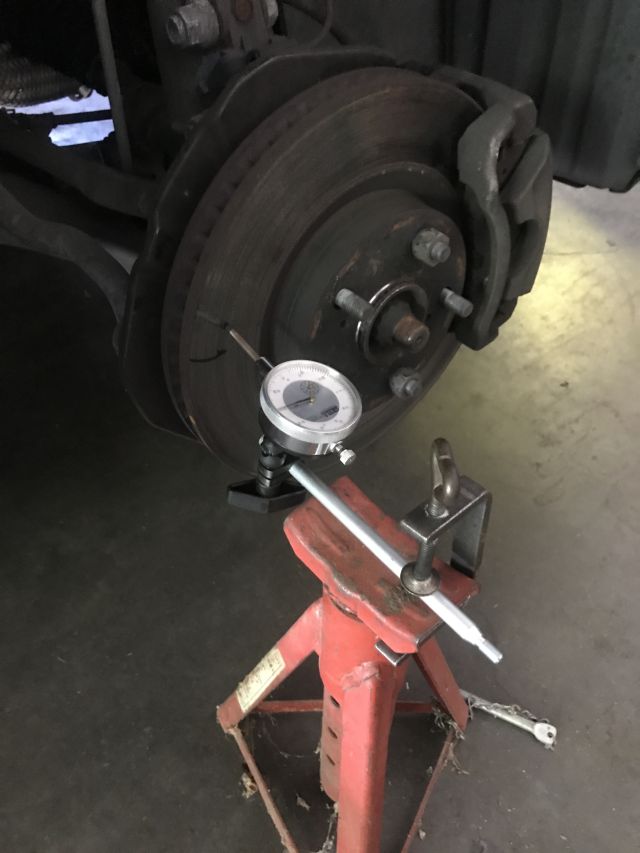
The setup (after some experimentation) is simple – I found a rod to which the gauge could attach, and I secured the rod with a clamp to an axle stand.
you can clearly see the rotor, against which the tip of the gauge is pressing and the brake caliper near the top right corner
I ensured the vehicle was safely and securely supported by an axle stand in addition to the car jack. The left rotor had no runout, which means I rotated the rotor 360 degrees and the gauge needle did not move by even a thousandth of an inch. However, the front right rotor had 4/1000″ run out. Instead of ordering a $25 rotor I splurged and ordered a $40 replacement rotor. And I removed, cleaned and greased the two caliper pins on each caliper which enable the caliper to move and center on the rotor – perhaps this is the reason why one rotor went bad – too much heating from a recalcitrant caliper.
The new rotor arrived, I installed it and the brakes are now fine.
Dishwasher machine fix
Some time ago M. informed me the dishwasher was not fully draining. Since it appeared to be otherwise ok, I ignored the issue. Then M. told me there were particles on the plates. New machine or fix the old?
Youtube has excellent videos for working on the Kenmore Elite dishwasher (model 665), which were easy to follow. Remember to first disconnect power at the breaker panel/distribution board. I used a shop vacuum to suck out the water in the sump so I could locate and remove the sump parts. I removed the detergent gunk and, following the video, located and removed the sump check valve. Except it was broken – the top half came out easily, the bottom half took a lot of fishing to locate and retrieve.
severed sump check valve. circular flapper flexes to allow pumped water out and re-seats to prevent water returning to sump
I ordered a new part (cost $14 before taxes) and installed and the old dishwasher now works ok. I believe that over time water in the sump which was not pumped out, deposited detergent sludge and so enabled the build up which became troublesome.
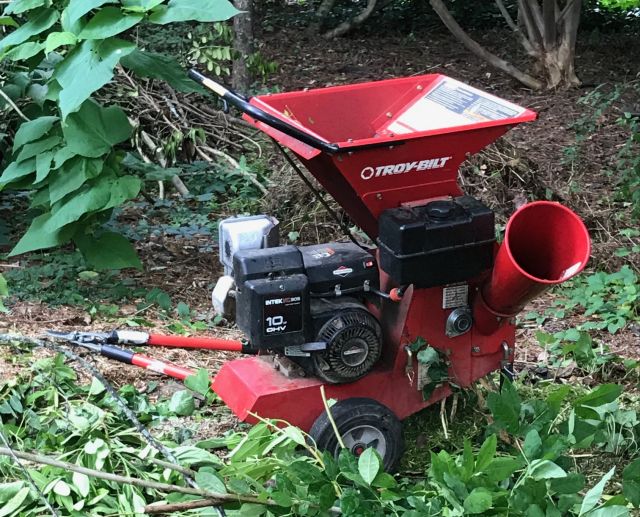
I extend the life of appliances so they can age gracefully as I am also attempting to do. But they need attention and repair. I previously posted how I repaired (or had someone repair) the circuit boards of the wall oven, fridge and treadmill all of which are >15 years old and still work fine. In August 2013 I posted how I rebuilt the engine of my chipper/shredder (see picture above) after the oil plug came off, the oil escaped and the engine seized. I believe I bought the chipper new in the 90’s and have used it regularly. Other than the engine repair, I also replaced the fuel tank (costly part), the drive belt, and the axle bearing.
I heard loud thunking from the chipper this week and noticed that the axle bearing was broken and again needed replacement after some 10 year’s use.
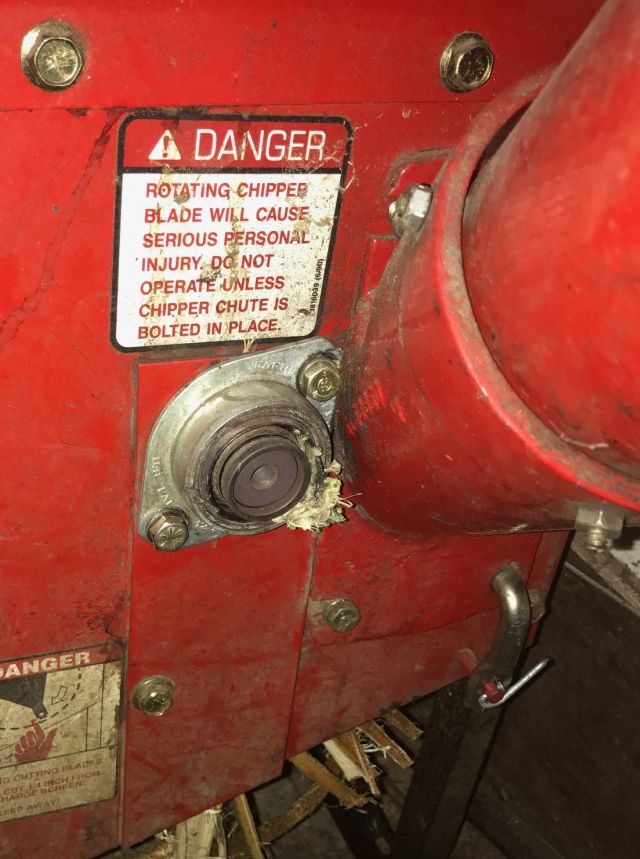
you can see the damaged bearing and the end of the axle which rotates the chipper and the shredder and needs a heavy duty bearing to service it. some debris has pierced the bearing brace and replacement is long overdue
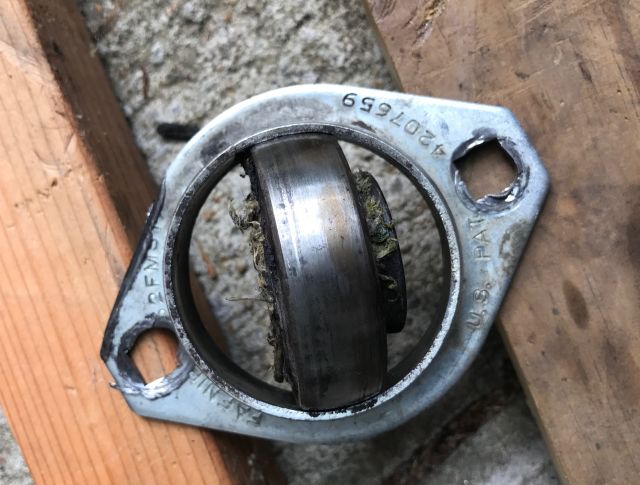
What I refer to as the “bearing” is actually 2 components – a housing, and a bearing inserted into the housing.
with heavy hammer and steel chisel I was able to dislocate the bearing and you see it edgewise in the housing
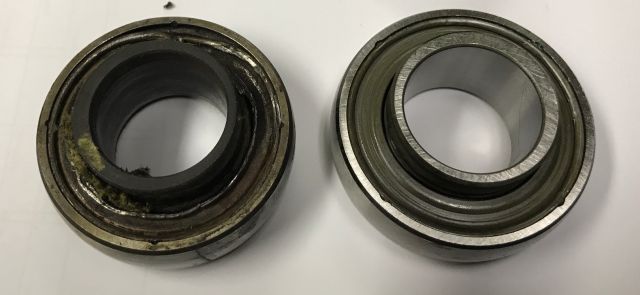
When I last replaced the assembly some 10 years ago I am sure the price was <$20. Today the price >$60 on all the websites I visited. Seems a lot. To find lower prices it helps to use a generic sku (part #) and not the manufacturer’s sku. I had no success. But it occurred to me that since the housing was ok, why not just buy the bearing separately?
By magnifying the website picture of the >$60 replacement assembly I was able to identify most of the part number of the bearing. And by googling various combinations of the number I located the standalone bearing (Timken RA100RRB wheel bearing) and on Amazon prime it was available (including tax) for $17.19. It arrived a couple days later and matched the defective bearing.
old bearing and new bearing side by side
However, I could not press the bearing into the housing. Youtube guidance suggested I freeze the bearing and heat the housing. Just freezing didn’t work and I was under increasing pressure from M. to chip the accumulating pile of branches and to “”just pay the $65 and get the right part”. So I put pride aside and visited the local tractor dealer and they fitted the 2 together, and refused payment. With hindsight I realize I was using the wrong technique. Instead of trying to align the bearing with the housing and then force the bearing into the housing, I should have forced it in edgewise and then rotated it. My lesson for next time.
new bearing in old housing installed on chipper. you can also see the fuel tank I replaced a few years ago, since the old one leaked at the horizontal seam
It was quick work to reinstall the bearing on the chipper and today I chipped >2 hours and the new bearing appears fine. I should mention this is the chipper I use at the Atlanta house. North of Atlanta where I have my growing operations I use a large chipper driven by the PTO of my 60hp Case 585 tractor.
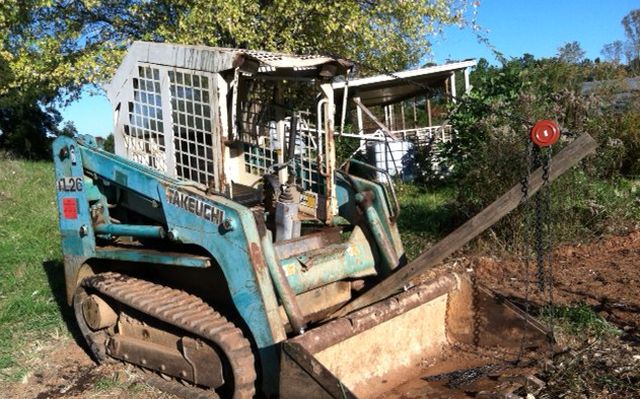
Much time since my last post. My uncovered greens have held up well through the cold and I have begun germinating tomato seeds. Read some excellent books and took a MOOC on software design in connection with 3D printing. And I have spent considerable time diagnosing and fixing my silent Takeuchi TL26 (bobcat).
I don’t use it much but the compost heap needed turning and I wished to grade some ground for additional rainwater tanks, and it stayed silent when I turned the key. Not good.
Previously I had looked at the electrical system diagram (wiring diagram) but did not really understand it. It is one thing to wire components together or replace components (see my posts on replacing failed capacitors), but it is a different ball game actually understanding what’s going on when you turn the key. So this time I resolved to understand how the electrics for starting the bobcat actually work and to step by step test each link and find out what was wrong.
I write up the whole experience separately on this website – if interested please follow this link
The testing process was a slog in part because of poor testing procedures. Here I will mention the problem I had testing the battery.
Warning – a friend, who is a former eye surgeon, told me he had many patients whose eyes were damaged by battery acid. He said an exploding battery is a nasty thing and I should always wear eye protection and keep water nearby for washing off acid.
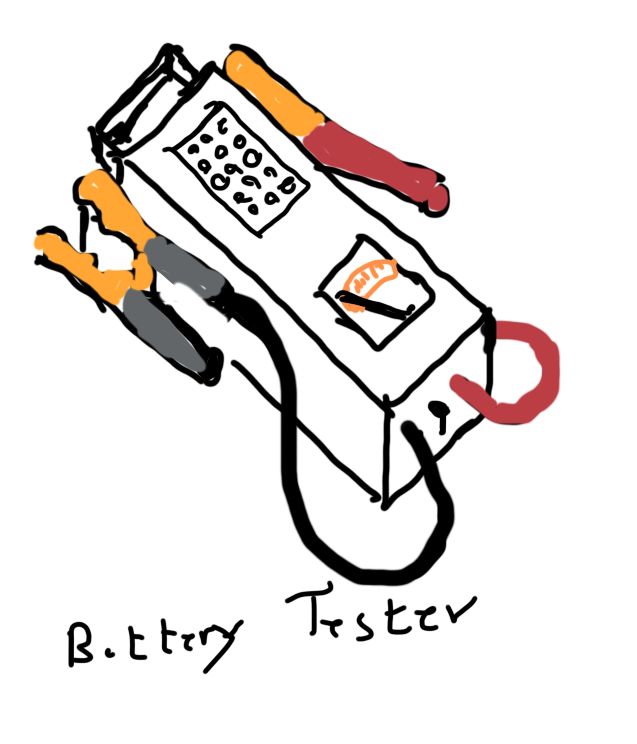
When I pulled the cab forward over the bucket (actually I winched it forward – see photo above), I noticed the negative terminal/post was badly sulphated (covered in white guck). Apparently a sulphated negative terminal can indicate undercharging by the alternator, and a sulphated positive terminal overcharging – just something I read, don’t quote me. I was not surprised since I suspected the alternator was not charging properly and had previously resolved to test it, but never got around to it. I cleaned the ground terminal and charged the battery for a couple of hours. This is a relatively new battery purchased in second half of 2014. Then I decided to test it with Schumacher battery load tester – this is the tester with the big battery clamps and you hold the switch toggle on for 10 seconds and it applies a load and you can tell the real condition of the battery.
my Schumacher BT-100
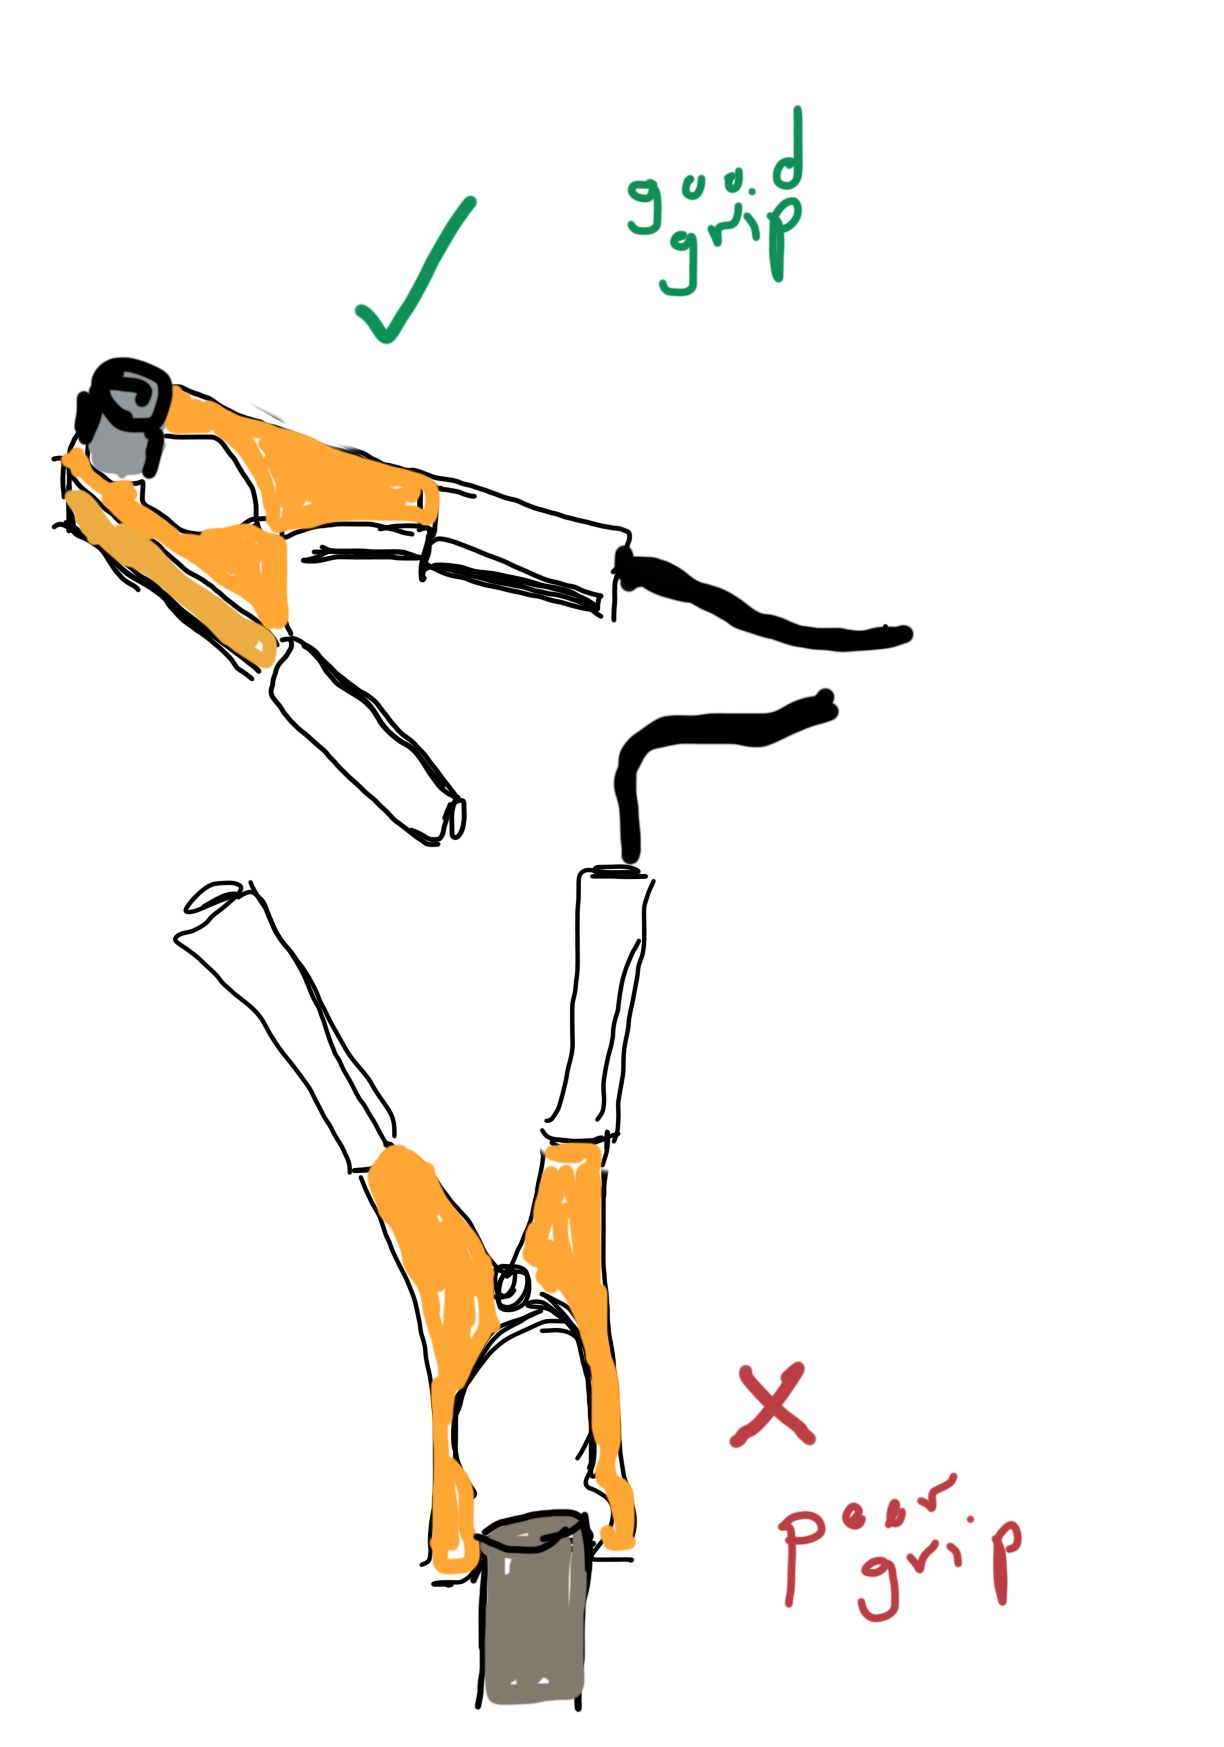
The tester showed 12+ volts before I applied the load and nothing when I applied the load. I was surprised and hauled the battery out of the bobcat (pulled it forward between the lip of the bobcat and the raised cab, which is easier than climbing into the engine area and lifting vertically) and took it indoors and charged it with a sophisticated charger. After 1 hour it said the battery was fine. I tested with Schumacher with 10 second load and it was fine. Took it back to the bobcat connected the terminal clamps, and no response from engine. Decided on a hunch to test again with the Schumacher – nothing. How was this possible? Removed the terminal clamps and applied the Schumacher clamps directly to the battery terminals – read fine. So either the terminal clamps were not making good contact with the battery posts or the Schumacher clamps were not making good contact with the battery terminal clamps. I cleaned the terminals and terminal clamps, reconnected and applied the Schumacher clamps. Tested fine. I removed the Schumacher clamps and then reapplied them – nothing. But now I was concentrating and there was a fizzing/spritzy sound from the Schumacher clamps and the terminal clamps. So this was a problem solved – to get a good load test I had to make sure the Schumacher clamps are tightly seated before applying the load.
8 clamp teeth gripping are better than 4 teeth
A long description of a faulty testing procedure. But I learned. In the link to my detailed testing you can read how I took several wrong turns as a result of faulty testing procedures.
I should mention that an internet authority recommended 3 battery tests – 1) voltage >12.6v; 2) battery load test (described above); 3) use an electronic battery tester. So I purchased a Solar Battery Tester (model BA5) and followed the procedures including inputting the battery CCA of 925. The tester said the battery was fine and calculated the CCA at 830, which should be more than sufficient to start the engine. I would have been surprised if the battery had failed since, to my mind, if the battery passes the load test it should be ok for starting the engine. With 2 testers both indicating the battery was fine, I ruled out the possibility of a bad battery.
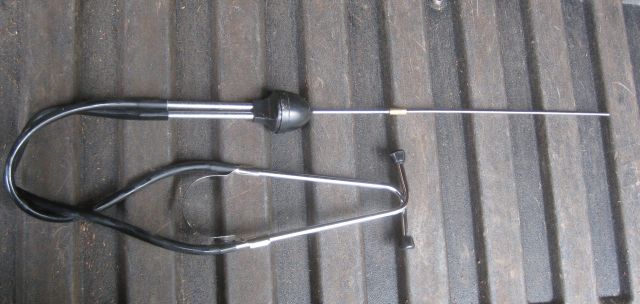
My trusty Toyota Tacoma 2005 2.7L at 218k miles was doing fine, until recently I noticed a high pitched whine from the engine area, even when the truck was not moving. The whine was pronounced some days, less so others. It did not seem to come from the engine block (good) but one of the accessories. The serpentine belt is a long belt driven by the engine crankshaft which turns the alternator (charges the battery), the power steering pump, the water pump and the A/C compressor and is held under constant pressure by a tensioner. I found lots of guidance on the internet and, as suggested in one blog, my first stop was at Harbor Freight for a stethoscope ($5).
stethoscope for locating unusual engine noises
As luck would have it, when I reached my destination the whine had almost disappeared – isn’t this always the case when you go to the mechanic and the noise cannot be replicated? However when I listened carefully I could just discern it. With the engine running and with care to avoid the spinning radiator fan and the serpentine belt, I carefully probed the reachable accessories and determined the offending noise was loudest with the probe on the alternator.
I had two ways forward – I could replace the bearings on the old alternator or buy a replacement alternator. I watched an excellent youtube video on how to replace the bearings and it seemed well within my abilities. However, I have spent very little to date on repairs and decided to buy a new unit. And “new” could mean OEM reconditioned or non OEM new. I wanted a good quality replacement. Now for some research. Usually Amazon or eBay have the best prices but not this time. In addition to price you need to figure shipping and tax and website probity. I located what appeared a good site for a highish price. And then I thought, why not check out O’Reilly. It would be quicker to pick up the part, easier to return the old part for a core credit and, if a problem with the part, easier to rectify with a visit. They had the part for a competitive price with pulley attached and proposed shipping to my home because their closest store did not carry it. However, most days I drive from Atlanta to the farm and one of their other stores en route carried it. So I ordered it online yesterday and this morning I picked it up and the manager told me it has a lifetime warranty – great.
At the store was a younger guy looking for new lights for his ’08 Tundra. I asked him how many miles he had on it and he said 360k – put my 218k in the shade. He needs to replace his automatic transmission but his engine goes fine. Which is good news and I hope my engine can achieve a similar life. My truck has a manual transmission and no clutch work has been needed to date.
Though my serpentine belt looks fine it is 10 years old and I decided to replace it as well.
Removing the old and installing the new alternator was fairly easy. I first used my voltmeter to read the charging volts i.e. how much electricity the old alternator was producing, which was 14.16 volts.
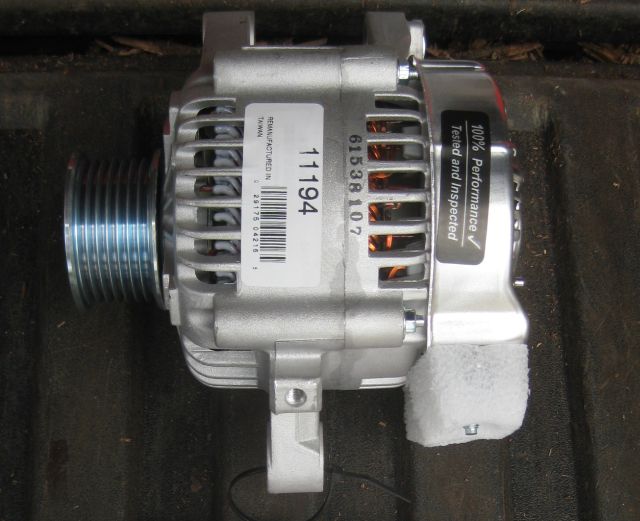
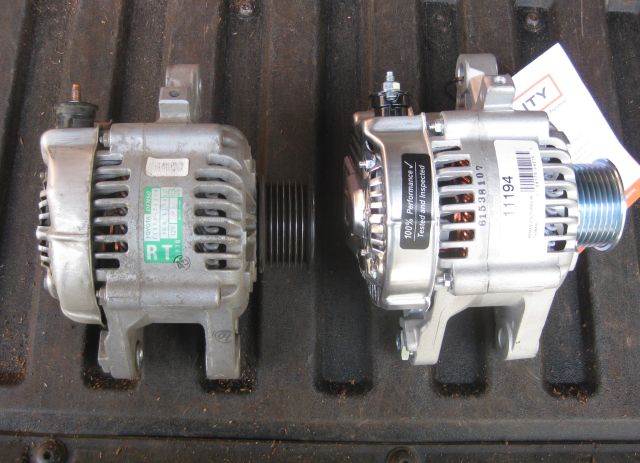
Then I followed Haynes Manual instructions – disconnect negative cable from battery, remove the serpentine belt, remove the wires connected to the terminal and then remove the 2 securing bolts. I compared the old and the new alternators and they appeared identical.
new and old alternators, side by side
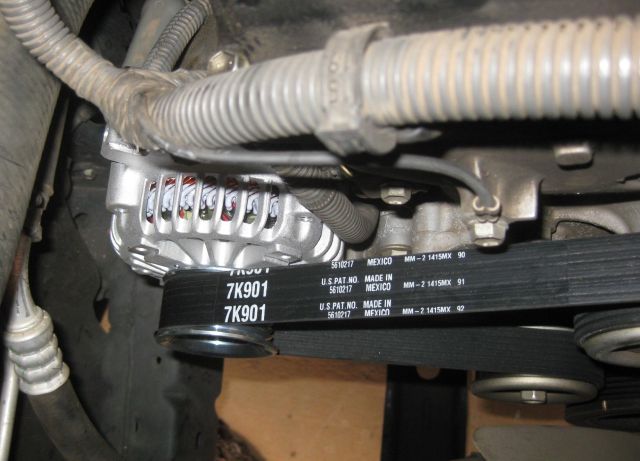
Installing the new alternator followed the above in reverse. Removing and replacing the belt takes some manipulation and co-ordination. I checked the charging voltage and it was 14.29 – great.
new alternator and new drive belt in situ
And, most important of all, the whining noise has gone.
update
After I replaced the alternator the car idled poorly. I suspected this was because I had disconnected the battery and recalled that when we had the battery in M.’s car replaced, the auto store assistant connected a small battery to the car (either via OBD or cigarette lighter, I forget) before disconnecting the battery. This also maintains the radio settings and keeps the clock time current. Apparently the problem is more pronounced with older cars and it occurs because the car’s computer makes adjustments for the car’s inefficiencies (throttle body deposits?) as it ages and when the battery is disconnected the computer’s memory is wiped clean and it has to relearn the adjustments. My car is relearning quickly and the idle is almost back to normal.
When I returned the old alternator for the $35 core credit I noticed there is a $20 rebate coupon for the purchase, so I am even happier with the purchase.
3 sisters refers to the practice of growing corn, climbing beans and squash closely together with the corn providing scaffolding for the beans, the beans providing nitrogen fixing and their hairy stems dissuading insects, and the squash shading out weeds and enabling water retention by the soil. My 3 sisters appear to be doing ok, though I now realize some fine tuning is needed for next year.
corn reaching for the sky
You can see the beans wrapping round the stalks.
bean vines growing on the corn
But is the corn handy scaffolding, or are the beans strangling the corn?
in some cases the aggressive been runners have encircled the corn tassels and pulled them down, hampering corn pollination
Next year I will give the corn a head start rather than plant the beans simultaneously with the corn.
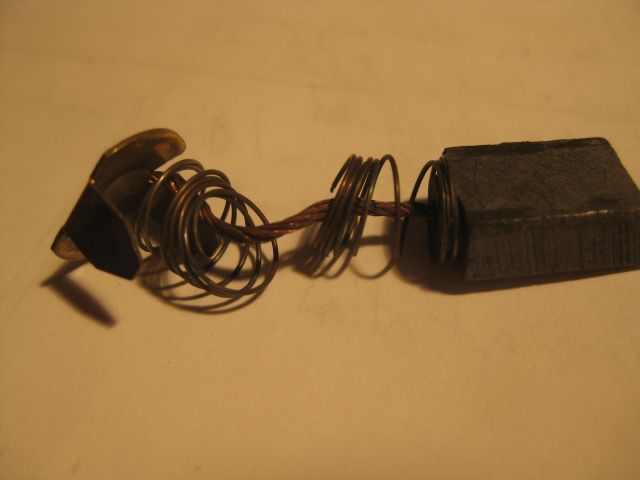
a new brush
I have 2 water pumps for my rainwater harvesting operations and a couple days ago the one pump was very hesitant on the first go round and refused to start when I needed it a second time. I remember in South Africa how it was well known that women could fix electrical appliances by giving them a kick – the floor polisher doesn’t work, kick it. A well aimed kick could even start a car. So I thought what the heck and I kicked the pump and it started up and ran for a bit. And then stopped. Must be the brushes I thought. There are 2 brushes to a motor and they are easily replaced.
towards the top of the pic in the middle you can see the plug, easily undone with a screwdriver, behind which a brush resides
The first brush appeared fine with much remaining life. Could it really be the brushes I thought since the 2nd brush presumably replicated the condition of the first.
But the 2nd brush it was, u can see the broken spring which disabled the brush
I cannibalized a disabled pump (see previous posts on ice damage to water pumps) and the pump started easily. A quick inexpensive repair.
problem = solution
Transforming the problem into the solution is a permaculture mantra and discovering instances are pleasing to the audience and more so the discoverer. I have a problem with rats and mice in my coop. They are experienced tunnelers and prefer to live in chambers below the dirt floor because they are there protected from the elements, have easy access to food and water, less threatened by snakes and lots of bedding material like pine shavings and snips of plastic bags. They are fastidious home proud family members and unfairly branded rodents and vermin. However they are unwelcome in my coop and I tire of their telltale poop strewn on ledges and even in the chicken feed, so I want them out.
In the beginning I refilled their holes with excavated dirt; then I hammered stones into the hole entrances; then I bought sacks of concrete and concreted the holes. In 1 week I used the entire contents of a 60 lb bag of concrete. I then became a bit more creative. I poured water into their holes and once, a bedraggled rat charged out the hole. On other occasions, who knows, an inhabitant may have been trapped inside to a watery end. Some chambers were large and absorbed 4 gallons of water before the entrance brimmed. I know moth balls would have been effective, or so I have been told, but I did not want anything noxious in the coop. And then as I was shoveling chicken poop into a bucket – a brain wave. Save the haul to the fruit tree and just slide it into the hole. Followed by a good water drenching and a concrete cap. Maybe it will work and the labor of chicken poop disposal engineered into a triumph over the inveterate tunnelers.
food from the garden
Lots to eat these days.
here squash, beans, onions, okra and tomatoes
Supplemented with soy patties, mango chutney and sweet potato. And several glasses of zin. However, the melon which looked promising on the outside.
water melon looks promising
Was picked too early.
was picked too early. soft and nice texture but not sweet enough
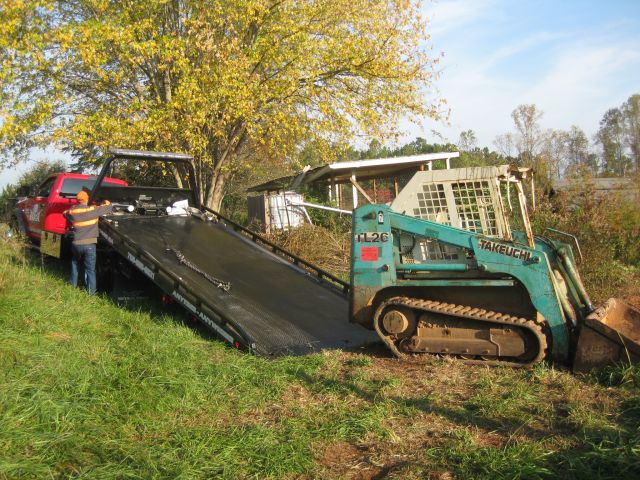
I agreed a $75 fee with the towing company and next day, probably because it was early morning and they were not yet busy (or because bobcats are fun) a big tow truck and a couple guys in a pickup came out. They winched the bobcat onto the back of the truck using ingenious pulleys located at varying places on the bed to bring it in at an angle.
the bobcat was at an angle to the bed so a pulley was located halfway down the left side of the bed so the bobcat was winched initially to the left side and then, when on the bed it was winched up
Getting it off was more difficult – they raised the bed up and jiggled it and the bobcat slowly slipped down, but slowly is the word. So they hooked a pulley to the end of the bed where it met the ground and winched the bobcat down the deck. Clever.
the bed was jiggled to slide the bobcat down but it was slow progressyou can see the pulley with 1 wire to the winch and the other to the rear of the bobcat to encourage it down
Cost was the quoted $75 and I topped it to $100. And now I had the bobcat away from the curious and possibly mischievous and all to myself. I was sure the starter had jammed but how to remove it. The engine is surrounded by plate metal underneath and to the side. A starter has 2 bolts. I could reach the top bolt by raising the cab.
you can spot the starter just above the wires and, to the right of the top reverse C loop wire, the top bolt of the starter (also my shoe, bottom right)
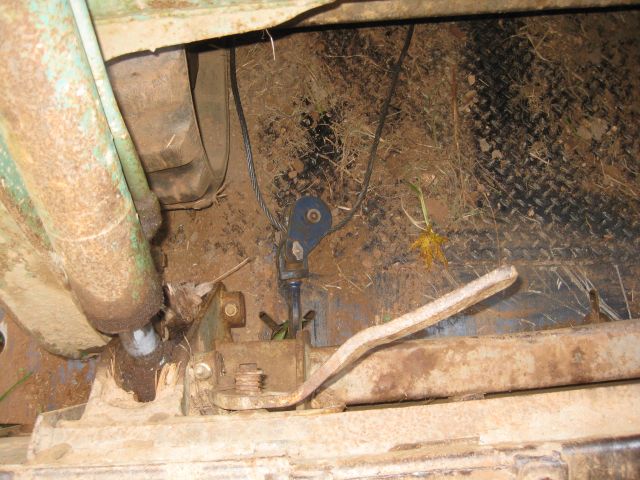
But the bottom bolt was inaccessible from the front. I dismantled some components on the top of the engine but couldn’t reach the bottom bolt. Then I tried from the rear – no success. Time to watch utube. And there I found a video of how the owner of a Takeuchi excavator (same manufacturer, different kind of machine) removed his starter. In his case he could access the bottom bolt of the starter but not the top bolt. So he pulled out the engine! Wow, definitely not for me. But unfortunately for him he did not get a new starter, he had his repaired, and 6 months later when it failed (again) he went a different route. He cut through thick plate metal to access the top bolt and succeeded. I was beginning to think this was all too much for me and then the penny dropped. How did he access the bottom bolt (which was my problem)? He mentioned there was an inspection hole in the plate metal which covers the underbelly. So I dived under my bobcat to look again and under the caked mud and dirt I discovered two bolts and a plate (19″ by 21″, pretty heavy) which I removed, and there a short way up was the bottom bolt of the starter.
the underbelly with the plate removed allowing access to the bottom bolt of the starter motor
After first disconnecting the battery cables, I was able to remove the starter without trouble. A very encouraging event was as it came away from the engine I heard a metallic zing, which I knew must be the stuck gear disengaging, so proof that the starter was the culprit.
here is the old starter which had evidently previously been pulled and worked on – note one of the 3 screws surrounding the gear is missing
I ordered a new starter on the internet for $260 and when it arrived I connected the various cables and bolted the starter motor to the engine. The process actually took some time since I had to figure which way to push the starter up to the engine (space around the engine is limited) and how to attach the cables (cables had to be secured before the starter was bolted to the engine because once the starter was in place it was not possible to reach the nuts securing the cables). And then I reconnected the battery cables turned the key, the bobcat started immediately and I drove it to under the cover of the carport.
I wish I could proclaim success and say I switched off the engine, dismounted from the cab and cracked a celebratory beer. But no such luck – when I turned off the key the engine kept running. I siphoned off about 5 gals of diesel and had to leave the engine idling until it used up the remaining diesel and stopped. So now I have another project – to figure out which wires or whatever I must have knocked loose while working on the starter and then make the repairs so I can have a normal functioning bobcat.
This is a long discourse on engine repair- so if you aren’t interested in this subject you should skip or you will find it incredibly boring.
It began a few weeks ago. My Takeuchi TL26 track bobcat has always had an iffy battery. Even with a new alternator it often struggled to start the engine and the last few occasions I had to charge it before it would start the engine. I bit the bullet and bought a new tractor size battery from the local Tractor Supply Store. The next couple days were flawless (in terms of starting the bobcat), and I cleared an area of brush and privet in preparation for a planting of chestnut and hazelnut – yes I know chestnut is plagued by blight and Georgia is probably too hot for hazelnut but what the heck, so I bought 15 of each from Badgersett Research Corporation and will take my chances.
Now I digress again – I remove small trees, roots and all, by winding a chain round the trunk at the bottom and securing with a clevis slip hook – it’s a hook which allows the chain to slip through as you pull on the other end of the chain, thus tightening the grip. I secure the other end of the chain to the bobcat loader about 4 ft off the ground and I then drag the tree out. I keep the loader high off the ground so that if the chain snaps it will go over the bobcat not at me. I was using a lighter chain than usual and it did snap (first time for me) but it did not whiplash. My buddy, who was an engineer with the army in Germany, told me of men being killed when cables used for dragging heavy equipment snapped. Both a cable and a chain stretch however when a cable snaps it shrinks like an elastic band and that creates the whiplash. When a chain snaps the links which are stretched retain their shape so it appearsthere is little or less whiplash. I tried this theory on my buddy and he understood the argument but said stretched chains can be very dangerous, so be careful.
Anyhow, my bobcat was performing so well I decided to switch it off while I did some cleanup before heading back to base. Big mistake, I should just have left it idling. When I tried to start it for the ride back to the house nothing happened, zilch. Absolutely dead. Even the gas gauge did not move.
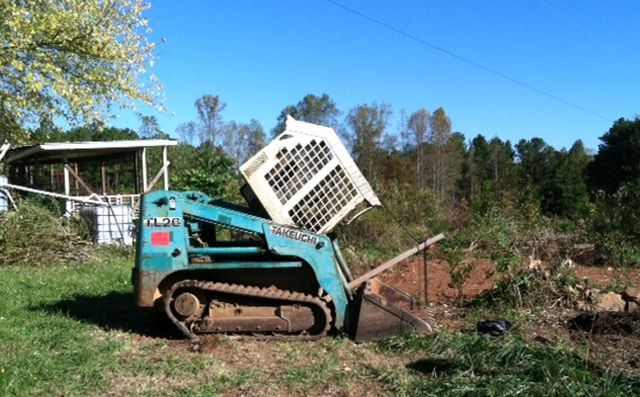
raising the cab requires 2 average sized guys and since I work alone, I devised a winching system using a fence post wedged between the body and the loader
Over the next 3 days I tried everything. First thoughts were the wires to the ignition switch had come loose. I unbolted the control panel and inspected the wiring, all screwed tight. Then I thought a fuse had blown, so I pulled out all the individual fuses and tested them for continuity and they were fine. Then I thought the battery cables might be loose, but they were fine. So I visited the local Kobota distributor and discussed the problem with an obliging workshop foreman, Jeff. He said it was obviously electrical and I should recheck the battery cables for cleanliness and the functioning of the ignition switch. He also gave the ‘phone number of Steve, a local mechanic experienced with Takeuchi. I disconnected the battery cables and checked the functioning of the ignition switch with a continuity tester – it was fine. I thought I might have a bad earth so I connected a jump start cable from the negative terminal of the battery to the chassis – nothing. Next day I brought out with me a battery tester which applies a load across the battery, thinking the battery may have suddenly failed. The battery was fine.
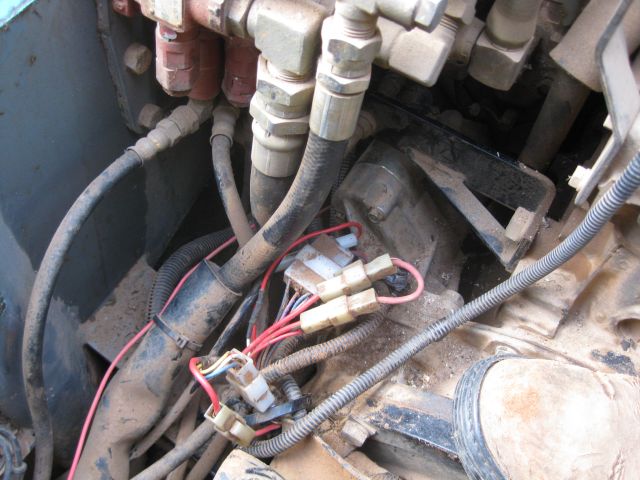
here is a snap of the cab raised forward which exposes the engine, hydraulics and battery (but not the starter motor)
So time to call Steve, First thing he said was he had a 2 week backlog. But he was prepared to listen. When I told him the battery was fine he said check the fusible link in the wire which leads to the starter solenoid and if this was ok then apply a hot wire (wire direct from the positive battery terminal) to the starter solenoid. I couldn’t find the fusible link but I tried and retried various ideas to no avail. To get smart I decided I needed a workshop manual. There are typically 3 types of manuals – operator’s manual, parts manual and workshop manual. Parts manuals are easy to come by and have a wealth of information and are provided free by several online parts sellers. The operator’s manual is usually available free from the manufacturer. I had both of those. I mulled signing up with a website in Asia which offered the workshop manual under a bonus points plan. But I fortuitously discovered, before I went down that road that 3 years ago I had purchased a workshop manual which had been gathering dust for some time. (Memory, memory?) So I pored over the workshop manual for advice. Unlike the Chilton/Haynes auto manuals this one did not provide procedures on how to do things. It had a perfunctory troubleshooting section on electrics and a lot more on hydraulics, which was not the problem. So that was Friday, Saturday and Sunday gone.
Monday, my buddy Mike was between jobs and came out to visit. I dug around the wiring near the starter and found the fusible link, hooray – it looked fine and I tested it with the continuity tester and it was fine. This was a setback since I had hoped I had a bad fuse which had deteriorated with age. No such luck. I did not want the engine to suddenly start while I was perched above the engine compartment below the raised cab so I devised two long wires with alligator clips at the ends connected via a 15 amp fuse to a press switch. Then I connected one of the wires to the battery positive terminal and the other to the wire to the starter solenoid. I stood back and pressed the switch and expected it to start – zilch. Then Mike and I thought the wire might not be thick enough and we used a lower gauge (thicker wire) – nothing. I retested the battery with the battery tester – it was now a bit weak. I had noticed that when I turned the ignition key occasionally the gas gauge needle would move and once I heard a click. So I was now coming to the conclusion that I had a bad solenoid or starter. The solenoid is attached to the starter and its main function is to take the current from a small wire from the ignition switch and use that to connect the big wire from the positive terminal of the battery to the main terminal of the starter. The problem could be the solenoid was not working or it was working but the teeth of the starter were jammed or the brushes of the starter were faulty. What intrigued me was that I had never had a problem with the starter and when they start to fail there is usually good warning, so this seemed unusual. Anyhow – what to do next.
I thought extra current might help so I drove my truck up and tried jump starting the bobcat. I heard a click and that was all. My neighbor across the road, Greg, is an automobile bodywork specialist and he said tapping the starter with a hammer might loosen a jammed part and get the starter to work so I could drive it back to the house. I used a steel hammer to hit a 2 by 6″ piece of wood onto the starter – nothing happened. Greg later that afternoon said it had to be steel on steel not wood on steel, and not too hard. But I had had enough for the day.
Greg suggested I contact a wrecking service and have them lift the bobcat onto the back of a truck and move it to my house where I could work on it at my leisure. So I called Steve, the local mechanic expert, and he still had a 2 week backlog but, on questioning said that the starter could be replaced in the field and it did not have to be done in a workshop. He also said that if/when he came out he would have the starter repaired rather than buy a new one. I asked him about towing and he said that the tracks do not move if the engine is not running and while it could be winched onto the back of a truck, getting it off could be difficult. I contacted a wrecking service and they initially declined thinking the bobcat was out in a field but agreed when told it was easily accessible from a gravel road. They said they had lots of experience loading and unloading track bobcats.
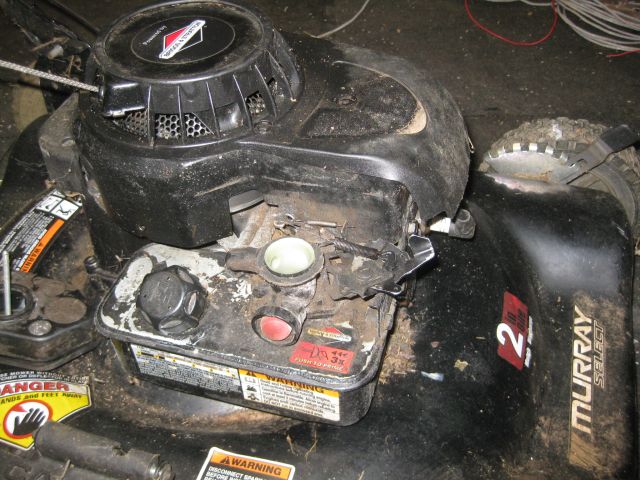
I have spent time with 3 organic growers in the area and hope to expand my circle when I am able to participate in the local Saturday morning markets. I visit often with one grower who, tho good at growing, is less interested in repairing equipment. His riding mower and his push mower are both out of action. Though I use a scythe in the hilly and restricted areas, I also make frequent use of a riding mower (see my posts on various repairs) so I sympathized with him. I tried starting his push mower with starting fluid and the engine fired and then immediately cut off. Must be carburetion I said and suggested he could find full repair instructions on the internet. He was not enthusiastic, so several weeks later I volunteered to fix the mower for him.
With the push mower in my basement I made a start – first thing is to find the model # and google for parts diagrams and utube videos. But the part # related to the mower frame not the engine, so I then found the Briggs Stratton model # concealed under a shroud. The model # 10H902 tells you a lot about the engine. The “10” is the cubic inch displacement, the “H” is the design series, and of most interest the “9” tells you it has a vertical shaft pulsa jet carburetor. “Pulsa jet” I thought, I wonder how it operates? Well, with the resources of the web you can download detailed information on the pulsa jet carburetor, which is very simple but clever in operation.
here is the mower with the air filter cover removed
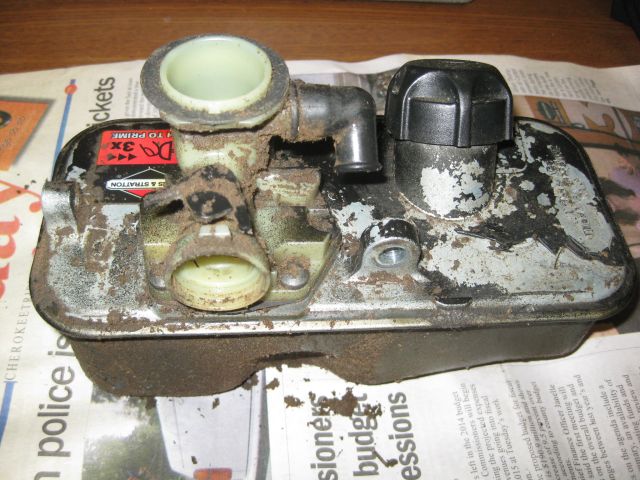
The carburetor and fuel tank are removed as one unit.
the carburetor and fuel tank before disassembly, still looking dirty after I removed several coats of grime
And here is the carburetor separated from the fuel tank, with the tank mating surface facing the camera.
the red button is the primer button which you press a few times to fill the carburetor with gas.
The long yellow tube is immersed in the fuel tank and when you press the primer button, gas is sucked into the carburetor. The short silver tube interested me – what was this for?
When the engine is running, the downwstroke of the piston lowers air pressure in the carburetor and this causes a diaphragm to move which sucks gas liquid into the carburetor and also fills a little reservoir above the gas tank. This reservoir maintains constant fuel supply to the engine because if it was not there then as the level of the gas fell in the tank, the flow of gas would be affected. And the silver tube sits in this reservoir and the silver color is actually a fine strainer filter for the gas. Knowing how and where the fuel moved in the carburetor I was able to blow all the passages clean with carburetor cleaner fluid. There are no jets to disassemble, it is a simple carburetor. The diaphragm appeared in good condition, so, after cleaning out particles in the gas tank as well, I put everything back together again and started up the mower. And it worked.
A couple weeks ago one of my running/walking buddies mentioned he had to replace the ignition lock of his Honda minivan. He is handy and used to enjoy tackling projects but now, some 10 years older than me, he will have others do the work. At a cost! He said the bill was close to $1,000. I was surprised but since I persist in doing things myself I am out of touch with rates.
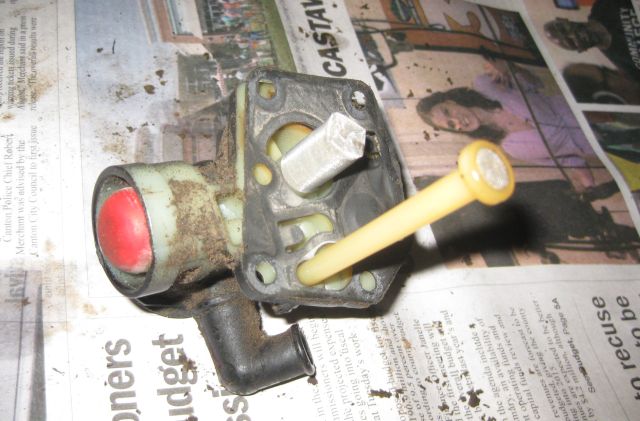
My problems was different – I have a basic Toyota Tacoma truck and could not open the driver’s door from the inside. When I pulled on the handle nothing happened, so the routine was to lower the window with the crank and with my hand pull on the outside handle. And it worked. I assumed the handle which connected to a cable which connected to the latch was defective. I studied a couple utube videos (very helpful) on how to remove the interior panel and replace the handle. Since removing the interior door panel is a pain and I only wanted to do so once, I ordered a replacement handle.
the door handle with 2 cables, the top yellow one is for locking the door, the lower green one is for operating the latch
Now the logic for making a repair is fairly simple: 1) diagnose the problem; 2) get the parts; 3) dismantle with care so you know how to reassemble’ 4) execute the repair. In my haste I did step (2) before step (1). After I removed the interior panel I saw that the problem was not the handle but the cable that the handle connected to.
the green cable which worked the latch is broken
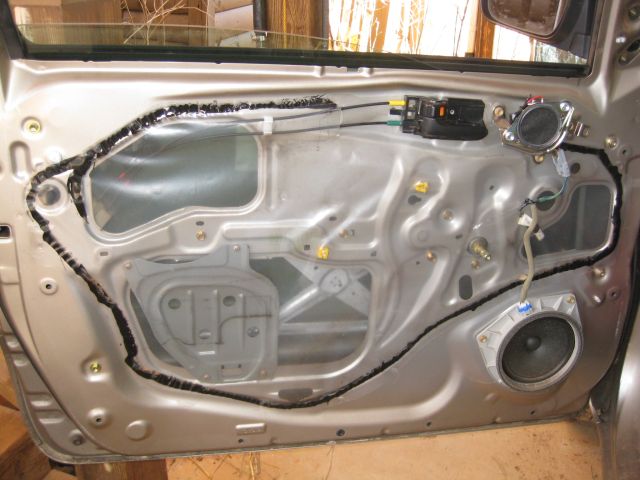
So I had purchased the wrong part. A little frustrated, I went online to order a replacement cable. When the replacement arrived I again removed the interior panel to fit the new cable and discovered, incredibly, that I had ordered the wrong cable. I couldn’t believe it. So a week later the correct cable arrived and I removed the interior panel and then discovered I had a new problem. Attaching the cable to the handle is relatively easy but connecting the cable to the latch is a puzzle. The latching mechanism is out of sight and has to be unscrewed from the door jamb and disconnected from the outside handle mechanism. And the window guides block access as well. And to unscrew the latch from the door required a driver I did not have handy. I put the interior panel back in place for the third time.
a view of the door with panel removed, to attach the cable to the handle requires working through the large top left hole!)
When I located the driver a few days later I made a fourth attempt. And working with the latch partly disassembled and rotated for easier access I was able to attach the cable to the latch (phew!) and also the cable to the new handle (the old one was fine but rather use the new) and I reassembled the panel and the window cranking handle. And, finally, I was done and had learned a couple useful lessons along the way.
I use two water pumps – a 1HP Water Ace (cost circa $150) with handy carrying handle which I move to various rainwater collection tanks and then pump to the larger storage tanks (2,800 gallons) and thence to the top of the hill; and a Wayne PC4 0.5HP pump (cost $130) whose sole purpose is to pump from my 2,400 gallon carport tank to the top of the hill. At the top of the hill I have tanks which gravity feed the rainwater to the plantings. The Wayne worked fine until a couple years ago when I forgot to disconnect it in winter and the internal membrane (called the backhead) was shattered by ice. I did a cursory examination for parts on the internet, couldn’t find any, and replaced it. This past January, can you believe it, I again neglected to remove all the water from the pump (it was disconnected from the tanks but had water in it) and the backhead of the second pump also shattered. I googled and found on eBay a backhead replacement kit for $15 plus $3 for shipping. It made sense to self repair since if the repair worked I could also repair the previously damaged pump (I keep everything).
my Wayne workhorse – never let me down until I let it down
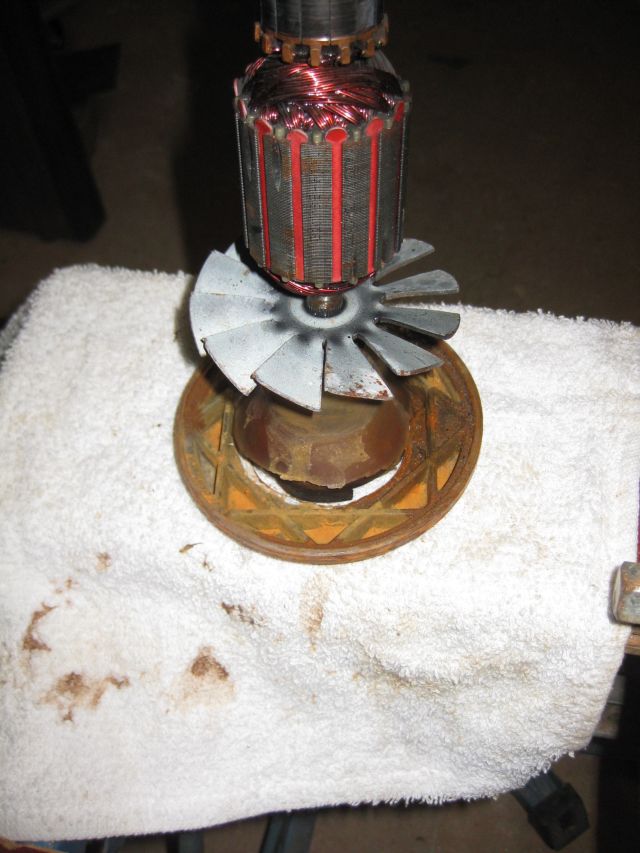
It is easy to dismantle, just remove 4 screws at the base of the motor housing which secures it to the pump housing, and the ice damage is easy to see.
the broken backhead can be clearly seen
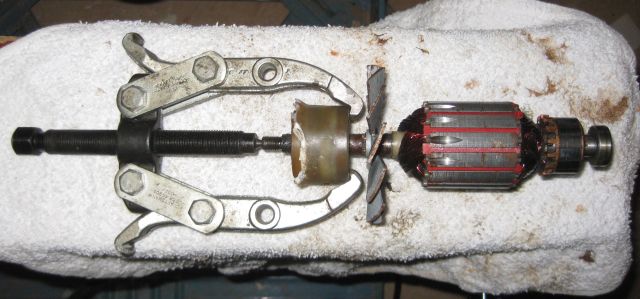
First time round it is always difficult – how do I remove the backhead. Fortunately the manual is easily accessible on the internet and it suggested smashing the ceramic seal with a hammer driven screwdriver. I tried this at first but the concept did not appeal. So I found a puller I used for automotive work.
with the right tools everything becomes much easier and less dangerous
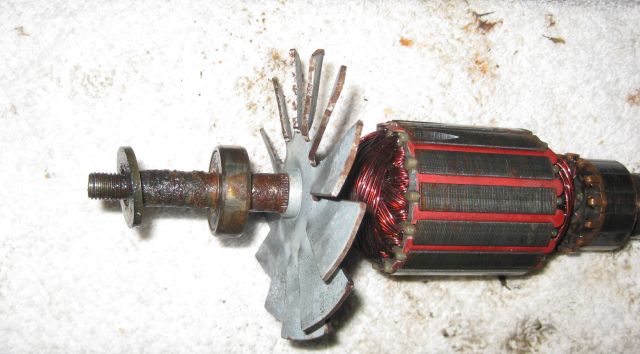
And with a few turns of the wrench the backhead was off, leaving behind the bearing to which it had been press fitted.
after removing the backhead the bearing and a water seal remain
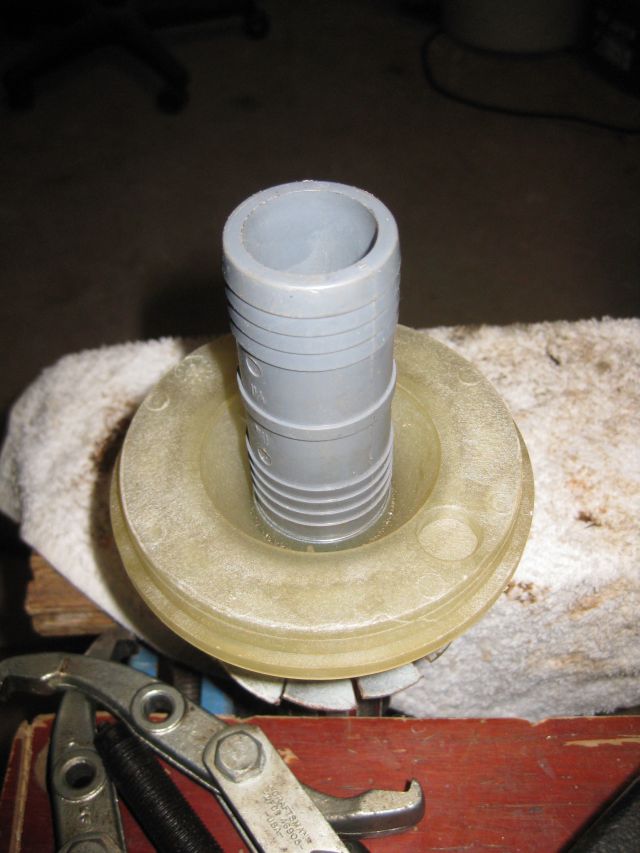
From here it was relatively simple to re-assemble the motor following the manual’s instructions and taking care, as I press fit parts together, to tap gently with a hammer and use improvised tactics, like this water pipe connector to ensure pressure is applied evenly to the part being fitted.
a plastic water pipe connector with ideal dimensions is used with gentle hammer taps to press fit a part
When all was assembled I decided to test the repair, and it works perfectly.