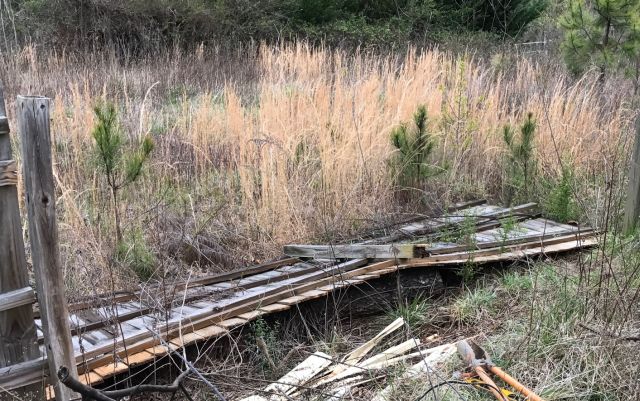
Some time ago I noticed the perimeter fence was down – a post had rotted at the base and 2 8ft attached panels fell with it.
you can see post rotted at base and 2 attached panels. also notice left standing post has warped and panel has separated
I call them panels because you can buy them that way – 8 ft length with 3 horizontals and 17 attached panels for about $49. Or you can buy 3 2×4 8ft pieces for horizontals and 17 individual panels and nail them together. I prefer the latter – easier to transport and move and cheaper but will take much longer unless you have a nail gun, which I happen to have.
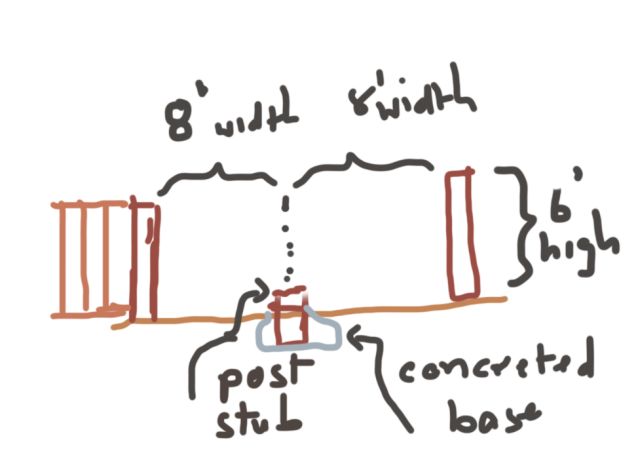
But before considering the panels I had to first figure how to replace the post. I confirmed its base was concreted into the ground and assumed the rot was because the fence is at the bottom of a hill and soil carried down by the rain covered the post for about 3 inches above the concrete base preventing quick evaporation of rainwater.
One option was to pull out the stump and the concrete base, which would be hard work, take some time and leave a big hole requiring a big plug of new concrete and rocks. Another concern was I would have to locate the post just right so that each panel could be attached to it. A post is about 3.5″ wide and since the panels touched each other when in place, each would have to extend across the post by 1.75″. Too finicky. Especially if the panels were no longer vertical.
a sketch of the problem
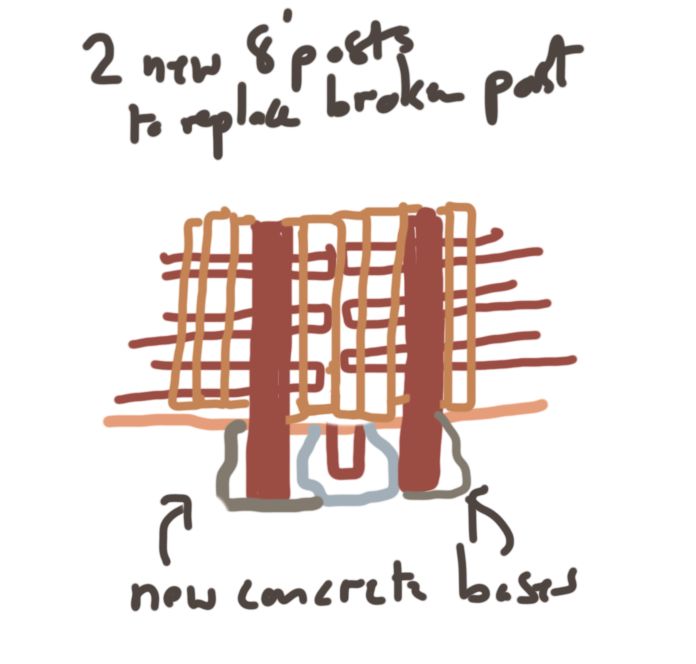
So instead I decided to install a new post on either side of the concrete plug gripping the rotted post. Advantages: 1) save a lot of work pulling out the old post; 2) would be twice as strong; 3) much easier for attachment of panels since each panel would have its own post rather than sharing a common post.
a sketch of the solution, the old concrete base contributes to holding the new bases in position
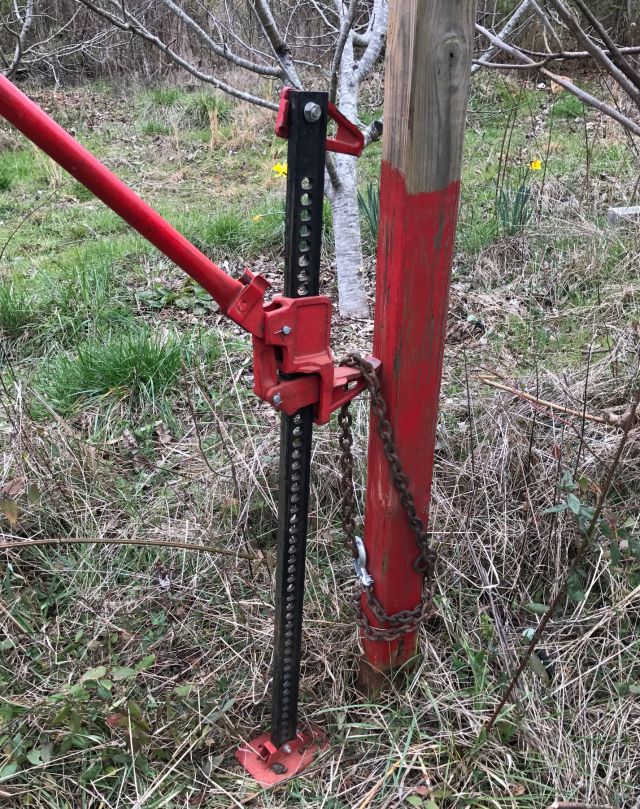
I had 2 unused 8ft posts available – each sunk 2ft into the ground but not concreted. By pushing and pulling I could have loosened and wiggled them out but why risk the back when I have a farm jack. With a slip hook on a chain it hauled them out of the ground easily and quickly.
this farm jack which I bought some years ago at a discount store and frequently used has proved its value
Installing the new posts was relatively easy – in addition to the clam shell post hole digger I used a long crow bar for breaking through hard patches and old saw for roots. And I made sure to concrete above ground level with a bevel to direct water away from the post. I bolted the panels to the replacement posts to better secure them. And it was done.
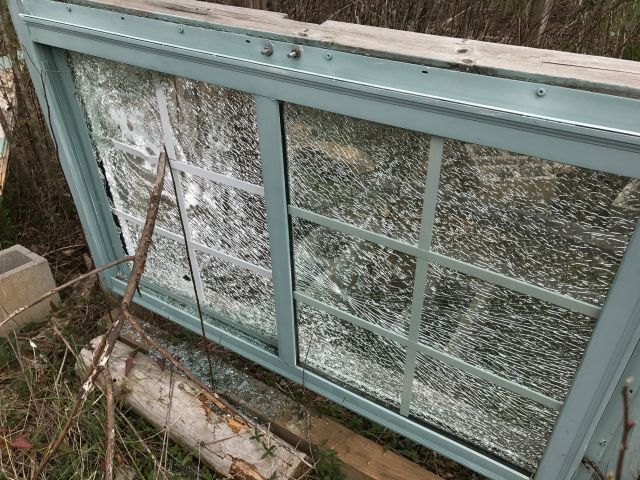
I didn’t mention my sudden motivation to repair the fence. The fence is an outer perimeter fence and there is an inner perimeter fence and 10ft inside the latter is one of my bee hive locations. It is shielded from the setting sun by an apple tree and from the north west wind by a glass window I purchased for a few dollars at the thrift store. Just recently I noticed the window had been shattered either by a catapult or bb gun or maybe .22 – I mention all 3 since in a couple of spots only one of the double windows was broken and in others the projectile penetrated both windows and the frame.
the bee hive was fortuitously located elsewhere or I might have had to also deal with a toppled bee hive
Made me think of the strategy of Giuliani, former mayor of New York City – if there are a few broken windows more will be broken. If they are all fixed likelihood of vandalism much reduced. So the 2 downed panels gave an aura of neglect and repair was necessary.
In my recent post on September 4 I described the installation of a whole house filter, see schematic below.
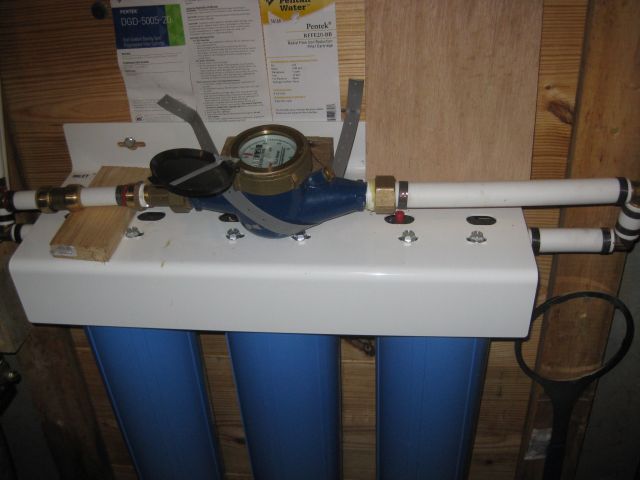
pipes, fittings and the filter which I installed
Since this was the first time I was using pex, I was concerned there could be a rupture or seepage in the basement during the night when I was not at the house and so I disconnected power to the well pump which is located deep in the ground. The following day when I switched on the power I was surprised that the pump had to run for some time to charge the expansion tank. I thought there could be a leak and, yes the outside faucet was leaking. I repaired the faucet, disconnected the power that evening and the next day no water emerged from the kitchen faucet and again the well pump had to refill the expansion tank. So I visited the other outside faucet which was fine and all the faucets in the house and the washing machine connections and listened to the toilets, and all seemed fine. I gloomily concluded that the check valve in the well was leaking and the water in the expansion tank was leaking back into the well.
My searches on the internet advised that adding a second check valve just before the expansion tank was not a good idea and that I should have the pump pulled and replaced (minimum cost $1,200 if done by contractor) or there could be a leak in the line from the house to the well head or the well head to the pump. But was this really the reason?
I decided to use available instruments to determine the cause. I shut off the water valve at C (the valve at A is always closed) and disconnected the power to the pump and noted the psi pressure reading at E and time of observation. I did not use any water and 50 minutes later was surprised and relieved to see the psi had not budged. So this meant that no water was leaking back to the well. I connected power to the well pump, opened C and allowed pressure to normalize and then closed C and noted pressure at D. Even as I watched, the meter at D slowly rotated to 0. So there was a leak somewhere and my valuable well water was being squandered. Again I visited all the outlets but this time, instead of listening to the toilets I removed the cover of each toilet. And in the last toilet the water was silently overflowing into the overflow tube because the float was not shutting off the fill valve. This will be a quick, easy and inexpensive repair and far, far better than having to deal with a bad well check valve. And with hindsight, the diagnostics to perform were obvious, but isn’t that always the case with hindsight?
serendipity
Common sense is important but a little luck along the way is always welcome. Yesterday at 4.30am, when I was away from the logcabin, my smart phone began chanting I had received a text and it was a “security event zone 2 alarm” at the logcabin which meant something triggered the sensor in the kitchen and my neighbors were being awakened from their slumbers. I quickly shushed the alarm and looked at the cameras and all was well and so I reset the alarm. Zone 2 has been triggered twice in the past 3 months and at the time of one of the triggerings a camera in the kitchen captured a large moth flying in the room. Was it again the moth?
This time the cameras were silent but it could still have been the moth since the camera and and the sensor are in different parts of the room. I decided to open the sensor case to lower its sensitivity and, to my surprise a small spider emerged from inside the cover of the sensor. I now think that this spider was hanging out in the sensor case and it triggered the alarm by crossing the face of the sensor. I removed the spider and some nearby webs. Hopefully this solves the zone 2 alarms. And it was serendipitous, since I was not looking in the sensor case for an inhabitant – but I will take luck anytime.
A few weeks ago M. confronted me in the kitchen with a glass of discolored water. “It’s dirty” she accused. I agreed but suggested if she wanted drinking water she should use the under sink 2 stage filters I installed, which deliver crystal clear water, and not worry about the water from the faucet. She was not appeased and said she would not shower in discolored water nor did she want the dishes or clothing to be washed in the water. We have a deep well I explained so bacteria is not an issue and there was probably a lightning strike which shook up the ground and displaced some sediment.
I mentioned this to my neighbor across the road and he said the discoloration was iron in the water and he used a whole house filter and replaced the cartridge every few months. Time for some research, and I found an excellent YouTube video which clarified. Iron in well water which is dissolved or in solution is called ferrous. When exposed to oxygen it precipitates and becomes visible and is called ferric. A sediment filter cannot trap ferrous but will remove ferric. So if you install a single filter where the well water enters the house it will remove ferric but the ferrous will slip by and will precipitate into ferric while sitting in the water heater or the toilet bowl. This solved a puzzle. Our house has an upstairs bathroom which is rarely used. Every few months I flush the upstairs faucets and toilet to ensure there is water in the traps. And the toilet bowl always has red/brown sediment, yet when last flushed a few months previously I had brushed the bowl clean. How did all this sediment get into the bowl? I now conclude the invisible ferrous in the water precipitated into ferric which settled in the bowl.
unappetizing sight – iron sediment precipitated in bowl
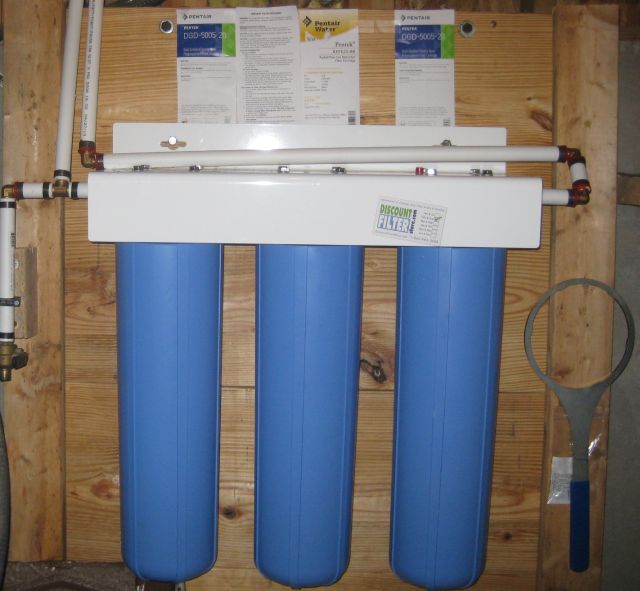
The youtube video recommended 3 filters used in series. The 1st is a sediment filter to trap any sediment and ferric in the well water so it will not clog the 2nd more expensive filter. The 2nd filter (Pentek RFFE-20BB) contains agents (apparently potassium permanganate) which oxidize the water and thereby precipitates the ferrous into ferric. The 3rd filter, like the 1st is a sediment filter which traps the ferric which was produced by the 2nd filter. Pretty neat!
details on the filters – sediment filters on each end and iron filter in middle
Typical filters are 20” in height and enclosed in big blue tubes and therefore called big blue filters. I researched prices and found I could get a better deal (>10% less on a comparable basis) from an independent rather than big A, except for one of the filters which I ordered from big A. A few days later the packages arrived.
Plumbing technicals
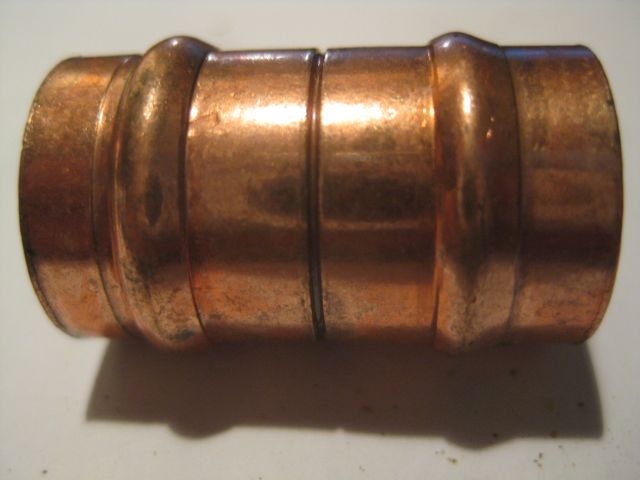
When I lived in London I completely replumbed an old house including installing a gas furnace and 17 radiators and a pump and 3 thermostat controlled motorized valves. I used copper pipe and soldered all the joints except for a few compression fittings. It was much easier to solder a joint in the U.K than in the U.S.A. because, for amateurs like me, there were the wonderful Yorkshire capillary fittings, which had solder rings.
a “yorkshire” fitting
The process was simple – you clean the pipe and the fitting into which it will be inserted, smear both with flux, and then heat with a butane torch until the solder appears at the rim of the fitting where the pipe is inserted. And it always worked and was just as easy for vertical fittings as for horizontal. Here I have often battled establishing capillary action to suck the solder into the joints of larger pipes (1” or greater) and it is frustrating after you have finished soldering to find that one joint leaks. Disassembling the pipes takes time and removing all the water drops also takes time (I used to push bread down the pipes to soak up the moisture and then flush it when all was done). So I was keen to explore alternatives to copper soldered fittings.
Today there are at least 6 different methods (soldering, compression, glue, pex – cinch, pex – crimp, pex – expander, sharkbite) to connect water pipes and fittings, and there are at least 4 different pipes to choose from – copper, cpvc, pvc and pex. The house has cpvc ¾” pipe and I decided to use pex-crimp and transition with sharkbite. If this all sounds like gobblydegook I will try explain. CPVC is a plastic type pipe, somewhat flexible which is glued into fittings. Unlike PVC, it is good for hot as well as cold water and the glued fittings seem reliable and are cheaper than copper/bronze fittings. But once glued, it is glued and you have to cut the pipe if measurements were off or a change of mind. Sharkbite is expensive but easy to assemble just push the pipe all the way into the fitting and you are done, and it is easy to later separate the pipe from the fitting. And sharkbite is a great way to transition from copper to cpvc or to pex. Pex pipe (a form of polyethylene) is flexible like CPVC. For the pex-crimp method you position (carefully) a copper ring near the end of the pipe, insert a fitting into the pipe, and with both hands position the clamp mouth of a large tool over the ring and (with some effort) close the arms of the tool which crimps the ring tight over the fitting. And then you are done. Pex-crimp is cheaper than sharkbite and a nice feature is you can loose fit and position all the fittings and when you are satisfied then crimp all the rings on the fittings. And after it is crimped you can still rotate the pipe if necessary. And, if you make a mistake (I haven’t yet) you can cut off the ring and re-use the fitting.
my pex crimp ring tool with adapters for 3/8″, 1/2″, 3/4″ and 1″
A disadvantage with pex is the fitting goes into the pex pipe and this reduces the internal diameter of the pipe and impedes water flow more than with copper and cpvc where the pipe goes into the fitting. In London I used a pipe bender for 15mm (0.6″) and 22mm (0.9″) copper pipe which produced wider bends and less water friction than elbow fittings. So now it bugs me to use 0.75” internally restricted pex pipe for the main flow to the house. I considered transitioning to 1” pex but there was less availability and greater cost, so I decided to wait and see.
installation
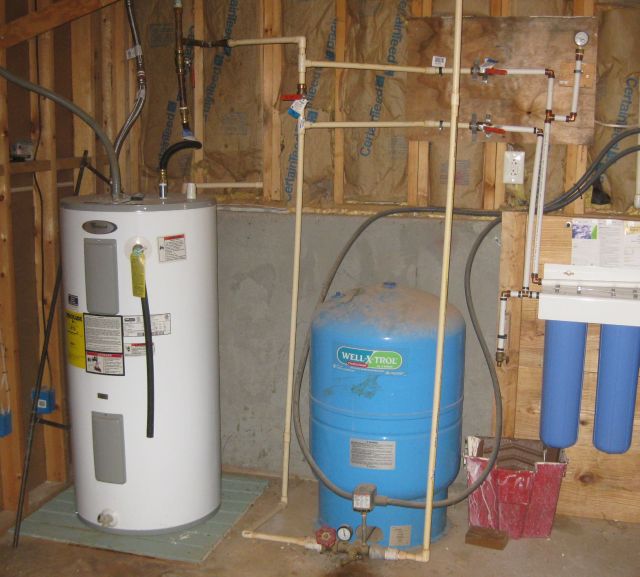
First I had to decide where to mount the 3 stage filter in the basement. It would have been best between the expansion tank and the water heater but there was insufficient space so I reluctantly decided on the right side of the expansion tank. Reluctant because it took the water flow through a number of 90 degree bends.
here is the setup – well water enters blue expansion tank in middle then is diverted to blue filters on right then returns to feed hot water tank and house on left
Next, how to secure to concrete wall. I considered concrete anchor bolts but decided to install a wood wall against the concrete basement wall. I bought a 12ft long, 2” thick, 12” wide (nominal) plank, cut into 4 boards each 3 ft long and stacked them horizontally (see pic above) and held vertically in place by 2×4’s at each end. The top of the top plank rose above the concrete apron wall and I secured it with 7” bolt screws into the base of the vertical wood studs. I screwed the filter housing to the wood wall.
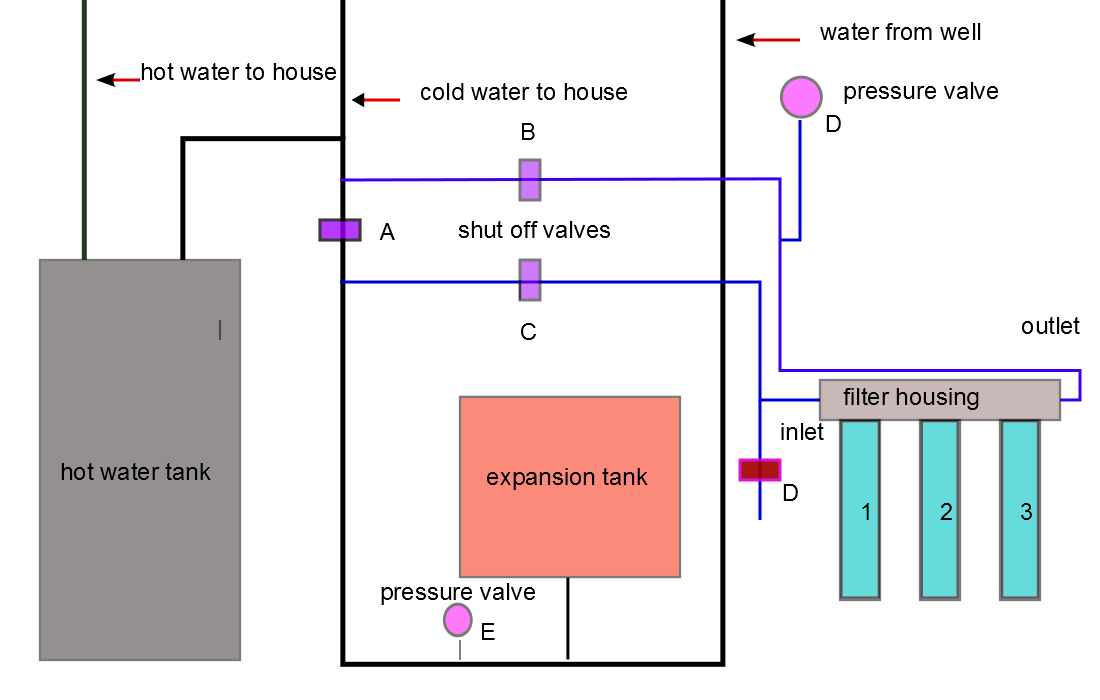
Next for the plumbing. Below is a schematic of the installation:
The blue colored pipe lines are what I installed plus valve A. When valve A is closed, water flows through C to the filters and then returns via B to the original pipe. I can bypass the filters by closing B & C and opening A. I used CPVC all the way to sharkbite valves B & C since I know that glued CPVC will not leak and I am still learning with pex. Pex commences from valves B & C to the filters. I installed a 4th valve at D which allows me to bleed the system (after closing B & C) for removing valves, winterizing the system if I am away, and to inspect the quality of the incoming water. In addition to the existing pressure valve at E I installed another valve at D. As sediment accumulates in the filters there will be a difference between D (higher) and E and when it is greater than say 15 psi, it will be time to change. As previously mentioned filters 1 & 3 are the sediment filters and 2 provides the oxidizing action to precipitate out the ferrous.
Water flow seems fine notwithstanding all the 90 degree turns although I may, one day, replace the line from filter outlet to B with 1″ pex. I bled the water heater and it produced a lot of really brown discolored water which accumulated over the years.
discharging some of the water heater
And now that I have clear water throughout the house I will replace the clogged aerator inserts in the faucet spouts. So far so good.
postscript – see my post dated Sept 9 for water loss issue I identified and corrected. Which made me think that I really needed to install a water meter. I happened to have one handy and I used 1″ pex from the filter through 2 90 degree elbows and then returned to 3/4″ pex. See picture below for result.
the new water meter is secured on top of the filter assembly. 1″ pex from filter then 3/4″ pex to house
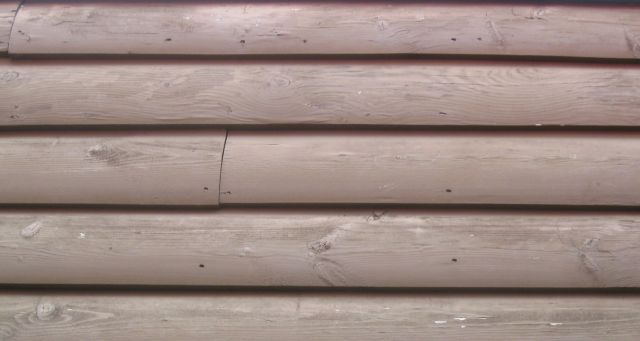
The house on the property has D log wood siding. The “D” describes the shape of the log as seen in cross-section, one side is flat and the other has the shape of a D. The house was built in 2002 and when I purchased it 10 years later the siding was neglected. I engaged a well recommended painting contractor who provided a 5 year guarantee. He recommended, rather than a transparent varnish which would show the wood grain underneath, that we use a block stain which required less annual maintenance. The first day they pressure washed the exterior with a bleach solution – actually sprayed is more accurate since the black mold and loose paint was not disturbed. I took photos showing black mold remaining on the surface and contacted the manager and questioned whether it made sense to paint on top of black mold. With much patience he assured me they were professionals, they had “killed” the mold and it was a good base on which to paint, they knew what they were doing and all would be fine. Each subsequent year paint peeled off and the only comfort was they came back each year and after the obligatory pressure wash/spray ($250) did some scraping and repainted. Aggrievedly they told me they were losing money on each visit. I had little patience. I pointed them to the barn which I had pressure washed and scrubbed before painting and which for 5 years had retained a pristine appearance. They provided imaginative explanations which held them blameless as to why the barn looked good and the house did not. Then the 5 year guarantee ran out and I was on my own.
I try to be self sufficient but scraping and painting from a ladder 3+ stories high does not appeal. And M. provides frequent horror stories from hospital roundings of guys my age who fell off ladders and are now done.
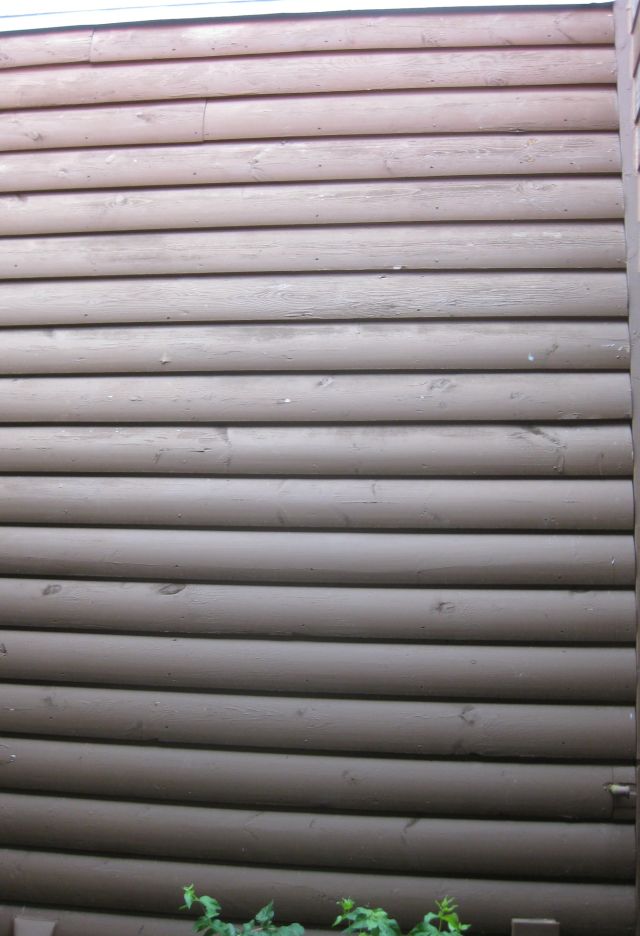
So what to do? I should mention that after the third year, peeling paint was a problem only on the sides facing the summer afternoon sun (west and north). The first two years it was a problem most everywhere because they had not properly prepared the surface before painting. But once they had scraped the loose paint and repainted, it was the sides facing the afternoon sun that deteriorated.
can you spot the difference – the wood top half catches the afternoon sun, the bottom half is largely shadowed by the car port
I remembered in New York I had a similar problem and solved it by applying oil based primer as the foundation on the wood surface and then regular latex paint. Perhaps this would also work in the South?
But who would do a thorough paint job for me? I contacted a local contractor but he didn’t impress and the quoted price for just the chimney and a small area was ridiculous. I spoke to a guy who looked like a painter (skinny, the previous guy was overweight) and he was motivated but did not have insurance. Does my house insurance cover a painter fall? The answer from the broker was confused. I decided if any painting was to be done, the painter had to have adequate insurance. I had my neighbor over who builds log homes and he said wood siding needs annual maintenance and I should go with HardiePlank type siding (allura fiber cement siding) which he could install.
the vexing blunder
I mulled this over and suggested we leave the D log siding on the lower 2 levels and just do the 3rd level and gables in fiber cement siding. My thought was I could easily maintain the lower 2 levels. He said this would look silly and M. agreed with him, so I gave the go ahead. We agreed on 3 phases – the chimney first, then the long north side and finally the east/west sides. Most of the siding on the south side is covered by roof overhang and is easily accessible and in good condition.
the chimney was intricate and took 2 days, here they are removing the old wood siding
Then came the long side of the house which was also competently done.
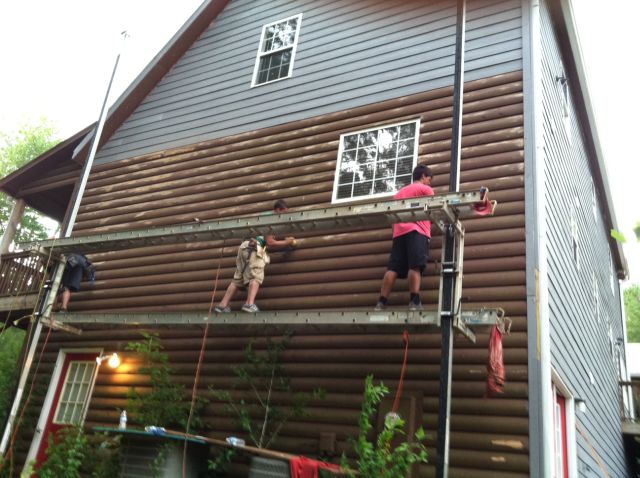
the contractor used pump jack scaffolding – platform is raised by a foot pump operated simultaneously by an individual at each end, and lowered with a hand crank
Weather was in the 90’s and after the north side was done I made an upsetting discovery – the a/c took longer to cool down the house. I went outside and leaned a 5 ft fiber cement siding and a 5ft D log board against the north side of the house facing the sun. Then placed my hand on the sun facing sides – both very hot, then the shadowed sides – the cement board was hot, the D log board only warmish. So the wood board had greater thermal mass and that’s why the house had always been so well insulated in the summer and the winter. I felt sick, my first priority has always been to conserve – energy or rainwater, and now I had unwittingly removed good insulation. I delayed the next phase and pondered what to do. Eventually I decided to have fiber cement board on just the 3rd level and gables of the east and west sides, and leave the wood in place on basement and ground level. And the contractor suggested it would help some if I caulked all the windows and doors which abutted the fiber cement siding (apparently it is accepted practice not to caulk these areas).
the east side is 3 levels plus gables, you can see the paint work on the remaining wood siding has slightly deteriorated
Since the scaffolding would be lowered after the fiber cement siding was installed I suggested extra payment if they would sand and paint the peeling areas. The contractor agreed.
with the scaffolding already in situ, it took little time to power sand the peeling paint areas and repaint and this saved me the chore
Worth mentioning – yes I got proof of adequate insurance coverage, the flashing was also replaced with fiber cement boards and I pre-painted all the siding before it was installed. Finally on the west side I sanded to bare wood all the boards exposed to the setting sun using a 5″Makita disc sander 4,500rpm with #50 and #80 7″ abrasive discs, which produced some circular scarring. I then painted with oil based primer, then latex primer, then 2 coats of acrylic flat paint. Time will tell if this treatment holds up to the fierce Georgian summer afternoon sun.
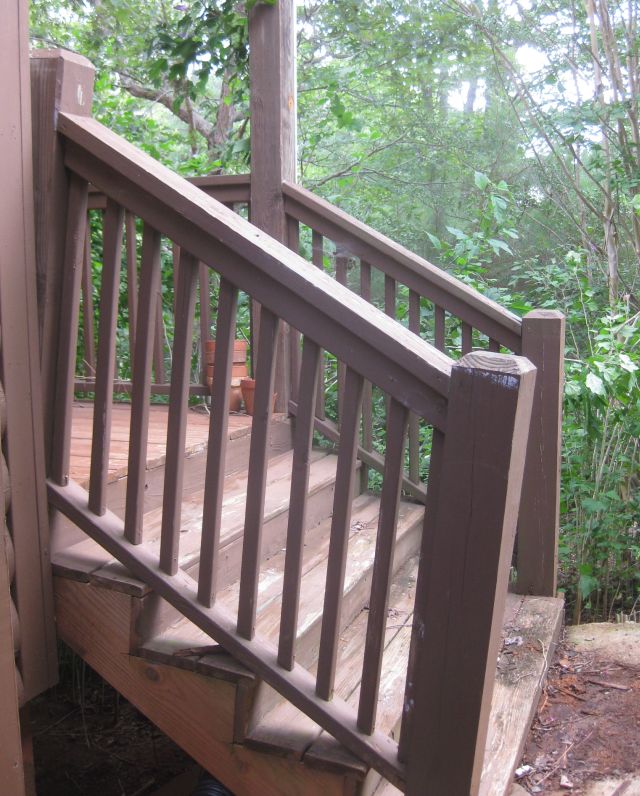
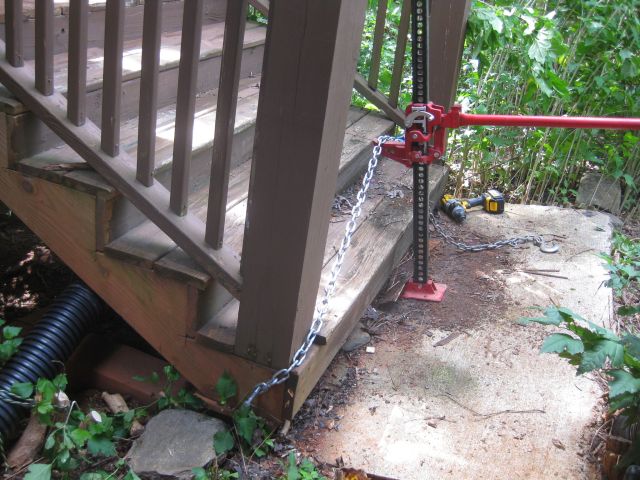
We always access the house through the kitchen door since this is most convenient to the carport. The steps to the porch to the front door are neglected and have sagged miserably as the concrete base on which they rest settled into the ground.
the post at bottom right has sagged the most and you can see how it has pulled the top post, to which it is connected, off vertical
My neighbor is a builder and his suggestion was to remove the stairs and then level the concrete base and then re-attach the stairs. I notice professionals prefer to remove what is defective and begin from the beginning, which is logical since everything will look good and plumb and, with adequate manpower is quicker, though with more material cost. I however wanted a quick fix with my own resources, and so I decided to raise and level the stairs and later I can pour concrete to level the concrete base.
But how do I single-handedly level the stairs? Not enough space for a bottle jack or car jack. And then I thought of my farm jack, also called a Hi-Lift jack which I last used 5 years ago to hoist railway ties, also called sleepers, out of the ground. It cost <$30 and now is about double in price.
Ok, the farm jack would be the lifter but how do I attach it to the stairs? I thought of screwing a 2×4 horizontally to the ground level posts and use that for the jacking point, but then I saw the posts were nailed to the stair risers and the jack would just lift the posts off the stairs. Not what I wanted. The connection had to be to the stair risers, but how?
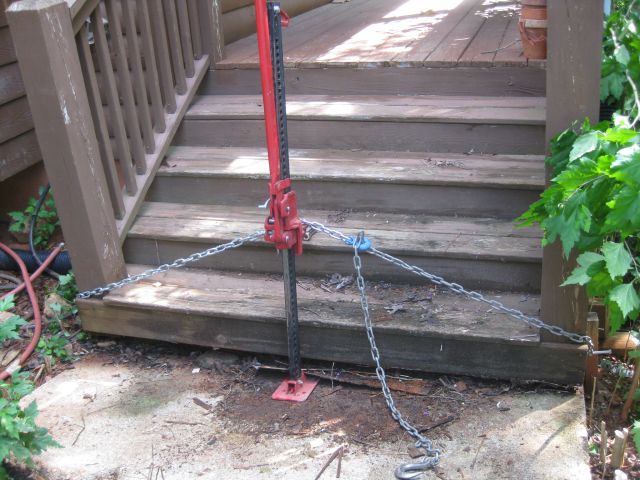
the solution – a chain bolted to the bottom of each of the risers
I then used the farm jack to raise the stairs.
farm jack in action with bottom of stairs raised off the ground
I had two lengths of chain which was handy since I was able to use a grab hook (shown in blue) to adjust the length to what I wanted.
I leveled the stairs with concrete blocks and used flashing to protect the wood from rising damp
Since the top left corner of the slab had settled most, that end of the stairs needed the most adjustment – thick concrete slab and treated 2×6 and flashing for damp protection.
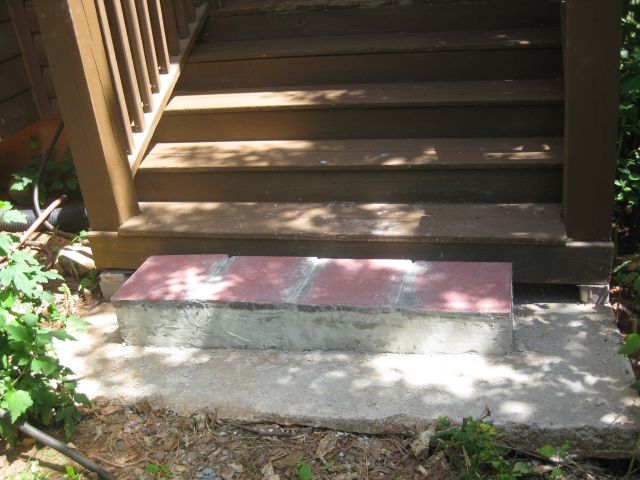
Next steps are to scrape, prime and paint the stairs and then pour a level concrete step on top of the existing base.
a few weeks later – here is the finished product:
I made a simple mould, poured concrete which self-leveled and topped with 4 red flagstones, and the result (to me) is acceptable
My drive is 220 ft long and is a gravel drive with most of the original gravel buried, worn or washed away. Time for a new face. I contacted the local trucking company and dispatch was not available but the accounting lady, who acknowledged she was not very knowledgeable about gravel, suggested that #34 gravel would work and that it costs $30.50 a ton. A ton is 2,000 lbs which is what she was referring to, though there is also a metric ton which is defined as 1,000 kg which equates to 2,204.6 lbs. The trucking company uses 17 ton trucks so a truck load would be approximately $518.50 (17 * $30.50). I asked her to check with dispatch for a shipping date and to confirm that #34 was the right grade gravel. She called back with a shipping date and said dispatch also mentioned #57 gravel but she wasn’t sure which grade dispatch recommended. Time for research – and I found that #34 is 2″- 3″ diameter, and #57 is 0.75″ to 1.5″ diameter and is the recommended grade for drives. (Larger sized gravel can be used as the base on which #57 is packed, but my drive does not need a base.) So I ordered 2 truck loads of #57, which costs $28.50 per ton.
The drive is reasonably smooth and on a hill and I previously dealt with crossing rainwater by digging a diversion ditch on the uphill side of the drive. Delivery day it was raining incessantly and continued for the next day and until lunchtime the day after. Which is when the trucking company called and said they would really like to deliver the 2 loads. When the truck arrived I asked the driver if he could spread the load as I have seen often done by slowly raising the bed as he drives slowly forward. He said this needed chains and, after a pause, that he had chains in his cab. Clearly this was a favor. And I tend to be independent, eschewing favors. I said do the best you can without chains. To do this he said he would have to angle across the drive and his left rear wheels skewed off the drive and began churning up mud. I said to forget spreading and just dump the load on the drive. Which he did and took off for the next load.
And now to spread the 35,000 lbs of gravel (17 tons*2,000lbs) I fired up my bobcat which I repaired painfully slowly earlier this year (see posts). It worked fine and I had almost all the gravel spread when the dump truck arrived with the second load. Total delivered was 35.94 tons at $28.50 for a total of $1,024.29.
I will not say it was easy spreading the gravel since it has a tendency to slide off to the sides of the drive and my objective was to do all the work with the bobcat and minimal work with a shovel. So it took time and looked a bit disheveled when I was done. But next day I started packing it down with my Murray lawn tractor and it is looking better. Some collateral damage – the large wheel ruts on the side of the drive are still prominent and the raised truck bed ripped away a large branch leaving half behind which I sized down safely with my powered pole saw. And, I hope with time, the gravel will pack down nicely and give years of service.
My logcabin has a large basement and I have many books in piles around the living areas – time for a large bookshelf. The Atlanta house we bought 20 years ago had a built in bookshelf in a couple of rooms (that’s what attracted us) and in the attic was surplus wood shelves of varied lengths – 36″, 33″ and 32″.
Preparation
I cleared a wall and corner in the basement, polyfilled the holes in the sheetrock, painted the wall with the color I will use for the rest of the room and began construction of the bookshelf. The shelves are 11″ wide so I purchased two lengths of 16 ft by 12″ wide wood and had them cut into manageable 8 ft lengths at the store (although described as 12″ wide the wood is actuall 11″ wide). I selected the wood carefully avoiding bowing, splits and disfigurations. I also bought 3 10ft lengths of 2″ by 4″ wood.
Construction
I will not go into too many details since the design is simple and evident from the photographs.
the completed bookshelf
The bookshelf is 8 ft high and the 3 sections are respectively 36″ wide, 33″ wide and 32″ wide. The shelves for two of the sections are aligned. The furthest section has extra height at the lower shelves for very large books. To prevent toppling, the four vertical lengths are screwed into horizontal 2-4’s at the top and also to a 10′ 2-4 at the base where the wall meets the floor. A 3rd 10′ 2-4 in the front secures the front edge of the verticals and provides extra footprint stability.
securing the vertical to the top of the wall
The horizontal 2-4’s at the top have two functions – to keep the vertical the right distance apart and to secure the verticals to the wall to prevent toppling. As shown, a scrap piece of wood is all I used to secure the vertical to the horizontal 2-4.
I used flashing at the base of the vertical
Since the vertical rests directly on the concrete floor I decided to place some flashing between the base of the vertical and the concrete floor, lest the vertical wick moisture from the concrete.
securing the base of the vertical
I also secured the base of the vertical to the rear 2-4 using scrap wood and screws, and a single screw to the 2-4 in front of the vertical.
For the horizontal ledges for the shelves, I cut 10.5″ lengths 1.5″ wide from scrap wood and plywood. I predrilled the ledges for 2 screws to reduce splitting and effort of screwing them into the verticals.
horizontal ledges for shelves
The procedure is to place the lowest shelf, then measure the height for the next shelf and draw a horizontal line with a square, screw the ledge into place, then rest the shelf on the ledge and with a spirit level ensure it is level, pencil in the line on the other vertical. This ensures each shelf is level each time.
Now the bookshelf is done I will begin populating the shelves.
One of my takeaways from the recent GO conference (see two previous posts) is that a raised bed can be constructed from untreated pine and will last a number of years. I have previously constructed my raised beds from composite decking planks.
an example of a raised deck from composites. the wooden planks in the middle support the row cover, when needed
On the first day of the conference we visited local farms and the small farm I visited was on 2.5 acres of mainly granite and therefore made extensive use of raised beds. The composite decking planks I used for my raised beds cost $21.97 for 1.25″x6″x12′ or 30.5cents per sq inch. I had not thought to use untreated pine for raised beds since I thought it would rot within a few years. The farm we visited, which provides for 40 CSA customers, has been using the same untreated pine for raised beds for 8 years. The cost of untreated pine is $11.71 for 2″x10″x12′ or 9.8c per sq inch. So the cost of constructing a raised bed with untreated pine is less than 1/3 the cost of a raised bed with composite materials. And if my raised bed will last even 5 to 6 years I will be very happy.
a one tier composite raised bed half of which serves as a simple cold frame
As a trial I purchased 2 10″by 12′ lengths and had the store cut each 12′ length into an 8′ and 4′ piece. I also bought a 2″x2″x8′ stud for joining the corners. It was quick work to construct the raised bed.
new raised bed constructed from untreated pine with steel rods buttressing the middles of the sides
Since the raised bed is on sloping ground and I wanted it reasonably level I had two choices. I could dig the higher side into the ground or raise the lower side. Since I wanted to reduce earth contact as much as possible (to minimize rotting), I decided to raise the lower side of the raised bed by placing it on surplus bricks. The raised bed is reasonably level now. I pinned the corners of the raised bed using 2.5″ weather resistant screws and also buttressed the sides with scrap iron rods hammered vertically into the ground. I filled the raised bed with soil which previously covered rotted logs so it is rich in organic materials. And then I added a wheel barrow of compost to the top and forked it in. The raised bed is now ready for its first occupants and after the next rains, when it has settled, I will seed with root plants (carrots, turnips and beets) interspersed with my favorite kale seedlings.
new raised bed showing bricks supporting the lower side
Rain has been unrelenting in the Atlanta area. I have captured all I can in my storage tanks and contour ditches and I hope most of the surplus is recharging the underground reservoirs and not running for the Gulf. So, with little to do outside, I decided to build a bat house.
I am increasingly relying on natural predators to combat pests. Because the weather has been unusually warm, a number of pest families are happily populating themselves on my lettuce in my cold frames. So I was pleased to see that the ladybugs, which overwinter in the logcabin, have also turned their thoughts to population expansion. I captured several preoccupied couples and gently deposited them on the lettuce plants in the cold frame and hope, when their immediate priorities have been satisfied, they will turn their attentions to food snacking and find something worth eating. My biggest challenge will be towards the end of summer when the BMSB (brown marmorated stink bug) returns. Neighbors suggested using a nicotine spray (cigarette contents liquified) to fight them but yesterday a visitor, who is a local master gardener, was surprised with this concept and said I could be turning tobacco mosaic virus loose on my tomatoes. Some research is needed here. But, back to the bats which are great predators of night insects (moths) and are surely, a more natural and effective solution than using red light traps and lures.
I recently replaced 23/32 plywood sheathing on the Atlanta house with hardiplank cement siding (a much better long term solution) and the weathered plywood sheathing has waited patiently for a new use – why not, for starters, a one chamber bat house. Several websites offer finished models or books (thin books <60 pages >$8) but with little effort I found a great conservation website with free instructions for my bat house: http://www.batcon.org/pdfs/bathouses/SingleChamberBHPlans.pdf.
I shall be attaching the bat house high up on the east side of my barn where I know there is bat activity. My raw materials outlay has been modest – just a 1″x 2″- 8ft length of cedar for $2.47. The cedar is a compromise since I did not want to use treated wood and untreated pine wood will not endure. I hope bats do not have an issue with cedar. All the other materials were either left overs or recycled from disassembled structures. I also decided, when I saw the price, to buy a second circular saw. I have a heavy duty professional model which I keep in Atlanta and am using to cut the hardiplank. Lowe’s was selling a light duty Blue Hawk saw for $30 and I decided to splurge and will keep it at my log cabin and, if it should be stolen, it will be an easier loss to bear (by the way it works fine).
The one chamber bat house is simple to construct – you just follow the plan provided by the website. The plan suggested applying 2 coats of dark, water-based stain to interior surfaces. I skipped this step. Not sure of the logic here. If the intention is to reduce wood deterioration then the stain should be an exterior stain which has all types of nasties to prevent mildew etc. Interior stains make the wood look nice and I am sure this is not high on the bats’ preferences. Even linseed oil has inorganic components. So I skipped the interior decoration but I did roughen the backboard as recommended by cutting horizontal grooves with the circular saw.
the bat house backboard with horizontal scored grooves and central support spacers to minimize warping
For the exterior, I first applied a good primer. The unpainted area at the bottom is the landing board from which the bats enter the chamber. The width between the front board (facing the photo) and the backboard is only 0.75″. I would have made it wider but those who produced the plan know better than me.
bat house with white primer and 0.5″ vent space and landing area at the bottom
I assume self-respecting bats prefer natural wood colored habitats for their bat house and not a glossy white exterior and so I added an exterior solid brown stain. I also cut out a piece of surplus roof sheeting and folded it over the top to provide a roof for the dwelling.
the bat house – finished product
Now all I have to do is wait for the rain to stop as it eventually must and then I will attach the bat house to the barn and await the new occupants.
In a recent post I mentioned that mushroom production in my mushroom shelter has been poor due to inadequate watering. The system I installed had a 0.5″ diameter water pipe run from a nearby slightly higher rainwater collection tank to the ceiling of the mushroom shelter from which the water flowed via bubblers onto the spawn impregnated logs. Water flow was weak and the bubblers often clogged.
source of water for mushroom shelter is the elevated rainwater collection tank which collects from the north facing roof
I rectified this by replacing the 0.5″ diameter pipe with a 1″ pipe and by eliminating the bubblers and using adjustable .75″ pipes to torrent the water onto the logs. I do not have the dispersion I had with the bubblers but the flow is strong and there is no clogging – any debris is blown out.
rainwater from the storage tank directed by adjustable pipes to the mushroom logs (ignore the horizontal white pipe)
Another watering improvement I made is to collect rainwater from the roof of the mushroom shelter and direct it onto the logs. First step was to install a gutter.
gutter attached to catch rainwater from mushroom shelter roof with pronounced dip to the left to feed into 4″ elbow
The open lower end of the gutter feeds into a 90 degree 4″ elbow attached to a 10ft 4″ water pipe. I crumpled chicken netting into a ball and inserted it into the open end of the elbow to trap leaves and debris before they entered the water pipe.
gutter on mushroom shelter feeds into elbow with protective chicken wire
It was then a simple matter to lead the 4″ diameter 10ft pipe into the shelter, cap the far end, and secure it ensuring it dipped from the elbow end to the capped end. With a power drill I made holes staggered along the length of the pipe.
4″ diameter 10 ft water pipe in place with staggered holes to ensure good coverage of mushroom logs
The improvements should ensure more reliable mushroom production.