quick, cheap loudspeaker repair

During my working days I owned a luxury used car which I purchased with 28k miles on the clock and traded in at 140k miles 10 years later – a decision I regret, since it had character (a big wrestler looking badge for the front grill) and I should have kept and nurtured it.  At about 110k the Bose sound system deteriorated and I arranged for an audioshop to replace the tuner/CD player and, since they said the Bose speakers were incompatible with the new system, the speakers as well.  But I requested they set aside the 4 Bose speakers for me, and for the past 12 years the speakers have sat on a shelf in the garage awaiting their destiny.

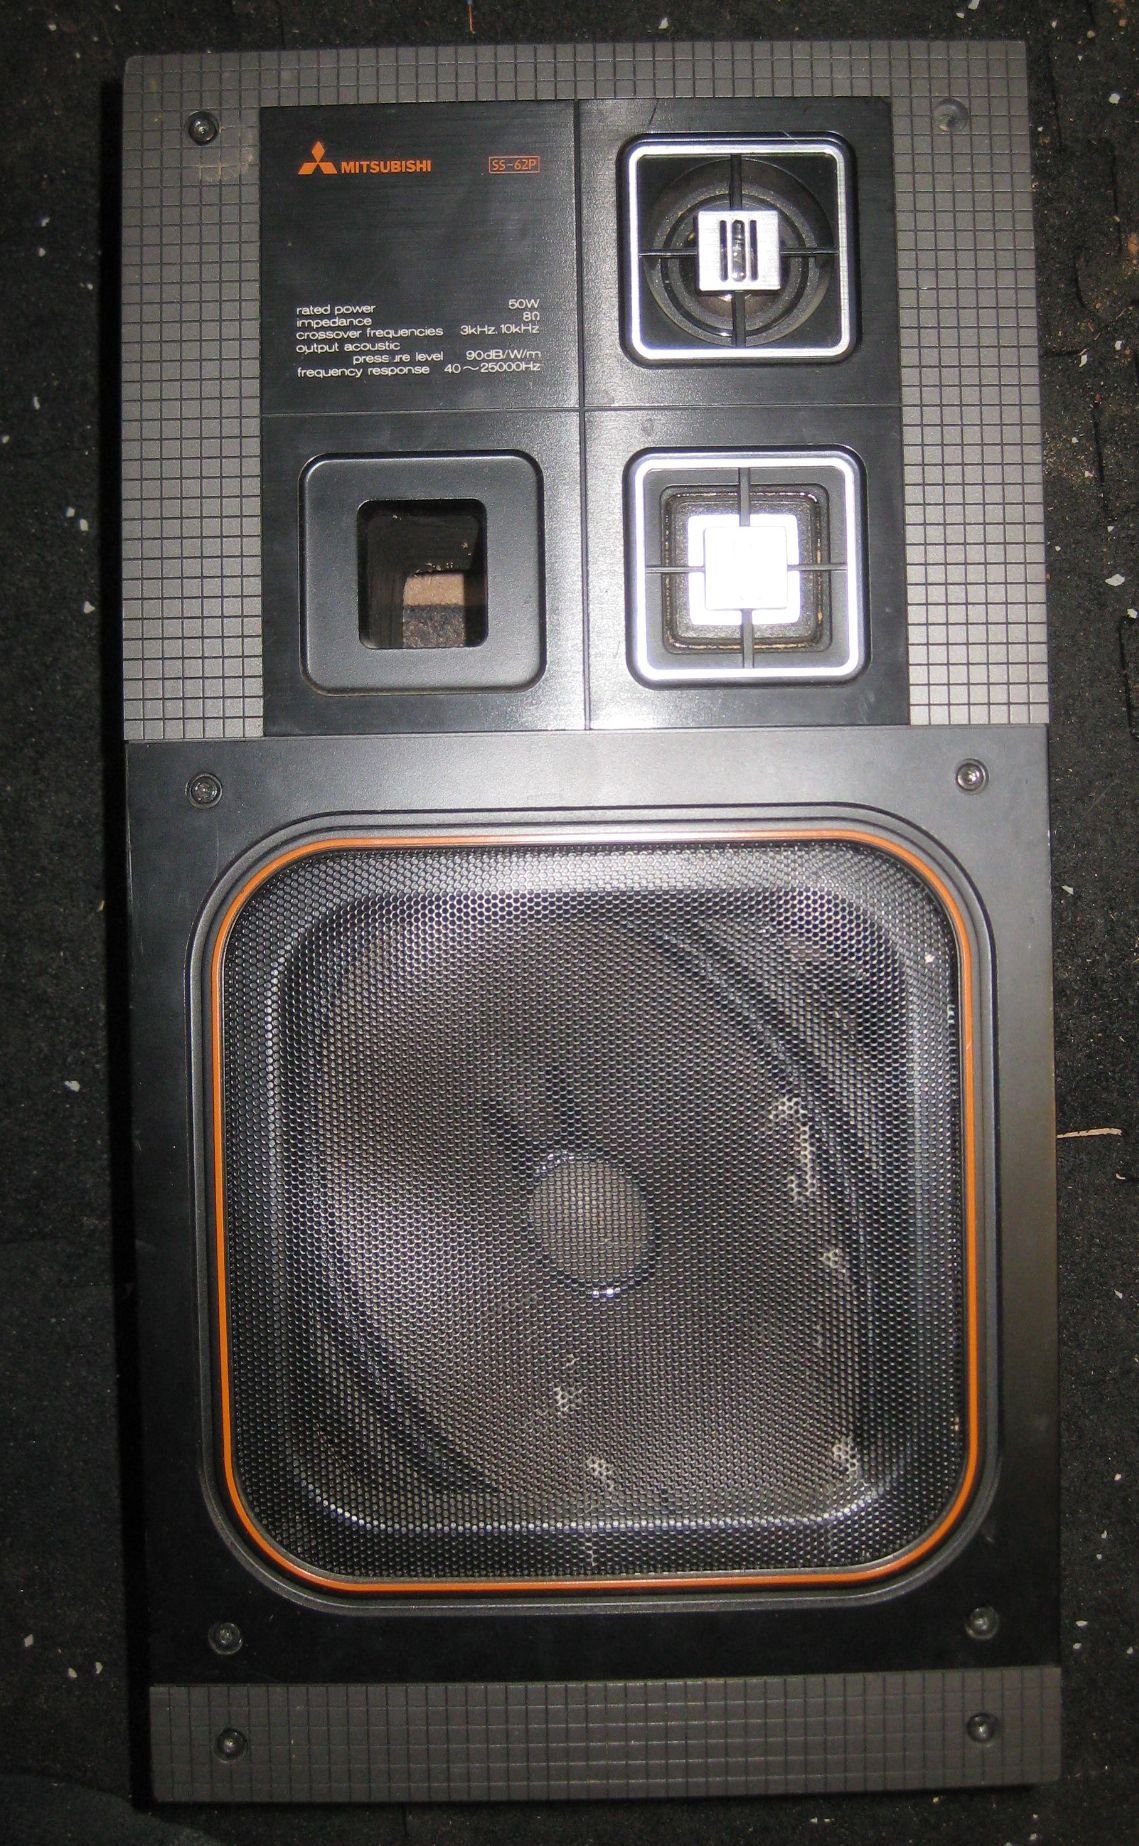
I enjoy most music genres and at my log cabin I incorporated various audio components into an acceptable sound system.  Since I did not have speakers, I purchased a pair at the local thrift store – they seemed decent quality.

my thrift store speaker purchase

And for $18.91 what had I to lose.

caveat emptor - sold "as is" with no implied warranties
caveat emptor – sold “as is” with no warranty implied

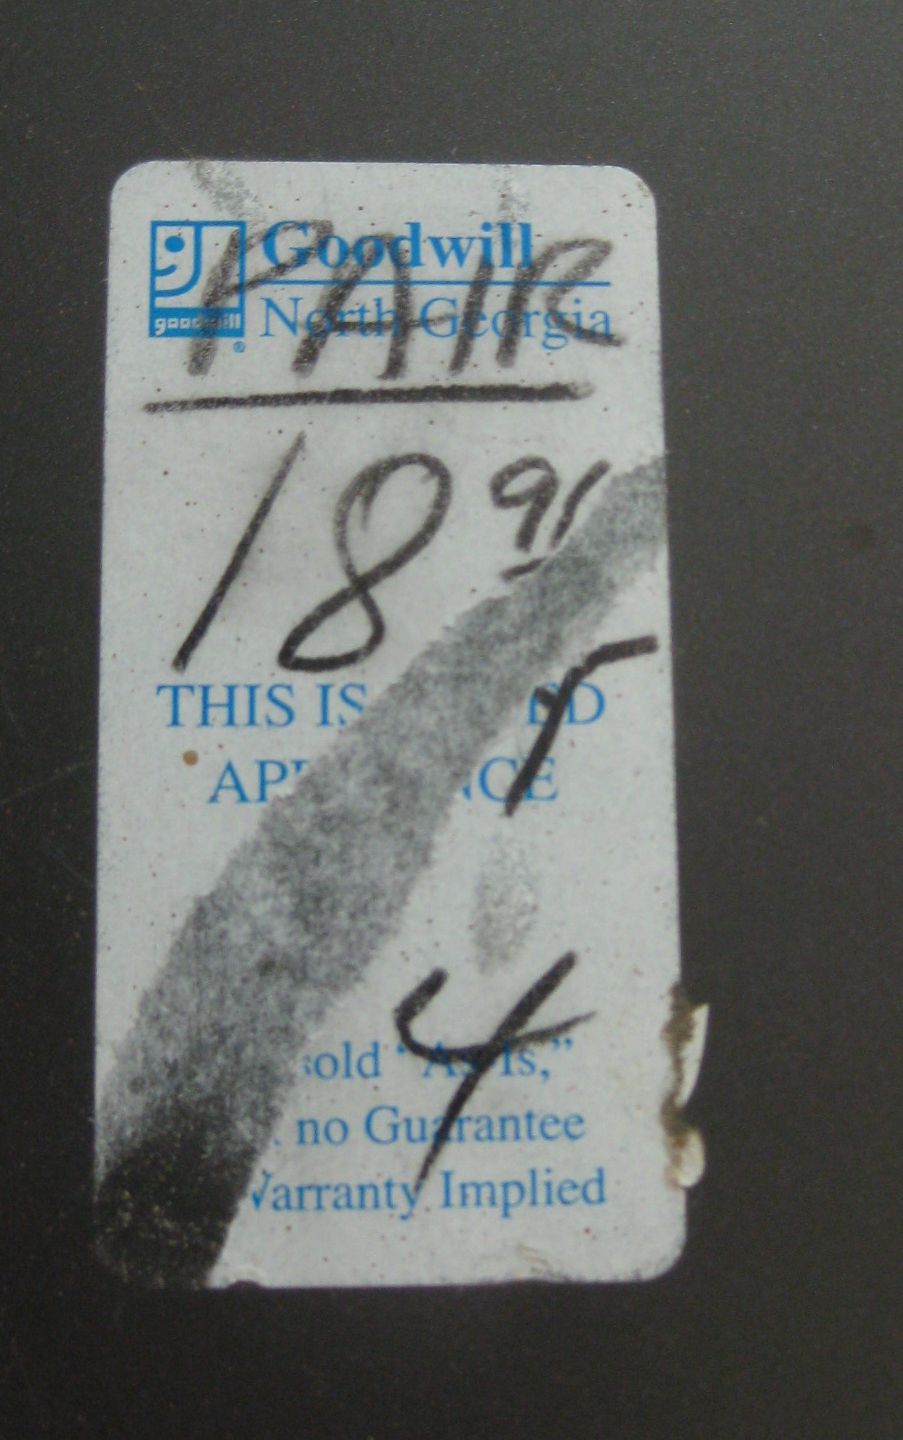
Actually, $18.91!  I have bought solid wood desks ($6) and paintings ($8 – $25) at the thrift store and been very happy, but then I was able to inspect all the components of the purchase.  A pair of good looking speakers on a shelf unconnected to a sound system can be a pig in a poke – after all why would anyone donate good quality, working speakers.  Desks and paintings you can outgrow but good speakers are always useful.  When I connected the speakers up at the house one worked fine and one was buzzy and noisy.  I suspect the speakers were hammered at high volumes and the one was damaged.

this is the main speaker I replaced - you can see the damaged apron
this is the main speaker I replaced – you can see the damaged apron

So I have  used just the one speaker until, with the advent of hot weather, I had time during mid-day heat to ponder a solution.

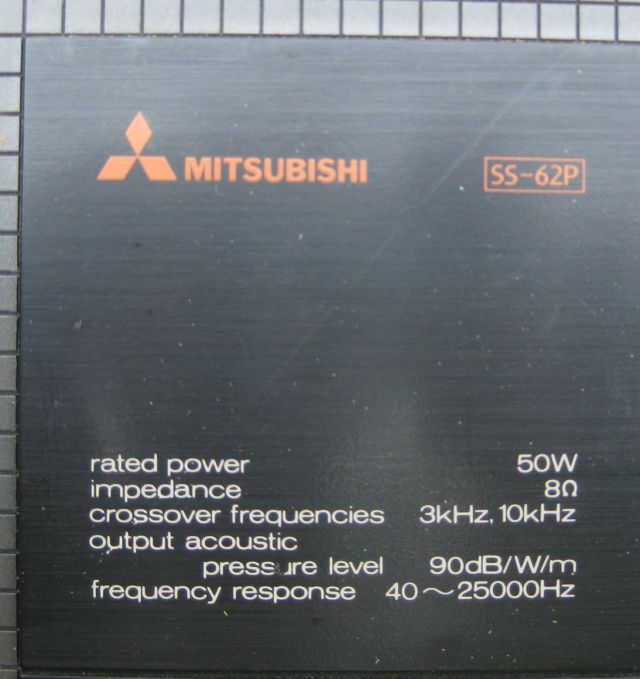
And then the Bose speakers came to mind.  Why not replace the damaged speaker with one of the Bose speakers.  But there is a problem – for whatever reason the Bose has a receptacle for 4 speaker wires while I have only 2 to provide.

see the blue box above the specs - it is anticipating 4 wires
see the blue box above the specs – it is anticipating 4 wires

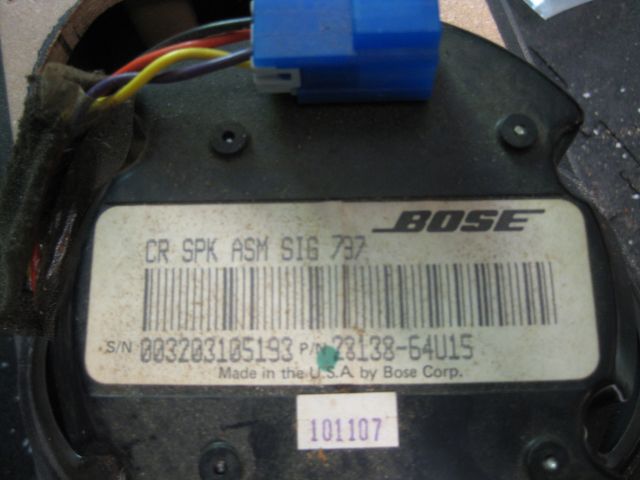
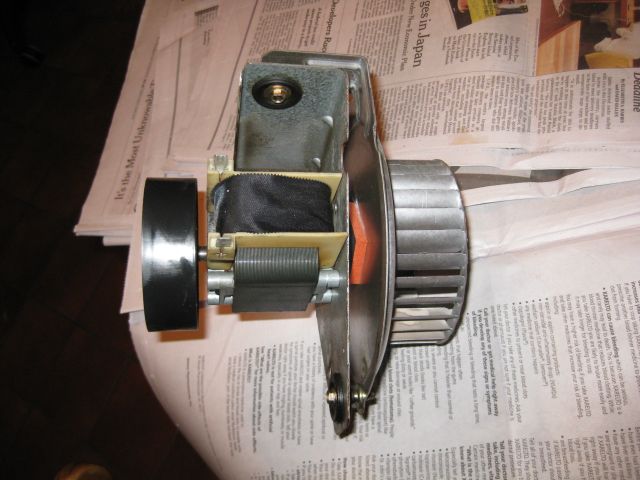
I powered the sound system and tried touching my 2 speaker wires to all combinations of the 4 speaker tabs but no response.  Then I inspected the Bose more carefully and saw that when all was said and done, just 2 wires headed for the speaker.

2 wires lead to the speaker

So I touched the speaker wires from the sound system to these 2 wires and the speaker came alive and sounded decent.  I could have connected the speaker wires to these 2 wires and job finished but I thought it would be more elegant to connect to the interior tabs and I was curious to see how 4 input wires became 2.  So I disconnected the back cover plate.

as I suspected 4 input wires did not simply become 2 wires, there is a circuit board and presumably fancy electronics fineturing the input from the speaker wires
as I suspected 4 input wires did not simply become 2 wires, there is a circuit board and presumably fancy electronics fine turing the input from the speaker wires

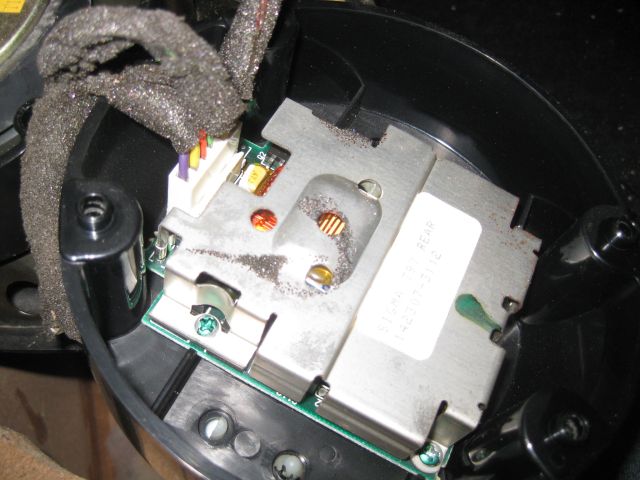
Since I am a bit of a novice I decided to commit a travesty and sidestep all the embedded electronics and connect directly to the 2 wires going to the speaker.  I reasoned that the Mitsubishi speaker box had its own electronics and these would have to suffice.  So I made a short extension with connectors for the Bose tabs and a screw on connector for the 2 wires from the speaker box, ensuring I maintained polarity.

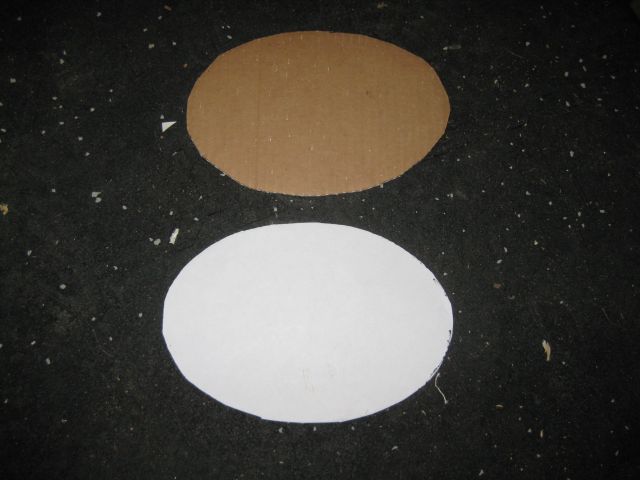
But first I had to fit the Bose speaker into the speaker box and since its profile was elliptical/oval it would not fit the rectangular shape of the speaker being replaced.  I needed a template to mark out the shape on the speaker box so I could cut with my Skil jigsaw.  I measured the length and width of the speaker where it would fit into the box , but how to draw an elliptical circle.  Fortunately for my permaculture design course I have been working with Inkscape, freeware software, and so I produced the shape with the software to actual size, printed the circle, then copied it onto cardboard which I trimmed and then used the cardboard to sketch the shape on the speaker box.

the printed elliptical shape on the white paper and the cardboard template to which it was transferred
the printed elliptical shape on the white paper and the cardboard template to which it was transferredI

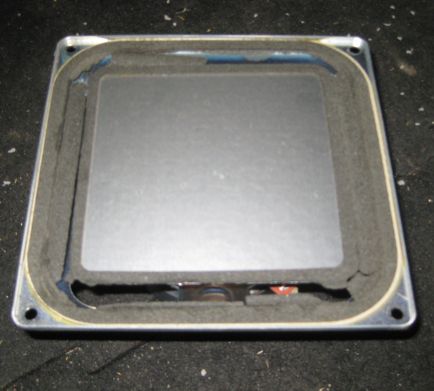
With the jigsaw I cut out the pattern, the Bose speaker fitted well into the box, I connected the wires and fitted the lid cover and tried it out on my system and it sounds fine.  Job accomplished.

my refurbished speaker - you can see the oval shape of the Bose speaker through the grill
my refurbished speaker – you can see the oval shape of the Bose speaker through the grill


2 simple fixes

Hand tools

I use several hand tools for my weeding and mulching operations.  They are easily misplaced in the high grass and surrounding weeds and not discovered until, accidentally, days later.  It occurred to me that a cause was their lack of distinctiveness (blame the tools not the workman).  Their handles are either natural wood color, yellow or, the logic for this beats me, green.  So, easily camouflaged.  The solution was a small pot of cherry red paint and now, with their distinctive coloring, they come easily to hand.

my red painted hand tools
my red painted hand tools – the green colored weeder however, is resisting this solution

Pump timer

When I established my irrigation system I thought it would be neat to have an automated process with the pump starting and stopping at given times whether I was there or not.  So I incorporated a digital timing system which produces a low volt output when switched on which was connected to a relay which switched on the 110 volt circuit to power the pump.

the previous timer - overkill and unnecessarily complex
the previous timer – overkill and unnecessarily complex

For the past year I have been manually starting the timer and mainly hand watering and the timer would switch off after the set period.  The timer no longer works and I really don’t need a 4 station device when I am pumping only one line.  Rather then buy another digital timer with surplus features which could fail, I decided to buy a simple mechanical timer like you see in some hotel bathrooms.  Since it is a simple timing device it is unlikely to fail soon and its output is 110 volts so the circuitry is simplified.  I bought a double gang box and wired it to a 3 prong outlet – and it works great.  No longer do I have to press several buttons on the digital timer, I simply turn the timer handle to the desired time period and the pump starts up.

the new timer - all it needs is a cover plate and to be mounted on the post
the new timer – all it needs is a cover plate and to be mounted on the post

And here is the finished product

the timer with cover plate mounted on a post in the carport


kudos for HD

I do not promote brands or permit advertising on my site.  But when credit is due – I give it.   Some 10- 15 years ago I replaced  two defective bath tub/shower faucets which had washer valves  with new identical faucets which used ceramic valves.  Coincidentally both developed problems in the past few months.  I did not have receipts but knew I had purchased them from Home Depot.

The first problem was a dripping faucet which needed a new ceramic valve – cost about $6.  I am always interested in how companies service their customers so I decided to pursue this with HD.  I was placed in touch with the Store Support Center, Resolution Expediter, who requested 4 photos of the faucet to identify the brand and model.  Within a few days the parts arrived and the leak was fixed.

The second problem with the other faucet was that the ceramic handles on the faucet had broken – don’t ask me how, this is my son’s bathroom.  The replacement parts would have cost >$50 and would not have matched exactly.  Knowing the drill and whom to contact it was a quick process to snap 4 photos and email them off – see below.

faucet in bathroom - front view
faucet in bathroom – front view – the broken parts are the left handle and the center mixer handle
faucet in bathroom - left rear view
faucet in bathroom – left rear view
faucet in bathroom - right rear view
faucet in bathroom – right rear view
the broken parts which I wished to replace

When I originally installed the faucets I had to cut out a rear access panel which I had screwed into place when the job was done, so it was easy to remove the panel and snap the rear photos.  Two days after my email I received a call saying they had identified the faucet and I would receive replacements within 6 business days.  In the event, I received the replacement parts within a week of my emailing the photos, talk about service.  The parts matched exactly and a couple of extras were included as well.

An effortless, costless repair which leaves a good feeling toward a major retailer.


new electric water heater and visit to recycle center

New electric heater

The electric water heater in the basement began leaking water – a lot of water by the time I discovered what it was up to.  Most of my neighbors in this rural area have propane tanks and use propane for water heating, cooking and warming their houses.  My house has a heat pump for heating and cooling and uses electricity for cooking and water heating.  This is one of the reasons I recently installed an efficient wood stove.

The electric water heater was corroded, and beyond repair so, after researching various brands I bought a new Whirlpool 50 gals 9 year warranty replacement from a big DIY store. Their website said the 12 year warranty model was in stock but on arrival I was told their website was not accurate (they really should get this fixed), so I bought the cheaper 9 year warranty version and saved $100 plus, and then trucked the heater home.    The installation had two complications – the soldered in place gate valve was defective and the conduit had 4 wires and the heater required only 3.

Gate valves are good for controlling water flow but if you have to shut off the water completely a ball valve is the way to go.  Soldering a new valve would have been time consuming since water kept dripping down the pipe which lead to the floors above.  Also my soldering skills have become erratic.  In London I soldered numerous copper connections with hardly any fails – here my success is mixed and I attribute this to  my using Mapp gas which is too hot compared with propane, and perhaps to the old flux I was using.  Note that, consistent with the saying “a bad workman always blames his tools” I exculpate myself.  And in London the way I solved a dripping pipe was to push bread up the pipe and this detained the drops long enough for me to get the  job done.  Anyhow, I have been wanting to try out a “SharkBite” and this was my opportunity.

A SharkBite is a push fit connector (no soldering required) and I bought one which combined with a ball valve.  It cost just less than $20 which is a lot for one connection.  However I was staggered at the cost of the fittings I usually use – both big DIY outfits wanted over $6 for a 3/4″ female copper connector (come on!) and if I had bought this, plus 3 male connectors plus a ball valve the cost saving against the SharkBite would have small – and it would have taken longer, may not have taken and may have been a frustrating installation.  The SharkBite worked perfectly and the plumbing was resolved.

new electric water heater - the SharkBite valve is on the right with red handle pointing down
new electric water heater – the SharkBite valve is on the right with red handle pointing down

I should explain some of the other features in the above photo.  The new water heater is 48″ high compared with the old heater which was 60″ high.  So I needed to extend the connections and opted for the flexible connectors shown rather than copper  pipe – a more expensive alternative but easy to install and will save time on future replacements.   At top left you can spot another ball valve in the off position.  This is one of my innovations – a problem with well water is that if it is allowed to cool it can develop a stinky sulphur smell and the way to treat it is to add H2O2 (hydrogen peroxide) and also to not let the water cool.  The top left valve is where I used to add the hydrogen peroxide – simply open the valve and drain half the water out the tank through the valve at the bottom of the tank, then with a plastic funnel add the peroxide through the top left valve.  I haven’t had to do that for years since I now always keep the water at around 120 deg and the smell has not recurred.  The wood battens are to secure the pipes against movement.

The second complication had to do with the wiring  – both heaters required 240 volt service and the cable had 4 wires which had connected to various parts of the old heater, but the new heater only required 3 wires.   I googled and learned that the 4 wires in the conduit consisted of 2 power wires, a neutral and a bare earth/ground.  The new heater required the bare earth/ground to be connected to the body and had terminals for the two power wires.  But what about the 4th wire which was neutral – surely that was needed, don’t you always have to have a neutral?  Well apparently not – the 2 power wires produce the 240 volts and you only need the neutral if you have a 120 volt circuit, which a range has but not the new water heater.  So I connected the three required wires, terminated the neutral and was done.

My first visit to a recycling yard

I loaded the old water heater into my ever so useful truck and, rather than go to the landfill where there is a $20 minimum charge, I visited a nearby (5 miles) metal recycling yard.    I asked  the office attendant if they accepted water heaters and the young girl said she had only been there a couple weeks and I should ask someone in the yard.  I saw this old bod (my age) strolling towards me and he said he did not work there, had no idea, and had just finished helping his mate drop off some iron.  I noticed that his mate had pulled the truck and trailer onto the truckscale/weighbridge.  I found someone knowledgeable who said sure, so I returned to my truck and waited for the old bod and his mate to be paid.  When they drove off the truckscale the driver stared at me very hard and I wondered what that was about.  So I was weighed, then unloaded the heater then was weighed again and the attendant gave me a check for $14 since the heater weighed 140lbs and they paid $1 for each 10 lbs.  It was only when I was driving away that I figured out the scam.  The old bod sat with his buddy in the cab when they arrived and were weighed, then when the truck and trailer was being weighed after offloading the iron, the old bod was walking back from the dump to the office.  So the truck was 150 lbs lighter, assuming that was his weight, and so they made an additional $15.  I suppose if you are sneaky you could have also plugged the water heater and filled it with some water and this would also have increased the payout.

One of my running buddies just had his water heater replaced.  Prior to the replacement he told me it would not cost him any since the heater was under warranty.  When I next spoke to him he told me the cost was close to $1,000.  His is a gas heater, he was not present when the work was done, and the repairman had solicitously asked his wife if they had grandchildren and upon learning they were proud grandparents, said that the flue connections were defective and leaking exhaust could cause serious harm to the grandkids and the defects should be fixed as soon as possible.  My buddy who was hooked in to the call drew the line at paying $100 to have the old water heater removed and so I have volunteered to do this for him and will make another $14 and earn some goodwill along the way.   He said that when I am older and no longer a DIYer and have grandkids I will be suckered just like him!

wood stove installation (part 2)

The installer said to expect him between 8am and 9am.  He arrived shortly after 8 and finished the job by 11.15am – just over 3 hours.  And to a professional standard.  Mind boggling.

He offloaded the new chimney components and I noted all were new out of unopened boxes and bore UL compliance labels.

insulated flue pipe for installation

He began first with removing exterior wood siding from the chimney and then the 7/16 OSB (oriented strandboard).

installation b
an opening is made to extract the fireplace

With the OSB sheathing removed the rear of the fireplace is visible.

the fireplace and the flue are visible

He loosened and extracted some of the flue through this opening and then climbed to the top of the chimney to remove the chimney cover and cap and the rest of the flue.

there he is on top of the chimney removing the old flue

He had an assistant who received and passed him pieces as needed.  Next he and his assistant pulled out the old fireplace.

the old fireplace on its way out through the rear of the chimney stack

He installed the new flue and a new chimney cover and cap – here are the latter two items awaiting installation.


the new chimney cover and cap awaiting a hike to the top of the chimney

Then he and his assistant brought in the new hearth pad and sited the wood stove on the hearth pad and connected the stovepipe so it went through the wall to the new flue.

and here is the new wood stove connected and ready to fire

And all of this done in just around 3 hours.  I fixed plywood sheathing to the chimney exterior and the room interior and over the next week I will repair the chimney exterior and install a tile surround behind the wood stove.

My neighbor asked if he could have the old fireplace and flue which I set aside for him.

old fireplace, flue and components set aside for neighbor
old fireplace (rear left), flue and components set aside for neighbor

And last night I lit the wood stove and marveled how long it took to consume my oak logs and the radiant heat it provided.  I should mention, in conclusion, that a good reference for me was “The Woodburner’s Companion” by Dirk Thomas.

wood stove installation (part 1)

I have always wanted a wood stove.  Think of a box with 6 sides.  If the box is inserted into the wall of a room only 1 side faces the room.  The other sides are buried in the wall and face up, down, to the left and right and to the rear – this is the fireplace in our living room.  Now I know that a lot of the heat comes out the front of the fireplace into the room, but more goes straight up the chimney – what a waste.  My other problem with our fireplace is all the particulates it releases into the room – after a good fire the surfaces of tables and objects have a gritty film, and I can only think what is inside my lungs which recirculate the air more efficiently than the air passing the table tops.  Plus a fireplace releases high emissions into the environment.  So it was always my intention to change out the fireplace for a good wood stove, but this was action deferred until the recent arctic vortexes got me moving.

First the research – I called a well rated chimney firm and they wanted $99 for a consultation visit and would not provide any estimates either for installation or stoves until the visit.  No thank you!  From their website I noted they use the Heatilator brand and two sizes WS18 and WS22 got my interest – I have no interest in pellet stoves since I wish to be self reliant and have access to lots of trees.  The NYT carried a recent article on stoves and mentioned one stalwart with emissions of just over 3 grams per hour.  The WS22 is better and has EPA certified emissions of 2.7 grams per hour.   I googled Heatilator for my area and located a dealer who informed me they were no longer a dealer and had a WS22 in their showroom, brand new, which they would sell for a discount.  They are in Ellijay which is our apple growing area located in the Appalachian range and just 20 miles away.  They agreed to strap the stove to a pallet and loaded it into my truck.

stove a
the palletized, shrink wrapped, strapped down stove at the start of its journey to a new home

The stove weighs over 400 lbs, too much for me to offload, but a simple matter for my bobcat using chains.

the pallet and a moving blanket protect the stove from damage from the lifting chains

Some things I won’t do, and climbing roofs and chimneys is one of them.  I made several calls and located an installer who seemed to know all about wood stove installation.  I suggested that all that was needed was to pull out the fireplace, leave the existing flue in place and connect the stovepipe which rises above the stove through a 90 degree bend and through the wall, to a tee which would connect to the existing flue.  He said this was not code compliant and could not be done.  Instead he said the whole flue would have to be removed and replaced by a flue designed for wood stoves. He visited (no charge), impressed me and gave me a reasonable quote.  I called his insurer to confirm coverage, called his reference which is someone who works at a major fireplace/stove retailer and was very positive, and drafted a simple agreement confirming insurance coverage, that I would not be responsible for any injuries, that all materials were new and UL compliant, that the installation would be code compliant and that work and materials were warranted for 1 year.  He signed in his personal capacity and as owner for his company and we were set to go.

His quote detailed separately the cost of removing the stone surround and the cost of framing up the hole remaining after removing the fireplace but not  to tape or mud the drywall.  I decided to do these tasks myself.  Removing the stone surround and mantle was a big job.

the fireplace has/had a nice stone surround and attractive mantle - demolition has commenced
the fireplace has/had a nice stone surround and attractive mantle – demolition has commenced

There were lots of stones and the mantle included a lot of wood.

a bigger job than I initially thought

The floor stone was on a wood frame and the big question for me was whether the oak flooring in the room extended under the frame or terminated at the frame.

stone surround c
there was no flooring under the frame

Unfortunately the oak floor terminated at the frame – so now I had to install new flooring.  The floor is 3/4″ thick and 2.25″ wide and HD sold it by the bundle.  After googling instructions and using my pneumatic finish nailer and miter saw, I installed new flooring which matched its surroundings.  And now I was ready for the wood stove installer who arrived the next day and which I chronicle in part 2.


a simple repair and a Bridge Too Far

Some repairs are straightforward, others frustrating and now there is one I began and backed off – it was a Bridge Too Far.  An instantaneously rewarding repair was replacing the gasket on the cappuccino maker – immediately thereafter we were again enjoying our once a day treat and this time without spluttering plumes of hot water.

About 14 years ago I bit the bullet and purchased a good cappuccino maker (Expobar) and a coffee bean grinder. (Rancilio nicknamed Rocky).  We have enjoyed cappuccino at least 5 days a week ever since – a gratifying investment.

Expobar and Rocky
Expobar and Rocky

Expobar needed a new gasket.  I shopped and found a modestly priced E61 which arrived timely.  The trick was removing the old gasket – not easy at all.

you can see the black circular gasket and the dispersion screen it embraces

I removed the movable parts of the maker and inverted the machine.  The gasket holds the dispersion screen in place and there are various suggestions for removing the dispersion screen or the gasket – none worked for me.  So with my portable electric drill and an appropriately sized drill bit I drilled holes into the gasket taking care that the drill only entered the gasket.  It was then easy to pry out the gasket.  I removed and cleaned the screen and re-assembled with the new gasket and it worked fine.

another view of the gasket and dispersion screen

The repair I abandoned was attempting to fix the CD player on my RCA (RS 2502) stereo system.

my old(ish) RCA stereo system with the 5 CD player at top incorrectly advising there is no CD

The 5 CD player opened fine and rotated among CD’s fine but when it came to playing a track it gave an error message that it could not read the CD.  I  opened it up which was easy enough – just remove a few screws and take off the cover.

a view of the inside of the CD player with CD drawer open

I studied and tested and concluded that the problem was the spindle motor – this is the motor which spins the CD around, and the reason for the error message was that the laser disc reader did not recognize the CD because it was not being spun around.  I tried lubricating the motor to no avail.

you can see the shaft of the spindle motor on the right below the platter

Perhaps I should have ordered a new motor (they are less than $10 on eBay) and tried to install it.  My hesitation was because I was not sure which motor I needed – I could have disassembled further and identified the motor but the bad weather had turned to good and I was losing patience), and because new systems come with blue tooth and I am using blue tooth extensively in my car trips to hear podcasts and so, to my mind the RCA had become somewhat technologically obsolete.  Lots of rationalizations.  I put it all together again, donated it since everything else worked fine,  and upgraded to a nifty blue tooth Sony system.


gas furnace repair

Our Carrier gas furnaces are relatively new – installed January 2001, so that’s 13 years.  I read that the furnace should last beyond 20 years but repair costs become crippling and many throw in the towel and simply buy a new furnace after 15 years.

Some 5 years after installation one of the furnaces would not fire up, I called the installer, the serviceman came by and said it needed a new igniter which he installed for a cost of about $190 made up of $120 for the igniter and $70 for the visit.  The googled cost of a new igniter was about $35, so the installer made a very hefty markup.  I called the boss man, the conversation got a bit tense and I resolved henceforth to do my own repairs.  The repairs involve working with electricity and gas and can be dangerous and should not be undertaken by unqualified or inexperienced individuals.

Another cautionary tale – just before the polar vortex my neighbors moved into a foreclosure they had purchased, the furnace malfunctioned, they called in an HVAC “friend of the family” who diagnosed a defective circuit board which he replaced for $500 and did not respond to frantic calls during the vortex when the furnace went into hibernation.  Upshot was a new HVAC specialist “friend of the family” was contacted who advised that the furnace and a/c compressor had been bastardized by diy’ers and all had to be replaced for $4k.  Their heating now functions and their savings are torpedoed.  Now these are isolated bad experiences and not reflective on the integrity of most HVAC specialists – the main reason I go down the self repair road is I enjoy my independence and a sense of self sufficiency.

Over the years I replaced igniters without much ado.  So when our main furnace recently failed to start I assumed it needed a new igniter and installed a replacement (I keep them handy) but it still would not start.  The igniter glows reds when powered and ignites the gas and then switches off.  The igniter in the furnace did not glow red.  I tested the new igniter with an ohmeter and it was fine.  The wiring to the igniter was fine.  I was stumped.  Then I recalled that before a furnace fires up it runs through several test procedures and so maybe something else was defective and because of this the furnace was shutting down without powering the igniter.

I performed what is called a component test where the furnace tests each of the components and during this test the igniter glowed red but another component, the inducer motor did not start up.  I then remembered that for several weeks prior to the problem the inducer motor had a high pitched whine like a jet engine.  So I concluded I needed a new inducer motor. The inducer motor has a separate blower wheel and new gaskets are recommended when the motor is replaced.  My first instincts were that I would use the existing blower wheel and skip on new gaskets.  How helpful the internet is – several commentators said they had thought similarly but were unable to remove the blower wheel, and I found that I also could not loosen the blower wheel.  So I bit the bullet and ordered a new inducer motor, new blower wheel and new set of gaskets from three different suppliers for a total cost including shipping of about $130. Of interest is that the package consisting of all 3 components is available from another supplier for $214 – go figure.

the inducer motor in situ in the furnace before removal
the inducer motor in situ in the furnace before removal.  the white goo on the cooler is lubricant I sprayed to lubricate the bearing and silence the high pitched whine – it worked for a week until the motor failed.

I took photos of the setup before dismantling the housing and replacing the parts and just as well since re-assembly is not intuitive.

you can see the components - the cooler wheel on the left which cools the motor, the motor, the housing to which it is attached and the blower wheel on the right which fits into the furnace and circulates the gas
you can see the new assembled components – the cooler wheel on the left which cools the motor, the motor, the housing to which it is attached and the blower wheel on the right which fits into the furnace and circulates the gas

Finally the new parts were assembled, I flipped the switch and after what seemed interminable checking by the circuit board the furnace fired up and heat was restored.  Yay!