cuddling a peach tree

I have 2 peach trees and last year their blossoms were freeze damaged and I had no fruit.  I really shouldn’t have any peach trees because they are difficult to produce fruit using organic methods and they blossom very early in the spring.  But Georgia is known as the “Peach state” and Peachtree is a very popular street name in Georgia, and the Peachtree 10K Road Race is the world’s largest 10k race (I have run it 20 times), so my enthusiasm got the better of prudence.

Freeze damage occurs differently based on the type of fruit tree and its stage of development.  For the peach at first bloom stage, where is where my one tree is, 10% of the blossoms will be destroyed at 26 deg F and 90% at 21 deg F.  My second tree is at the first calyx red stage where the relevant temperatures are 23 deg F and 9 deg F, so I was not too worried about it.  I decided that if I do not get any peaches this year I will replace the peach trees.  With this ultimatum issued, I feel I have to do my best to help them along.  With freeze warnings in place for most of the past week, I took the initiative and wrapped my most vulnerable tree with Agribon row covers which give about 6 deg F protection.  I have never wrapped a tree before.  Rather than web the technique, I decided to try figure it out myself.  The covers are 7 ft wide so I took covers from my raised bed and wrapped them round the tree.

my first attempt was amateurish, I wrapped the tree and hoped for the best

The wind was gusting >15mph and in a very short time the covers were undone and the tree looked like a weird ghost with flapping garments.  So I decided to be more deliberate.  I pruned off the taller branches and with a rope belted the limbs closer together.

the yellow roped served as a belt or girdle to pull in the tree's waistline
the yellow rope served as a belt or girdle to pull in the tree’s waistline

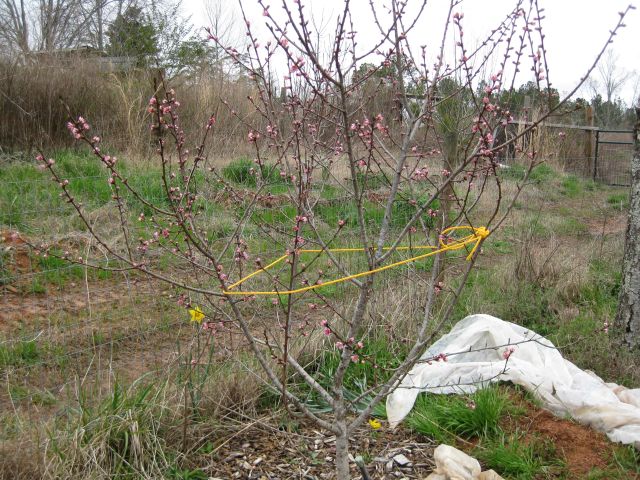
I again wrapped the tree in row covers and added two encircling ropes to hold them in place.

the shrouded tree with 2 securing ropes

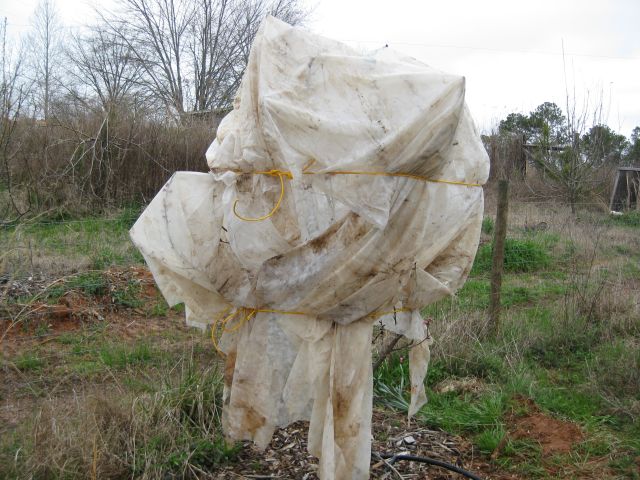
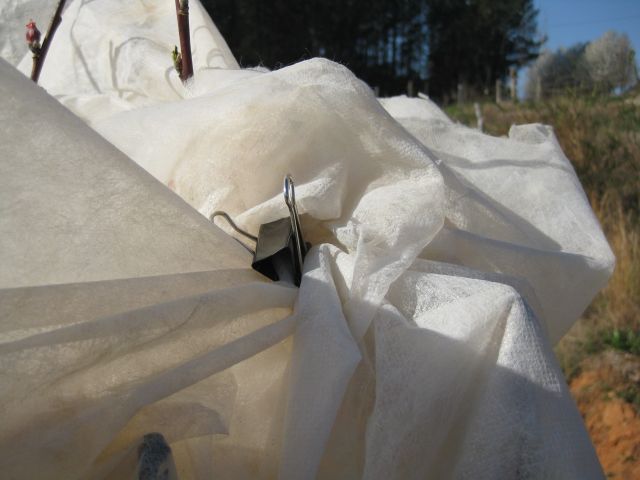
I thought this would do it, but the wind increased in intensity and was persistent.  So I remembered I had several bulldog clips on hand and used them to secure the loose ends of the covers together.

bulldog clip securing loose ends of the covers

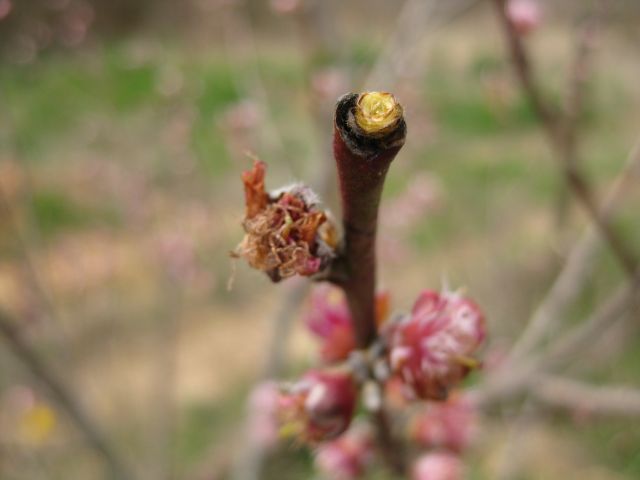
This seemed to do the trick and the covers stayed pretty much in place.  Now, with no freeze forecast for next week I removed the covers to inspect the damage.  All the blossoms were ok except for a few at the extremities which probably had poked through the covers.

a damaged blossom, the ones below are ok

And interestingly, a budding leaf also appeared partly damaged.

the tips of the leaf bud are also damaged

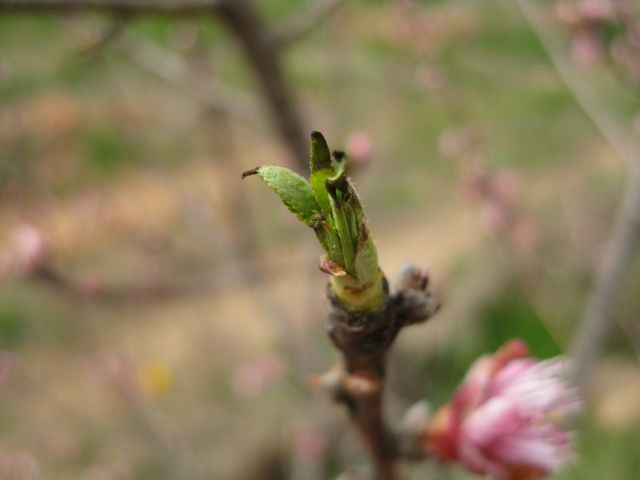
Beats me why the peach tree insists on producing blossoms first and then leaves while with most of my other trees it is the other way round.  So, for now, the peach blossoms are ok.  But as I consult my notes from last year I see there was a late frost in April which wiped out the blossoms of both peach trees.


raised beds for growing vegetables

One of my takeaways from the recent GO conference (see two previous posts) is that a raised bed can be constructed from untreated pine and will last a number of years.  I have previously constructed my raised beds from composite decking planks.

an example of a raised deck from composites
an example of a raised deck from composites. the wooden planks in the middle support the row cover, when needed

On the first day of the conference we visited local farms and the small farm I visited was on 2.5 acres of mainly granite and therefore made extensive use of raised beds.  The composite decking planks I used for my raised beds cost $21.97 for 1.25″x6″x12′ or 30.5cents per sq inch.  I had not thought to use untreated pine for raised beds since I thought it would rot within a few years.  The farm we visited, which provides for 40 CSA customers, has been using the same untreated pine for raised beds for 8 years.  The cost of untreated pine is $11.71 for 2″x10″x12′ or 9.8c per sq inch.  So the cost of constructing a raised bed with untreated pine is less than 1/3 the cost of a raised bed with composite materials.  And if my raised bed will last even 5 to 6 years I will be very happy.

the composite raised bed half of which serves as a simple cold frame
a one tier composite raised bed half of which serves as a simple cold frame

As a trial I purchased 2 10″by 12′ lengths and had the store cut each 12′ length into an 8′ and 4′ piece.  I also bought a 2″x2″x8′ stud for joining the corners.  It was quick work to construct the raised bed.

new raised bed constructed from untreated pine with steel rods buttressing the middles of the sides

Since the raised bed is on sloping ground and I wanted it reasonably level I had two choices.  I could dig the higher side into the ground or raise the lower side.  Since I wanted to reduce earth contact as much as possible (to minimize rotting), I decided to raise the lower side of the raised bed by placing it on surplus bricks.  The raised bed is reasonably level now.  I pinned the corners of the raised bed using 2.5″ weather resistant screws and also buttressed the sides with scrap iron rods hammered vertically into the ground.  I filled the raised bed with soil which previously covered rotted logs so it is rich in organic materials.  And then I added a wheel barrow of compost to the top and forked it in.  The raised bed is now ready for its first occupants and after the next rains, when it has settled, I will seed with root plants (carrots, turnips and beets) interspersed with my favorite kale seedlings.

new raised bed showing bricks supporting the lower side


a silver lining to faltering memory, also BMSB and IPM

I find that my memory does not work as well as in the past.  As a student I could easily memorize hundreds of law cases, now the labels I read one day are gone the next.  So where is the silver lining consolation?

I believe we have different skill sets and we compensate for those we lack.  The kid who can analytically unravel and reassemble complicated concepts  tends to be independent and does not require and consequently does not develop, good social skills.  The ambitious kid, who does not have this intellectual firepower, develops intuitive and empathy skills and thus can effectively recruit others to assist with or perform the tasks he/she finds difficult.  Perhaps it is our innate intellectual and physical abilities that fashion to a large extent our personalities?

So I am now more interested in how and why things happen than in the fact of their happening.  If I can link causation with result then my mind can re-navigate the route without having to remember the start or end point or even the directions taken.  An example from the recent GO conference (see previous post) was the excellent session on organic insect control by two entomologists from Auburn university.  I was particularly interested in their comments on the BMSB (brown marmorated stink bug) which is becoming the organic growers nightmare.  Not all stink bugs are pests and there are predatory stink bugs which are beneficial and whose prey are the pests we wish to eliminate.  You can google and find descriptions of the difference between the good and the bad stink bugs perhaps the shape of their shield or certain colorations.  But these are facts which must be memorized, not my strong point.  Much more helpful was the comment by one of the entomologists – look at their jaws/mandibles.  A powerful apparatus is for munching prey, a pointed beak type is for piercing and sucking out plant nutrients.  Now that logic I can recall without having to memorize.  As for eliminating this pesky pest they advocate trap crops and perhaps a vacuuming device tonguetwister titled “backpac bug vac”.  Worth pondering as I await the onslaught in late summer.

IPM (integrated pest management) was mentioned in several sessions and I found the schematic in the session on organic management of diseases easy to follow and remember.  At the base of the triangle are “preplant considerations” which includes soil fertility; site selection (for sun exposure, soil drainage); site preparation; rotation; using disease free seed and disease free planting material, timing of planting, spacing of plantings, plant selection (if a disease is blighting your crops then choose a disease resistant variety) and diversity of plantings. These are all logical first steps for before and at the time of planting.

Next level up are the biological controls which includes beneficials (this pm I transferred more lady beetles from the bathroom to the cold frames), Bt, and other ecologically sustainable techniques.

Another level includes physical and cultural controls such as row covers, lure traps, cultivation of weeds, sanitation,  and adequate irrigation (but not overhead spraying because of  foliar disease, especially in the hot humid Southeast).

And all the while observing and monitoring and if a certain threshold of pest/disease invasion is reached, then resorting as a last resort to nastier remedies which, while organic, will impact not only the bad guys but the good guys as well.  The basic premise is that healthy strong plants, which are not stressed (lack of watering is a big culprit) or injured, will be able to resist pests and diseases adequately.  If you grow organic you should be prepared to share, but not too much.

So this is all logical and dovetails with my growing experiences and this is one reason why I enjoy growing.  I sense that among sports enthusiasts recalling and recounting the details of past games and greats and scores is part of the pleasure.  Or the opera enthusiast who happily describes to those unfortunates within earshot how this particular aria though well delivered, does not compare with soprano A, in opera house B, in year C.  These feats are beyond me and I settle for the simple pleasure of trying to better understand, without committing labels to memory, what is going on in the outside spaces.

Georgia Organics conference – importance of nutrition

This weekend (Fed 22 -23) I attended the 15th annual conference of Georgia Organics (“GO”), which emphasized the importance of nutrition.  This was my 8th conference and each time I wonder if I will learn anything new and the result is always a resounding “yes”.  The organization has grown robustly.  Lots of young food activists.  I asked one last evening at the concluding Farmers Feast dinner why Atlanta has such a strong movement and he said “leadership”.  Atlanta has growing ethnic populations such as its Korean community but they are not active in GO.  Atlanta is relatively liberal, the rest of Georgia less so, but the support for GO is not confined to Atlanta.  Maybe it is economics and the growing realization that small farmers can only compete against the distant large scale farms with local niche products and that the label “organic” makes a very big difference.  And, of course, there is growing awareness of importance of good food and nutrition.  But give big credit to the leadership.  Certainly it was poor leadership in several large (supposedly top) companies I invested in which resulted in their disastrous outcomes so it is only fair to credit the leaders when the results are great.

The title of this year’s GO was “Farm Rx” with “Rx” being the abbreviation for a medical prescription and this represented a pivot (an increasingly overused term following our President’s pivot to the East) to the medical community.  Makes a lot of sense – if the influential medical community recognizes the importance of good food and nutrition to good health outcomes, what a big step this will be.  A key sponsor was Kaiser Permanente, a mainly west coast organization, and this will hopefully galvanize interest from the large local hospital groups (Emory, Wellstar and Piedmont).

The keynote speakers were very good especially Robyn O’ Brien who linked the food we eat to allergies and many of the serious illnesses we suffer, and gave her presentation a patriotic bent by asserting that bad food weakens our standing as a nation.  It is all about good nutrition.   I do not blame the food companies because I believe a company’s first duty is to its shareholder owners, which it fulfills by effectively and legally promoting and selling its products, thereby increasing its profits and their return.  Loyalty to employees and the community are, at best, secondary.  It is the government and the regulators and the practitioners and the consuming public who bear the responsibility for avoiding bad outcomes.

Another keynote speaker was Dr. Sanjay Gupta of CNN who interspersed his talk with a physical demonstration of the recommended and actual amounts of sugar we consume daily – mind boggling.  He included extracts from his one hour documentary “The Last Heart Attack” (easily googled).  Well presented with interviews with President Clinton and the outspoken Dr Ellestyn and his vegan diet.  I am focusing more now on the quality of my nutrition – I eat a lot of nuts and cheese and, following the documentary, I am resolved to cut back on, but not eliminate, oils (nuts) and anything which has a mother (meat, fish, chicken) and dairy.  My daily home machined cappucino treat will now use soy milk.

In my next post I include some insights from the workshops and lectures I attended.

——————–

Tadpole update – the tadpole bubble in the pond in the woods now only contains a few tadpoles.  Where are the others – eaten or surviving?  And then I noticed in the far corner, which catches the afternoon sun, several motionless below the water and only bestirring themselves when I got too close.

one of the tadpoles emerged from the bubble sunning in the shallow water
one of the tadpoles, now emerged from the bubble, sunning in the shallow water

Chicken update – the hens returned to egg laying duties a couple of weeks ago, except for the Ameraucana.  I assumed she might be too old.  And then this week – 3 dark green eggs!

horse manure control test

In March 2012 I performed a simple test to get some confidence that the horse manure I was collecting was not harmful to my plants.  The test indicated that my plants would not be harmed but the effect on worms was undetermined.  I had not visited the stables for some time until early this January I headed their way.  One of the immediate changes was the password controlled electric gate.  The new owners, a husband and wife team were welcoming, and when I mentioned I usually paid $20 per load of horse manure, the husband fired up his Yanmar tractor and we together headed for the manuring area.  The  previous owners used a John Deere tractor (30hp) which was occasionally  aggravating.  Kenny says he is very happy with his Yanmar.  Coincidentally, my Takeuichi bobcat has a Yanmar engine with untold hours (the hour gauge stopped working at 2,500 hours) and it works very well.

steaming horse manure nutrition from the stables
steaming horse manure from the stables

As the manure was being dumped into the pickup bed I noticed that they now use shavings in the stalls instead of straw/hay.  I preferred the latter though I am sure the shavings are cheaper.

a simple control test for horse manure
my simple test – a kale seedling planted in horse manure vs. compost

I decided to again test the manure.  I filled one yoghurt container with manure and the other with compost and inserted a 2″ soil block containing a  kale seedling into each, plus a 3″ worm.  And waited about a month.  And then examined the contents.  Both seedlings had grown at about the same rate and I was pleased to see their roots had extended well beyond the soil block so they had sampled their surroundings.

seedling roots in horse manure
white roots of seedling extending into the horse manure. note the fine horizontal roots I had not noticed until this photo

And as for the worms – both had disappeared.  I should have learned my lesson and included other soil life such as centipedes and millipedes.  Worms do tend to wander.

similarly sized seedlings a month later alternatively in horse manure and compost

So where does this leave me.  The Feb/Mar 2013 issue of Mother Earth News has an article “Killer Compost Update Herbicide Damage Still a Major Problem”.  The gist is that  persistent herbicides remain potent in composted manures and will damage crops to which they are applied.  The article did not focus on insecticides applied to pastures or dewormers or other chemicals given to livestock.

I recently read “Bringing Nature Home” by D Tellamy who makes a compelling case that we should protect and sustain all insects, including herbivore insects which are the ones which eat my vegetables.  His view is that these insects and particularly their larvae, provide food to predator insects and birds and thereby promote diversity of these species.  The book is very well written and castigates alien plants not only because they are invasive but also because it takes a long time for native insects to adapt to eating them and so they provide little nutrition and without natural enemies become more invasive.  To  test whether the horse manure is safe for insects I will now add centipedes and millipedes of which I have an abundance to the two containers and see how they fare.

taking a chance with citrus

My zip code says I am in plant hardiness zone 7 (0 to 10 deg F) .  With ongoing climate change and with use of micro climates, I coax myself that I am in zone 8.  Which means I can try my hand  at cold hardy citrus grown outdoors.  It’s a novel idea to think of growing citrus where I live.  But I love citrus, even lemons.  I used to chew on lemons until my dentist observed significant enamel erosion and presciently asked if I ate lemons.  End of my lemon eating, but oranges and grapefruit are high on my list and now I will try grow some citrus varieties.

I stumbled on the McKenzie farm’s website, which has a citrus grove in South Carolina .  Their latitude is 33.9N which is the same as Atlanta and is 0.5 degrees or about 35 miles south of my location.  Stan, the citrusman, was very helpful on the ‘phone and I decided to purchase 2 trees which he shipped in 1 gal pots (unlike all my other internet purchases, which are shipped bare root).  They arrived quickly with detailed and helpful suggestions on location and protection from the cold – such as wrapping the tree with Christmas lights and lighting them (the lights) if there is danger of a hard freeze and, if severe cold, throwing a blanket or plastic sheet over the lights.  Or using a passive solar heating system of 5 gal buckets of water around the trees, etc.

I ordered a Meiwa Kumquat and Owari Satsuma.  According to the website, the Meiwa, once dormant, can withstand temps in the mid teens and the Owari is very cold hardy down to 12F.

two cold hardy citrus
new arrivals, Meiwa and Owari citrus overwintering in the greenhouse

As can be seen above, the Meiwa had some small fruit attached which are delicious.  Rather than plant them in the ground now, I repotted them into 5 gallon former paint containers and have stationed them in my greenhouse and will plant them out in the spring.  The probable site will be on the top  of the hill which has excellent sun exposure and drains well and I will erect solid protection to the north and when next winter approaches, will use some of my surplus windows to protect from westerly winds.  There is a big windbreak to the south and I don’t get winds from the east.  I will also add boulders to sink heat and watch over them until they mature.  As the notes state: “Small trees will not tolerate freezes as well as larger, mature trees will.  Getting them to maturity is a challenge but it’s one that will reward you greatly.”  And then, perhaps, I may enjoy my own citrus grown fruit in upper Georgia.

delicious sweet Meiwa citrus

when it rains incessantly – then build a bat house

Rain has been unrelenting in the Atlanta area.  I have captured all I can in my storage tanks and contour ditches and I hope most of the surplus is recharging the underground reservoirs and not running for the Gulf.  So, with little to do outside, I decided to build a bat house.

I am increasingly relying on natural predators to combat pests.  Because the weather has been unusually warm, a number of pest families are happily populating themselves on my lettuce in my cold frames.  So I was pleased to see that the ladybugs, which overwinter in the logcabin, have also turned their thoughts to population expansion.  I captured several preoccupied couples and gently deposited them on the lettuce plants in the cold frame and hope, when their immediate priorities have been satisfied, they will turn their attentions to food snacking and find something worth eating.  My biggest challenge will be towards the end of summer when the BMSB (brown marmorated stink bug) returns.  Neighbors suggested using a nicotine spray (cigarette contents liquified) to fight them but yesterday a visitor, who is a local master gardener, was surprised with this concept and said I could be turning tobacco mosaic virus loose on my tomatoes.  Some research is needed here.  But, back to the bats which are great predators of night insects (moths) and are surely, a more natural and effective solution than using red light traps and lures.

I recently replaced 23/32 plywood sheathing on the Atlanta house with hardiplank cement siding (a much better long term solution) and the weathered plywood sheathing has waited patiently for a new use – why not, for starters, a one chamber bat house.  Several websites offer finished models or books (thin books <60 pages >$8) but with little effort I found a great conservation website with free instructions for my bat house:  http://www.batcon.org/pdfs/bathouses/SingleChamberBHPlans.pdf.

I shall be attaching the bat house high up on the east side of my barn where I know there is bat activity.  My  raw materials outlay has been modest – just a 1″x 2″- 8ft length of cedar for $2.47.  The cedar is a compromise since I did not want to use treated wood and untreated pine wood will not endure.  I hope bats do not have an issue with cedar.  All the other materials were either left overs or recycled from disassembled structures.  I also decided, when I saw the price, to buy a second circular saw.  I have a heavy duty professional model which I keep in Atlanta and am using to cut the hardiplank.  Lowe’s was selling a light duty Blue Hawk saw for $30 and I decided to splurge and will keep it at my log cabin and, if it should be stolen, it will be an easier loss to bear (by the way it works fine).

The one chamber bat house is simple to construct – you just follow the plan provided by the website.  The plan suggested applying 2 coats of dark, water-based stain to interior surfaces.  I skipped this step.  Not sure of the logic here.  If the intention is to reduce wood deterioration then the stain should be an exterior stain which has all types of nasties to prevent mildew etc.  Interior stains make the wood look nice and I am sure this is not high on the bats’ preferences.  Even linseed oil has inorganic components.  So I skipped the interior decoration but I did roughen the backboard as recommended by cutting horizontal grooves with the circular saw.

bat house
the bat house backboard with horizontal scored grooves and central support spacers to minimize warping

For the exterior, I first applied a good primer.  The unpainted area at the bottom is the landing board from which the bats enter the chamber.  The width between the front board (facing the photo) and the backboard is only 0.75″.  I would have made it wider but those who produced the plan know better than me.

bat house with landing strip
bat house with white primer and 0.5″ vent space and landing area at the bottom

I assume self-respecting bats prefer natural wood colored habitats for their bat house and not a glossy white exterior and so I added an exterior solid brown stain.  I also cut out a piece of surplus roof sheeting and folded it over the top to provide a roof for the dwelling.

bat house with roofing material
the bat house – finished product

Now all I have to do is wait for the rain to stop as it eventually must and then I will attach the bat house to the barn and await the new occupants.

short-night veggies

I was aware of but didn’t not pay much attention to the long-day and short-day preferences of certain vegetables.  I knew that with onions, since I live in the south, I needed to grow the short-day variety.  But that was it – until recently.  In spring last year I had a lot of success with radishes and beets and so this past fall I seeded the ground again with  radishes, beets and, for good measure, turnips.  Only the turnips grew, excepting a couple of sorry looking beets.  Got me wondering.  The seed was purchased this year, so it was good, so why were the radishes and beets so reluctant?

I am studying a couple of biology textbooks and reached the chapter on plant sensory systems and “photoperiodism”, which is the response of an organism to the relative lengths of day and night (the “photoperiod”).  Radishes, beets, spinach and lettuce are called long-day plants but this is confusing, they are really short-night plants.  The distinction is important – the plant is concerned with the length of the night not the length of the day.  It would seem this is a distinction of little importance but it does have significance.  A short-night plant monitors the length of the night so if sun down is 5pm and sunrise is 8pm producing a night of 15 hours (9 daylight hours), a short-night plant which requires a short night of 10 hours, will not be motivated to germinate, grow or flower.  However, if the night is interrupted by a short period of bright light, the plant concludes that this is a short-night, even if darkness returns when the light is snuffed.  So, theoretically, half an hour of light interrupting 15 hours of darkness can convince a short-day plant that the time has arrived to grow.  If, instead, the plant monitored the length of the day and required say 14 hours of daylight (the converse of 10 hours of night) and there are only 9 daylight hours, I would have to provide an additional 5 hours of light instead of the 0.5 hour of light calculated above.

I have given up on the radishes and beets – hopefully they will get going in spring.  But I seeded lettuce indoors (initially 0.75″ seedblocks transferred to 2″ seedblocks) and I germinated spinach seed in the refrigerator, and I would like to get some lettuce and spinach this winter.  I have a simple unheated, good sun exposed, greenhouse and I prepared a growing medium of soil and compost and planted out the lettuce soilblocks and germinated spinach seed.  To make the long nights short, I decided to use the flourescent lights which I had installed for a neighbor to encourage her chicken to lay eggs in winter.  (My chicken keeping days began when my neighbor headed north and gave me her chicken).  Chicken need 14 to 16 hours of daylight to be stimulated to lay eggs.  I have discontinued this practice for my chicken.  To my mind it requires a big effort for a chicken to produce eggs every day or so and I have given my chicken the winter off to recuperate.  They have filled out and look good during their wintry vacation.

So, I had available flourescent lighting and an external use 3 prong timer and all that was required was to position the lights and set them to switch on from 12am to 12.30am.  Initially I thought I would lay the light holder a few inches above the grow trays thus giving the plants maximum exposure.  After pondering this simple solution I realized that if I did this the light holder would block the sunlight and make watering difficult.

short-night vegetables
initially the fluorescent lighting, for interrupting the night for short-night vegetables, was located just above the grow bed

So I screwed together a simple beam structure using oak sapling trunks, which was cheaper and more green than buying 2 by 4’s, and it was done.  Now I will monitor the growth of the lettuce below the fluorescent tubes compared with lettuce in the cold frame outside and see if there is a difference.  A concern I have is that plants respond best to certain light wave-lengths (red light at 660nm) and the flourescent lighting is not the ideal wave-length (500nm – 600nm).   Although, importantly it is not the far red spectrum (735 nm) which actually switches off the growth response.  So, wait and see if interrupting the night will dupe the short-night vegetables.

short-night vegetables
the lights are now high enough above the growing bed of short-night vegetables to not interfere with daylight or watering

wood ash and the van Helmont experiment

On cold nights I burn wood in the hearth.  Really inefficient with most of the heat going up the chimney and I am resolved to install, some time, a good wood stove.  However, what puzzles me as I stare at the burning embers is why there is so little residue from the logs.  The amount of ash remaining depends on several factors such as type of wood, moisture content and heat of combustion.  Seasoned wood has a moisture content of say 20% (water represents 20% of the total weight).  The ash remaining has a weight equal to say 1% of the weight of the wood logs.   So, after excluding the weight of the water (20%) and the ash (1%) almost all of the dry weight of the wood (79/80) goes up in the air.  And yet I thought that much of the weight of plants and trees came from soil ingredients, which I supposed were inflammable and had mass commensurate with the weight of the vegetables harvested.  And so, after big food harvests, I diligently supplemented the growing areas with compost.

wood ash after hours of burning
little ash remaining after much log burning

In 1600 before the advent of classical science and fancy measuring instruments, van Helmont conducted the famous willow tree experiment.  In his own words:

“I took an earthen pot and in it placed 200 pounds of earth which had been dried out in an oven. This I moistened with rain water, and in it planted a shoot of willow which weighed five pounds. When five years had passed the tree which grew from it weighed 169 pounds and about three ounces. The earthen pot was wetted whenever it was necessary with rain or distilled water only. It was very large, and was sunk in the ground, and had a tin plated iron lid with many holes punched in it, which covered the edge of the pot to keep air-borne dust from mixing with the earth. I did not keep track of the weight of the leaves which fell in each of the four autumns. Finally, I dried out the earth in the pot once more, and found the same 200 pounds, less about 2 ounces. Thus, 164 pounds of wood, bark, and roots had arisen from water alone.” (Howe 1965)

van Helmont believed that the 2 ounces loss in soil weight was a measuring mistake and that all the additional weight of the tree came from water.  We now understand photosynthesis where water and carbon dioxide are transformed into sugar (glucose) and that typically, 96% of the dry weight of plants is made up of carbon, hydrogen and oxygen which are obtained from water or carbon dioxide.   And the 2 ounces of soil missing in the van Helmont experiment represented vital macro- and micro-nutrients which are critical for the health of the soil.

So, I now realize that my challenge is not to replace soil consumed by my plants but to ensure my soil stays in balance and that I maintain an adequate supply of essential nutrients – light in weight but heavy in importance.  And I carefully save and disburse the wood ash as part of the recycling process, except to my acid loving blueberries and other low ph plants.

the Bermuda grass campaign ctd.

In my 9/21 post I described various tactics I am using to eradicate Bermuda grass organically and how I covered an area with 6mm thick commercial grade black plastic.  Bermuda grass likes heat and rather than try solarize it with clear plastic (and this would only have possibly worked if I had tried this before the onset of summer), I thought completely depriving it of light might be more effective.

Today, some 3 months later, I decided I needed some of the covered area to plant out my remaining garlic cloves.  Also I was curious to see what effect the exclusion of light had on the bermuda grass.

bermuda grass
Bermuda grass area covered with thick black plastic 3 months ago

I lifted some of  the black plastic covering,  forked up a chunk of soil and pulled on the Bermuda shoots.  To my surprise they slipped easily out of the soil, much more easily that an adjacent area which I had just finished clearing.  So I decided to look more closely and noticed that the fungi strands on the ground, which I associated with the wood chips I had dumped the previous year, were actually decomposing the roots on the Bermuda grass shoots.  Without their roots, the Bermuda grass shoots slid easily out of the moist soil.

Bermuda grass infested with fungi
fungi from woodchips laid the previous year have invaded Bermuda grass roots

So the fungi attacked the roots.  I am assuming this is decomposing (saprophytic) fungi (rather than parasitic) and they migrated from working on the wood chips.

successful attack on Bermuda grass
another photo of the fungi decomposing the roots of the Bermuda grass

This could mean that either the Bermuda grass had died or had gone into a very deep withdrawal.  Bermuda grass hibernates every winter – it turns white and to northern visitors looks as if it is dead.  But in the spring the green shoots appear and, as the weather heats up, it comes vibrantly to life.  But I have not seen fungus attack overwintering Bermuda, so it seems likely that the black plastic covering had a significant effect.

I shall leave some of the covering in place through spring and then see if the grass can rejuvenate itself, and if it doesn’t then this will be a viable non manual yet organic way to combat Bermuda grass – establish fungi, seclude the grass from light and let the fungi do their work.

In the meantime I shall continue clearing the now vulnerable Bermuda grass from more of the area so I can install garlic and several varieties of kale which should do well in the winter in this very sun exposed site.