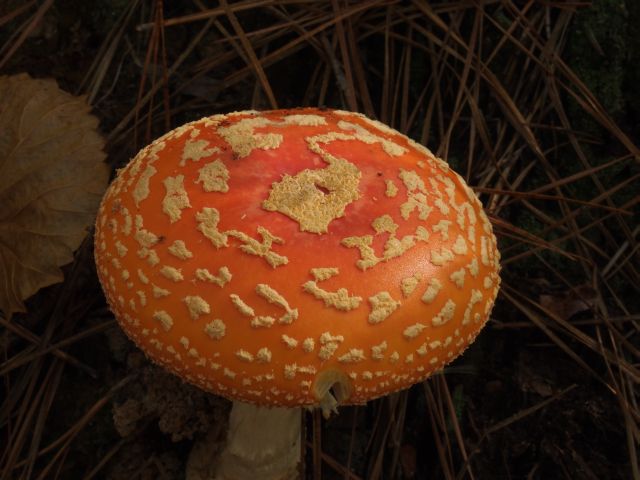
As anticipated, the recent heavy rains kickstarted fungi activity in the woods. Lots and lots of different mushrooms.
this type proliferates near the tractor building
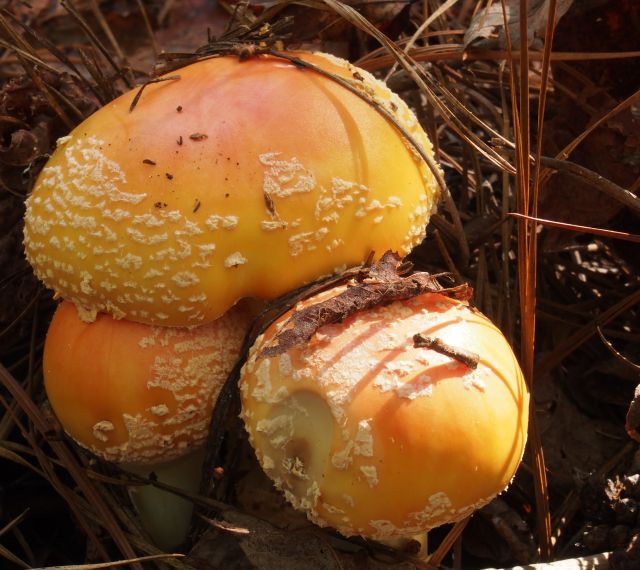
The one above is for me the most attractive. Here is a grouping of various ages.
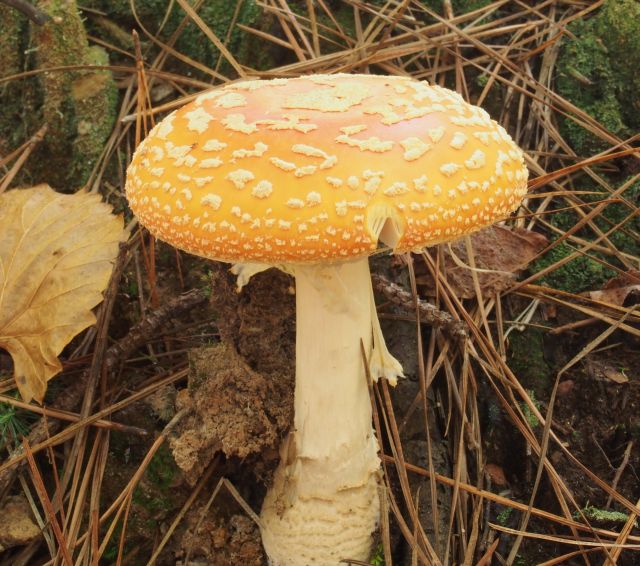
a threesome
And yet another pic.
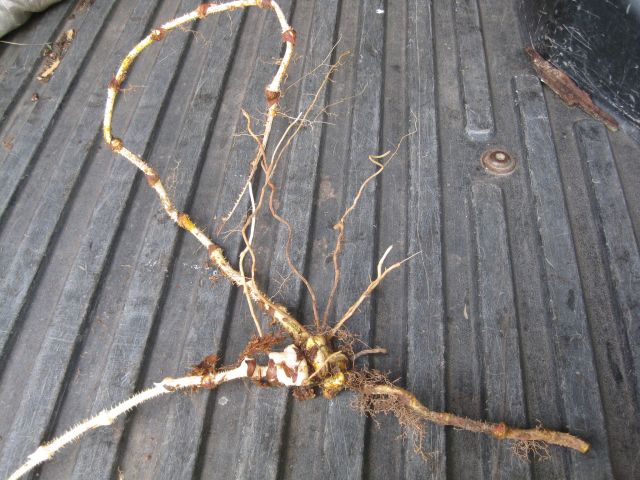
Brier
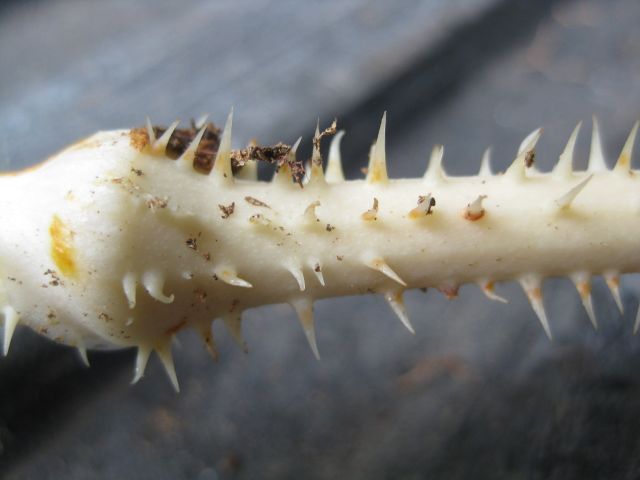
I last cleared the area between the house and the road in October 2012 and worked hard to remove the bramble and brier. Three years was too long to wait and again my oak saplings were submerged below pines, poplars and snared with brambles. And again I met brier. Above the ground they look ordinary – thorny stem and leaves, but below the surface they resemble a horror film monster.
all of this was below the surface – the upper half resembles a scorpion’s tail
And close up they look like the jagged snout of a swordfish.
And below is the production center, or so I think, with bulging sacs of new monsters waiting to emerge.
I think it is the ghostly white, untouched by sun, which gives menace
Oak
A neighbor in our Atlanta subdivision decided to have a tree removed. I saw the trucks and heard the revving chainsaw and wandered over. What type is it I asked the supervisor? “It’s dead” he said no doubt thinking I was questioning the act. Then hearing me better 2nd time round he said it was an oak. And he said I could take as much as I wanted. So with my trolley I headed back and forth and collected a lot of logs.
firewood enough for several winters, which I will split with a maul and some filial assistance
They also unloaded a truck full of oak chips which I will distribute around the Atlanta yard and apply at the farm. So, I suppose, a silver lining in every cloud.
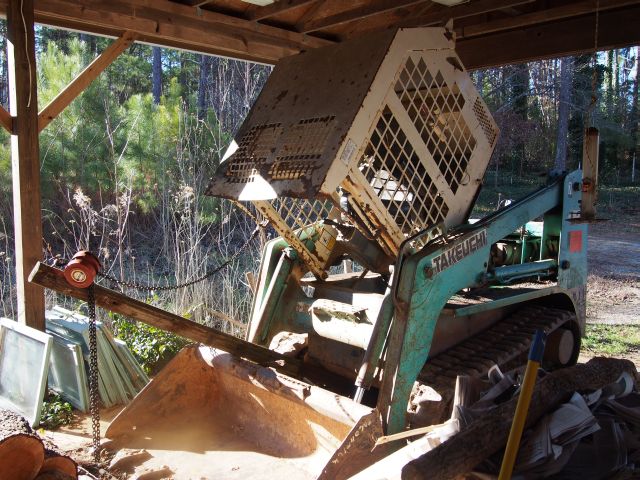
After some cold nights (12 below freezing) my Takeuchi bobcat refused to start. Cold and tired battery. The best way to charge the battery is to pull the cab forward on its hinges and then you have direct access to the battery. It is heavy and best done with an assistant. In the past I had an anchor point in front of the Take and winched the cab forward. However, there was no anchor point for the Take this time just a 2,400 gal rainwater tank. The last time I had no anchor point I attached the negative charging wire to the body and the positive to a nail which I inserted into a slot in the fusebox. I really didn’t want to do this again. So I pondered and created my own anchor point. I found an 8ft fence post, located it between the loader and the body of the Take, attached a hook and winched the cab up. Effortless and the charging was uneventful.
raising the cab of the Take
work in the orchard
This year, for the first time, my first row of apple trees produced apples but the second row which is nearest my neighbor’s fence did not, and the trees appeared lackluster. I diagnosed this to competition from vines, shrubs and small trees, some of which have thick roots 10ft long which have been out competing my apple trees for compost nutrients. I am avidly reading The Holistic Orchard by Michael Phillips in order to thwart the pests that nourished on many of my apples. He makes the interesting point that wood chips from hardwood trees create beneficial fungus for fruit trees. So I have worked hard to clear the growth between my trees with an eyehoe (what a wonderful invention). I then spread manure from the stables, layer newspapers thickly and now, with my Take recharged I ferry loads of woodchips and dump and spread over the newspapers.
mulching the orchard
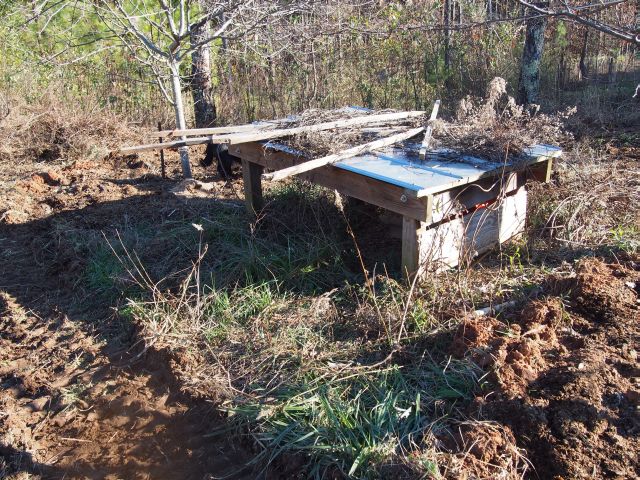
When the orchard is respectable I will bring in a flock of helpers to scratch and turn up over wintering pests. A couple years ago I improvised a simple chicken shelter which has a couple of nestboxes and I will clean it up for my chickens.
simple chicken shelter in the orchard
water and nutrient infiltration
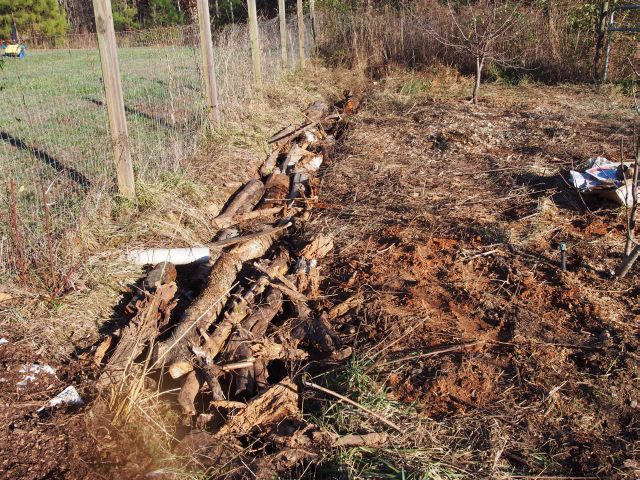
I dug a trench alongside part of the orchard to capture and infiltrate rainwater run off. I am now filling it with hardwood (mainly) logs, the idea is that the wood will decompose and the nutrients and fungi will benefit my fruit trees along the lines suggested in The Holistic Orchard book (and will also physically block the growth of tall weeds in the ditch).
various logs stacked in the rainwater ditch
clearing the slope bordering the vegetable growing area
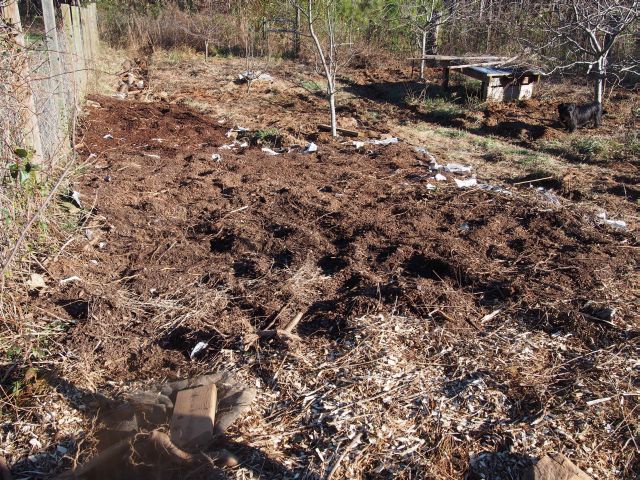
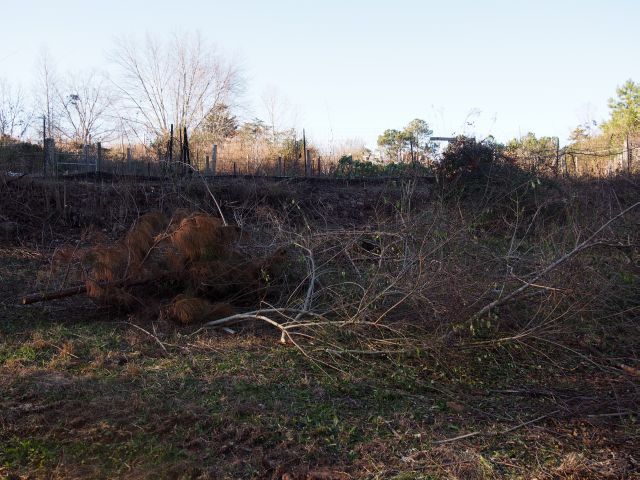
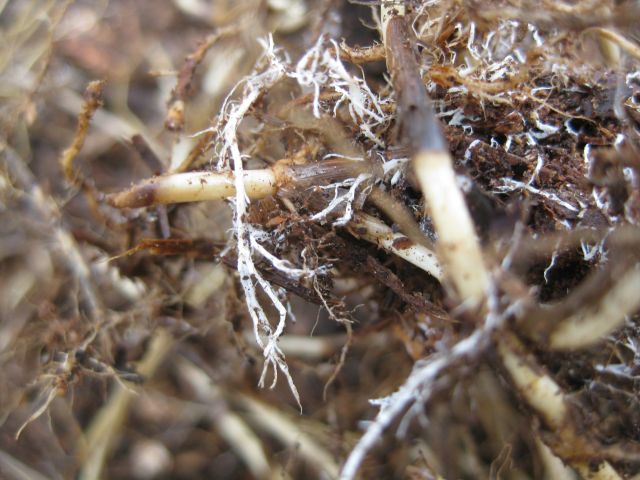
My main vegetable growing area is fenced in and along the southeast border a thicket of privet and briar sprung up over the past several years. I tolerated the growth since I reasoned it provided vantage points and shelter for insect loving birds which were helping me control pests in the vegetables. However there were two problems – a) the roots invaded my raised beds – there is one type of small tree which has very long wily roots which evaded all my attempts to obstruct it; b) in the winter, when sunlight is dear, the wild hedge blocked the sun from my frost ridden beds. So I worked hard to cut down and remove the growth and have been chipping away with the chipper, carried and powered by my tractor. This mulch I have also been adding to the orchard. Some chipping remains and when the clay soil has dried I will bring out the tractor again and chip away.
some of the small trees awaiting chipping in the foreground and the fenced growing area at the top of the slope
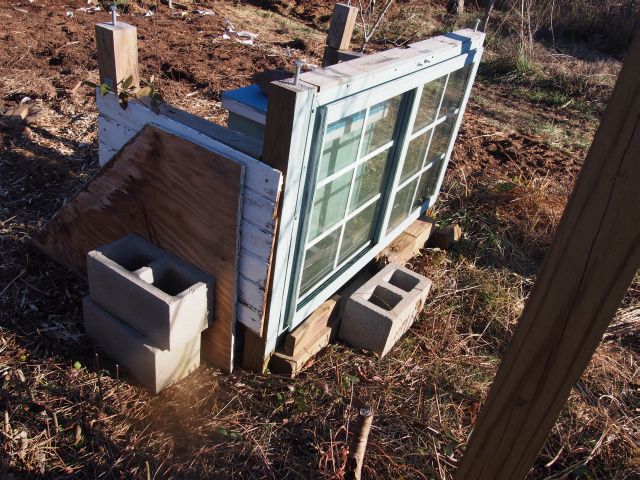
winter hive protection
My bee hive faces south. Chilling winds tend to come from the west and north. On the west side I have a window which allows the sun but not the wind access to the hive, and on the north side I have plywood protection.
the sheltered winter protected bee hive
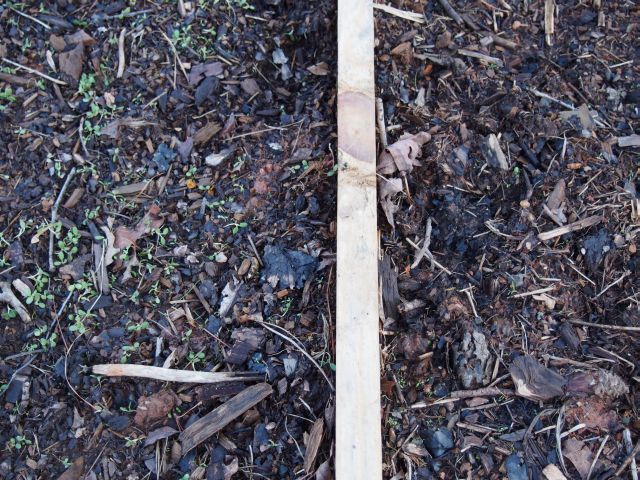
how the clover fares
I recently installed a 20ft by 4ft raised bed and sowed half of it with crimson clover and the other half with white (ladino) clover. The crimson clover is larger but both seemed to germinate equally well. However, following the recent cold, the ladino clover almost disappeared while the crimson is holding on well. Will be interesting to see how they comparatively perform in the spring.
the crimson clover is on the left of the divider and the barely surviving ladino clover is on the right
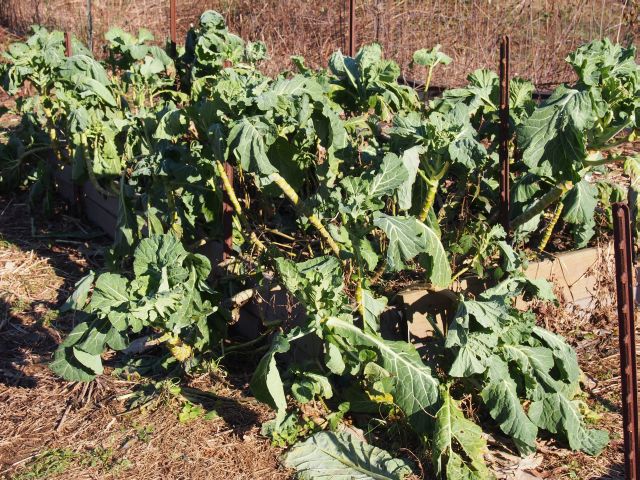
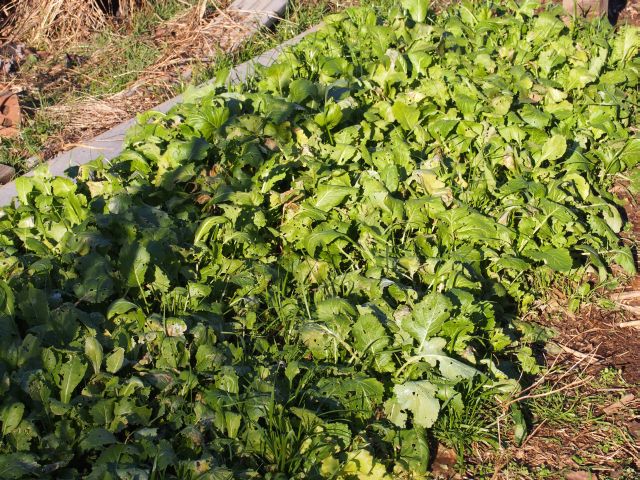
veggies for eating
.I am not using crop covers right now and my collard and turnip and mustard greens are surviving, tho at time the collard looks a little bedraggled.
tasty collard for the picking
A tasty (and healthy) dish is newly hatched eggs (yes my younger hens are laying in the winter without artificial lighting), collard, greens and garlic stir heated, eaten with home made whole wheat bread.
lots of winter greens which keep growing in the winter
So these are some of my winter tasks. And on the inclement days, Coursera, the free online college course compendium, awaits. I just completed calculus, precalculus and a fascinating history on mankind from 250,000 years ago to the present.
In a recent post I mentioned that mushroom production in my mushroom shelter has been poor due to inadequate watering. The system I installed had a 0.5″ diameter water pipe run from a nearby slightly higher rainwater collection tank to the ceiling of the mushroom shelter from which the water flowed via bubblers onto the spawn impregnated logs. Water flow was weak and the bubblers often clogged.
source of water for mushroom shelter is the elevated rainwater collection tank which collects from the north facing roof
I rectified this by replacing the 0.5″ diameter pipe with a 1″ pipe and by eliminating the bubblers and using adjustable .75″ pipes to torrent the water onto the logs. I do not have the dispersion I had with the bubblers but the flow is strong and there is no clogging – any debris is blown out.
rainwater from the storage tank directed by adjustable pipes to the mushroom logs (ignore the horizontal white pipe)
Another watering improvement I made is to collect rainwater from the roof of the mushroom shelter and direct it onto the logs. First step was to install a gutter.
gutter attached to catch rainwater from mushroom shelter roof with pronounced dip to the left to feed into 4″ elbow
The open lower end of the gutter feeds into a 90 degree 4″ elbow attached to a 10ft 4″ water pipe. I crumpled chicken netting into a ball and inserted it into the open end of the elbow to trap leaves and debris before they entered the water pipe.
gutter on mushroom shelter feeds into elbow with protective chicken wire
It was then a simple matter to lead the 4″ diameter 10ft pipe into the shelter, cap the far end, and secure it ensuring it dipped from the elbow end to the capped end. With a power drill I made holes staggered along the length of the pipe.
4″ diameter 10 ft water pipe in place with staggered holes to ensure good coverage of mushroom logs
The improvements should ensure more reliable mushroom production.
In my 9/21 post I described various tactics I am using to eradicate Bermuda grass organically and how I covered an area with 6mm thick commercial grade black plastic. Bermuda grass likes heat and rather than try solarize it with clear plastic (and this would only have possibly worked if I had tried this before the onset of summer), I thought completely depriving it of light might be more effective.
Today, some 3 months later, I decided I needed some of the covered area to plant out my remaining garlic cloves. Also I was curious to see what effect the exclusion of light had on the bermuda grass.
Bermuda grass area covered with thick black plastic 3 months ago
I lifted some of the black plastic covering, forked up a chunk of soil and pulled on the Bermuda shoots. To my surprise they slipped easily out of the soil, much more easily that an adjacent area which I had just finished clearing. So I decided to look more closely and noticed that the fungi strands on the ground, which I associated with the wood chips I had dumped the previous year, were actually decomposing the roots on the Bermuda grass shoots. Without their roots, the Bermuda grass shoots slid easily out of the moist soil.
fungi from woodchips laid the previous year have invaded Bermuda grass roots
So the fungi attacked the roots. I am assuming this is decomposing (saprophytic) fungi (rather than parasitic) and they migrated from working on the wood chips.
another photo of the fungi decomposing the roots of the Bermuda grass
This could mean that either the Bermuda grass had died or had gone into a very deep withdrawal. Bermuda grass hibernates every winter – it turns white and to northern visitors looks as if it is dead. But in the spring the green shoots appear and, as the weather heats up, it comes vibrantly to life. But I have not seen fungus attack overwintering Bermuda, so it seems likely that the black plastic covering had a significant effect.
I shall leave some of the covering in place through spring and then see if the grass can rejuvenate itself, and if it doesn’t then this will be a viable non manual yet organic way to combat Bermuda grass – establish fungi, seclude the grass from light and let the fungi do their work.
In the meantime I shall continue clearing the now vulnerable Bermuda grass from more of the area so I can install garlic and several varieties of kale which should do well in the winter in this very sun exposed site.
cover crops – I cleared the tomatoes and weeds, added compost and sowed winter rye and crimson clover. A few years ago I used hairy vetch, which worked well and next year I will order more since the local supplier, who originally sold me the seed, no longer carries it.
a vegetable growing area seeded with winter rye and crimson clover cover crops
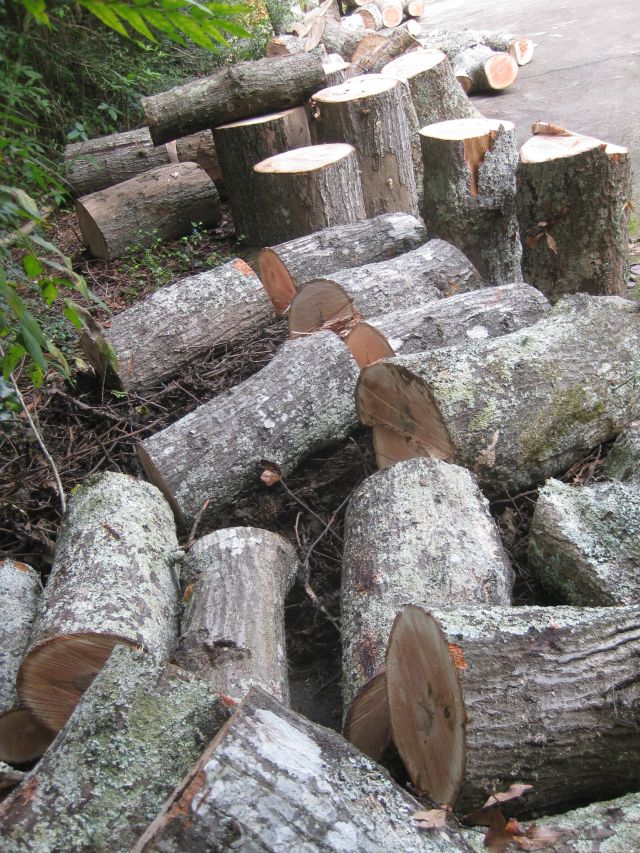
firewood – during the year I cut a new 5 foot wide route through the woods and I steered the path to avoid the larger trees. I had to uproot and remove smaller trees and I cut their trunks into 5 foot lengths and stored under cover for fuel for winter. I am now chain sawing the wood into 2 foot lengths to fit the grate. Last Sunday was cold and the wood burnt well.
firewood stored under cover drying for winter use. I have used some of the oak trunks as mini posts for structural jobs
firewood cut to size next the fireplace
mushrooms – I built a mushroom house, which I filled with logs impregnated with sawdust spawn, and then neglected to water. A few weeks ago I watered the logs and some oyster mushrooms have surfaced. Encouraged, I shall water more regularly. Also I must affix a gutter to the roof of the shelter and direct the rainwater onto the logs – this is obvious and I should have done it at the outset.
mushroom shelter with solid sheeting or barrier cloth on north and west sides for sun protection, and chicken wiring and door protecting remaining access pointsmushrooms have begun to grow
winter growing shelters – last year I was able to purchase a number of wooden windows for a $1 each and constructed rudimentary cold frames. This year I would like to create a larger structure but to do this I need posts. Pressure treated posts would be ideal but I do not want to pollute the soil or my vegetables. So the options are cedar wood (which rots with time), composite posts (which are expensive and may distort), metal structural posts (ideal but where will I find them) or use some oak trees from the woods (cheapest, self reliant and maybe the way to go). In the meantime I painted the wooden windows, first with Kilz primer and then a good quality exterior latex.
painted windows drying in the sun
seed gathering – now the cosmos and zinnia have finished flowering and set seed, I sortie out to gather seed for next year.
ebullient cosmos in a field
rainwater collection – when it comes to my rainwater harvesting systems the invariable rule is that it will fail wherever I have not checked. The main flow from the house roof went through a “Y” and the “Y” leaked in small amounts and eroded the ground supporting the connection so one of the 4″ pipes disconnected (maybe also assisted by the rodent hunting activities of my dog).
this is the old, cheaper, now replaced Y connection
I replaced the old Y with a more substantial Y, I rebuilt the underpinnings and I secured the inlet pipes to the Y with duct tape and am resolved to keep a good eye on this joint and have instructed Trudy to leave the water drainage pipes well alone.
rainwater harvesting – the more expensive replacement Y secured with duct tape
winter vegetables – I decided to seed more lettuce since I already have sufficient kale. The lettuce was seeded initially into 3/4″ soil blocks and are now in 2″ soil blocks in the greenhouse. I will probably grow some full size in the greenhouse and the remainder will be ground planted once I have figured out the construction of my new windowed winter shelter.
4 varieties of lettuce seedlings in 2″ soil blocks. the reason there are several in one block is this was older seed and I thought germination would be irregular. silly me, they all came up and I will have to thin or transplant.
cuttings and acorns/nuts – I have taken cuttings from trees I would like to replicate like mulberries, pears (my neighbor’s pear tree was prolific this year and my Giant Korean, which bore for the first time, was excellent), cherry, plum and one of my neighbor’s apple trees which had very sweet small apples. I know with the apple tree I may have a problem with the root stock. Perhaps next year, when I am successful with grafting, I will graft scions to root stock. As for nuts – my other neighbor gave me a dozen pecan nuts from his magnificent pecan tree and I also buried Ohio buckeye nuts, acorns from selected oak trees and nuts from other local trees. The cuttings and nuts are in an area which I visit and weed and water most days, with good sun exposure and the soil is well mixed with compost. So I am hopeful. If the cuttings are viable I may transplant them in spring next year or, better, wait till fall and then plant them out with the nut seedlings.
in earlier posts I mentioned other activities such as terracing the hill in anticipation of delivery of assorted fruit trees promised for the end of November, and winterizing the bee hives and the chicken coop. When really cold weather threatens I will wrap my fig and other cold sensitive trees in swadling and leaves to prevent die back.
My permaculture readings have focused me on developing an edible forest garden and earthworks figure prominently in my designs. Although I already have a number of different fruit trees in my orchard I decided to expand the selection and expect, by the end of November, to receive 2 goumi, 2 pawpaw, 3 kiwi (2 female, 1 male), and a medlar, aronia, sour cherry, and juneberry. With these pending arrivals I have been at work preparing their planting sites on the side of the hill.
The earthworks are dug by my scruffy Takeuchi tracked bobcat. My approach is to terrace the slope with the terrace canted to the slope and with a contour ditch in the middle of the terrace. So rainwater on the terrace will move to the contour ditch and that which misses the contour ditch will move to where the terrace intersects with the slope. I fill the contour ditches with logs, for several reasons: a) my readings suggest that grasses promote bacteria and trees promote fungi and since the slope was grass covered, by filling the ditches with rotting tree trunks I am hoping to accelerate beneficial fungi in the soil; b) the contour ditches are a couple feet deep and without infill it is easy to fall in; c) if the ditches are left as ditches, they are quickly invaded by vegetation which competes with the tree roots and hides the location of the ditches (facilitating (b) above); d) parallel with (a) the tree trunks will provide nutrients to the soil as they degrade and will absorb and retain water for the benefit of the plantings.
earthworks – a view of my new terrace showing the grading toward the slope and the cut made into the face of the slope
After grading the terrace I planted winter rye and crimson clover on the exposed earthworks and watered every couple of days with rainwater. I have marked the location of the future tree plantings with stones – they will be at least 15 ft apart. And, since my comfrey did so well this year, I have planted out root snippets from a couple of my comfrey plants.
earthworks – terrace and contour ditch – looking north you can spot the winter rye seedlings. interspersed amongst them are crimson clover seedlingsearthworks – terrace and contour ditch – I am fortunate to have degrading tree trunks for filling the ditch
I created a second terrace as an extension to the terrace and tree plantings I made last year.
earthworks – terrace with contour ditch and tree trunks, follows the same principle as the one above and the two together will accommodate the new arrivals
And while I was at it I went back to last year’s terrace, deepened the contour ditch and filled it with tree trunks which had been left on the property by a previous owner.
earthworks – last year’s terrace upgraded to include tree trunks in the contour ditch. The cosmos and aster are still in bloom and the air is heavy with bees
The oyster mushroom is one of the easiest to grow. Available free on the internet is a +300 page handbook on oyster mushroom cultivation which has as its central premise that: “Mushroom cultivation has been evaluated as an effective means for poverty alleviation in developing countries due to its possibility of low cost production, high profit and quick return”. A handy insight into mushroom growing around the world.
I purchased grain spawn grey dove oyster (Pleurotus ostreatus) in February and today I harvested some of the mushrooms from my grow box and sauteed them with olive oil and chopped garlic – delicious. In fact the whole meal was delectable – home made whole wheat bread, home brewed dark German style beer, free range eggs (my hens are producing approximately 9 a day) and mounds of garlic, lettuce and other greens from the raised beds.
But to return to the oyster mushrooms. I have two operations going – an outdoor mushroom shelter where I am waiting for them to emerge from tulip poplar logs, and an indoor grow box. For the grow box I submerged a bale of straw in water for several days, then packed the straw (substrate) into a plastic grow container which is 36″ long, 22″ wide and 7″ high, sprinkled with grain spawn.
after thoroughly wetting the straw, time to empty the water
plastic grow container packed with straw sprinkled with grain spawn
grow box incubating in warm, dark enclosure
straw blanketed with mycelium
I enclosed the container fully in a black trash bag for a few weeks in the upstairs room where it is warm, checking that it was moist at all times. The black trash bag prevented cereal seeds from sprouting. When the fungus (mycelium sounds better) had colonized the straw (the straw was covered with a soft white layer), I made a plastic (see through) tent over the container to maintain a high humidity level.
wood frame for plastic tent
plastic tent enclosing grow box
My first mistake was to allow outside light to hit the container. The mycelium staggered from the light onslaught, visibly slowed its efforts and appeared to assume a yellowish pallor – presumably it was thinning and showing the straw underneath . I moved the container to a less bright area of the upstairs room and hoped growing activities would resume, but when activity had obviously abated, I concluded the room temperature was too high (my second mistake). So I relocated the container to the basement where it is cooler and there is some but not much outside natural light. And the mycelium got back into the swing of life and began growing actively. I have also been adding coffee grounds from my cappucino machine (my afternoon indulgence) and the grounds have been colonized but have not yet produced mushrooms.
The next couple of days I shall be at the Georgia Organics annual conference held this year in Columbus GA, south of Atlanta. This shall be my 5th year of attendance – my first few years I learned a lot and with each year there is less new information but I enjoy meeting other growers and learning from them. I was torn between doing a permaculture design course or the conference and have not ruled out a PDC for the future.
Shiitake mushrooms
I picked about 15 mushrooms today. Just as well I enclosed the growing area since, as I approached the shelter, I startled several large white tail deer, which are not usually there and may have been attracted by the smell of the mushrooms. Notwithstanding my enclosure, someone small, perhaps a squirrel or smaller, did get in and savored a few chunks.
Shiitake mushrooms growing from 5 year logs
Today I also prepared another maple log with oyster mushroom spawn, this time grown on birch dowel plugs. You can notice, in the photo below, on the center maple log the holes on the face of the log where I inserted the plugs and then covered with melted wax. I also inserted plugs on the exterior trunk.
maple log with oyster mushroom dowel plugs
Another mushroom venture earlier this week was to soak straw for 5 days in a large trash bin weighted down with a cement block. I located an unused plastic container, placed a sheet of wet cardboard (corrugations exposed) on the bottom and built up layers of oyster grain spawn and the wet straw. I fitted the container with its lid and, since the contents were rather cold, I placed the container in a black trash bag and left it outside in the sun for a few hours to warm up. Once warm, I transferred the brew indoor to a warmish location and I will leave it (in the black bag with access to some air) for a while until I see results, which I hope will be masses of white mycelium and not green/black bacteria blobs.
straw substrate for mushroom bed
You can see below the container in which the grain spawn and straw was packed.
oyster mushroom growing bed
Cold frame
My two cold frames are performing as expected. My regret is that I did not start them at the beginning of winter. Had I done so I would have had larger pickings. On warm days I lift off one of the windows to prevent temperatures rising too high, as you can see in the photo below.
cold frame at top of hill with modest sized vegetables
Both cold frames have internal irrigation (gravity fed from my rainwater tanks) so watering them, which must be done every couple days, is an easy matter. When spring truly arrives I shall remove the windows and grow squash in the frames protected by row crop covers. My squash has always been nailed by squash borers and perhaps this year I will be successful.
cold frame at bottom of hill with window temporarily displaced until day's end
Muscadine transplants
It appears that 11 of the 12 muscadine grape vines I transplanted have survived. I know well why the one muscadine failed. It takes much effort to relocate a muscadine – their roots travel far and wide and, so long as I limited my efforts to two a day, all went well. It only takes about an hour to transplant a muscadine but when you are tired and impatient it is easy to tear off the roots. The one that failed was the third I did in a morning and I rushed it and now it stands there, bark eroding, moistureless, silent fingers pointed at me. I do not expect to get anything like the grape harvests of previous years when the muscadine roots happily invaded my composted vegetable beds and sucked nutrients wholesomely. There were so many grapes my bees abandoned pollen gathering to suck their sweetness (as well as all manner of wasps and beetles). I shall be satisfied with a limited offering and maybe more in future years as their roots go roaming.
6 muscadine vine tranplants, 3 on each side of the contour ditch
My woodland has so many naturally occurring mushrooms that I am again inspired to grow my own mushrooms. I say again because when I first purchased the woodland it had no access road and I had to cut down a number of trees including oak trees to gain access to the interior where my tractor building now stands. At the time, I cut the trunk of one of the oak trees into 3ft logs and drilled and inserted shiitake mushroom plug spawn and placed the logs in a valley on the north side of a rise where it was mostly sheltered from the sun. With time the logs sprouted mushrooms, especially prolifically after extended rainy periods. Unfortunately I did not visit the site very often and when I did the mushrooms had either been eaten by wild animals or had matured and spoiled. Below is a ‘photo from April 2009 showing some overmatured mushrooms:
over matured shiitake mushrooms -note the edges of the cap have upturned
I kept myself busy with other matters and I only thought of mushrooms again last year when several wild cherry and maple trees had to be taken down. I thought mushroom growing was easy and, without research, decided to purchase several varieties of mushroom on birch dowel sticks (plug spawn) and innoculate the wild cherry logs. Bad idea! As I have now learned, cherry is not a preferred wood for mushrooms. I would have been better off using the maple logs. Apparently fruit trees, and wild cherry belongs to that class, should not be used. I built a mushroom shelter and watered the cherry logs intermittently and, to date, zero.
When my neighbor had her sound maple tree cut down (it was threatening the foundation of her house), I decided to get back in the mushroom business and bought grey dove grain oyster spawn. Grain spawn is more difficult to insert into a log than sawdust or plug spawn. Another difficulty – the logs were large in diameter, much more than the 8″ preferred diameter. So I had to make do and drilled vertical holes about a foot long into the face of the logs and filled with the spawn. Not a method I have seen used elsewhere, or recommended.
drilling holes in face of maple log for oyster mushroom spawn
I then sealed the holes with wax – I melted the wax with a blow torch and dripped the molten wax into the holes. I tried to keep things reasonably clean and swabbed tools and materials with hydrogen peroxide – the bottle can be seen on the side of the log.
5 vertical holes in face of log sealed with wax
It is interesting how we draw conclusions which are so often wrong. I transferred to the wood shelter 6 of the oak logs from 2008/2009 which had borne shiitake. Four of the logs were light and two were heavy and, I assumed that if the shiitake were to fruit again (seemed unlikely after 4 years of neglect) it would do so on the heavier logs, which had more material remaining. So I placed the 2 heavier logs in the shelter where they enjoyed the same watering routine as the other logs and left the 4 lighter logs under the drip line of the roof. Well – young mushrooms began appearing on the lighter logs and not on the logs in the shelter. Perhaps the logs under the drip line received more water than the logs in the shelter, or the logs were lighter because the mycelium in those logs was more aggressive than the mycelium in the heavier logs. The logs came from the same tree so the wood should not be a factor. Below is a ‘photo of the young shiitake mushrooms now located in the shelter.
small shiitake mushrooms on logs left outside since 2007
To ensure the logs in the shelter are well watered I rigged a simple spraying system which is gravity fed by rainwater harvested by the tractor building.
simple gravity fed water spray system for cherry, maple and oak logs
The mushroom shelter is close to the path I use for my woodland walks with Trudy (my canine companion) so I pass it frequently and will be more likely to keep a close eye on mushroom happenings than when the growing took place in the valley which was out of the way. Also, to deter wildlife visitors I have completely enclosed the 8ft by 8ft structure. The 4″ posts are cedar, the 2×4’s are untreated wood, the scraps of metal are just scraps, the black material was used to prevent silt erosion on a construction site, and the fencing material was left overs from a chicken paddock. And the red door, which is not an exterior door and will deteriorate from weather exposure, is a $2 special from the thrift store. Not a particularly attractive construction but should not attract human attention (unless passersby think there is a still in operation) and hopefully will provide food for the table.
The recent heavy rains and at times warm weather have transformed the appearance of the woodland – the trunks of the trees have assumed a variegated green appearance.
lichen on the trees
On closer examination these are lichen – a symbiotic alliance between photosynthesizing green alga and fungi.
leaf like lichen
Other growths are more intricate.
unusual trumpet shapes
And there are the long reaching arms.
an intricate maze
And finally some regular mushroom growths at work decomposing the end of a tree trunk.
 And below is the production center, or so I think, with bulging sacs of new monsters waiting to emerge.