When the need to lay is too great, and only one nest box will do, then the need for privacy and dignity are a distant second.
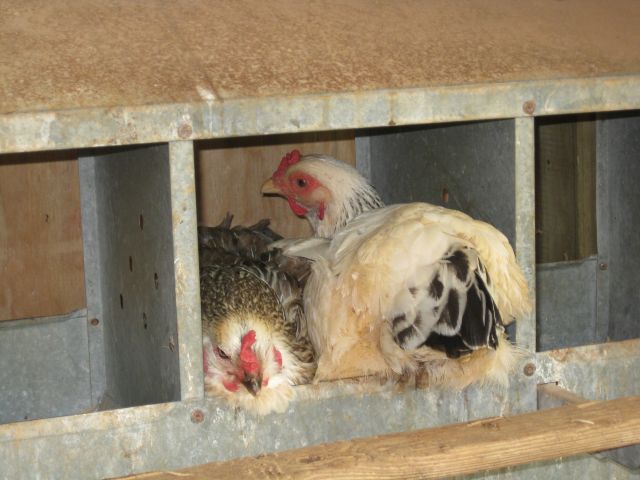
new life tracks – growing organic, self reliance, permaculture
When the need to lay is too great, and only one nest box will do, then the need for privacy and dignity are a distant second.
I was aware of but didn’t not pay much attention to the long-day and short-day preferences of certain vegetables. I knew that with onions, since I live in the south, I needed to grow the short-day variety. But that was it – until recently. In spring last year I had a lot of success with radishes and beets and so this past fall I seeded the ground again with radishes, beets and, for good measure, turnips. Only the turnips grew, excepting a couple of sorry looking beets. Got me wondering. The seed was purchased this year, so it was good, so why were the radishes and beets so reluctant?
I am studying a couple of biology textbooks and reached the chapter on plant sensory systems and “photoperiodism”, which is the response of an organism to the relative lengths of day and night (the “photoperiod”). Radishes, beets, spinach and lettuce are called long-day plants but this is confusing, they are really short-night plants. The distinction is important – the plant is concerned with the length of the night not the length of the day. It would seem this is a distinction of little importance but it does have significance. A short-night plant monitors the length of the night so if sun down is 5pm and sunrise is 8pm producing a night of 15 hours (9 daylight hours), a short-night plant which requires a short night of 10 hours, will not be motivated to germinate, grow or flower. However, if the night is interrupted by a short period of bright light, the plant concludes that this is a short-night, even if darkness returns when the light is snuffed. So, theoretically, half an hour of light interrupting 15 hours of darkness can convince a short-day plant that the time has arrived to grow. If, instead, the plant monitored the length of the day and required say 14 hours of daylight (the converse of 10 hours of night) and there are only 9 daylight hours, I would have to provide an additional 5 hours of light instead of the 0.5 hour of light calculated above.
I have given up on the radishes and beets – hopefully they will get going in spring. But I seeded lettuce indoors (initially 0.75″ seedblocks transferred to 2″ seedblocks) and I germinated spinach seed in the refrigerator, and I would like to get some lettuce and spinach this winter. I have a simple unheated, good sun exposed, greenhouse and I prepared a growing medium of soil and compost and planted out the lettuce soilblocks and germinated spinach seed. To make the long nights short, I decided to use the flourescent lights which I had installed for a neighbor to encourage her chicken to lay eggs in winter. (My chicken keeping days began when my neighbor headed north and gave me her chicken). Chicken need 14 to 16 hours of daylight to be stimulated to lay eggs. I have discontinued this practice for my chicken. To my mind it requires a big effort for a chicken to produce eggs every day or so and I have given my chicken the winter off to recuperate. They have filled out and look good during their wintry vacation.
So, I had available flourescent lighting and an external use 3 prong timer and all that was required was to position the lights and set them to switch on from 12am to 12.30am. Initially I thought I would lay the light holder a few inches above the grow trays thus giving the plants maximum exposure. After pondering this simple solution I realized that if I did this the light holder would block the sunlight and make watering difficult.

So I screwed together a simple beam structure using oak sapling trunks, which was cheaper and more green than buying 2 by 4’s, and it was done. Now I will monitor the growth of the lettuce below the fluorescent tubes compared with lettuce in the cold frame outside and see if there is a difference. A concern I have is that plants respond best to certain light wave-lengths (red light at 660nm) and the flourescent lighting is not the ideal wave-length (500nm – 600nm). Although, importantly it is not the far red spectrum (735 nm) which actually switches off the growth response. So, wait and see if interrupting the night will dupe the short-night vegetables.

I notice the butterflies love the zinnia plantings in the vegetable patch.

I have not lost any more chicken to predators, for which I thank my handsome rooster. His aggressiveness to some of the chickens seems to have abated. Here he is with Lady Macbeth, who is still missing feathers from the back of her head, but they now seem on cordial terms.

And the rains we have fortunately received have promoted sprinklings of mushrooms throughout the woods and perhaps encouraged the turtles to explore their surroundings.

Finally, I gave some of the wax collected from the last honey harvesting session to my neighbor and she worked some magic and produced a wax cake (or so it looks). She said she will melt and strain it one more time, perhaps with cheesecloth.

Matching wits with a chicken predator is not a contest I chose. But I have no option but to contend, as best I can.
Some 3 weeks ago on a Saturday evening as I readied to close up the chicken coop I did my count and noticed that Goldie 2 was missing. We searched the three paddocks and then the perimeter zone without result. It was only when I went 50 yards into the woods that I noticed one of her feathers. Golden Comets have distinctive gold colored feathers. Goldie 2 was my favorite chicken – intelligent, trusting, inquisitive – and probably with less honed survival skills. A few paces further I saw more feathers and then a bundle of feathers where she must have made her last struggle, and then no more feathers. I suspected the culprit was a fox, probably a red fox I had spotted in the past.
Since foxes are supposed to be active early morning and late afternoon, I decided to reset the automatic coop door opener from 7.30am to 9am and I hoped the chicken would be safe until 5.30pm to 6pm when I typically coop them. A week passed without incident. Then I spotted the fox again one evening. Then some more time passed. Last Thursday at 4.30pm the rooster gave his serious distress call – four distress calls in quick succession. Onto the deck I stumbled and I heard some commotion at the bottom gate and then I saw this lithe attractive fox head down the hill into the woods, alone. Then two days later, Saturday afternoon at 4.15pm, we happened to glance outside and saw the red fox heading for the chicken paddocks. Upon seeing us it swiftly turned around and moved quickly up the hill and, without seeming to slow down, under a gate where the space between the gate and the ground was approximately 5.5″ and then up the hill and it was gone. Pity, a really good looking animal.
I decided to engage. First make it more difficult to get past the field gate by blocking the space under the gate.

This quick fix will not discourage him/her, just motivate it to find another route and at least foster the realization that my holding is not a cafetaria where you can just saunter up for your next meal.
Then I turned my attention to the paddocks – some of the fences are 4 ft high and some 5 ft. I laid one or more strands of barbed wire above all the exterior 4 ft fences.

Then I tried plugging gaps beneath the fences with large stones/boulders. The next area of weakness was the gates – one is 7ft high, the other 3 about 4 ft high. I encircled the top rail of all 3 gates with barbed wire to discourage climbing activities.

Sundry other improvements were made including clearing the growth on the paddocks’ west exterior so that I and the rooster could more readily spot a stealthy intruder.


My next steps will be to resort to technology and install motion sensors which may alert me to the fox’s approach. I believe the coop will withstand a predator so my concern is about day attacks when I am deep in the woods or temporarily away from the property. I have considered and rejected traps – would hate to ensnare my Trudy or a neighbor’s dog. But there are other options and so I have cleared surrounding brush and obstacles for a clear line of sight.
When I built the new coop in October last year I fitted a gutter which directs rainwater to an adjacent 250 gallon storage tank. My thought was to (a) collect all rainwater landing on impervious surfaces, and (b) use the water to irrigate a chicken food growing area. To grow food for the chicken I would have to cordon off a growing area and maintain it with vegetables and irrigation, which involves extra work, so instead I now give them excess vegetables from the vegetable garden. And the storage tank, which has been full almost since it was installed, now overflows each time it rains. A waste of water!
With the coop “summerized” with a powered vent fan, insulation and two semi-automatic coop doors, I turned my attention to the rainwater storage tank, which may also be the culprit for the mosquitoes which hang out in that area. I have a portable electric water pump and it was a simple matter to run a 1″ diameter water pipe from the coop to the barn where two large storage tanks are parked. For the water to flow as easily as possible, I avoided sharp turns and led the pipe in a gradual sweep and rise from the coop along the ground to a gradual turn to the barn and then, gaining altitude, up to a gutter on the barn which feeds into the rainwater collection system. I may decide to trench the pipe when the ground is soft after the next decent rainfall.
The exit pipe from the storage tank and the pipe to the barn are fitted with Norwesco fittings, as is the electric water pump. It is a simple operation to couple the pump to the two pipes, open the tank valve to flow water from the storage tank to prime the pump and then power the pump with electricity already cabled to the coop. Some 20 minutes later all 250 gallons have been transferred to a large storage tank from which it will be pumped, as needed to irrigate my crops.


Last week I designed, constructed and installed my first coop door opener – it has operated flawlessly the past week automatically opening the door at about 8am and then late afternoon I reverse the current and close it when I feed the chickens and settle them for the night.
An ongoing issue has been the aggressiveness of the Buff Orpington rooster to his Buff Orpington sister. The coop has a partition door and, prior to the advent of the door opener, I would house Lady Macbeth (such a fierce sounding name yet such a timid bird) and the gentle New Jersey Giants and the two Golden Comets on the one side, and the rooster and the other birds on the other. But since I now arrive later and the door is opened by my new gadget they all have to have access to the exit door, which means no partition. So the drill the past few evenings was to enforce the partition while Lady Macbeth ate and then, when she had had her fill, I opened the partition door, the rooster charged in and she hopped onto the roost for the night where she was safe from him. I notice it takes her longer to fill her crop than the other birds and I surmise that, unlike her companions who snack the feed during the day, she probably doesn’t because she does not wish to be cornered by the rooster. So each evening I wait about 10 minutes while she eats. Time for a second door.
My second door follows the same design as the first with a few refinements. I acquired a sturdy double pole double throw automotive switch from Radio Shack, which is easier to use than the two separate switches I used on version 1. I ordered a transformer 10VDC with an advertised 1.5 amps on the internet but it was a puny affair and could not turn the motor and certainly did not deliver 1.5amps, even though the specs made this claim. It was cheap and the adage “cheap is costly” applied in this case. I rummaged and found a 10VDC transformer rated at 0.8amps and it works just fine. Again I used an inexpensive timer and a night light to remind me at the end of the day to switch the live circuit to timer circuit. So tonight Lady Macbeth can sup at her leisure with her 4 docile companions and the rooster can rant and rave to no avail.


After several weeks spinning my thoughts, I finally got down to it and built and installed an automatic chicken coop door opener. For the time being it is half automatic – it will open the coop door in the morning (time set for 7.30am) and I will close it in the evening after I have housed and fed the chicken. Cost of components, excluding scrap wood, hardware, and the transformer which was laying around, was less than $50.
I have included full details and photos under the “Self reliance” tab at the top of this website or just click here.
I previously mentioned how I had summerized the coop by adding a powered vent and insulation. The rooster did not like the sound of the vent when it was at full blast and there were no controls to slow it down since its intended location is in the attic of a house where its noise is less obvious. The rooster’s concerns were resolved with the addition of a fan speed switch so, until he is more at ease, I have set it to spin at about half speed, which does not upset him.
Before I get to the coop, a quick update on my “Spring activity” journal. I mentioned that pokeweed is an unwelcome visitor, difficult to extricate because of its long thick taproot. In permaculture “the problem is the solution” and it occurred to me that the taproot, like that of comfrey was performing a valuable function mining minerals two or more feet below the surface. But this seemed inadequate justification for its presence until I noticed that it, and it alone, has been attacked and eaten by insects, as yet unidentified. So it is also serving the role of a trap crop and attracting these hungry feasters from my diverse array of vegetables which, so far, are unscathed.
|
|
|
I also mentioned I was leaving the crimson clover to flower to provide succour for the bees and seed for next growing season. Well the clover is maturing quickly and today the honey bees and bumblebees and others were busy at them, so my next honey harvesting will include some clover honey.

Now to the chicken coop.
I have 3 coops, two constructed on two sides (north and east) of the barn. The east coop is well protected from the summer sun and would be good for summer quarters. Last year, as winter approached, I built a new larger coop (building details elsewhere on this website) which was well exposed to the winter sun and, since there are no neighboring deciduous trees (yet) even better exposed to the summer sun. I had considered moving the chicken to the east coop for the duration of the hot weather. And then a development – Buffy, the Buff Orpington rooster, fixated on Lady Macbeth, his sister. She is the only hen missing feathers on the back of her head and she is vociferous and will have not truck with him, when she can avoid him. Which is difficult when they share the same coop and so to escape him she immediately goes to the roosting ledge when they are housed for the night and consequently misses the much anticipated evening meal.
Matters came to a head when she refused to enter the coop one evening and with me trying to coax her in and Buffy charging at her as soon as she crossed the threshold, she became vociferous and agitated, and the two males increasingly frustrated. The upshot was she spent the night in the north coop with the two comets for companions. This got me thinking about the wisdom of transferring them all to the east coop. Their new coop has a partition, all that is missing is a door. So rather than spring $80 for a gate from HD or Lowes, I constructed a simple door with left over lumber and chicken fencing and two $1.54 hinges from Walmart.
|
|
|
So with the winter coop the designated summer home, next steps were to reduce the heat buildup. It has four south facing windows and a window each on the east and west sides. Two of the south facing windows and the east and west windows have been predator proofed (I hope) with wire fencing material and are left open. I found an old tarp (8ft by 10ft) with brown colored and silver sides and scrubbed the mud off the silver, soon to be sun facing side. I cut it into 4 sections – two ‘5 by 5′ and two 5′ by 3’. The two larger pieces were fitted over the two closed south facing windows and the two smaller pieces over the two open south facing windows.
|
|
|
More work remained. I decided to install a powered attic exhaust fan. Since in the afternoon and evening the air will be cooler on the east side, I installed the fan on the west facing wall of the coop. I considered using a roof vent (i.e. one installed on the top of the roof) which would have therefore been higher up and removed more of the hot air at the higher levels of the coop, but I was unsure where that air would be drawn from. By installing the exhaust fan on the west side I can ensure that it pulls air from the east window and therefore the air will be moving across the two roosts which are located in between the east window and the installed vent fan. To power the fan, I installed an exterior power outlet box on the barn wall closest to the coop and led a cable the 100 feet from the barn to the coop.
|
|
|
Apart from the powered vent and the hinges, all the other items were recycled i.e. lying around unused. As you can see from the ‘photo, I attached the cable to the top of the chicken paddock fencing and to surmount the gates, I bolted 2×4’s to the gate posts and raised the cable 8’ above the gate entrance.
My next venture, and a new one for me, will be to install solar panels on the barn roof and a battery bank and inverter in the barn and thus power the exhaust fan using the summer sun (as well as a powered timed coop door to let the flock out early in the mornings). To return to an earlier theme, albeit crudely – in the problem (the summer sun) will be found the solution (solar energy powered fan).
I have been intrigued with neem oil for some time. Something exotic about it. When I first planted tomatoes in north Georgia four years ago, and they were overwhelmed by aphids, neem came to my rescue. Aphids were never a problem again, not because of the neem but my voracious ladybug population. (This week I have been collecting my overwintering ladybug guests and ushering them out to their workplace in my vegetable garden). My second recourse to neem was a couple years ago when the stinkbugs arrived. With my pistol grip sprayer I doused the offenders and they looked dazed and disgusted. Last year I awaited them but they did not arrive, again not due to neem but to some mysterious forces at work. And so my neem oil sat unused in the cool basement for more than a year, until last week when it was recalled to the front line.
But a word about neem. A neat little book by John Conrick titled “Neem The Ultimate Herb” goes into much detail on its origins and uses. He traces its first use as a medical treatment to 4,500 years ago. He states it is a major element in preventing and healing diseases among Ayurvedic practitioners (a system of traditional medicine in India). The neem tree (Azadirachta indica) is a tropical evergreen which grows in much of Southeast Asia, welcomes extreme heat of up to 120 F but will not tolerate hard freezes – so unlikely to call my yard home. My interest is not in its medical properties, or how it is made, but its use for insect control. Unlike synthetic pesticides, most of which have quick acting nerve toxins, neem’s main action is as an anti-feedant, which dissuades pests from eating neem covered plants. It can also reduce an insect’s ability to reproduce. No wonder the stinkbugs looked dazed and disgusted! Conrick also mentions that neem has been found to be beneficial on bees.
So how did I use it as a remedy for my chickens? Our Buff Orpington rooster has a good looking comb but the tips of his comb turned black a few weeks ago from frost bite. He didn’t seem to mind and, as he is becoming more aggressive, I decided to leave him be. Then I noticed black spots at the base of the comb. One of the Golden Comets tried to peck at his comb (for food or as a grooming favor?) and he discouraged her endeavors. But this made me think that this was an insect problem not a frost bite issue. So how to treat it? Diatomaceous earth and Sevin dust have been suggested for mites and lice etc. but I didn’t want to powder a young vigorous rooster near his eyes. I also didn’t want to use a synthetic treatment given my recent success with an organic treatment, psyllium, for chicken crop problems. And then came the idea of neem – I cannot claim credit for this inspiration since I believe it was derived from internet browsing.
Neem is usually mixed with water but I was concerned this mixture could dribble into his eyes. So I took a little dropper bottle and mixed the neem with Johnson’s baby oil at 10% strength i.e. 36 drops of the baby oil and 4 drops of the neem oil (the neem oil is described as having 70% extract of neem oil). Administering the concoction single handed was not as big a challenge as I had thought. I cornered him in the coop, and held him firmly between my knees and then one hand held and pivoted his neck and crown and the other retrieved the pre-charged bulb dropper and doused the infected areas with the mixed oils. After initial hysterical protestations he submitted to the treatment. A day later most of the black infestation was gone and two days later he was cured. Easy enough now but, when his spurs are developed, I do not think this will be a happy experience for either of us.
This winter was very mild and the bugs are out and about and multiplying. I really would like not to use any organic treatments this year. I am hoping that with my expanded beneficial insects army and diverse plantings and good compost and strong plants I will be able to withstand the onslaught. Except in the month of August when we tend to become overwhelmed and then the best is to cut back on the plantings (so as not to subsidize future generations), and look the other way. But if I have to, then neem will be reactivated.
I have mentioned my travails with the Speckled Sussex – one was ill and died and the other went into a serious slump and, despite my efforts also died. So from 13 hens and 1 rooster I am down to 11 hens and a rooster. Two of the hens had problems of sorts.
Gimpy, one of the hybrids inherited from my neighbor, developed a bad leg or hip. Don’t know why – could this has been from the rough attentions of the rooster? She hobbles with difficulty and I recently noticed she was now losing feathers on her back. Thinking this was caused by insects (lice, mites, fleas) I began dusting her with diatomaceous earth. I then ratcheted up the treatment and began dusting her with Sevin dust powder (deviating from organic principles here). Then she wouldn’t come out of the coop during the day and I thought this was because the weather was cold and she did not have all her feathers to keep her warm. But I noticed she wasn’t wandering around the coop but huddling in a corner under the nest boxes, so it occurred to me that some of the feather loss was because of feather-pecking by the other birds and she was sheltering defensively. One warmer morning, I dusted her with Sevin and, despite her protests, took her outside and placed her amongst the others. I noticed that two of the birds approached her as she balanced on a log on one foot (she tries not to use her damaged foot unless she has to) and pecked at her back. And got a bite of Sevin powder and backed off in disgust. Maybe this helped. I am pleased that she is now, of her own accord, coming out of the coop during the day.
My other patient is one of the Golden Comets whom I have named “Goldie” – a spur of the moment naming decision required when I took her to the vet. Her problem was her large crop, which was always large, and her unusual neck movements as she tried to get the food down and to stay in her crop. The vet realized I like to be hands on and was very helpful showing me how to insert a tube to try drain the crop contents. He also prescribed Nystatin for crop fungal infection and gave me a couple of tubes for administering the medicine and draining the crop, if I wished. Well, Goldie seems to be getting better, as well. After scouring the internet for advice and noticing what appeared to be conflicting suggestions, I decided to administer every few days, via a feeding tube, a capsule of psyllium fiber (Metamucil) mixed with 25ml of water and then massage the crop. And it seems to be helping.
I should mention that, unlike the now departed pair of Speckled Sussex which appeared devoted to each other and always stayed together, the other Golden Comet (Goldie’s sister as it were) appears little interested in Goldie and when I remove Goldie from circulation and then reintroduce her, the other Golden Comet pays scant attention. This other Golden Comet is also amongst the most intelligent of the birds, the first to run up to me on the off chance I am bearing food and, when I am digging trenches or turning the dirt, she is constantly at my side pecking at the worms in the upturned soil as soon as they appear. I am not suggesting intelligence trumps emotion, just that she appears to have reordered her priorities.
So it is spring now and everything is looking up, and the chicken appear happy and content and I am getting between 7 and 9 eggs a day – different sizes and colors.


