what are “pasture raised” eggs, also chicken update

During the winter, short daylight months, our chickens cease egg production and we work our way through the eggs we saved until, around mid-December we are out of eggs.  And then the offerings in the local supermarket become more appealing.  Without including photos, since upsetting folks and triggering nastiness is unnecessary, I will describe the tempting labels.

Carton A – “Fresh Eggs, No Antibiotics, Organic, Non-GMO Feed, Pasture Raised, Grade A One Dozen Large Eggs, Level 4 Pasture Raised”

Carton B – “Pasture Raised, 12 Large Grade A, Made with Fresh Air and Sunshine, Happy Hens, Freedom to Forage Outdoors Year Round, Under Open Skies, Tended by Hand Raised with Respect, Certified Humane Raised & Handled etc.”

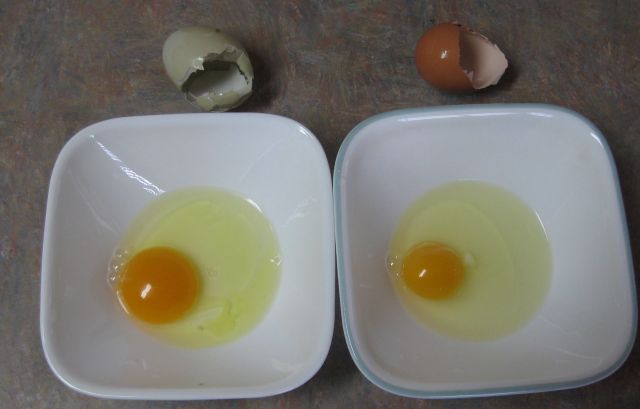
You get the idea.  It is at times like these that M.  looks at me with new respect.  She cracked 4 eggs from Carton A and said their yolks were insipid  and 2 looked approaching albino.  M. has a scientific background and not inclined to exaggerate.

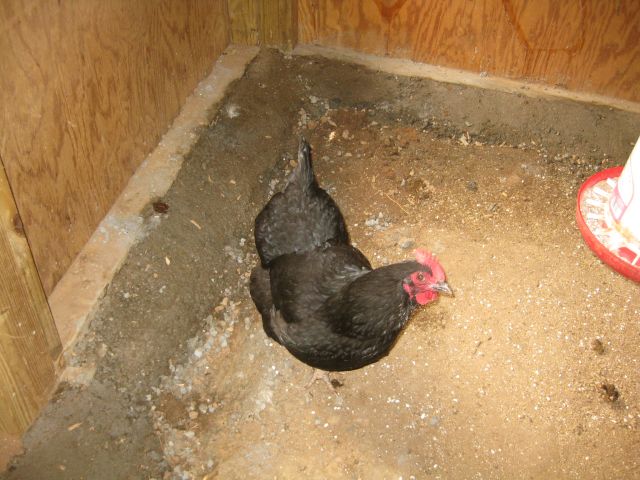
Then good news – Speckles (Buff Orpington dad, Americauna mom) began laying and we have  enjoyed 4 good eggs.  But not yet enough of them so we are using up the remnants of Carton B.  Their yolk color is getting there, but though self-described as “Large Grade A” they appear pitiful against a recent egg from Speckles.

our pasture raised hen's egg on left and commercial version on right
our pasture raised hen’s egg on left and commercial version on right

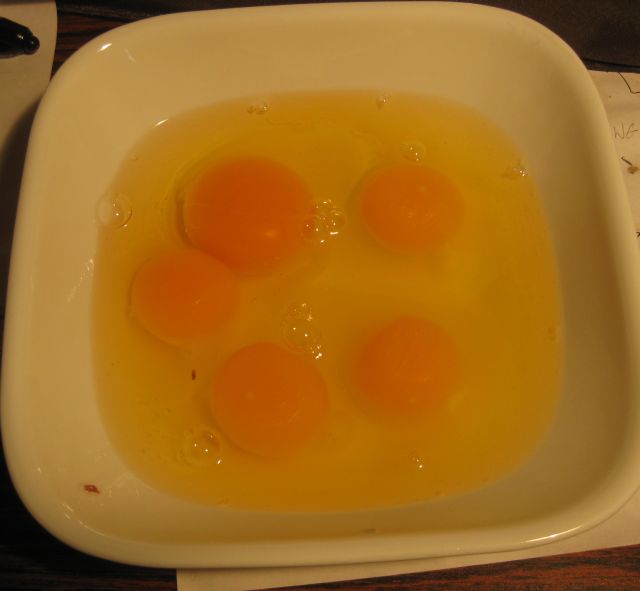
When I compare eggs from our pasture raised hens with commercial eggs I wonder why there is such a difference.  I wonder what pasture raised means – does it include not only space to roam but lots of green goodies and insects to eat?  Our chicken breeds are nothing special yet their eggs seem so much better.  Here is another pic of 5 eggs – can you guess which is ours?

one of thes 5 eggs is ours, the remainder are from carton A

Or if the difference is not the pasture maybe it is organic feed.  We use regular non-medicated feed and maybe it has a more complete nutrition profile.

Enough with the speculation – now we have passed the shortest day of the year we are hoping our other hens will begin to mimic Speckles and we can begin eating again their delicious eggs.

Update

My previous post mentioned a close shave between Wanda and a predator.  I trapped and relocated a feral cat.  There was some concern whether I had trapped the culprit.  Since that post the 2 fence flying hens (yes Wanda is fully recovered tho without tail feathers) have resumed escaping the paddock areas and wandering around the yard.  And on several days I allowed all the hens to go roaming, especially in the compost area where snacks abound.  And there have been no incidents and the squirrels, which were previously not to be seen have returned and chase the birds from their bird seed.  So I am hopeful that the problem has been resolved.

3 sisters, a new brush, problem = solution, food from the garden

3 sisters

3 sisters refers to the practice of growing corn, climbing beans and squash closely together with the corn providing scaffolding for the beans, the beans providing nitrogen fixing and their hairy stems dissuading insects, and the squash shading out weeds and enabling water retention by the soil.  My 3 sisters appear to be doing ok, though I now realize some fine tuning is needed for next year.

corn reaching for the sky

You can see the beans wrapping round the stalks.

bean vines growing on the corn

But is the corn handy scaffolding, or are the beans strangling the corn?

in some cases the aggressive been runners have encircled the corn tassels and pulled them down, hampering corn pollination

Next year I will give the corn a head start rather than plant the beans simultaneously with the corn.

a new brush

I have 2 water pumps for my rainwater harvesting operations and a couple days ago the one pump was very hesitant on the first go round and refused to start when I needed it a second time.  I remember in South Africa how it was well known that women could fix electrical appliances by giving them a kick – the floor polisher doesn’t work, kick it.  A well aimed kick could even start a car.  So I thought what the heck and I kicked the pump and it started up and ran for a bit.  And then stopped.  Must be the brushes I thought.  There are 2 brushes to a motor and they are easily replaced.

towards the top of the pic in the middle you can see the plug, easily undone with a screwdriver, behind which a brush resides

The first brush appeared fine with much remaining life.  Could it really be the brushes I thought since the 2nd brush presumably replicated the condition of the first.

But the 2nd brush it was, u can see the broken spring which disabled the brush

I cannibalized a disabled pump (see previous posts on ice damage to water pumps) and the pump started easily.  A quick inexpensive repair.

problem = solution

Transforming the problem into the solution is a permaculture mantra and discovering instances are pleasing to the audience and more so the discoverer.  I have a problem with rats and mice in my coop.  They are experienced tunnelers and prefer to live in chambers below the dirt floor because they are there protected from the elements, have easy access to food and water, less threatened by snakes and lots of bedding material like pine shavings and snips of plastic bags.  They are fastidious home proud family members and unfairly branded rodents and vermin.  However they are unwelcome in my coop and I tire of their telltale poop strewn on ledges and even in the chicken feed, so I want them out.

In the beginning I refilled their holes with excavated dirt; then I hammered stones into the hole entrances; then I bought sacks of concrete and concreted the holes.  In 1 week I used the entire contents of a 60 lb bag of concrete.  I then became a bit more creative.  I poured water into their holes and once, a bedraggled rat charged out the hole.  On other occasions, who knows, an inhabitant may have been trapped inside to a watery end.  Some chambers were large and absorbed 4 gallons of water before the entrance brimmed.  I know moth balls would have been effective, or so I have been told, but I did not want  anything noxious in the coop.  And then as I was shoveling chicken poop into a bucket – a brain wave.  Save the haul to the fruit tree and just slide it into the hole.  Followed by a good water drenching and a concrete cap.  Maybe it will work and the labor of chicken poop disposal engineered into a triumph over the inveterate tunnelers.

food from the garden

Lots to eat these days.

here squash, beans, onions, okra and tomatoes

Supplemented with soy patties, mango chutney and sweet potato.  And several glasses of zin.  However, the melon which looked promising on the outside.

water melon looks promising

Was picked too early.

was picked too early.  soft and nice texture but not sweet enough
was picked too early. soft and nice texture but not sweet enough

Wait maybe another week.


2 simple lessons learned – garlic and the chicken coop

I first planted garlic in fall 2010 – 4 varieties 1) organic California Early White – softneck ($4.99 lb); 2) Elephant garlic – very mild like a leek ($4.99 lb);  3) organic Music Garlic – hardneck  ($12,99 lb.) – the only reason I bought this more expensive variety is because my family is into music; 4) organic Dujansky  – hardneck ($9.99 lb).   They grew well, I harvested them and each fall I planted out the cloves for the next year’s harvest.  In fall 2014 I must have planted out >200 cloves and they are all doing well.  But most of the cloves were small.  And then it occurred to me, a sudden insight, that I had been selecting down.  During my meal gathering forays I always picked the best looking garlic plants and after the harvest when they were strung up to dry, my better part/chef always picked the biggest garlic because they were “less labor intensive”.  This human selection process inevitably resulted in the smallest, least desirable garlic surviving into the fall and becoming the forbears of the next year’s crop.  This was real dumbing down.

So this spring I made a change.  With surveyor’s bright colored tape I made gentle nooses around the best looking biggest garlic.  These will not be picked for eating and will be separately stored for next fall planting.  Additionally I will intentionally first pick for eating the garlic plants closest to the selected few so they will have access to more light and nutrients and grow even better.

one of the 20 garlic selected for special attention
one of 20 garlic selected for special attention

My other lesson pertained to the chicken coop I built in October 2011.  If you follow the link and look at the photos of the interior you will see that the wooden walls rested on cinder blocks and to cover the hollow centers I ran wood boards over the exposed blocks with part of the board extending over the dirt floor.  My logic at the time was I didn’t want poop falling into the hollow centers or onto any dirt and rocks used to fill the centers.  Pity.

Fast forward a few years and the coop is home not only to a happy rooster and his 10 consorts but to numerous rats which hide under the boards and have built tunnels and chambers under the dirt floor.  Initially I tried filling the chambers with stones but these were excavated by the following morning.  The only solution I learned was to add concrete mix and then water into the chambers and this solidified mass defied the rats best efforts.  And the boards.  I decided they had to go.  So I unscrewed them, filled the hollow centers with stones and dirt and then applied a thick layer of concrete troweled smooth to enable easy removal of chicken poop.  Here is Onyx, a Black Jersey giant  and behind her you can see the concrete application.  Still a bit rough but as I worked my way round the perimeter I became more adept and the concrete finish on later stages looks almost professional.  Another mistake identified, corrected and lesson learned.

a concreted corner inspected by Onyx

cold weather returns

I won’t complain about the cold, not when I know what is going down in the north east, I will just comment on conditions and how I am responding.  We had freezing rain 2 days ago and the result was more aggravated where my farm is 50 miles north of Atlanta, than Atlanta itself.  The trees off the highway look normal as you head north on the 515 from Atlanta until you pass Canton and then you notice a silvery, icy sheen on the branches.  Georgia has lots of pine trees and the pine needles are adapt at catching the freezing drops and making icicles, the weight of which bows down the younger trees and snaps the branches of the older trees.

I wonder if these youngsters will be able to right themselves

And when you look closer you see the icy fingers.

thoroughly ice coated

In the coop I have a water heater and each day of freezing temps I have to refill the 2 gal container which sits on a thermostat controlled warming base.  Monday night during the freezing rain, the log cabin and surrounding area had an 8 hour power outage.  I know the hours because my security system emails and texts me with unusual events such as the dsl modem losing power.  Since there was extensive black ice on the hilly road to the farm,  I did not visit on Tuesday and my neighbor let the chicken out of the coop and locked them in the evening.  A wonderful neighbor.  My coop door is set to open automatically at 9am and I texted her in the evening whether she had reset the timer.  She had not and went back to the coop and the door had opened after she had cooped the chicken.  Whatever can go wrong will go wrong and an open coop door in the night is how I lost my favorite chicken a couple years ago.  Another consequence of a power outage is the lamp bulb in the well house no longer warms the well pipes.  This is my well house.

well house, you can see the corner uprights I replaced last year

From the inside of the well house I noticed chinks of light and I caulked every occurrence to make the structure more air tight.  A savvy neighbor tells me that because of power outages he uses oil lamps for heating his well house.  He bought his at an estate sale.  I traversed Amazon and found two 12″ lamps, one for $11 (red) and one for $15 (blue).

2 paraffin powered hurricane lamps

I tried them both out and the blue one was still burning the following morning, the red one was extinguished (there was still oil in the base).  So, when I am at the property and the temp will fall below say 15 F the next morning, then I light an oil lamp.  If I will be away for several days, then I use a light bulb (base 50c at the Thrift store) and a timer to switch current on during the cold hours.

my electric lamp heater in the well house with timer and cable run from the house

I have a small greenhouse I built on the south side of the carport.  It is passive heated (sun only) and the cold temps have hammered some of my seedlings.  The warm weather vegetables (pepper, cucumber, eggplant) have been annihilated, but the cool season (kale, collard, lettuce etc.) are holding on.  The situation is exacerbated by an uninvited guest, a feral cat which ripped a hold through some sheeting near the top and beds in a pine straw box (I use the pine straw for my bee smoker).  I have not the heart to deny the visitor entrance and I do not have a rodent problem (except in the coop), but when the weather improves I will make the greenhouse cat proof.

small greenhouse for developing vegetables,  especially later, tomatoes
small greenhouse for developing vegetables,especially later, tomatoes

And finally, my wood stove, which was installed last year, is a boon – it has some mass and really helps out in the living room and keeps my utility bill down.

efficient wood stove in living room

growing update 0822

Good news – my squash have not (yet) been visited by the dreaded borer and are growing rampaciously.

squash growing vigorously in raised bed
squash growing vigorously in raised bed with a mullein scaffold available if needed
0822 squash a
another squash plant in production – but there is a problem, someone has been snipping off the squash buds – you can see some single squash stems
here is a closeup of another plant and you can clearly see someone has been snacking - I suspect a rabbit
here is a closeup of another plant and you can clearly see someone has been snacking – I suspect a rabbit

So I have a new pest to respond to and I have set a live trap with some enticing carrots to try catch the rabbit.  A more tedious, though inevitable response will be to better secure the growing area and the fence which surrounds it.  Here is a welcome visitor.

a welcome visitor to a squash flower, most of the pollinating is done by bumble bees, this may be a yellow jacket

My most productive bed which is just 4ft by 4ft and was an afterthought, in addition to pumping out tomatoes and cucumbers and kale and chard is now sporting a new squash plant.

this 4ft by 4ft bed does very well and you can spot a new squash flower amongst the regular residents

this 4ft by 4ft bed does very well and you can spot a new squash flower amongst the regular residents


I have a few pepper plants.

green peppers are looking good

And am pleased some holy basil (I planted two varieties) is growing well.

a variety of holy basil

I was preparing a raised bed for a seeding of radish and beets and noticed the soil looked drained of its vigor.  Forking a bit deeper I was not surprised to find invading roots.  I traced them to their entry point and from the outside I chopped the roots and then inserted a few left over pieces of cement siding.  This should stop the roots for a while.

newly seeded radish and beet bed with added compost and cement siding below ground to stop roots

Finally, the 4 chicks which hatched last week were getting frustrated in their lamp heated chamber, so I screwed 4 old windows together to make a square on the grass in the shade, and placed them and their water and food inside and covered the top with wire mesh.  At first they were terrified by the big circling chicken giants but then settle down and enjoyed themselves until the rain showers ended their first outdoor adventure.

outing for the week old chicks


battle of wits with a chicken predator

Matching wits with a chicken predator is not a contest I chose.  But I have no option but to contend, as best I can.

Some 3 weeks ago on a Saturday evening as I readied to close up the chicken coop I did my count and noticed that Goldie 2 was missing.  We searched the three paddocks and then the perimeter zone without result.  It was only when I went 50 yards into the woods that I noticed one of her feathers.  Golden Comets have distinctive gold colored feathers.  Goldie 2 was my favorite chicken – intelligent, trusting, inquisitive – and probably with less honed survival skills.  A few paces further I saw more feathers and then a bundle of feathers where she must have made her last struggle, and then no more feathers.  I suspected the culprit was a fox, probably a red fox I had spotted in the past.

Since foxes are supposed to be active early morning and late afternoon, I decided to reset the automatic coop door opener from 7.30am to 9am and I hoped the chicken would be safe until 5.30pm to 6pm when I typically coop them.  A week passed without incident.  Then I spotted the fox again one evening.  Then some more time passed.  Last Thursday at 4.30pm the rooster gave his serious distress call – four distress calls in quick succession.  Onto the deck I stumbled and I heard some commotion at the bottom gate and then I saw this lithe attractive fox head down the hill into the woods, alone.  Then two days later, Saturday afternoon at 4.15pm, we happened to glance outside and saw the red fox heading for the chicken paddocks.  Upon seeing us it swiftly turned around and moved quickly up the hill and, without seeming to slow down, under a gate where the space between the gate and the ground was approximately 5.5″ and then up the hill and it was gone.  Pity, a really good looking animal.

I decided to engage.  First make it more difficult to get past the field gate by blocking the space under the gate.

chicken
gate to #3 chicken paddock with 4 by 4 post blocking access between ground and gate

This quick fix will not discourage him/her, just motivate it to find another route and at least foster the realization that my holding is not a cafetaria where you can just saunter up for your next meal.

Then I turned my attention to the paddocks – some of the fences are 4 ft high and some 5 ft.  I laid one or more strands of barbed wire above all the exterior 4 ft fences.

gate to chicken area
barbed wire strands above 4 ft horse fence which surrounds some of the chicken paddock

Then I tried plugging gaps beneath the fences with large stones/boulders.  The next area of weakness was the gates – one is 7ft high, the other 3 about 4 ft high.  I encircled the top rail of all 3 gates with barbed wire to discourage climbing activities.

chicken paddock gate
4 ft gate to chicken paddock with barbed wire on top rail and interstices blocked with fencing material

Sundry other improvements were made including clearing the growth on the paddocks’ west exterior so that I and the rooster could more readily spot a stealthy intruder.

fence on west side of chicken paddock
west side of chicken paddock before clearing
west side of chicken paddock
west side of chicken paddock after clearing

My next steps will be to resort to technology and install motion sensors which may alert me to the fox’s approach.  I believe the coop will withstand a predator so my concern is about day attacks when I am deep in the woods or temporarily away from the property.  I have considered and rejected traps – would hate to ensnare my Trudy or a neighbor’s dog.  But there are other options and so I have cleared surrounding brush and obstacles for a clear line of sight.

rainwater from coop roof

When I built the new coop in October last year I fitted  a gutter which directs rainwater to an adjacent 250 gallon storage tank.  My thought was to (a) collect all rainwater landing on impervious surfaces, and (b) use the water to irrigate a chicken food growing area.  To grow food for the chicken I would have to cordon off a growing area and maintain it with vegetables and irrigation, which involves extra work, so instead I now give them excess vegetables from the vegetable garden.  And the storage tank, which has been full almost since it was installed, now overflows each time it rains.  A waste of water!

With the coop “summerized” with a powered vent fan, insulation and two semi-automatic coop doors, I turned my attention to the rainwater storage tank, which may also be the culprit for the mosquitoes which hang out in that area.  I have a portable electric water pump and it was a simple matter to run a 1″ diameter water pipe from the coop to the barn where two large storage tanks are parked.  For the water to flow as easily as possible, I avoided sharp turns and led the pipe in a gradual sweep and rise from the coop along the ground to a gradual turn to the barn and then, gaining altitude, up to a gutter on the barn which feeds into the rainwater collection system.  I may decide to trench the pipe when the ground is soft after the next decent rainfall.

The exit pipe from the storage tank and the pipe to the barn are fitted with Norwesco fittings, as is the electric water pump.  It is a simple operation to couple the pump to the two pipes, open the tank valve to flow water from the storage tank to prime the pump and then power the pump with electricity already cabled to the coop.  Some 20 minutes later all 250 gallons have been transferred to a large storage tank from which it will be pumped, as needed to irrigate my crops.

east side of coop showing gutter, downpipe to tank, overflow pipe from tank and exit connection to pump
closer up view of conection from storage tank to pump to water pipe to barn
view of the water pipe run from the coop initially on the ground then climbing higher along paddock fence, surmounting gate and ending in gutter


2nd chicken coop door installed

Last week I designed, constructed and installed my first coop door opener – it has operated flawlessly the past week automatically opening the door at about 8am and then late afternoon I reverse the current and close it when I feed the chickens and settle them for the night.

An ongoing issue has been the aggressiveness of the Buff Orpington rooster  to his Buff Orpington sister.  The coop has a partition door and, prior to the advent of the door opener, I would house Lady Macbeth (such a fierce sounding name yet such a timid bird) and the gentle New Jersey Giants and the two Golden Comets on the one side, and the rooster and the other birds on the other.  But since I now arrive later and the door is opened by my new gadget they all have to have access to the exit door, which means no partition.  So the drill the past few evenings was to enforce the partition while Lady Macbeth ate and then, when she had had her fill, I opened the partition door, the rooster charged in and she hopped onto the roost for the night where she was safe from him.  I notice it takes her longer to fill her crop than the other birds and I surmise that, unlike her companions who snack the feed during the day, she probably doesn’t because she does not wish to be cornered by the rooster.  So each evening I wait about 10 minutes while she eats.  Time for a second door.

My second door follows the same design as the first with a few refinements.  I acquired a sturdy double pole double throw automotive switch from Radio Shack, which is easier to use than the two separate switches I used on version 1.  I ordered a transformer 10VDC with an advertised 1.5 amps on the internet but it was a puny affair and could not turn the motor and certainly did not deliver 1.5amps, even though the specs  made this claim.  It was cheap and the adage “cheap is costly” applied in this case.  I rummaged and found a 10VDC transformer rated at 0.8amps and it works just fine.  Again I used an inexpensive timer and a night light to remind me at the end of the day   to switch the live circuit to timer circuit.  So tonight Lady Macbeth can sup at her leisure with her 4 docile companions and the rooster can rant and rave to no avail.

Buffy, the rooster, with a Golden Comet


the "summerized" coop (the tarps exclude the light and keep it cool), and the two recently installed coop door openers
simple housing for timer, night lite and transformer
simplified design, one DPDT switch to reverse door direction, contact switches on either side


chicken coop door opener

After several weeks spinning my thoughts, I finally got down to it and built and installed an automatic chicken coop door opener.  For the time being it is half automatic – it will open the coop door in the morning (time set for 7.30am) and I will close it in the evening after I have housed and fed the chicken.  Cost of components, excluding scrap wood, hardware, and the transformer which was laying around, was less than $50.

I have included full details and photos under the “Self reliance” tab at the top of this website or just click here.

I previously mentioned how I had summerized the coop by adding a powered vent and insulation.  The rooster did not like the  sound of the vent when it was at full blast and there were no controls to slow it down since its intended location is in the attic of a house where its noise is less obvious.  The rooster’s concerns were resolved with the addition of a fan speed switch so, until he is more at ease, I have set it to spin at about half speed, which does not upset him.

summerizing the coop

Before I get to the coop, a quick update on my “Spring activity” journal.  I mentioned that pokeweed is an unwelcome visitor, difficult to extricate because of its long thick taproot.  In permaculture “the problem is the solution” and it occurred to me that the taproot, like that of comfrey was performing a valuable function mining minerals two or more feet below the surface.  But this seemed inadequate justification for its presence until I noticed that it, and it alone, has been attacked and eaten by insects, as yet unidentified.  So it is also serving the role of a trap crop and attracting these hungry feasters from my diverse array of vegetables which, so far, are unscathed.

the pokeweed invader is the banquet for hungry feasters

a few feet away the spinach, collard, chard, garlic et al. are unscathed

I also mentioned I was leaving the crimson clover to flower to provide succour for the bees and seed for next growing season.  Well the clover is maturing quickly and today the honey bees and bumblebees and others were busy at them, so my next honey harvesting will include some clover honey.

crimson clover in flower with bees in attendance

Now to the chicken coop.

I have 3 coops, two constructed on two sides (north and east) of the barn.  The east coop is well protected from the summer sun and would be good for summer quarters.  Last year, as winter approached, I built a new larger coop (building details elsewhere on this website) which was well exposed to the winter sun and, since there are no neighboring deciduous trees (yet) even better exposed to the summer sun.  I had considered moving the chicken to the east coop for the duration of the hot weather.  And then a development – Buffy, the Buff Orpington rooster, fixated on Lady Macbeth, his sister.  She is the only hen missing feathers on the back of her head and she is vociferous and will have not truck with him, when she can avoid him.  Which is difficult when they share the same coop and so to escape him she immediately goes to the roosting ledge when they are housed for the night and consequently misses the much anticipated evening meal.

Matters came to a head when she refused to enter the coop one evening and with me trying to coax her in and Buffy charging at her as soon as she crossed the threshold, she became vociferous and agitated, and the two males increasingly frustrated.  The upshot was she spent the night in the north coop with the two comets for companions.  This got me thinking about the wisdom of transferring them all to the east coop.  Their new coop has a partition, all that is missing is a door.  So rather than spring $80 for a gate from HD or Lowes, I constructed a simple door with left over lumber and chicken fencing and two $1.54 hinges from Walmart.

the aggrieved Lady Macbeth

new partition door for coop

So with the winter coop the designated summer home, next steps were to reduce the heat buildup.  It has four south facing windows and a window each on the east and west sides.  Two of the south facing windows and the east and west windows have been predator proofed (I hope)  with wire fencing material and are left open.  I found an old tarp (8ft by 10ft) with brown colored and silver sides and scrubbed the mud off the silver, soon to be sun facing side.  I cut it into 4 sections – two ‘5 by 5′ and two 5′ by 3’.  The two larger pieces were fitted over the two closed south facing windows and the two smaller pieces over the two open south facing windows.

new coop, south side, before sun covers

new coop after sun covers installed

More work remained.  I decided to install a powered attic exhaust fan.  Since in the afternoon and evening the air will be cooler on the east side, I installed the fan on the west facing wall of the coop.  I considered using a roof vent (i.e. one installed on the top of the roof)  which would have therefore been higher up and removed more of the hot air at the higher levels of the coop, but I was unsure where that air would be drawn from.  By installing the exhaust fan on the west side I can ensure that it pulls air from the east window and therefore the air will be moving across the two roosts which are located in between the east window and the installed vent fan.  To power the fan, I installed an exterior power outlet box on the barn wall closest to the coop and led a cable the 100 feet from the barn to the coop.

new power vent and insulation added to west side

power cable to the coop

Apart from the powered vent and the hinges, all the other items were recycled i.e. lying around unused.  As you can see from the ‘photo, I attached the cable to the top of the chicken paddock fencing and to surmount the gates, I bolted 2×4’s to the gate posts and raised the cable 8’ above the gate entrance.

My next venture, and a new one for me, will be to install solar panels on the barn roof and a battery bank and inverter in the barn and thus power the exhaust fan using the summer sun (as well as a powered timed coop door to let the flock out early in the mornings).  To return to an earlier theme, albeit crudely – in the problem (the summer sun) will be found the solution (solar energy powered fan).