Tomato season is peaking and I am doling out bags to neighbors, friends and my running group. A few weeks ago I was plagued with blossom rot but that has disappeared with changes to my watering methods. The best producer is still the Parks Whopper which a neighbor gave me in exchange for 6 of my varieties. It has outperformed the rest, though interesting my neighbor has not done as well with her Parks but is enjoying my Juliet and Cherokee Purple.
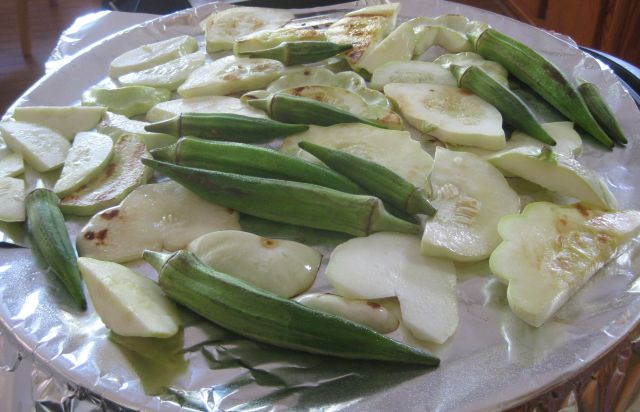
The daily vegetable harvest is tomatoes, cucumbers, beans (rattlesnake and common), pattipan squash and okra.
Pattipan squash and okra sprinkled with olive oil in a G Foreman grill. Add pepper to taste. Delicious.
Okra grows rapidly and should be harvested daily. Miss 3 days and it is too large and stringy. The corn disappointed again – I was unable to water sufficiently and they are spindly.
The fruit orchard is bearing well and recent heavy rains have helped tremendously. My best apple tree, the early season Pristine, is about done. The Ginger Gold was ok, prodigiously huge apples and ok taste. The Matsu, which is smaller and younger than the rest produced well for the first time – tasty. The Paduckah has lots of good looking apples, but they have little taste.
the Paduckah look good but little taste
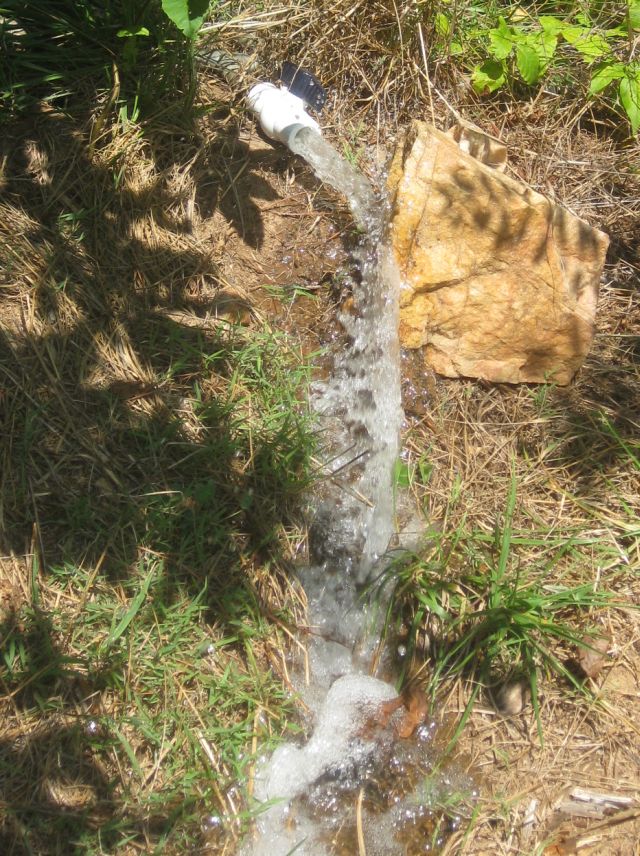
An Arkansas Black apple tree provides setting sun protection to the bee hive and this is its first year of decent production and the apples are promising. In another post I mentioned how I clear airlocks by opening a valve at the bottom of the hill – rather than waste the flush water I direct it in a channel (after bouncing off a rock) to the Arkansas Black which is responding well to this consideration.
water used to flush out bubbles directed by a stone to a quick path to a thirsty apple tree
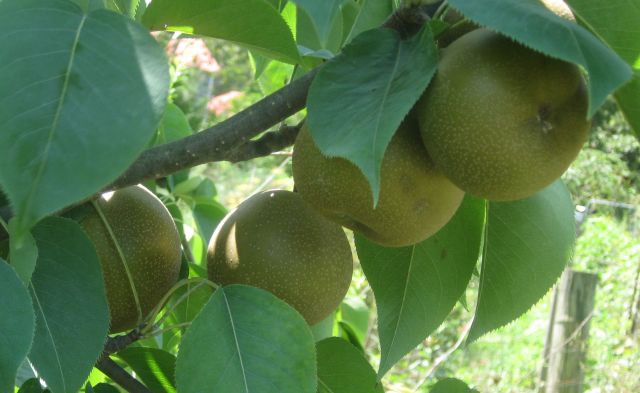
My pears will soon be ready – the Kieffer and TyTy are almost ready and the prize and jewel, the Giant Korean pear is following closely behind.
Giant Korean Pear – the best of all my fruit trees, firm, slightly sweet but sweet enough and impervious to pests and disease
I have one peach tree (the other died) and it produced delicious peaches though we had to do a lot of cutting out of pests and disease. The reward is sufficient for me to keep it in production. I have a second small orchard planted several years after the first and the Ein Shemer (from Israel, low chill hours) has a pleasing taste. The jujube looks good and we will wait until it turns brown and crinkly, and the fig trees which were cold killed the past few years have tiny little figs. The American and Asian persimmon are growing well and may produce fruit next year.
So there is plenty to eat and it is pleasurable to pick what is ready and, after cutting out pests, eat with the skin without washing and without concern for toxins.
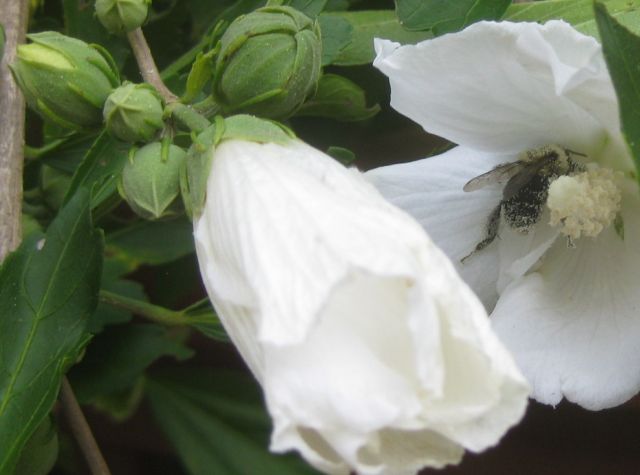
the recent rains brought to life the Rose of Sharon hibiscus and even late morning it is besieged with pollen dusty foragers
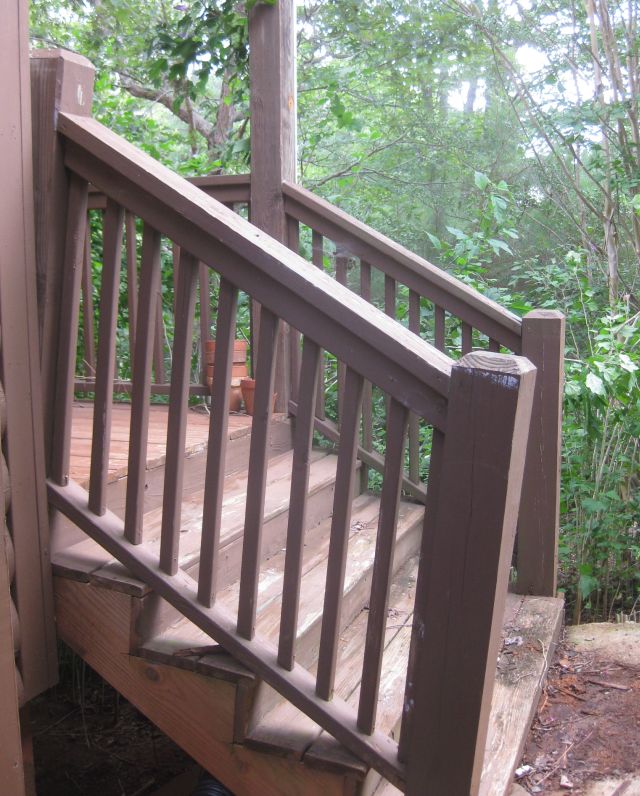
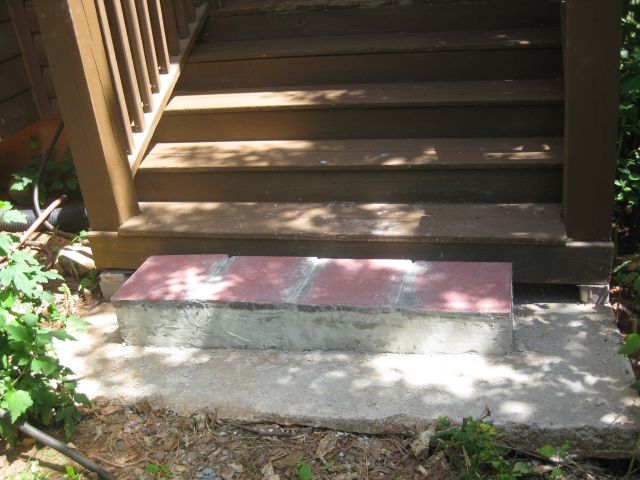
We always access the house through the kitchen door since this is most convenient to the carport. The steps to the porch to the front door are neglected and have sagged miserably as the concrete base on which they rest settled into the ground.
the post at bottom right has sagged the most and you can see how it has pulled the top post, to which it is connected, off vertical
My neighbor is a builder and his suggestion was to remove the stairs and then level the concrete base and then re-attach the stairs. I notice professionals prefer to remove what is defective and begin from the beginning, which is logical since everything will look good and plumb and, with adequate manpower is quicker, though with more material cost. I however wanted a quick fix with my own resources, and so I decided to raise and level the stairs and later I can pour concrete to level the concrete base.
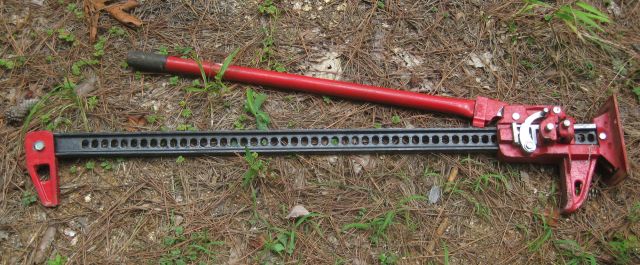
But how do I single-handedly level the stairs? Not enough space for a bottle jack or car jack. And then I thought of my farm jack, also called a Hi-Lift jack which I last used 5 years ago to hoist railway ties, also called sleepers, out of the ground. It cost <$30 and now is about double in price.
Ok, the farm jack would be the lifter but how do I attach it to the stairs? I thought of screwing a 2×4 horizontally to the ground level posts and use that for the jacking point, but then I saw the posts were nailed to the stair risers and the jack would just lift the posts off the stairs. Not what I wanted. The connection had to be to the stair risers, but how?
the solution – a chain bolted to the bottom of each of the risers
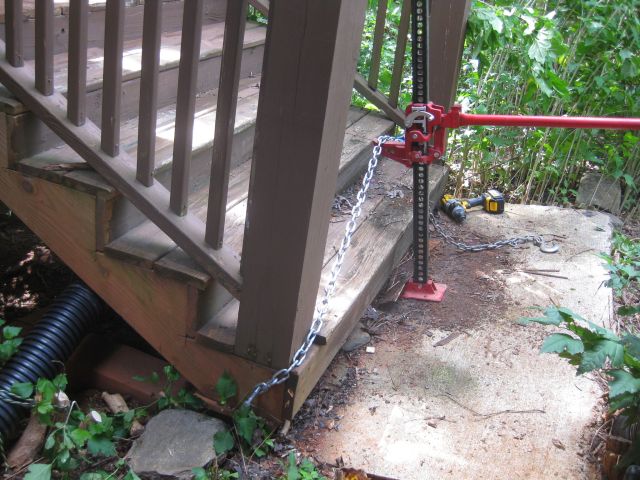
I then used the farm jack to raise the stairs.
farm jack in action with bottom of stairs raised off the ground
I had two lengths of chain which was handy since I was able to use a grab hook (shown in blue) to adjust the length to what I wanted.
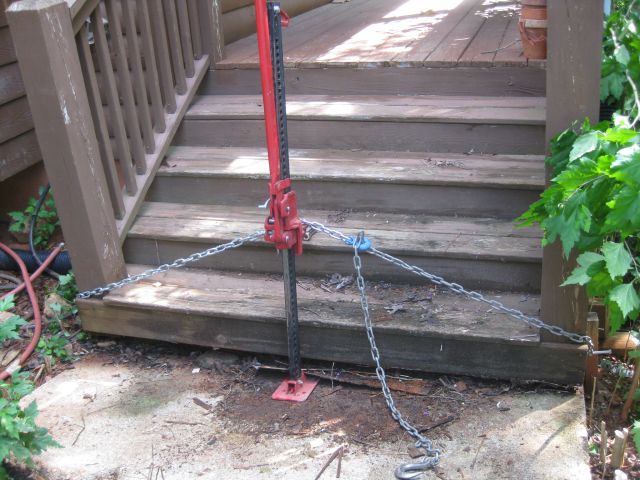
I leveled the stairs with concrete blocks and used flashing to protect the wood from rising damp
Since the top left corner of the slab had settled most, that end of the stairs needed the most adjustment – thick concrete slab and treated 2×6 and flashing for damp protection.
Next steps are to scrape, prime and paint the stairs and then pour a level concrete step on top of the existing base.
a few weeks later – here is the finished product:
I made a simple mould, poured concrete which self-leveled and topped with 4 red flagstones, and the result (to me) is acceptable
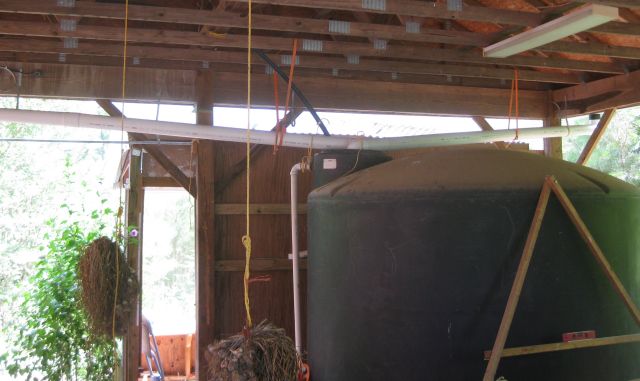
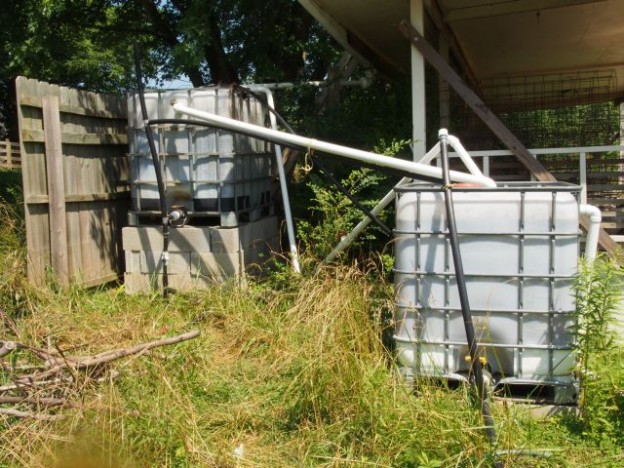
My rainwater harvesting system (elsewhere described) includes a 2,500 gal storage tank which takes water from the carport roof. Rain has been sparse but on Saturday we had a short heavy deluge and I noticed that both gutters which feed the tank were overflowing. I was surprised since a month previously I had connected a hose to the gutters and each had drained into the storage tank.
The drawback with testing for a blockage with a hose is if a pipe is partly blocked the water will still flow and seem ok but that slower flow cannot accommodate a heavy downpour. The reason for my recurring pipe blockages is poor design and so even if the pipes are clear, the gusts which precede a storm can dump leaves on the roof which will clog a weak system.
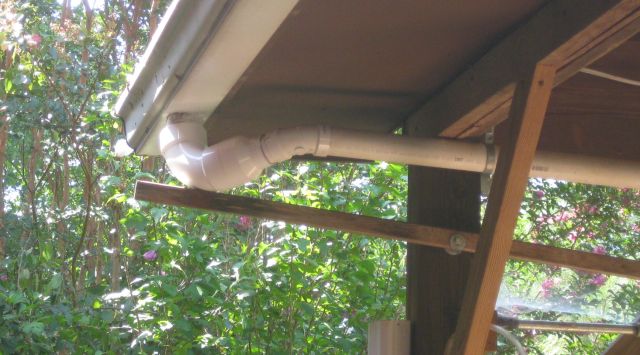
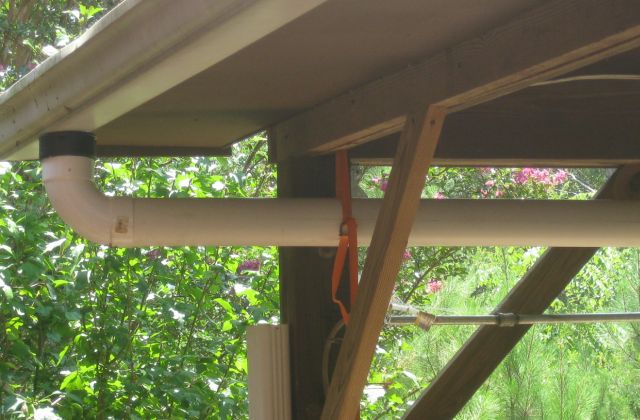
As you can see below I capture water in a 4″elbow positioned below the gutter downspout and then reduce the flow to a 2″ pipe which runs to the storage tank.
the old connection – a 4″ pvc elbow reducing to a 2″ pipe and 45 degree elbow held in position by a 8 ft length of 1×1 with the long end rotating on a bolt fulcrum to keep the short end pressing the elbow in position below the gutter outlet. The size reduction guarantees blockages.
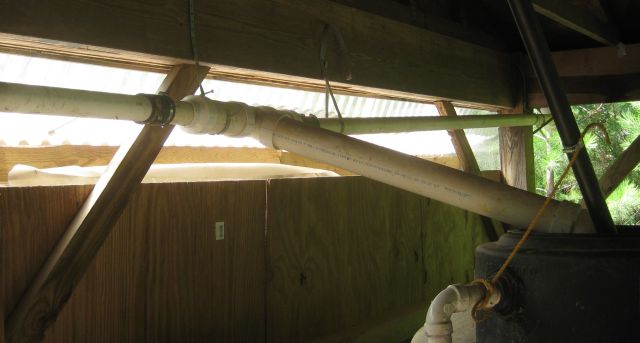
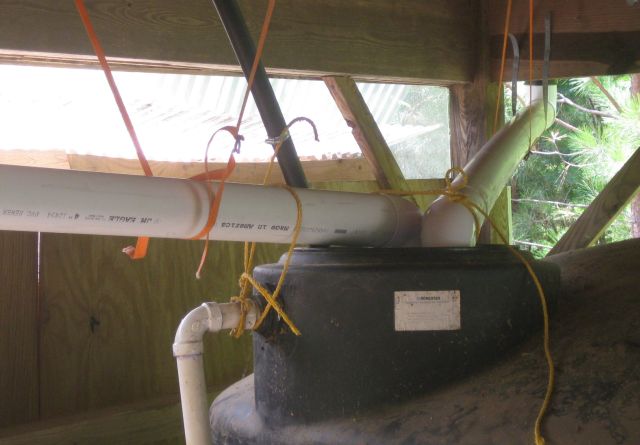
The old design had the two 2″ pipes connecting to expansion joints connected to a 4″ T connection which fed into the top of the storage tank.
you can see the two 2″ pipes expanding into a 4″ T joint. Because the pipes would block I used sleeves with screw clamps (you can see the black sleeve on the left) to easily disconnect the pipes and clear the blockage
I cannot recall why I used such a convoluted design. Perhaps I had surplus 2″ pipe though the cost of the expansion joints should have been offputting. Perhaps the thought of using heavy thick wall 4″ pipe was a deterrent. Today I resolved to fix the problem and as I considered my options I decided to keep it as simple as possible. Why not use thin wall 4″ pipe and run it from the downspout directly to the storage tank. This would eliminate the need for 45 degree connectors and a T joint and direct the water to the shortest route with a continuous down slope to the tank instead of a horizontal run to the T connection and then the down slope to the tank. Keep it simple stupid!
So here is the new connection in place of the connection first shown.
a straight downward run. I should mention that a 90 degree 4″ thin wall elbow has a smaller internal diameter than a 4″ thick wall elbow but I found a corrugated pipe adapter which fits inside the elbow and has a wider internal diameter to accommodate the gutter downspout – the adapter is the black sleeve between the elbow and the gutter
And below is the connection of the 4″ pipes to the storage tank – a straight run with a 90 deg elbow at the end to dump the contents into the mesh filter at the top of the tank. Since the pipes can be raised vertically it should be easy to remove and clear the mesh basket, when needed.
the two 4″ pipes feed directly into the top of the tank and are secured with straps and rope
This is the design I should have used at the outset, the cost of the new design is less than the old design and I am hoping for no future blockages. And why didn’t I think of this at the outset. I wanted the weight of the water and the pipes on the wall rather than the rafters and aesthetically it looked less intrusive, plus I didn’t have the experience of recurring blockages and knowing how to keep things simple.
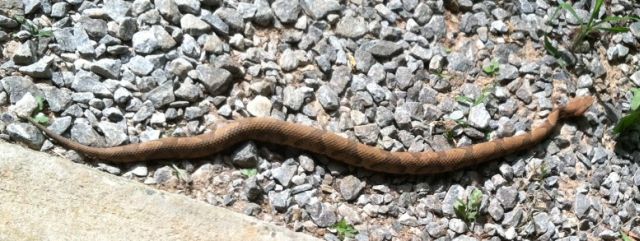
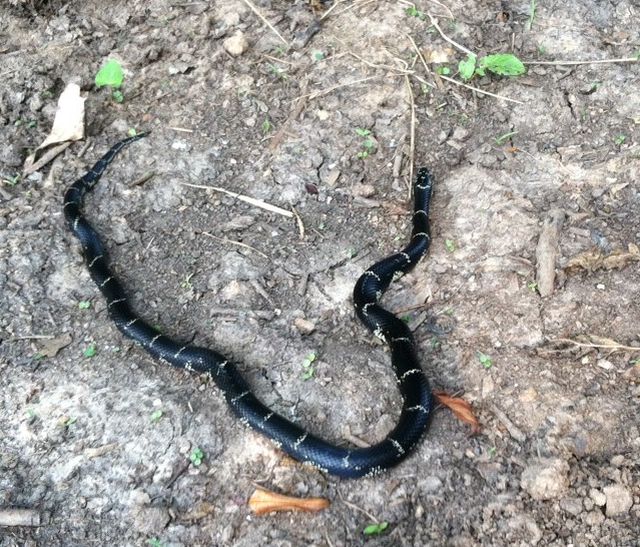
I affectionately refer to the large non venomous snakes around our place. But out here good goes with bad and the copperhead in the header photo, thick of body and (to me) ugly and close to the house, was an unwelcome sight.
In north Georgia it is hot and dry. Blackberry and blueberry season is over and now it’s time for fruit and crops such as squash, cucumbers and tomatoes. And this year my apples and squash are great yet many of my tomatoes have blossom rot. Usually my tomatoes excel and the squash and apples underperform. I wonder why?
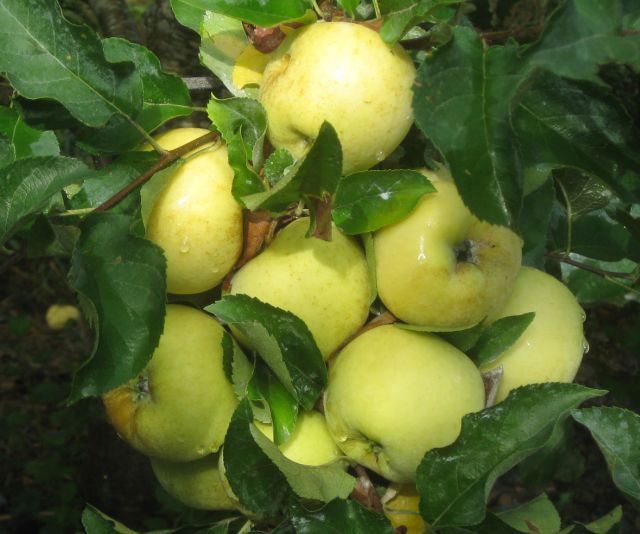
succulent, sweet early season Pristine apples
The Pristine apple is the first to ripen, it is yellow skinned and tastes great. Purchased in March 2007. I grow organically and this year there was minimal pest invasion. Although I could attribute this to running my chickens in the orchard where they dug up and ate hibernators around the tree trunk areas; or the increased presence of the brown Thrasher, our state bird, which loves insects; I believe the main reason is my first time use of kaolin clay as a spray applied when the fruit had first formed. Our dehydrator is running non stop (almost), our neighbors are happy, and it’s a pleasure to eat tasty apples without concern for what may have been sprayed.
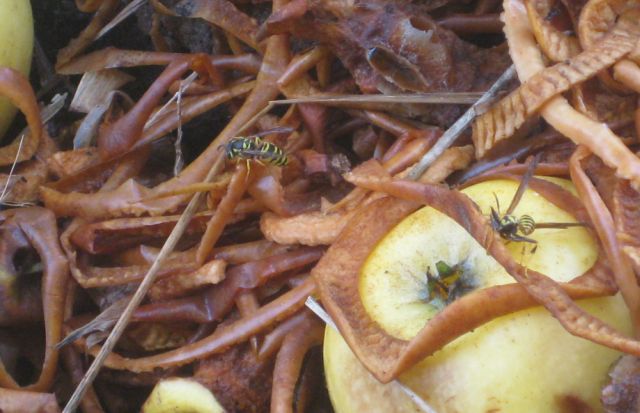
discarded apple peels and apples attract many yellow jackets and other wasps
Equally intriguing is the success of the the pattypan squash. I have never been successful with squash – the plants would grow vigorously and then as the first squash appeared the leaves would wilt and examination revealed vine borer tunnels through the stalk where it emerged from the soil. Not this year (yet). What is different? This is my first year with pattypan squash and maybe it is less attractive to vine borers. Other possibilities are patrols by the brown Thrasher, a new planting area with more disciplined weeding and watering, or my compost tea which looks vile and may be offensive to pests. The main ingredient is comfrey leaves which decompose and produce an unattractive bloom in the 35 gals brew tank to which is added coffee grounds and a supplement of liquid human fertilizer. Or it may be an off year for the borers?
attractive squash flower with a large wasp and at its base a cluster of bumblebees
The disappointment is the tomatoes. I previously rarely had blossom rot, this year it is a problem.
the scourge of blossom rot
Why? Prior years I used newspapers and woodchips as mulch, this year black plastic. A theory is the black plastic channels the water to the area at the base of the plant and the rest of the soil dries out, so the roots congregate around the central area and cannot access other nutrients (calcium) which they need. But then I noticed a planting which had no plastic and also had blossom rot and a tomato plant given by a neighbor which is producing large healthy tomatoes yet was planted through black plastic. Were my seedlings prior to planting under nourished or defective?
With growing and life in general it is often difficult to determine cause & effect unlike say electronics where components conform rigidly to their specs and the reason for aberrations can be easily identified.
My conclusion is that I didn’t water adequately and this was exacerbated by the channeling effect of the black plastic. I have now removed the plastic altogether from some plants and rolled it back for others and am irrigating a larger base area.
And why did I not water adequately? We have a drought in north Georgia and all my irrigation is from harvested rainwater. My storage capacity is around 6,000 gals and when levels run low I become frugal. With hindsight it would have been better to plant half the plants with double the irrigation.
The manual is dated October ’92 so I must have purchased the scroll saw in the early 90’s. It worked fine though I did not use it much. Recently I had need for it but there was no response when I plugged it in.
Notice: If you are not competent with electricity do no attempt anything mentioned below – serious harm or death can result – instead seek professional assistance for your electrical problem.
I removed the base plate to expose the circuit board and checked: a) was power reaching the circuit board (yes); b) was the on/off switch functioning (yes); c) was there a fuse which may have shorted (no); d) was power being output to the motor (no). Conclusion – the circuit board was receiving power, no fuse had shorted, the on off switch worked fine and no power was output to the motor which drives the saw. So the motor was fine and there was a problem with the circuit board.
Elsewhere on this website I describe how I shipped circuit boards of an oven and a refrigerator to a specialist firm for repair. Also how I have replaced capacitors of air conditioning units. And how I replaced the fuse of a Bose cd/radio. But I have never repaired a circuit board. So time for a new challenge.
The beauty of old appliances is their circuit boards appear simple and are easier to work with than the modern stuff. The pcb (printed circuit board) of the Scroll Saw has relatively few components:
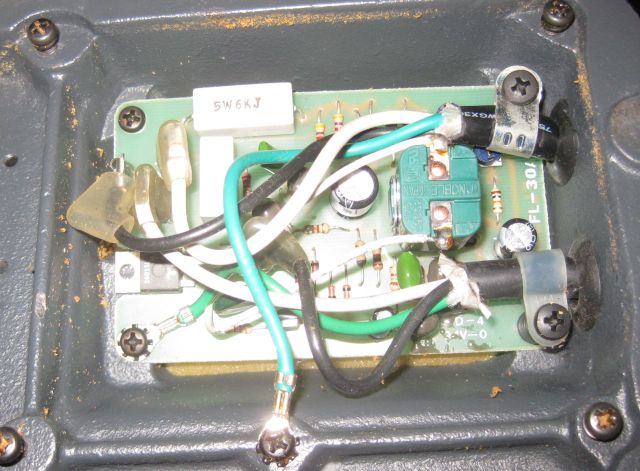
the pcb attached to the base of the saw. AC volts come in top right and DC volts go out bottom right
Here is a better pic with the connectors removed:
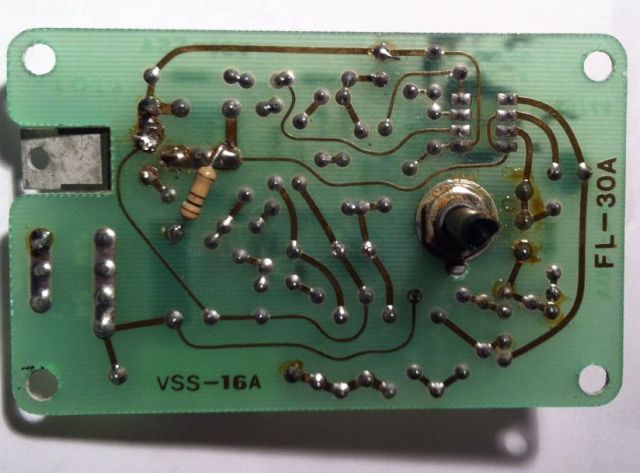
topside view -you can clearly see the components and there are not too many of them
Some pcb’s have a numbering system for each of the components – not this one. The big green device on the right is the on/off switch. The 3 barrel looking devices with the silver tops are the capacitors – there usually is a problem with one of them. Then there are a number of resistors and diodes and several transistors (some covered in glue) and on the left, just above TOTY a thyristor with 3 legs. The rectangular horizontal white object at the top is a resistor and the rectangular vertical white object is a capacitor. Plus other items such as a varistor and pots.
You will notice on bottom right a number E1?9744. I hoped to find a schematic of this pcb on the web and fruitlessly googled this number which I thought was E119744 or some other combination. To no avail. Testing and replacing components is ok but I would much rather understand how the power supply actually works. I have a 1991 Radio Shack booklet on “Building Power Supplies” (compatible lineage) which was helpful explaining the principles of PWM etc. but even then I could not figure out how this particular pcb worked.
I thought the only way to test a capacitor is to unsolder and remove one of the legs from the circuit. I did this with the large cap (470 micron Farads) next to the switch, and it was fine, but what a pain for testing. Then I learned about ESR meters which can test caps seated on the pcb. Much easier. And guess what – the cap at the bottom (47 micron Farads) was defective. I placed an order for a replacement cap and got instead a 4.7 micron Farads cap. So I found an old pcb (one of my sons collected them) and unsoldered a 47 micron Farad cap and it tested fine and I installed it.
Here is an underside view of the pcb:
the object on the right is a shaft connected to the on/off switch. when pulled up it switches on the motor and when rotated it alters the speed of the motor
My next focus of interest was the thyristor the rectangular white object visible through the board cutout on the left of the picture. I surmised that the cut out was to allow the thyristor to be attached to a heat sink which would dissipate the heat generated during operation and therefore the non presence of a heat sink could have contributed to its failure. Design flaw?
From the topside view you can see the thyristor has 3 legs – a collector, emitter and base. No current flows unless voltage is applied to the base. When this occurs the thyristor should latch which means that when the voltage is removed from the base, the current continues to flow from collector to emitter. I unsoldered the thyristor and tested it and when base voltage was removed current stopped flowing from collector to emitter. It was defective. I ordered and installed a new thyristor (fortunately the defective component had sufficient information for identification).
I thought the pcb should work but it didn’t. I was stumped. I retested the components – all fine. Rather than mess with 120 VAC I connected the pcb to 24VAC – less chance of electrocution. And, unexpectedly instead of getting <1 VDC I suddenly got 16 VDC. I re-installed the pcb connected the power and, it didn’t work, back to <1VDC. A lot of head scratching and I concluded that one of my soldered joints must be faulty. Reconnected to 24VAC and gently pressed with a gloved finger each of the components – the voltmeter stayed below 1VDC. Then I pressed the thyristor and the meter showed >16VDC. Solution. On examination one of the legs was cold soldered so I resoldered it and got my >16VDS with the 24VAC supply. Reinstalled the pcb and connected to mains power and it works. The scroll saw is back in operation!
It all began when Bill, a club member with several hives 600 feet from the local school, learned that Zika inspired pesticide applications had occurred and would continue. It was little consolation to Bill that the fogging occurred when school was out, since Bill’s bees do not observe the school’s calendar.
The April club meeting was, as usual, well attended and our eyes swiveled to the young man (when you are 66 most look young), Max, who stood uncertainly at the front of the room while the introduction was made. He was the fogger man. He rattled off his pesticide credentials, his training in IPM (integrated pest management), his allergic child and therefore attuned sensitivity to toxins, and said he was there to reassure us that our bees would be ok.
When I was transferred from NYC to the south my then boss took me aside and said “this is how it is. In New York if we don’t like you we tell you to your face, where you are going they are always friendly and you will not be able to tell if they like you or not. Personally, I prefer the latter”. So I watched and listened to the cordial interactions between our members and Max. Hard to discern any animosity, and comments approaching a challenge were couched in gentle assurances would make a statesman proud.
Eventually I asked if these applications could be described as IPM since a tenet of IPM is you first identify the presence of a pest before you begin the treatment; furthermore even if there were Zika carrying mosquitoes frequenting the playgrounds surely when the fogging was done and the spray subsided (and incidentally all the bees in the area nailed), the next day a gust of wind could bring me more Zika carriers. Wouldn’t it be better to larvacide standing water in the area? This opened the floodgate and Max was questioned and acknowledged he had not monitored or identified any Zika mosquitoes prior to spraying; that mosquitoes can and will travel a good few miles in search of protein; and that his ‘cides were harmful to bees.
Our club leaders met with the county school officials, the local radio and TV stations joined the drumbeat and to the relief of our club, all spraying operations have been halted.
However if Zika concerns mount and a vaccination is not speedily developed fogging will increase and insects and bees decrease.
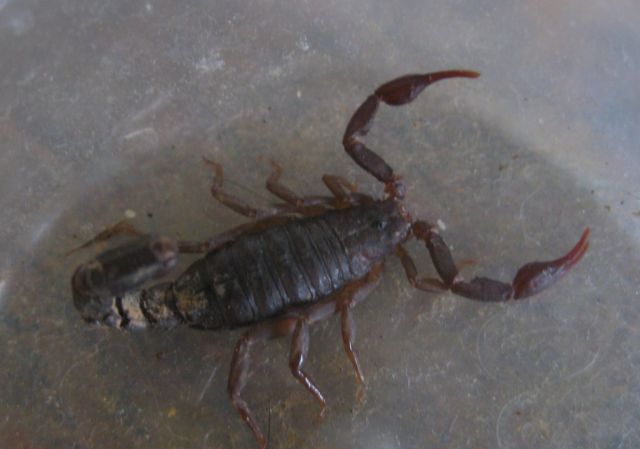
Talking of pests, here are two we found in our house. M. was not happy to see this fellow/gal under the dish washing liquid bottle:
a house scorpion. good practice is to shake out the shoes before putting them on
And M. was upset (putting it lightly) to find this on our pillow:
a local tick – there are lots around and my high grass and excessive vegetation doesn’t help
To end on a positive note – I was very happy to spot this young king snake near my compost heap. In previous posts I mentioned how large king snakes >6 feet had vanquished rodents from our chicken coop. I haven’t seen any copperheads at my farm but they are around in our Atlanta subdivision and I attribute this to our Atlanta locals killing off the gentle king snakes, which snack in venomous snakes.
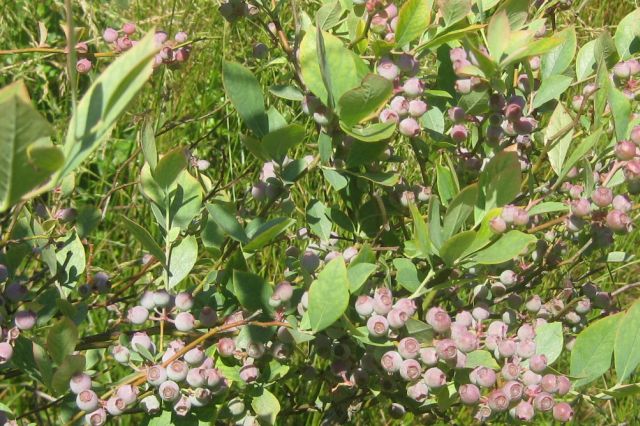
I showed M. the berry laden blueberry plants and ventured they would be ready for picking within a few weeks. But why are the leaves yellow? she asked and drew my attention, as she usually does, to what I had missed. Yellow leaves with green veins can indicate the plant is not receiving enough iron (iron chlorosis) since iron produces cholorphyll which makes the leaves green which enables photosynthesis, sugar production and growth. Blueberries thrive on acid soil (between 4 and 5) and if the soil is not sufficiently acid they cannot uptake iron.
Following my pH experiments last week I decided to sample the pH of my blueberry plants. I selected a sample from each of 3 plants, mixed each sample in a separate container with distilled water, and followed my testing protocol: 1) rinse meter in distilled water; 2) put meter in 4.0 buffer solution – it read 4.1 great; 3) rinse meter in distilled water; 4) put meter in 6.9 buffer solution – it read 6.9 great; 5) rinse meter; 6) put meter in soil sample 1 – it read 6.6; 7) rinse meter; 8) put meter in soil sample 2 – it read 7.4; 9) rinse meter; 10) put meter in sample 3 it read 6.3. Each immersion was for 1 minute and water temp around 65 deg F.
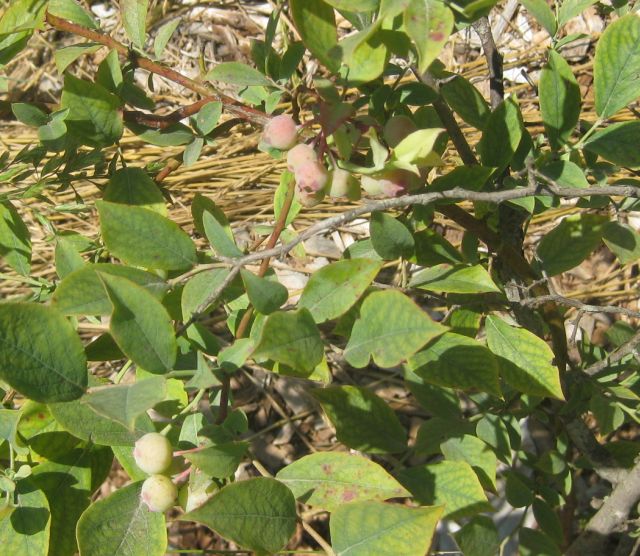
this plant has never really grown over the years, has few berries and has 7.4 pH, no surprise
I was expecting lower pH readings since earlier in the year I had purchased and added sulfur powder to the soil of the blueberry plants. I mentioned to M. that when taking the samples I had noticed sulfur powder in the soil (it is very yellow and easily seen) and she said that was because it had not been absorbed. The sulfur powder I am using does not dissolve in water.
sulfur powder floats on top of the water or in clumps below the surface even after vigorous stirring
I mixed some sulfur powder with distilled water and the pH was 6.6 about what it would have been without the powder, so the sulfur powder was not interacting with the water. M. explained that sulfur loving bacteria, which are equipped with the necessary enzymes, are needed to transform the sulfur powder into soluble form. So the sulfur I added in spring had not yet been transformed and apparently this is a slow process which takes time. It would be quicker if we found some sulfur loving bacteria and added them to the soil, but this is an unlikely route.
So what to do in the meantime? There are synthetic iron chelates (a chelate is a soluble form of the mineral which makes it accessible to the plant) which will work quickly but this is at odds with my organic philosophy. The yellowing blueberry leaves do not presage a good blueberry harvest. Short term remedy – we researched and ordered an organic iron foliar spray which will work directly on the leaves and with some luck (if I don’t over apply or under apply) may get them normal looking and back to their photosynthesis work.
Also, if you look carefully at the leaves you may notice some red blotches which could indicate magnesium deficiency so I will provide an epsom salts drink to the plants as well.
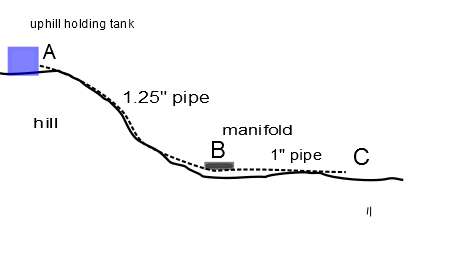
I harvest rainwater and when I need to irrigate I pump the water to a tank at the top of a hill (right hand tank in the picture) and use gravity to move the water from the tank to its final destination. See my description of the system and airlocks at airlock problems
I use a 1.25″ pipe to take the water from the top of the hill to the base of the hill and then I use a manifold to direct the water into four 1″ pipes, three of which irrigate the orchard with positioned bubblers and the fourth goes to the vegetable growing area where I hand water with a hose.
Over the years as my patience with air bubble delays diminished, my progress towards a solution increased.
a) In the beginning I opened the valve to the hose at C and waited for the trickle of water to slowly increase in volume as some but not all of the air bubbles were expelled by the water pressure.
b) Then I made a tee at C with 2 water valves, one to the hose and the other to a short length of pipe. I would open first the valve to the short length of pipe and the water would flow more quickly since it did not have to go through the hose. With the water flowing faster, the blockages cleared quicker. It sounded like a train gradually gaining speed.
c) I discovered that if I opened and then quickly closed the valve to the short pipe it increased turbulence in the downhill pipe since the water coming down backed up, and then if I quickly opened the valve again the water appeared to come through with more pressure and bring more air bubbles with it.
d) But this all took time so I developed a smarter approach. Before starting with C, I went to the manifold at B and opened a spare valve. Now the water rushed out with quick stabbing pauses as the air in the 1.25″ pipe was ejected. It took very little time to clear all the air in the pipe from A to B because this pipe was at a steeper incline and larger diameter than the pipe B to C. Then clearing the 1″ pipe from B to C was much quicker.
e) And finally, to avoid air blockages all together I made my final change. I had gate valves at the manifold and some trickled water in the fully closed position so overnight the pipe from A to B lost water. I replaced the gate valves with ball valves and eliminated all leaks so the full length from A to B and B to C was full of water with no air pockets before I began irrigating. The trick was to stop watering before the tank at the top of the hill emptied.
These procedures have minimized the inconvenience of air pockets in my gravity fed irrigation setup.
The pH (acidity/alkilinity) is an important must know for growing vegetables, fruits and berries. Blueberries notoriously love acid conditions. Tomatoes like a pH range between 5.5 to 7.5. Since pH can range from 1 (very acid) to 14 (very alkaline) it follows that 7 is neutral. I have tried over the years to independently determine my soil’s pH, with little success. I have sent samples to the extension service for general soil analysis but have always wanted to determine pH myself.
The pH strips I purchased were little help to me since I had difficulty confidently matching the color on the strip after it had been dipped into the liquid I was testing, with the pH graded color chart. An inexpensive pH meter was also little help to me.
I decided to go upmarket and purchased a laboratory grade meter and 7.0 buffer, electrolyte cleaning and storage solutions and I again got unusual results. This may be because I purchased the meter for a discounted price from an alternative supplier and the electrode bulb may have dried before it reached me (I subsequently learned that a dried out bulb doesn’t work) or after it reached me due to my inexperience.
I probably needed a new replacement electrode but this cost >$60 and I was not motivated to go this route. Then it occurred to me that a) I do not need laboratory grade equipment; and b) a whole lot of decent electronic instruments have been flooding the market at much lower prices than the well known brands and should work decently.
So I studied the options and purchasers’ comments on Amazon and purchased the pH tester below for $11.10 total which included 2 packets of buffer powder.
my new ph meter
I purchased a gallon of distilled water and made up the 2 buffer solutions by dissolving each packet into a separate container holding 250ml of distilled water. The instructions said to use deionized water for preparing the buffer solutions and to use distilled water for rinsing the electrode. I figured nothing could beat distilled water and I had no deionized water available so I made up the solutions with distilled water (more about this later).
my 2 buffer solutions – pH 4.01 and pH 6.86
Now the moment of truth – as instructed I rinsed the electrode with distilled water and then immersed it into the 6.86 pH solution. The meter read 6.7 and with the small screwdriver provided, I adjusted the reading to 6.9. I rinsed the electrode again and put it into the 4.0 pH solution and it read 4.0. I was seriously impressed – this $11 instrument really worked. I rinsed it again and measured the pH of distilled water expecting 7.0 (neutral) and it read 5.5 what the !!!!. Surely distilled water is neutral! Back into the 6.86 solution and it read 6.9, rinsed and back into the 4.0 solution and it read 4.0 and back into the distilled water and again it read 5.5. The meter appeared consistent.
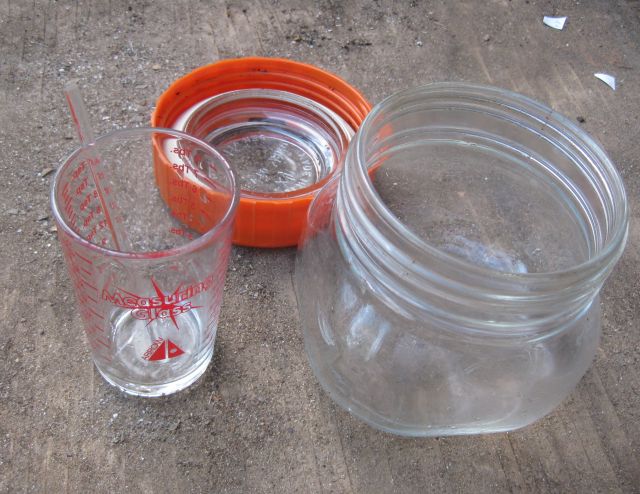
So I pressed ahead. My rainwater measured 4.9 (acid rain?) and my well water 6.0. Time to do the tomatoes – I took 3 soil samples from 3 different tomato beds – 2 samples from beds prepared this year and 1 from a bed I have used for several years. Each sample I mixed with distilled water and then filtered the solution to remove large abrasive particles.
some of my utensils – a glass stirring rod, a measuring beaker and a jar to hold the solution being tested
Samples 1 & 2 both read 6.7 and sample 3 read 7.8. Wow! – a big difference. Then I remembered that I had copiously applied lime and wood ash to the existing bed in previous years so the high alkaline reading made sense. My conclusion was that none of the beds required liming.
The next day I began over again. The 6.86 buffer solution read 6.8, and the 4.0 solution now read 4.3 so I adjusted it to 4.0. and then rinsed and retested the meter on both buffer solutions and they both read true. I mixed coffee grounds with distilled water and the pH was 6.0. My comfrey and coffee compost tea was 5.5 – made using rainwater which had read 4.9 so this made sense. And I took 2 more samples from the bed which read 7.8 the previous day and they read 7.0 and 7.3 so the bed was too alkaline.
It all seemed to make sense except for one big and growing concern – why was the pH of the distilled water 5.5 and was this low pH affecting all the readings of the samples which had been mixed with distilled water. For example if with a soil sample and distilled water solution I get a pH of 7.3 and the distilled water by itself has a pH of 5.5 does this mean the soil sample if mixed with water with a neutral pH (7.0) will have a much higher pH reading?
And why does distilled water have such a low pH? Apparently distilled water when produced has a 7 pH but it reacts with CO2 (carbon dioxide) to produce a mild carbonic acid which lowers the pH of the water. It appears that the pH of distilled water is easily influenced by what it mixes with. My analogy is a shopping cart – if empty and you push with a finger it will move some distance. If heavily loaded then a 1 finger push will barely budge it. If the distilled water is the empty cart and the CO2 moves it one direction then the pH of a soil sample (I would like to think as a one handed push) will overcome the 1 finger push and get it to where it should be. Very simplistic and unproven.
I bought another gallon of distilled water from another large chain and its pH was 5.0. Now I could resolve matters by buying deionized water but it cost >$25 a gallon vs. $1.72 a gallon for distilled water. There is another solution – how about using bottled drinking water. I tested one sample and its pH was 7.4 – much closer to the neutral 7.0. If I mix the soil sample with drinking water with a 7 pH will it give a more accurate result than if mixed with 5.5 pH distilled water?
So a simple test. I filled a container with 200ml of distilled water and another with 200ml of bottled drinking water. And added a small quantity of lime to both and stirred and measured their pH’s. Lime is alkaline so you would think the lime mixed with the 7.4 pH drinking water will have a higher pH than the lime mixed with the 5.5 pH distilled water. And the result?
The drinking water had a pH of 8.4 and the distilled water a pH of 9.7! (Repeat tests with 2 drinking water solutions and 2 distilled water solutions gave pH’s of 8.6 for the former and 9.4 for the latter – a similar trend). So distilled water with a lower starting pH gave a higher pH result when mixed, compared with the drinking water which has a higher starting pH. Using my analogy, the distilled water is a very light cart with well greased wheels and the drinking water is heavily laden and moves sluggishly. I am not scientifically trained so don’t rely on my findings – if this is important to you do your own tests.
For my purposes I will continue using distilled water for my soil pH testing and will not fork out for deionized water.
FYI – a friend who is qualified in this area, says this is a long boring post; not using deionized water for the buffer solutions invalidates my readings; the shopping cart analogy is stupid; and he/she is sceptical of the results but acknowledges that for my purposes distilled water is probably ok for mixing with soil samples.
Additional note: I noticed that distilled water when first poured has a lower pH than when subsequently poured and I hypothesize that the carbonic reaction at the surface of the water, which produces the acid, does not diffuse through the whole solution (unless stirred) but I did not test this by withdrawing a sample from the bottom of the container.
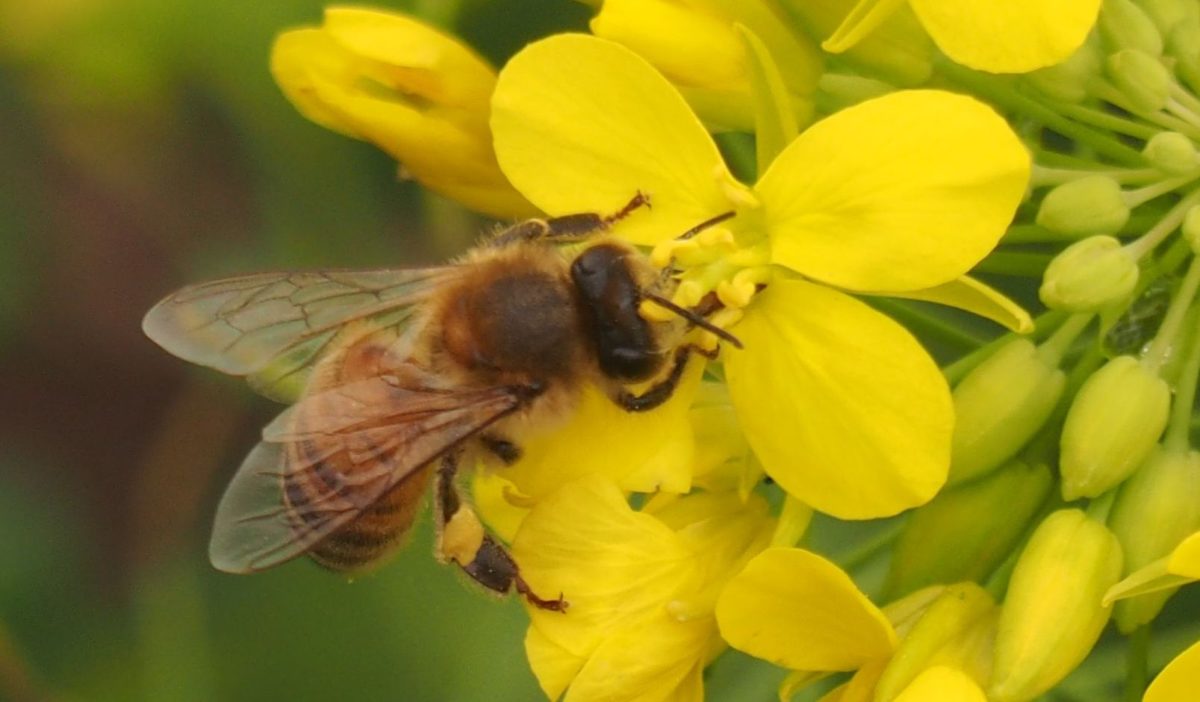
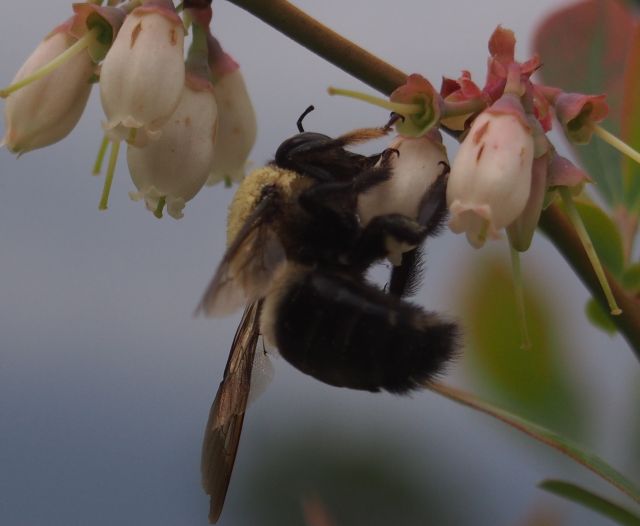
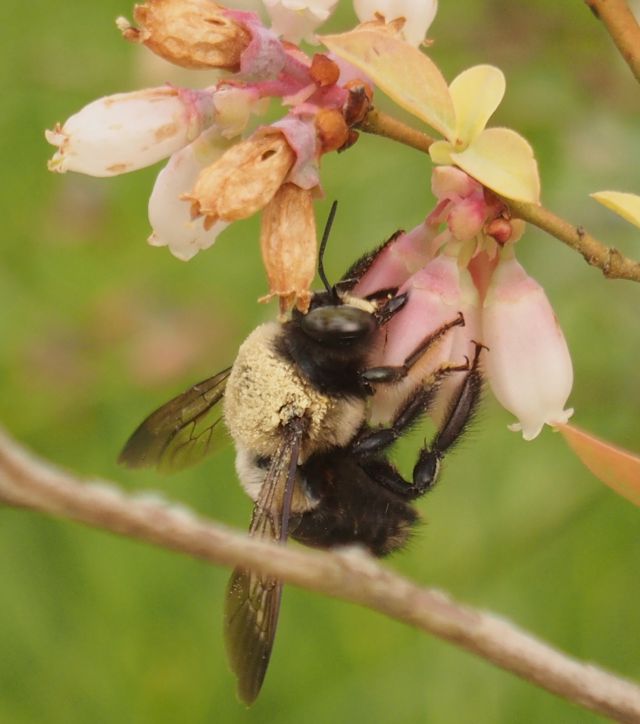
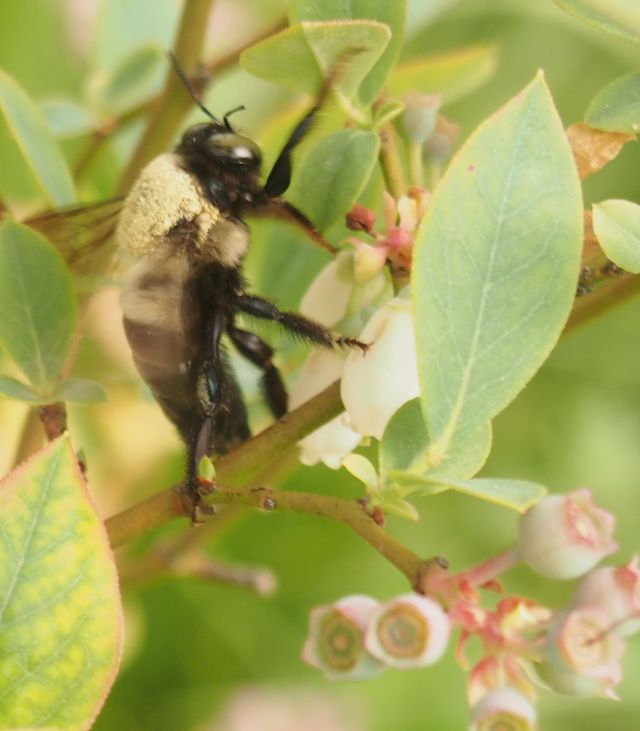
Last week (April 21) I was at the top of the hill watering the blueberries when I saw the busy bumblebees and honey bees.
bumblebees not honey bees pollinate my blueberries
This year I added sulfur powder to lower the ph and also Starbuck coffee grounds and I am hoping for an even better blueberry yield.
bumblebees with their hairy yellow abdomen, I like. Not so the black abdomen carpenter bees which bore into the wood siding of my house
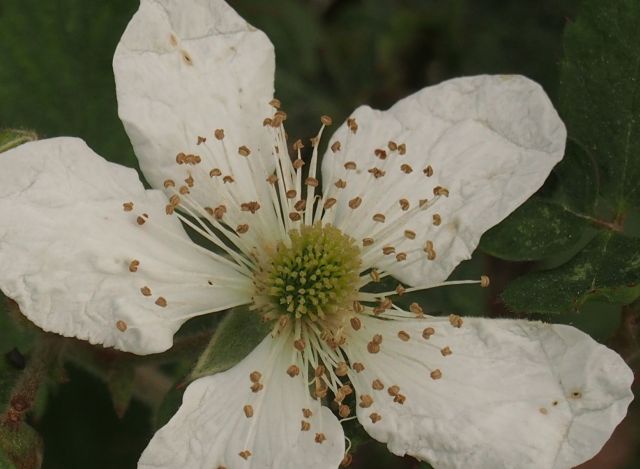
I mentioned to my neighbor a Southern saying that came my way – don’t plant before tax day (April 15) and he replied that where we live which is in the foothills of Appalachia the last cold is when the blackberries flower. And he was right – after tax day we had a cold shiver and my figs were slightly damaged.
some fig leaves turned black but this year, unlike the previous 3 years, the limbs survived
And here is a blackberry in flower.
during the cold months I weeded and mulched my blackberries. I don’t irrigate them and they drink off a contour ditch which snags water sliding down the hill
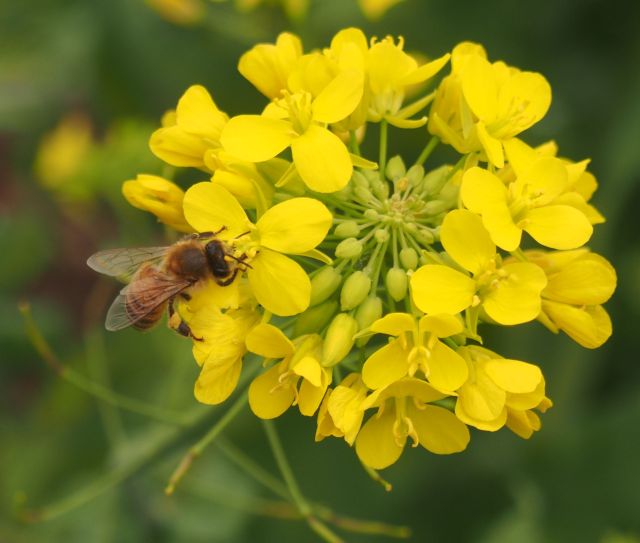
My bees love the turnip flowers which I have growing everywhere.
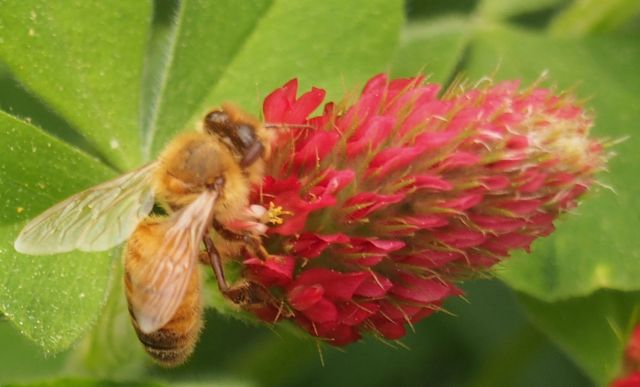
And crimson clover, which I am loathe to cut down.
crimson clover
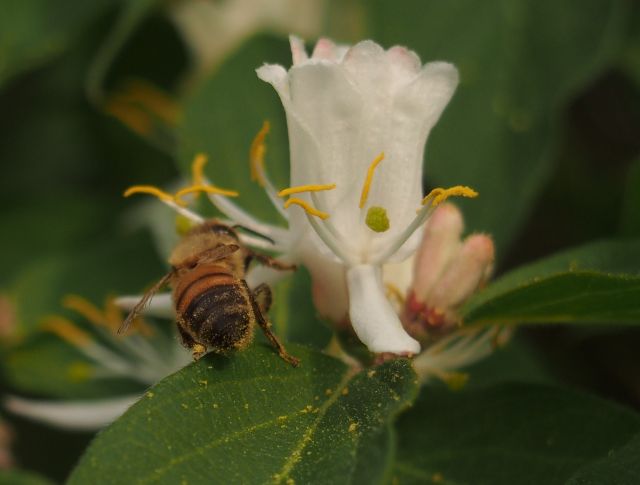
And a fragrant invasive honeysuckle (Lonicera maackii) which appears along the edges of the adjacent woods.
these plants grow naturally in the area
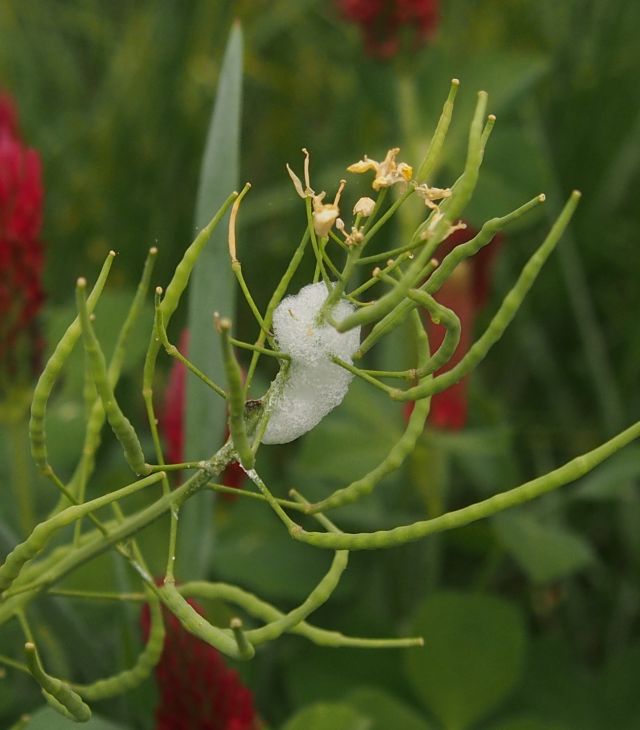
The spittlebug is also hard at work.
a spittlebug deposit on a turnip plant gone to seed
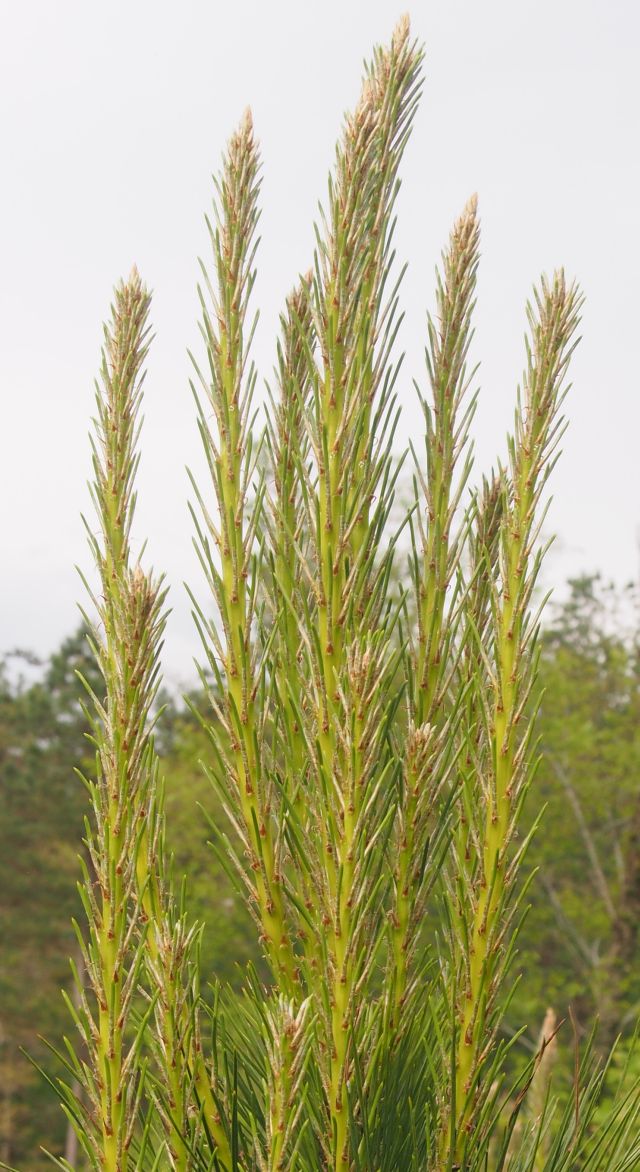
And I have my annual chore of cutting down the pine saplings and wild trees which compete with my orchard and vines on the hill side.
the small pines thrust for the sky but down they must come
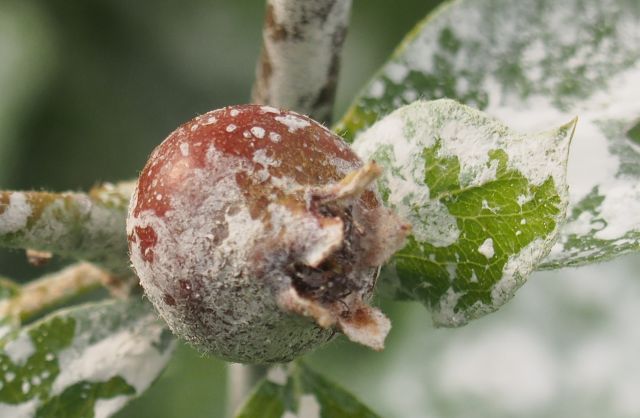
And I must continue spraying the pear and apple fruitlets with kaolin clay (Surround) a new measure I have adopted this year to counter the pests which tunnel into my apples.
several applications are necessary and the limbs, leaves and fruit turn white