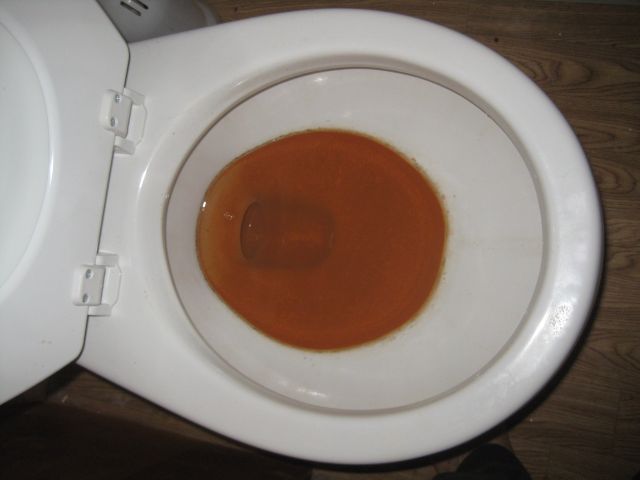
A few weeks ago M. confronted me in the kitchen with a glass of discolored water. “It’s dirty” she accused. I agreed but suggested if she wanted drinking water she should use the under sink 2 stage filters I installed, which deliver crystal clear water, and not worry about the water from the faucet. She was not appeased and said she would not shower in discolored water nor did she want the dishes or clothing to be washed in the water. We have a deep well I explained so bacteria is not an issue and there was probably a lightning strike which shook up the ground and displaced some sediment.
I mentioned this to my neighbor across the road and he said the discoloration was iron in the water and he used a whole house filter and replaced the cartridge every few months. Time for some research, and I found an excellent YouTube video which clarified. Iron in well water which is dissolved or in solution is called ferrous. When exposed to oxygen it precipitates and becomes visible and is called ferric. A sediment filter cannot trap ferrous but will remove ferric. So if you install a single filter where the well water enters the house it will remove ferric but the ferrous will slip by and will precipitate into ferric while sitting in the water heater or the toilet bowl. This solved a puzzle. Our house has an upstairs bathroom which is rarely used. Every few months I flush the upstairs faucets and toilet to ensure there is water in the traps. And the toilet bowl always has red/brown sediment, yet when last flushed a few months previously I had brushed the bowl clean. How did all this sediment get into the bowl? I now conclude the invisible ferrous in the water precipitated into ferric which settled in the bowl.
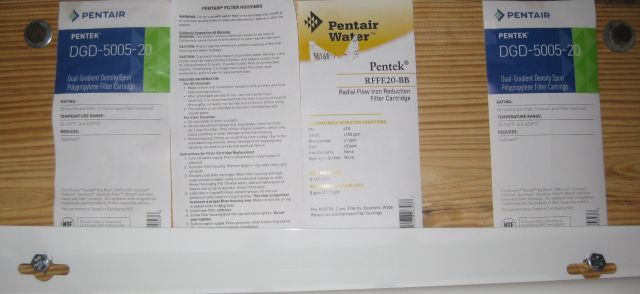
The youtube video recommended 3 filters used in series. The 1st is a sediment filter to trap any sediment and ferric in the well water so it will not clog the 2nd more expensive filter. The 2nd filter (Pentek RFFE-20BB) contains agents (apparently potassium permanganate) which oxidize the water and thereby precipitates the ferrous into ferric. The 3rd filter, like the 1st is a sediment filter which traps the ferric which was produced by the 2nd filter. Pretty neat!
Typical filters are 20” in height and enclosed in big blue tubes and therefore called big blue filters. I researched prices and found I could get a better deal (>10% less on a comparable basis) from an independent rather than big A, except for one of the filters which I ordered from big A. A few days later the packages arrived.
Plumbing technicals
When I lived in London I completely replumbed an old house including installing a gas furnace and 17 radiators and a pump and 3 thermostat controlled motorized valves. I used copper pipe and soldered all the joints except for a few compression fittings. It was much easier to solder a joint in the U.K than in the U.S.A. because, for amateurs like me, there were the wonderful Yorkshire capillary fittings, which had solder rings.
The process was simple – you clean the pipe and the fitting into which it will be inserted, smear both with flux, and then heat with a butane torch until the solder appears at the rim of the fitting where the pipe is inserted. And it always worked and was just as easy for vertical fittings as for horizontal. Here I have often battled establishing capillary action to suck the solder into the joints of larger pipes (1” or greater) and it is frustrating after you have finished soldering to find that one joint leaks. Disassembling the pipes takes time and removing all the water drops also takes time (I used to push bread down the pipes to soak up the moisture and then flush it when all was done). So I was keen to explore alternatives to copper soldered fittings.
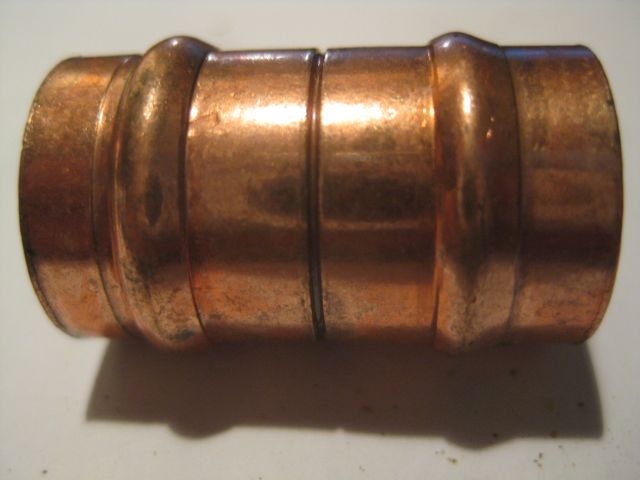
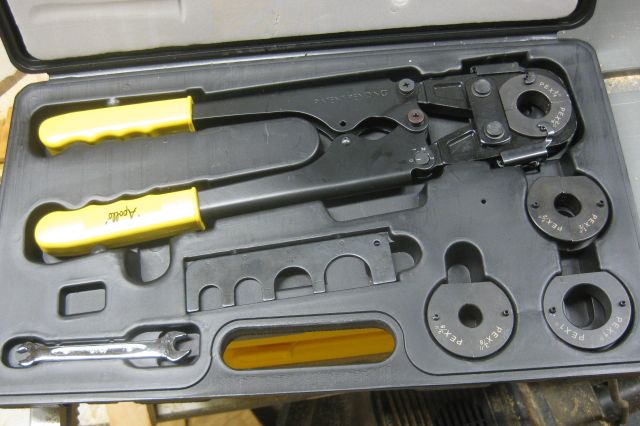
Today there are at least 6 different methods (soldering, compression, glue, pex – cinch, pex – crimp, pex – expander, sharkbite) to connect water pipes and fittings, and there are at least 4 different pipes to choose from – copper, cpvc, pvc and pex. The house has cpvc ¾” pipe and I decided to use pex-crimp and transition with sharkbite. If this all sounds like gobblydegook I will try explain. CPVC is a plastic type pipe, somewhat flexible which is glued into fittings. Unlike PVC, it is good for hot as well as cold water and the glued fittings seem reliable and are cheaper than copper/bronze fittings. But once glued, it is glued and you have to cut the pipe if measurements were off or a change of mind. Sharkbite is expensive but easy to assemble just push the pipe all the way into the fitting and you are done, and it is easy to later separate the pipe from the fitting. And sharkbite is a great way to transition from copper to cpvc or to pex. Pex pipe (a form of polyethylene) is flexible like CPVC. For the pex-crimp method you position (carefully) a copper ring near the end of the pipe, insert a fitting into the pipe, and with both hands position the clamp mouth of a large tool over the ring and (with some effort) close the arms of the tool which crimps the ring tight over the fitting. And then you are done. Pex-crimp is cheaper than sharkbite and a nice feature is you can loose fit and position all the fittings and when you are satisfied then crimp all the rings on the fittings. And after it is crimped you can still rotate the pipe if necessary. And, if you make a mistake (I haven’t yet) you can cut off the ring and re-use the fitting.
A disadvantage with pex is the fitting goes into the pex pipe and this reduces the internal diameter of the pipe and impedes water flow more than with copper and cpvc where the pipe goes into the fitting. In London I used a pipe bender for 15mm (0.6″) and 22mm (0.9″) copper pipe which produced wider bends and less water friction than elbow fittings. So now it bugs me to use 0.75” internally restricted pex pipe for the main flow to the house. I considered transitioning to 1” pex but there was less availability and greater cost, so I decided to wait and see.
installation
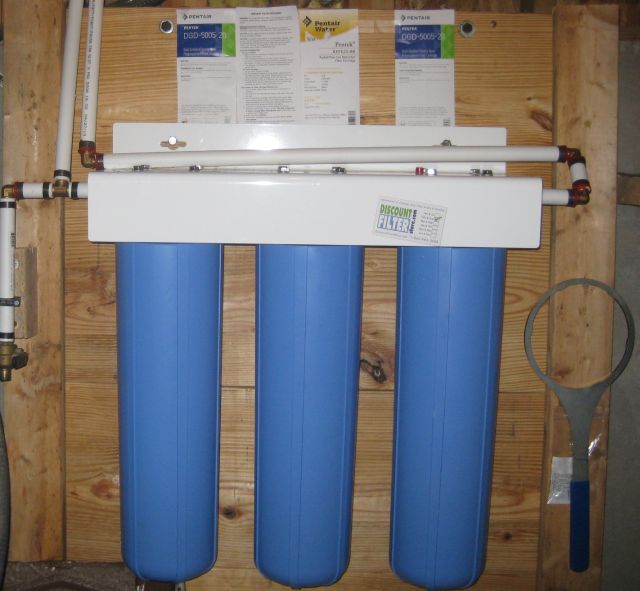
First I had to decide where to mount the 3 stage filter in the basement. It would have been best between the expansion tank and the water heater but there was insufficient space so I reluctantly decided on the right side of the expansion tank. Reluctant because it took the water flow through a number of 90 degree bends.
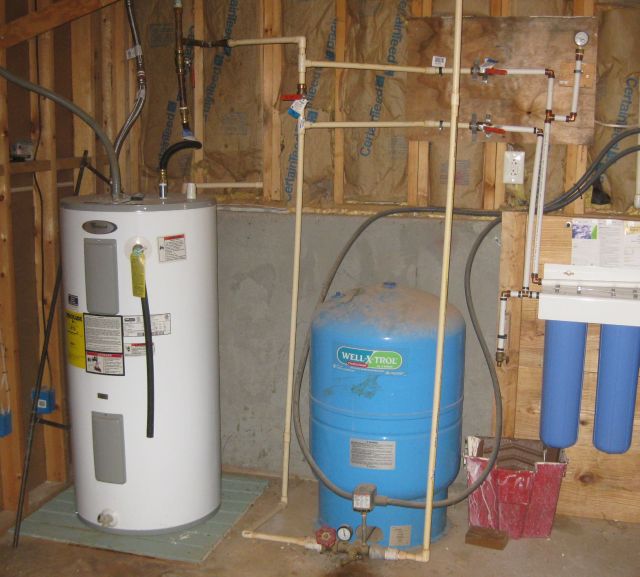
Next, how to secure to concrete wall. I considered concrete anchor bolts but decided to install a wood wall against the concrete basement wall. I bought a 12ft long, 2” thick, 12” wide (nominal) plank, cut into 4 boards each 3 ft long and stacked them horizontally (see pic above) and held vertically in place by 2×4’s at each end. The top of the top plank rose above the concrete apron wall and I secured it with 7” bolt screws into the base of the vertical wood studs. I screwed the filter housing to the wood wall.
Next for the plumbing. Below is a schematic of the installation:
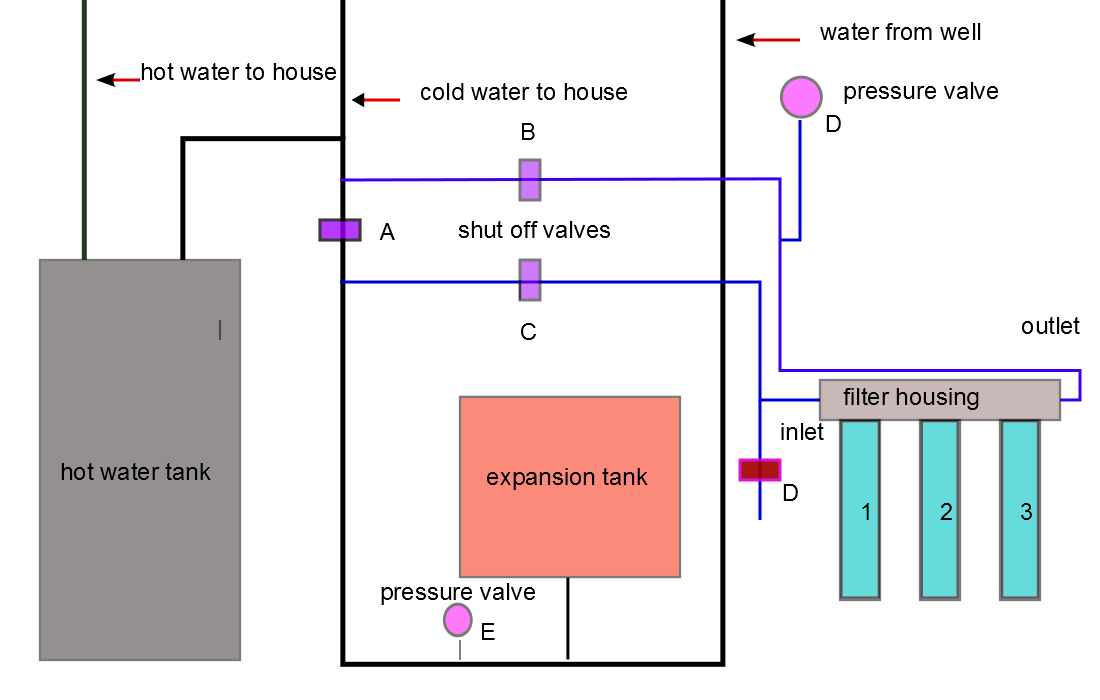
The blue colored pipe lines are what I installed plus valve A. When valve A is closed, water flows through C to the filters and then returns via B to the original pipe. I can bypass the filters by closing B & C and opening A. I used CPVC all the way to sharkbite valves B & C since I know that glued CPVC will not leak and I am still learning with pex. Pex commences from valves B & C to the filters. I installed a 4th valve at D which allows me to bleed the system (after closing B & C) for removing valves, winterizing the system if I am away, and to inspect the quality of the incoming water. In addition to the existing pressure valve at E I installed another valve at D. As sediment accumulates in the filters there will be a difference between D (higher) and E and when it is greater than say 15 psi, it will be time to change. As previously mentioned filters 1 & 3 are the sediment filters and 2 provides the oxidizing action to precipitate out the ferrous.
Water flow seems fine notwithstanding all the 90 degree turns although I may, one day, replace the line from filter outlet to B with 1″ pex. I bled the water heater and it produced a lot of really brown discolored water which accumulated over the years.

And now that I have clear water throughout the house I will replace the clogged aerator inserts in the faucet spouts. So far so good.
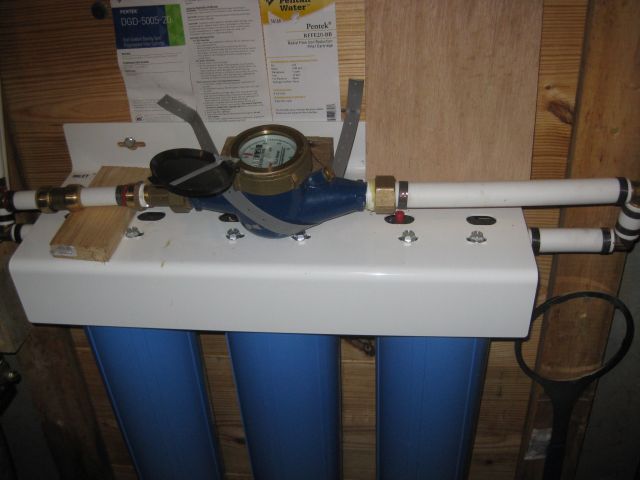
postscript – see my post dated Sept 9 for water loss issue I identified and corrected. Which made me think that I really needed to install a water meter. I happened to have one handy and I used 1″ pex from the filter through 2 90 degree elbows and then returned to 3/4″ pex. See picture below for result.